Cocos2d-xna : 横版战略游戏开发实验6 CCAnimate创建角色动画
游戏从出现以来,一直提升着玩家的需求,游戏开发者不止是考虑简单的位置移动,例如将游戏中各种演员做成动画,就可以大大提升游戏的品质,在咱们的这个三国统帅的游戏中,小兵和将领是有各种动作的,这些动作对应动画,让游戏的互动感觉更加优秀,这次使用cocos2d-xna中的CCAnimate来实现角色动画。
首先我们要先准备游戏中所需要的动画资源,按照设计,游戏中至少有这样的角色和职业:主将、小兵(步兵、枪兵、骑兵、弓兵),它们的各种所扮演的角色因所属势力只是样子不一样。
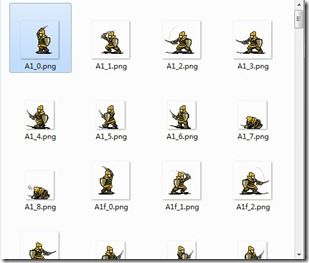
角色的动画祯按照一个规则命名,这样就能方便的管理:
{id}_{n}表示的是正方向,而{id}f_{n}表示的是反方向。比如说
A1表示的是角色的id,按照编号的显示动作分别为:
0-3:攻击动作
4-5:行走动作
6-6:站立动作
7-8:死亡动作
在这个实验游戏中,我们有两个势力对阵,分别为义军和黄巾军,按照这样的规则制作了如下的资源:
A1:黄巾军步兵
A2:黄巾军枪兵
A3:黄巾军骑兵
A4:黄巾军弓兵
B1:义军步兵
B2:义军枪兵
B3:义军骑兵
B4:义军弓兵
另外还加了两个英雄:
Hero02:关羽
Hero11:张角
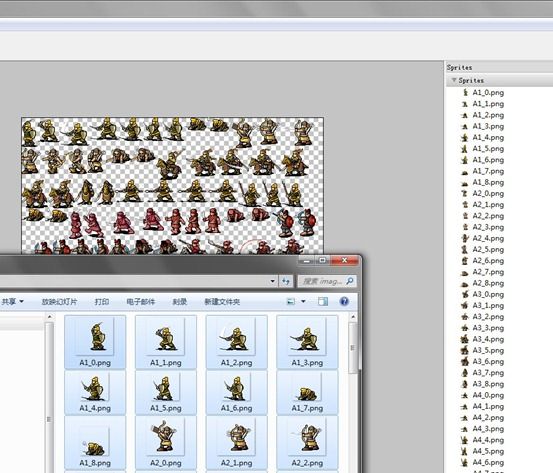
然后将他们的各种帧制作完成并命名完毕(这里也许你需要美术的帮助,我已将其完成,可以在最终的文件中浏览),用TexturePackerGUI打包。
图片包下载地址:http://files.cnblogs.com/nowpaper/SanguoCommander5_actors.rar
发布一下它,保存成一个plist和png图,命名为ActorsPack1,以后也许有Pack2,所以单独分开保存:
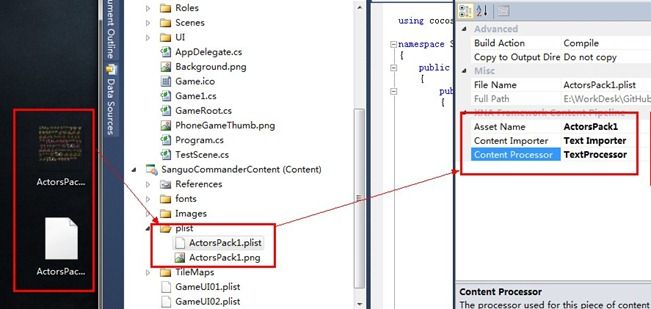
最终的plist文件放入工程Content下,可以建立一个例如plist的文件夹,并且将.plist文件的内容管线设置正确:
这张图并不正确,你应该建立子文件夹Images,并将ActorsPack1.png放入其中。
好了,下一步就可以开始对工程进行代码编写了。
从游戏本身的设计经验而言,最好的方式是数据驱动逻辑,所以,当我们描写一个角色动画类的时候,最先有一个比较明确的数据类,这里我们可以将游戏底层角色的复杂数据包含,并且做处理,例如角色最基本的特性、职业、类型等等:
enum ActorType

{

    None, Soldier,Hero

}

enum ActorPro

{

    None, Infantry, Pikeman, Cavalvy, Archer

}

enum ActorDir

{

    None, Right, Left

}

class ActorData

{

    public ActorData(string id)

    {

        ActorID = id;

    }

    //演员id

    public string ActorID { get; private set; }

    //演员分组

    public string GroupID { get; private set; }

    //类型

    public ActorType ActorType { get; private set; }

    //职业

    public ActorPro ActorPro { get; private set; }

    //获得一个数据

    public static ActorData getActorData(string id, string groupid, ActorType type, ActorPro pro)

    {

        ActorData data = new ActorData(id);

        data.GroupID = groupid;

        data.ActorType = type;

        data.ActorPro = pro;

        return data;

    }

}
在最上面,我们定义了三个枚举,分别来表示类型、职业和方向,方向是用来做动画用的,而类型和职业则是基本数据的需求,大家可以注意到,设计了一个getActorData静态方法,用来方便的制作基本测试数据,因为按照游戏数据的处理惯例而言,这些数据都是通过表单的方式配置,程序读取配置解析成为程序数据,方便游戏设计师随时调整。
下一步就是建立动画类了,我们使用类继承的方式抽象动画类,建立ActorBase类,这个类只是管理角色最基本的动画,继承自CCSprite,通过CCAnimate行为来控制动画:
class ActorBase : CCSprite

{

    public ActorData ActorData { get; private set; }

    private CCAnimate _action_attack;

    private CCAnimate _action_attack_flip;

    private CCAnimate _action_run;

    private CCAnimate _action_run_flip;

    private CCAnimate _action_stand;

    private CCAnimate _action_stand_flip;

    private CCAnimate _action_dead;

    private CCAnimate _action_dead_flip;

    public ActorDir ActorDir { get; set; }

    public ActorBase(ActorData data)

    {

        ActorData = data;

        //创建攻击动画

        List _attackFrames = new List();

        List _attackFrames_flip = new List();

        for (int i = 0; i < 4; i++)

        {

            _attackFrames.Add(CCSpriteFrameCache.sharedSpriteFrameCache().spriteFrameByName(data.ActorID + "_" + i + ".png"));

            _attackFrames_flip.Add(CCSpriteFrameCache.sharedSpriteFrameCache().spriteFrameByName(data.ActorID + "f_" + i + ".png"));

        }

        _action_attack = CCAnimate.actionWithAnimation(CCAnimation.animationWithFrames(_attackFrames, 0.1f));

        _action_attack_flip = CCAnimate.actionWithAnimation(CCAnimation.animationWithFrames(_attackFrames_flip, 0.1f));

        //创建行走动画

        List _runFrames = new List();

        List _runFrames_flip = new List();

        for (int i = 4; i < 6; i++)

        {

            _runFrames.Add(CCSpriteFrameCache.sharedSpriteFrameCache().spriteFrameByName(data.ActorID + "_" + i + ".png"));

            _runFrames_flip.Add(CCSpriteFrameCache.sharedSpriteFrameCache().spriteFrameByName(data.ActorID + "f_" + i + ".png"));

        }

        _action_run = CCAnimate.actionWithAnimation(CCAnimation.animationWithFrames(_runFrames, 0.1f));

        _action_run_flip = CCAnimate.actionWithAnimation(CCAnimation.animationWithFrames(_runFrames_flip, 0.1f));

        //创建站立动画

        List _standFrames = new List();

        List _standFrames_flip = new List();

        for (int i = 6; i < 7; i++)

        {

            _standFrames.Add(CCSpriteFrameCache.sharedSpriteFrameCache().spriteFrameByName(data.ActorID + "_" + i + ".png"));

            _standFrames_flip.Add(CCSpriteFrameCache.sharedSpriteFrameCache().spriteFrameByName(data.ActorID + "f_" + i + ".png"));

        }

        _action_stand = CCAnimate.actionWithAnimation(CCAnimation.animationWithFrames(_standFrames, 0.2f));

        _action_stand_flip = CCAnimate.actionWithAnimation(CCAnimation.animationWithFrames(_standFrames_flip, 0.2f));

        //创建死亡动画

        List _deadFrames = new List();

        List _deadFrames_flip = new List();

        for (int i = 7; i < 9; i++)

        {

            _deadFrames.Add(CCSpriteFrameCache.sharedSpriteFrameCache().spriteFrameByName(data.ActorID + "_" + i + ".png"));

            _deadFrames_flip.Add(CCSpriteFrameCache.sharedSpriteFrameCache().spriteFrameByName(data.ActorID + "f_" + i + ".png"));

        }

        _action_dead = CCAnimate.actionWithAnimation(CCAnimation.animationWithFrames(_deadFrames, 0.3f));

        _action_dead_flip = CCAnimate.actionWithAnimation(CCAnimation.animationWithFrames(_deadFrames_flip, 0.3f));

        //初始化默认帧

        base.initWithSpriteFrame(_standFrames[0]);

    }


    CCAction _currentAnimateAction;

    public void StateToRun()

    {

        if(ActorDir == Roles.ActorDir.Left)

            RunAnimateAction_RepeatForever(_action_run);

        else

            RunAnimateAction_RepeatForever(_action_run_flip);

    }

    //攻击状态

    public void StateToAttack()

    {

        currentAnimateActionStop();

        if (ActorDir == Roles.ActorDir.Left)

            RunAnimateAction_RepeatForever(_action_attack);

        else

            RunAnimateAction_RepeatForever(_action_attack_flip);

    }

    //死亡动画

    public void StateToDead()

    {

        currentAnimateActionStop();

        if (ActorDir == Roles.ActorDir.Left)

            _currentAnimateAction = runAction(_action_dead);

        else

            _currentAnimateAction = runAction(_action_dead_flip);

    }

    //站立动画

    public void StateToStand()

    {

        if (ActorDir == Roles.ActorDir.Left)

            RunAnimateAction_RepeatForever(_action_stand);

        else

            RunAnimateAction_RepeatForever(_action_stand_flip);


    }

    //停止当前的动画

    private void currentAnimateActionStop()

    {

        if (_currentAnimateAction != null)

            this.stopAction(_currentAnimateAction);

    }

    //播放循环动画的统一方法

    private void RunAnimateAction_RepeatForever(CCAnimate action)

    {

        currentAnimateActionStop();

        _currentAnimateAction = runAction(CCRepeatForever.actionWithAction(action));

    }

}
上述代码加了一些注释,希望能够帮助你的阅读,动画行为的制作流程是这样的:
首先我们要知道有那些帧,它们形成的集合变成CCAnimation的处理类,然后CCAnimate将其加载并形成特定的动画行为,有兴趣的配有可以看cocos2d的底层代码,CCSprite实际上是带了一个CCTexture来表示图像,CCAnimate是按照逻辑变化CCTexture。
在下面的代码中:StateToRun、StateToAttack、StateToDead、StateToStand等方法都是用来处理角色状态的动画,例如对应到当攻击的时候调用StateToAttack方法。
currentAnimateActionStop和RunAnimateAction_RepeatForever是为了方便处理动画的特定状态,因为诸如行走、站立、攻击,这一类的动画都是循环性质,统一代码比较方便。
那么我们就测试一下上面的代码看看直接的效果,还是为了方便,在本节中,我们直接将动画放在了开始界面这样浏览很方便了,打开SceneStart.cs,在构造函数中写如下代码:
//测试动画的角色

List id_buff = new List()

{

    "B1","B2","B3","B4","Hero02","A1","A2","A3","A4","Hero11"

};

for (int i = 0; i < 2; i++)

{


    for (int j = 0; j < 5; j++)

    {

        var actor = new ActorBase(new ActorData(id_buff[i*5 + j]));

        actor.ActorDir = (ActorDir)(i + 1);

        actor.position = new CCPoint(64 + i * 64, 64 + j * 64);

        if(j % 2 ==1)

            actor.StateToRun();

        else

            actor.StateToAttack();

        this.addChild(actor);

    }

}

//
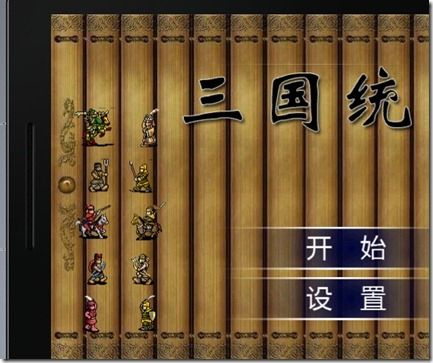
上面代码里,用一个List结构id_buff来描述ID,其实就是角色的前缀名,然后按照顺序排成两列,并且按照单数为行走动画,双数为攻击动画的形式显示。
上面是运行测试的效果,后面我们会将它们加到游戏界面中,让游戏真正的可以玩起来。
本篇例子工程:https://github.com/Nowpaper/SanguoCommander_cocos2dxna_Sample
本例子项目名为:SanguoCommander6
