若依前后端分离版本,Windows下使用Nginx代理的方式进行部署(全流程,图文教程)
场景
若依官网:
http://doc.ruoyi.vip/
前提:
服务器上安装Mysql,并将数据库导入,在SpringBoot中的application-druid.yml配置mysql数据库连接。
服务器安装Redis服务端,并在application.yml中配置连接。
具体可以参照:
https://blog.csdn.net/BADAO_LIUMANG_QIZHI/article/details/107486313
注:
博客:
https://blog.csdn.net/badao_liumang_qizhi
关注公众号
霸道的程序猿
获取编程相关电子书、教程推送与免费下载。
实现
后端部署
首先将后台项目进行打包,在application.yml配置后台端口,这里是8080。
然后在IDEA中将后台系统打成jar包,然后将jar包复制到服务器上,然后运行后台jar包。
这块比较简单,可以具体参照下面的官网教程。
后端部署
bin/package.bat 在项目的目录下执行
然后会在项目下生成 target文件夹包含 war 或jar (多模块生成在ruoyi-admin)
1、jar部署方式
使用命令行执行:java –jar ruoyi.jar 或者执行脚本:bin/run.bat
2、war部署方式
pom.xml packaging修改为war 放入tomcat服务器webapps
提示
SpringBoot去除内嵌tomcat
 org.springframework.boot
 spring-boot-starter-web


   org.springframework.boot
   spring-boot-starter-tomcat
  spring-boot-starter-tomcat
  org.springframework.boot
这里推荐使用Nginx代理的方式,所以需要将其打成jar包运行的方式,不用再搭建Tomcat运行war包。
最终将后台项目运行之后,访问后台接口
http://localhost:8080/captchaImage
此接口是登录时的验证码接口,是不需要权限验证的。
对应的后台接口位置
com.ruoyi.project.common下的CaptchaController
设置此接口放开不需要验证的配置的地方
部署成功后台项目后访问验证码接口如果出现以下界面则是部署成功
前端部署
这里是用VSCode作为前端的IDE,首先打开前端项目的vue.config.js
找到devServer下的proxy代理部分
这里的target是代理的请求后台的接口,对应上面部署的后台接口的url,下面还有一个路径重写,添加了一个
process.env.VUE_APP_BASE_API]:
此路径的配置在
所以在使用
npm run dev运行项目时,请求都会被代理到你设置的localhost:8080/dev-api下
所以要保证你在自己的本地运行前端项目和后台项目后能代理成功,即本地的前端能访问到本地的后台接口。
接下来将前端打包。
首先打包之前确保已经安装完依赖项,即
npm install 成功且没问题。
然后打开vue.config.js
首先将上面的这个端口改为你要在打包后访问的端口,即使用nginx代理前的接口。
这个端口默认是80端口,这里把其修改为不会冲突的70端口,不推荐使用80端口。
因为80端口是默认端口在部署到服务器上和下面启动nginx可能存在占用等问题。
除了这个70端口外,下面的target的url和端口要和你服务器上能访问到后台的接口一致。
然后在VSCode中新建终端,或者在前端项目下打开cmd
npm run build:prod进行前端项目的打包
打包前端成功之后
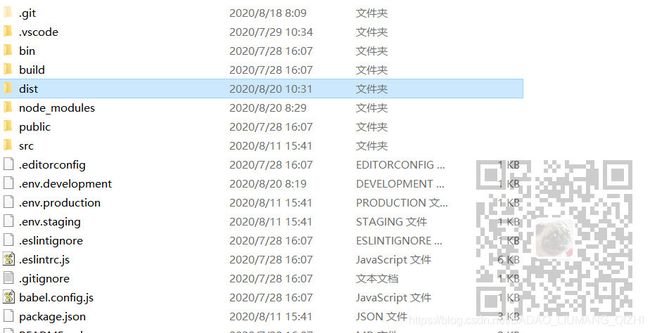
此时会在项目目录下生成dist目录
此目录就是打包之后的前端的资源。
然后将此dist目录放在服务器上的某个目录下,下面使用Nginx代理会用
不要动dist下文件的路径
下载安装Nginx
Nginx下载地址
http://nginx.org/en/download.html
这里点击相应版本的Windows版本
下载之后是一个压缩包,将其解压到服务器上的某个目录
Nginx代理配置
进入到上面解压的conf目录下,编辑Nginx的配置文件nginx.conf
找到server节点
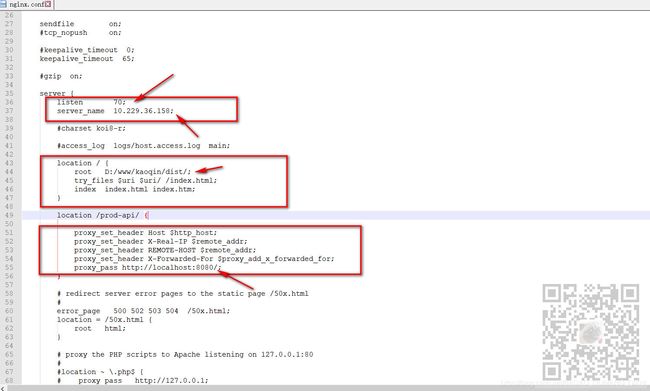
首先这里的listen下的端口就是代理前的接口,要与前面前端项目的vue.config.js中的端口一致。
    server {
        listen       70;
        server_name  10.229.36.158;
然后下面的server_name是你服务器的ip,这里即使是使用的本地也建议不要用localhost,避免修改hosts文件导致的问题。
所以这里就直接设置你要部署项目的服务器的ip。
然后下面的location /下面配置的就是代理前前端静态资源的路径等。
root 对应的就是在服务器上前端资源的dist目录的全路径,即代表根路径。
下面的两个配置保持默认不要更改,配置的是防止404和入口页面。
        location / {
            root   D:/www/kaoqin/dist/;
            try_files $uri $uri/ /index.html;
            index  index.html index.htm;
        }
然后再下面的location /prod-api/ 就是配置的代理后的地址。
  location /prod-api/ {

            proxy_set_header Host $http_host;
   proxy_set_header X-Real-IP $remote_addr;
   proxy_set_header REMOTE-HOST $remote_addr;
   proxy_set_header X-Forwarded-For $proxy_add_x_forwarded_for;
   proxy_pass http://localhost:8080/;
        }
这里的 /prod-api/就是跟前面前端项目设置代理的路径重写一致。
下面的一些是设置请求头等,防止出现跨域问题。
然后最下面的proxy_pass就是设置的代理后的地址,即你的服务器上后台接口的url。
通过上面两个配置就能实现在服务器上所有的请求
只要是通过
http://10.229.36.158/70/dev-api/
发送过来的请求全部会被代理到
http://localhost:8080/
下。这样就能实现前后端项目的请求代理。
完整conf代码
#user  nobody;
worker_processes  1;

#error_log  logs/error.log;
#error_log  logs/error.log  notice;
#error_log  logs/error.log  info;

#pid        logs/nginx.pid;


events {
    worker_connections  1024;
}


http {
    include       mime.types;
    default_type  application/octet-stream;

    #log_format  main  '$remote_addr - $remote_user [$time_local] "$request" '
    #                  '$status $body_bytes_sent "$http_referer" '
    #                  '"$http_user_agent" "$http_x_forwarded_for"';

    #access_log  logs/access.log  main;

    sendfile        on;
    #tcp_nopush     on;

    #keepalive_timeout  0;
    keepalive_timeout  65;

    #gzip  on;

    server {
        listen       70;
        server_name  10.229.36.158;

        #charset koi8-r;

        #access_log  logs/host.access.log  main;

        location / {
            root   D:/www/kaoqin/dist/;
   try_files $uri $uri/ /index.html;
            index  index.html index.htm;
        }

  location /prod-api/ {

            proxy_set_header Host $http_host;
   proxy_set_header X-Real-IP $remote_addr;
   proxy_set_header REMOTE-HOST $remote_addr;
   proxy_set_header X-Forwarded-For $proxy_add_x_forwarded_for;
   proxy_pass http://localhost:8080/;
        }

        # redirect server error pages to the static page /50x.html
        #
        error_page   500 502 503 504  /50x.html;
        location = /50x.html {
            root   html;
        }

        # proxy the PHP scripts to Apache listening on 127.0.0.1:80
        #
        #location ~ \.php$ {
        #    proxy_pass   http://127.0.0.1;
        #}

        # pass the PHP scripts to FastCGI server listening on 127.0.0.1:9000
        #
        #location ~ \.php$ {
        #    root           html;
        #    fastcgi_pass   127.0.0.1:9000;
        #    fastcgi_index  index.php;
        #    fastcgi_param  SCRIPT_FILENAME  /scripts$fastcgi_script_name;
        #    include        fastcgi_params;
        #}

        # deny access to .htaccess files, if Apache's document root
        # concurs with nginx's one
        #
        #location ~ /\.ht {
        #    deny  all;
        #}
    }


    # another virtual host using mix of IP-, name-, and port-based configuration
    #
    #server {
    #    listen       8000;
    #    listen       somename:8080;
    #    server_name  somename  alias  another.alias;

    #    location / {
    #        root   html;
    #        index  index.html index.htm;
    #    }
    #}


    # HTTPS server
    #
    #server {
    #    listen       443 ssl;
    #    server_name  localhost;

    #    ssl_certificate      cert.pem;
    #    ssl_certificate_key  cert.key;

    #    ssl_session_cache    shared:SSL:1m;
    #    ssl_session_timeout  5m;

    #    ssl_ciphers  HIGH:!aNULL:!MD5;
    #    ssl_prefer_server_ciphers  on;

    #    location / {
    #        root   html;
    #        index  index.html index.htm;
    #    }
    #}

}
启动Nginx
来到上面Nginx解压之后的目录下(服务器上)即含有nginx.exe的目录下,在此处打开命令行
start nginx.exe启动nginx
如果对nginx的配置文件进行修改的话
nginx -s reload如果没配置环境变量或者提示不行的话前面使用nginx.exe的全路径。
正常停止或关闭Nginx
nginx -s quit启动Nginx成功后打开浏览器验证,输入
http://10.229.36.158:70/
如果能出现页面,即对应的前端静态资源的index.html的页面,并且能显示验证码,验证码是通过代理后的
后台接口获取。那么就是代理成功,记住不要关闭此nginx的命令行。
如果访问服务器上的地址不成功后检查70端口是否开放
控制面板-防火墙-高级设置
入站规则-新建规则-端口,添加70
点击下一步
选择允许连接
配置连接域点击下一步
设置名称点击保存。


