从NovelAi的云端部署到post请求
利用GoogleColab部署自己的novalai云端模型,借novelai画二次元图片,auto.js制作软件进行post请求返回图片。GoogleColab的gpu是免费的,但每天是有限额的,每天都会重置。(代码下载地址在文末)
部署前提:能够科学上网进入到GoogleColab。
参考视频:
【【AI绘画】NovelAI终极傻瓜教程 无需任何环境 colab完全线上部署 A卡福音 (可可罗老师讲授)-哔哩哔哩】 https://b23.tv/I2N0ke5
演示:
novelai云端部署并添加post请求接口
一.云端部署
第一次云端部署最多半个小时,也是非常简单的。
1.进入GooleColab:
https://colab.research.google.com/drive/1jr2hwih87DSqixyNM_fmg5qWidUArCQP?usp=sharing
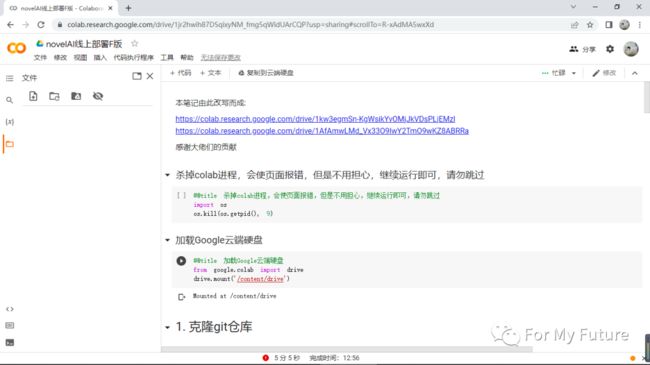
依次运行,到加载云盘,
2.加载云盘:
加载云盘进入到别人的云盘将云盘所有内容复制过来,右键点击然后复制即可(只能单文件复制,并且复制后的文件带副本这两个字,所以还要自己创建文件夹把相应文件移动到相应文件夹下,并对文件重命名,去掉副本这两个字)

完成后的文件结构如下:


随后继续运行,克隆git仓库,安装依赖,云盘复制版(推荐使用,需先进行文件上传)这三个步骤直接点击运行即可
3.添加api接口:
如果想进行后续post请求访问,那么请修改位于/content/stable-diffusion-webui/modules/ui.py的代码

打开ui.py文件,在其第742行修改代码:
submit.click(**txt2img_args,api_name="jianglaishi")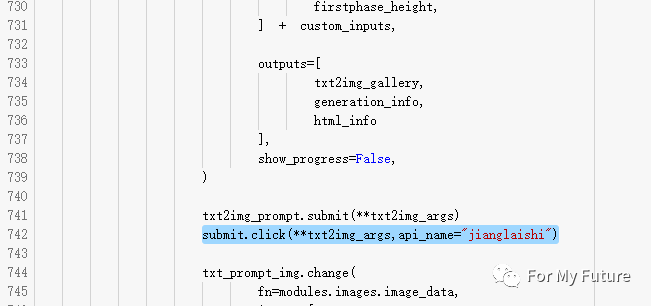
ctrl+s保存后到第四步部署模型到gradio
ctrl+s保存后到第四步部署模型到gradio
4 .部署模型到g'radio:
把命令修改一下,去掉
--gradio-auth me:qwerty方便后续post请求,修改后命令为:
!COMMANDLINE_ARGS="--deepdanbooru --share --gradio-debug" REQS_FILE="requirements.txt" python launch.py运行,等待出现最后的网址
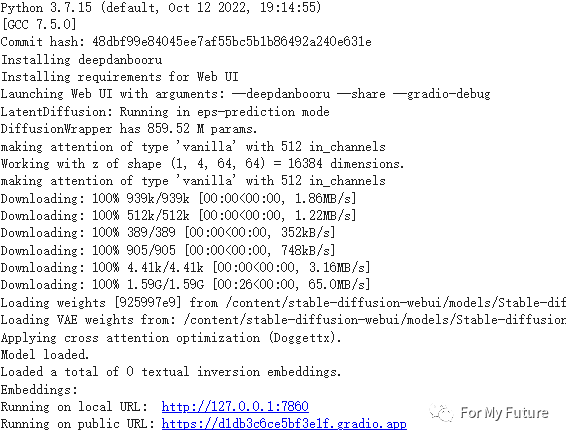
打开网址,即可进行ai绘图

二.post请求返回图片

在网站最下方有viewapi,点击
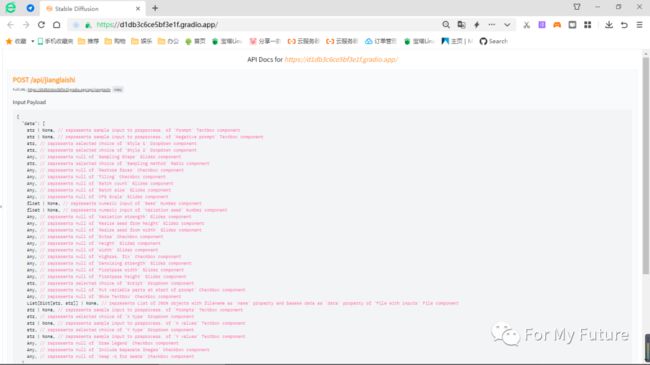
根据相应参数进行post请求,这里给个参数模板:
 "data": [
    description ,// represents sample input to preprocess. of 'Prompt' Textbox component
    undescription, // represents sample input to preprocess. of 'Negative prompt' Textbox component
    "_KT", // represents selected choice of 'Style 1' Dropdown component
    "_KT", // represents selected choice of 'Style 2' Dropdown component
    20, // represents null of 'Sampling Steps' Slider component
    "Euler a", // represents selected choice of 'Sampling method' Radio component
 false  , // represents null of 'Restore faces' Checkbox component
    false, // represents null of 'Tiling' Checkbox component
    1, // represents null of 'Batch count' Slider component
    1, // represents null of 'Batch size' Slider component
    7.0, // represents null of 'CFG Scale' Slider component
    -1, // represents numeric input of 'Seed' Number component
    -1, // represents numeric input of 'Variation seed' Number component
    1.0, // represents null of 'Variation strength' Slider component
    0, // represents null of 'Resize seed from height' Slider component
    0, // represents null of 'Resize seed from width' Slider component
    false, // represents null of 'Extra' Checkbox component
    512, // represents null of 'Height' Slider component
    512, // represents null of 'Width' Slider component
    false, // represents null of 'Highres. fix' Checkbox component
    0.7, // represents null of 'Denoising strength' Slider component
    0, // represents null of 'Firstpass width' Slider component
    0, // represents null of 'Firstpass height' Slider component
    "None", // represents selected choice of 'Script' Dropdown component
    false, // represents null of 'Put variable parts at start of prompt' Checkbox component
    false, // represents null of 'Show Textbox' Checkbox component
    null, // represents List of JSON objects with filename as 'name' property and base64 data as 'data' property of 'File with inputs' File component
    description, // represents sample input to preprocess. of 'Prompts' Textbox component
    "Nothing", // represents selected choice of 'X type' Dropdown component
    null, // represents sample input to preprocess. of 'X values' Textbox component
    "Nothing", // represents selected choice of 'Y type' Dropdown component
    null, // represents sample input to preprocess. of 'Y values' Textbox component
    true, // represents null of 'Draw legend' Checkbox component
    false, // represents null of 'Include Separate Images' Checkbox component
    false, // represents null of 'Keep -1 for seeds' Checkbox component
  ]
由于stable-diffusion-webui项目在不断更新,所以可能会有一些参数改变。
auto.js完整代码:
"ui";
/**
* 作者: 姜来式
* QQ: 1216951671
**/
ui.layout(
![]()
)
var path = "/storage/emulated/0/二次元生成/"
var img;
files.ensureDir(path)
var badwords = "bad anatomy,liquid body,liquid tongue,uncoordinated body,unnatural body,bad hands,fused hand,missing hand,missing feet,bad proportions,obesity,worst quality,low quality,normal quality"
var goodwords = "{{masterpiece}},beautiful,girl,angel"
activity.window.addFlags(android.view.View.SYSTEM_UI_FLAG_LAYOUT_HIDE_NAVIGATION);
var url = "https://d1db3c6ce5bf3e1f.gradio.app/api/jianglaishi"//api接口
var url2 ="https://d1db3c6ce5bf3e1f.gradio.app/file="//读取图片
var generationinfo;
var gallery;
var htmlinfo;
ui.ai.click(function(){
ui.word.setText("正在生成,请耐心等待,大约20s")
var description = ui.prompt.getText().toString().trim()
var undescription = ui.unprompt.getText().toString().trim()
threads.start(function(){
var res = http.postJson(url,{
"data": [
description ,// represents sample input to preprocess. of 'Prompt' Textbox component
undescription, // represents sample input to preprocess. of 'Negative prompt' Textbox component
"_KT", // represents selected choice of 'Style 1' Dropdown component
"_KT", // represents selected choice of 'Style 2' Dropdown component
20, // represents null of 'Sampling Steps' Slider component
"Euler a", // represents selected choice of 'Sampling method' Radio component
false , // represents null of 'Restore faces' Checkbox component
false, // represents null of 'Tiling' Checkbox component
1, // represents null of 'Batch count' Slider component
1, // represents null of 'Batch size' Slider component
7.0, // represents null of 'CFG Scale' Slider component
-1, // represents numeric input of 'Seed' Number component
-1, // represents numeric input of 'Variation seed' Number component
1.0, // represents null of 'Variation strength' Slider component
0, // represents null of 'Resize seed from height' Slider component
0, // represents null of 'Resize seed from width' Slider component
false, // represents null of 'Extra' Checkbox component
512, // represents null of 'Height' Slider component
512, // represents null of 'Width' Slider component
false, // represents null of 'Highres. fix' Checkbox component
0.7, // represents null of 'Denoising strength' Slider component
0, // represents null of 'Firstpass width' Slider component
0, // represents null of 'Firstpass height' Slider component
"None", // represents selected choice of 'Script' Dropdown component
false, // represents null of 'Put variable parts at start of prompt' Checkbox component
false, // represents null of 'Show Textbox' Checkbox component
null, // represents List of JSON objects with filename as 'name' property and base64 data as 'data' property of 'File with inputs' File component
description, // represents sample input to preprocess. of 'Prompts' Textbox component
"Nothing", // represents selected choice of 'X type' Dropdown component
null, // represents sample input to preprocess. of 'X values' Textbox component
"Nothing", // represents selected choice of 'Y type' Dropdown component
null, // represents sample input to preprocess. of 'Y values' Textbox component
true, // represents null of 'Draw legend' Checkbox component
false, // represents null of 'Include Separate Images' Checkbox component
false, // represents null of 'Keep -1 for seeds' Checkbox component
]
})
ui.word.setText("点击填写示例词汇")
var houzhui = res.body.json().data[0][0].name
img =images.load(url2+houzhui)
ui.run(()=>{ui.picture.setSource(url2+houzhui)})
})
})
ui.save.click(function(){
let name = ui.name.getText().toString().trim()
let savepath = path+name+".png"
img.saveTo(savepath)
media.scanFile(savepath)
toast("保存成功,请到相册查看")
})
ui.word.click(function(){
ui.prompt.setText(goodwords)
ui.unprompt.setText(badwords)
})
界面:

第一个框填正面词,第二个框填负面词,都是英文,描述的词汇越多,生成的图片也就越准确。
总结:
一开始对项目不理解,找参数花了很长时间,我看代码中input只有20多个参数,但网站的api显示是30多个,我又在项目里面找,原来多出的参数在\scripts\xy_grid.py这个文件里。
goolecolab每天都会清理gpu并且有限额,所以云端部署持续时间最多只有一天,一天过后就又要重新部署,由于第一次已经复制模型文件到自己的云盘里,部署就快多了,只要修改一下代码添加api接口即可重新部署。auto.js修改url,url2网址就又可以使用了。
本想热更新文件中网址,这样每天部署后我把相应网址改过后就可以使用app了,但感觉没什么必要,这种东西只有自己做出来才比较有成就感,并且测试的时候人一多gpu很容易限额,所以我交给了大家方法,就不放apk下载地址了。
代码下载地址:
https://jianglaishi.lanzout.com/iyRng0efgddc