k8s探针
目录
探针的类型
探针的检测方法
检测探针-就绪检测
readinessProbe-httpget
检测探针-存活检测
livenessProbe-exec
livenessProbe-httpget
livenessProbe
就绪探针和存活探针同时使用
启动和退出动作
探针的类型
readinessProbe(就绪探针):只是容器是否准备好服务请求。如果就绪探测失败,端点控制器将从与pod匹配的所有Service的端点中删除该pod的IP地址。初始延迟之前的就绪状态默认为Failure,如果容器不提供就绪探针,则默认状态为Success该探针不会重启pod。也会一直检测pod内部容器的程序是否正常,如果返回状态为sucess就不做操作,如果检测到异常,对应的service就会终止前端分发到该pod的流量,该探针主要针对的是程序启动了,但是否做好接收流量的准备
livenessProbe(存活探针):指示容器是否正在运行。如果存活探测失败,则kubelet会杀死容器并且容器会受到 其重启策略的影响。如果容器不提供存活探针,则默认状态为Success
startupProbe(启动探针):这个探针是k8s后来新增的,目的是仅仅前两者不太满足业务需求。该探针作用于程序启动过程中的检测,启动后不再检测。目的就是检测启动状态。为啥需要这个探针呢?因为有些程序启动的时候时间很长,没错,就这么简单。我们先来说如果用前两者,好像也可以用,把检测时间拉长一点,加入启动大概在一分钟,那我就拉长在大于一分钟的时候检测。但是,后续发生故障的时间检测的时间也会拉长到大于一分钟!!!如果对于时间要求过高的业务而言是不可接收的。你可能会问,不是有initialDelaySeconds这个初始化参数可以设置时间吗,我把它设置成1分钟后开始检测,不久可以避免之后检测时间过长吗。但是,初始化只有第一次的时候管用,之后的每次重启都无法使用该参数。所以这时候startupProbe探针就起作用了,针对程序的启动时间单独设置。在startupProbe期间,会禁止其他探针检测,知道它成功为止。
探针的检测方法
探针是由kubelet对容器执行的定期诊断。要执行诊断,kubelet调用由容器实现的Handler。有三种类型的处理数据:
ExecAction(命令行探测):在容器内执行指定命令。如果命令退出时返回码为0则诊断成功
TCPSocketaAction(端口探测):对指定端口上的容器的IP地址进行TCP检查。如果端口打开,则认为诊断被认为是成功的
HTTPGetAction(api探测):对指定的端口和路径上的容器的IP地址执行HTTP Get请求。如果响应的状态码大于等于200且小于等于 400,则被诊断认为是成功的
每次探测都会获得一下三种结果之一:
- 成功:容器通过了诊断。
- 失败:容器未通过诊断
- 未知:诊断失败,因此不会采取任何行动
检测探针-就绪检测
readinessProbe-httpget
[root@k8s-master ~]# cat redinessprobe-httpdget.yaml
apiVersion: v1
kind: Pod
metadata:   ##元数据信息
  name: readiness-httpget-pod  ##pod名字
  namespace: default   ##pod所在的命名空间
spec:  ##详细信息
  containers:
  - name: readiness-httpget-container  ##容器名字
    image: nginx  ##下载的镜像名字
    imagePullPolicy: IfNotPresent  ##镜像的下载策略  IfNotPresent如果有就不下载
    readinessProbe:  ##就绪检测
      httpGet:  ##检测方式
        port: 80   ##检测端口号
        path: index1.html  ##检测网站根目录下的index1.html
      initialDelaySeconds: 1  ##检测延时 1秒  容器启动一秒之后检测
      periodSeconds: 3  ##检测重试时间失败后三秒检测一次

利用yaml文件创建pod
[root@k8s-master ~]# kubectl create -f redinessprobe-httpdget.yaml
pod/readiness-httpget-pod created

[root@k8s-master ~]# kubectl get pod
NAME                    READY   STATUS    RESTARTS   AGE
readiness-httpget-pod   0/1     Running   0          61s
注释:虽然pod是run状态但是此时pod是没有就绪的因为就绪探针没有探测到index1.html文件
可以通过查看pod详细信息查看/查看pod的日志查看到原因

查看pod日志
[root@k8s-master ~]# kubectl logs readiness-httpget-pod

查看pod的详细信息
[root@k8s-master ~]# kubectl describe pod readiness-httpget-pod
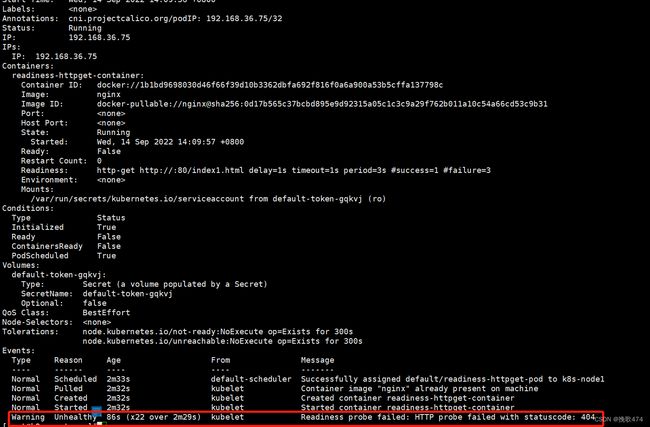
可以看到他是404检测不到目录所以检测失败
进入pod
[root@k8s-master ~]# kubectl exec -it readiness-httpget-pod /bin/bash
然后在网站根目录下创建index1.html文件
root@readiness-httpget-pod:/usr/share/nginx/html# cd /usr/share/nginx/html/
root@readiness-httpget-pod:/usr/share/nginx/html# echo "11111" >> index1.html
root@readiness-httpget-pod:/usr/share/nginx/html# ls
50x.html  index.html  index1.html
创建完成之后exit退出
root@readiness-httpget-pod:/usr/share/nginx/html# exit
查看pod
[root@k8s-master ~]# kubectl get pod
NAME                    READY   STATUS    RESTARTS   AGE
readiness-httpget-pod   1/1     Running   0          8m48s
这次pod已经成功
检测探针-存活检测
livenessProbe-exec
[root@k8s-master ~]# cat livenessProbe-exec.yaml
apiVersion: v1
kind: Pod
metadata:
  name: liveness-exec-pod
  namespace: default
spec:
  containers:
  - name: liveness-exec-container
    image: busybox
    imagePullPolicy: IfNotPresent
    command: ["/bin/sh","-c","touch /tmp/live ; sleep 60; rm -rf /tmp/live; sleep 3600" ]
    livenessProbe:
      exec:
        command: ["test","-e","/tmp/live"]
      initialDelaySeconds: 1
      periodSeconds: 3

注释:第一个command运行的命令:创建一个在tmp下创建一个live的文件休眠60秒然后删除休眠6分钟
     第二个conmmand运行的命令:判断/tmp/live这个文件是否存在

[root@k8s-master ~]# kubectl get pod
NAME                    READY   STATUS    RESTARTS   AGE
readiness-httpget-pod   1/1     Running   0          28m
首先是运行状态使用-w参数监测一下 等待一段时间过后你会发现pod重启了一下

[root@k8s-master ~]# kubectl get pod -w
NAME                READY   STATUS    RESTARTS   AGE
liveness-exec-pod   1/1     Running   0          11s


liveness-exec-pod   1/1     Running   1          101s

 注释:原因是因为启动容器的时候会创建一个文件但是60后文件就会被删除掉期间liveness会一直检测
      文件是否存在60秒后文件不存在他就会根据重启策略重启pod
livenessProbe-httpget
[root@k8s-master ~]# cat livenessProbe-httpget.yaml
apiVersion: v1
kind: Pod
metadata:
name: liveness-httpget-pod
namespace: default
spec:
containers:
- name: liveness-httpget-container
image: nginx
imagePullPolicy: IfNotPresent
ports:
- name: http
containerPort: 80
livenessProbe:
httpGet:
port: http
path: index.html
initialDelaySeconds: 1
periodSeconds: 3
timeoutSeconds: 10
注释:timeoutSeconds:超时时间设置为十秒
查看他的详细信息
[root@k8s-master ~]# kubectl get pod -o wide
NAME READY STATUS RESTARTS AGE IP NODE NOMINATED NODE READINESS GATES
liveness-httpget-pod 1/1 Running 0 115s 192.168.36.76 k8s-node1
访问他的pod
[root@k8s-master ~]# curl 192.168.36.76/index.html
Welcome to nginx!
Welcome to nginx!
If you see this page, the nginx web server is successfully installed and
working. Further configuration is required.
For online documentation and support please refer to
nginx.org.
Commercial support is available at
nginx.com.
Thank you for using nginx.
进入pod
[root@k8s-master ~]# kubectl exec -it liveness-httpget-pod /bin//bash
删除他的index.html文件
root@liveness-httpget-pod:/# rm -rf /usr/share/nginx/html/index.html
退出
root@liveness-httpget-pod:/# exit
可以看到他的重启过一次了
[root@k8s-master ~]# kubectl get pod
NAME READY STATUS RESTARTS AGE
liveness-httpget-pod 1/1 Running 1 5m15s
注释:当容器启动后livenessProbe会持续监视你的index.html文件当文件不存在他会根据重启策略重启pod livenessProbe
[root@k8s-master ~]# cat live-tcp.yaml
apiVersion: v1
kind: Pod
metadata:
  name: probe-tcp
spec:
  containers:
  - name: nginx
    image: nginx
    livenessProbe:
      initialDelaySeconds: 5
      timeoutSeconds: 1
      tcpSocket:
        port: 8080
      periodSeconds: 3

[root@k8s-master ~]# kubectl create -f live-tcp.yaml

[root@k8s-master ~]# kubectl get pod
NAME        READY   STATUS    RESTARTS   AGE
probe-tcp   1/1     Running   0          21s

 等待一段时间你会发现pod自动重启
 [root@k8s-master ~]# kubectl get pod
NAME        READY   STATUS    RESTARTS   AGE
probe-tcp   1/1     Running   1          56s

注释:容器启动后五秒以后开始检测发起连接8080端口超时时间设置为1秒当1秒过去以后他会发现
      连接不上就会根据重启策略把pod重启
就绪探针和存活探针同时使用
[root@k8s-master ~]# cat livenessProbe-httpget.yaml
apiVersion: v1
kind: Pod
metadata:
  name: liveness-httpget-pod
  namespace: default
spec:
  containers:
  - name: liveness-httpget-container
    image: nginx
    imagePullPolicy: IfNotPresent
    ports:
    - name: http
      containerPort: 80
    readinessProbe:  ##就绪检测
     httpGet:  ##检测方式
       port: 80   ##检测端口号
       path: index1.html  ##检测网站根目录下的index1.html
     initialDelaySeconds: 1  ##检测延时 1秒  容器启动一秒之后检测
     periodSeconds: 3
    livenessProbe:
      httpGet:
        port: http
        path: index.html
      initialDelaySeconds: 1
      periodSeconds: 3
      timeoutSeconds: 10

查看pod状态
[root@k8s-master ~]# kubectl get pod
NAME                   READY   STATUS    RESTARTS   AGE
liveness-httpget-pod   0/1     Running   0          55s

你会发现pod没有ready状态因为他找不到index1.html文件

[root@k8s-master ~]# kubectl exec -it liveness-httpget-pod /bin/bash

root@liveness-httpget-pod:/# cd /usr/share/nginx/html/


root@liveness-httpget-pod:/usr/share/nginx/html# ls
50x.html  index.html
root@liveness-httpget-pod:/usr/share/nginx/html# echo "qqqqq" >>index1.html
root@liveness-httpget-pod:/usr/share/nginx/html# exit
查看pod状态
[root@k8s-master ~]# kubectl get pod
NAME                   READY   STATUS    RESTARTS   AGE
liveness-httpget-pod   1/1     Running   0          5m33s
现在pod已经启动成功因为有了index1.html文件

删除index文件
[root@k8s-master ~]# kubectl exec liveness-httpget-pod -it  -- rm -rf /usr/share/nginx/html/index.html
等一会查看pod状态
[root@k8s-master ~]# kubectl get pod
NAME                   READY   STATUS    RESTARTS   AGE
liveness-httpget-pod   0/1     Running   1          8m9s
发现他会重启一次然后不会出现ready状态


注释:创建完pod之后就绪探针会探测他的index1.html文件如果没有的话他不出现ready状态然后
      创建index1.html文件pod正常运行 后面删除掉index.html文件存活探针探测不到就会重启
      重启之后的pod没有index1.html文件所有没有ready状态
启动和退出动作
[root@k8s-master ~]# cat post.yaml
apiVersion: v1
kind: Pod
metadata:
  name: lifecycle-demo
spec:
  containers:
  - name: lifecycle-demo-container
    image: nginx
    lifecycle:
      postStart:
        exec:
          command: ["/bin/sh","-c","echo hello from the postStart hadnler > /usr/share/message" ]
      preStop:
        exec:
          command: ["/bin/sh","-c","echo hello from the postS`top hadnler > /usr/share/message" ]

[root@k8s-master ~]# kubectl create -f post.yaml
查看pod状态
[root@k8s-master ~]# kubectl get pod
NAME                   READY   STATUS    RESTARTS   AGE
lifecycle-demo         1/1     Running   0          2m45s
进入容器

[root@k8s-master ~]# kubectl exec -it lifecycle-demo /bin/bash
查看容器启动成功后有没有信息
root@lifecycle-demo:/# cat /usr/share/message
hello from the postStart hadnler