首先将主相机调整为正交镜头,这样可以防止模型畸变。X轴旋转角度调整为 50°。
创建相机控制类,并写入以下代码:
using UnityEngine;
using UnityEngine.EventSystems;
namespace TDGameDemo.Control
{
///
/// 相机控制类
/// 用于控制主相机的拖拽、放大缩小等操作
///
public class CameraController : MonoBehaviour, IDragHandler
{
///
/// 拖拽速度
///
public float dragSpeed;
///
/// 缩放系数
/// 拖拽时需要根据缩放系数来调整拖拽距离,避免过快或过慢
///
private float scaleRatio;
///
/// 地图缩小最小值
///
private int scaleMin = 90;
///
/// 地图放大最大值
///
private int scaleMax = 25;
public void OnDrag(PointerEventData eventData)
{
float h = -Input.GetAxisRaw("Mouse X") * dragSpeed * scaleRatio;
float v = -Input.GetAxisRaw("Mouse Y") * dragSpeed * scaleRatio;
Camera.main.transform.Translate(new Vector3(h, 0, v) * Time.deltaTime, Space.World);
// 以下代码用于限定拖拽边缘,目前使用固定值做限制,实际上还可以根据缩放比例进一步优化
if (Camera.main.transform.position.x < 30)
{
Camera.main.transform.position = new Vector3(30, Camera.main.transform.position.y, Camera.main.transform.position.z);
}
if (Camera.main.transform.position.x > 170)
{
Camera.main.transform.position = new Vector3(170, Camera.main.transform.position.y, Camera.main.transform.position.z);
}
if (Camera.main.transform.position.z < -50)
{
Camera.main.transform.position = new Vector3(Camera.main.transform.position.x, Camera.main.transform.position.y, -50);
}
if (Camera.main.transform.position.z > 120)
{
Camera.main.transform.position = new Vector3(Camera.main.transform.position.x, Camera.main.transform.position.y, 120);
}
}
void Update()
{
// 鼠标滚轮的效果
// 缩小
if (Input.GetAxis("Mouse ScrollWheel") < 0)
{
if (Camera.main.orthographicSize <= scaleMin)
Camera.main.orthographicSize += 5F;
}
// 放大
if (Input.GetAxis("Mouse ScrollWheel") > 0)
{
if (Camera.main.orthographicSize >= scaleMax)
Camera.main.orthographicSize -= 5F;
}
// 缩放系数scaleRatio要根据正交镜头的角度变化,70°时除以45.5,50°时除以78。
scaleRatio = Camera.main.orthographicSize / 78f;
}
}
}
注意:以上代码有部分为硬编码,比如左右边缘位置以及随着缩放比例变化的缩放系数 scaleRatio 的计算方式,但目前版本已经有较合理的表现,所以暂时不做修改。
运行游戏,使用点击鼠标按键拖拽实现拖拽地图功能,滑动滚轮实现缩放地图功能。
下面将前面讲到的用于测试导航的代码融合到本例中。将Enemy代码改为:
using TDGameDemo.GameLevel;
using UnityEngine;
using UnityEngine.AI;
namespace TDGameDemo.Enemy
{
///
/// 敌人类
/// 移动、声音、动画、寻路
///
//[RequireComponent(typeof(AudioSource))]
public class Enemy : MonoBehaviour
{
private NavMeshAgent agent;
public Transform target;
public EnemyConfig config;
///
/// 动画系统
///
private CharacterAnimation chAnim;
private AudioSource _audioSource;
///
/// 敌人生成时的声音
///
public AudioClip _generateClip;
///
/// 敌人受到攻击时的声音
///
public AudioClip _underAttackClip;
///
/// 敌人走到终点时的声音
///
public AudioClip _finishClip;
///
/// 敌人移动时的声音
///
public AudioClip _moveClip;
void Start()
{
// 获取组件
agent = GetComponent<NavMeshAgent>();
chAnim = GetComponent<CharacterAnimation>();
initEnemy();
}
///
/// 初始化敌人
///
public void initEnemy()
{
if (agent != null)
{
agent.speed = config.EnemySpeed;
}
}
void Update()
{
// 敌人到达终点
if (Vector3.Distance(transform.position, target.position) < 10)
{
ReachDestination();
return;
}
if (agent != null)
{
bool flag = agent.SetDestination(target.position);
chAnim.PlayAnimation("run");
}
else
{
chAnim.PlayAnimation("idle");
}
}
///
/// 敌人到达终点
///
void ReachDestination()
{
Destroy(gameObject);
}
private void OnDestroy()
{
LevelManager.EnemyAliveCount--;
}
}
}
将原来 NavTest 中的 Update 代码放到 Enemy 中,删除原来的导航测试类即可。
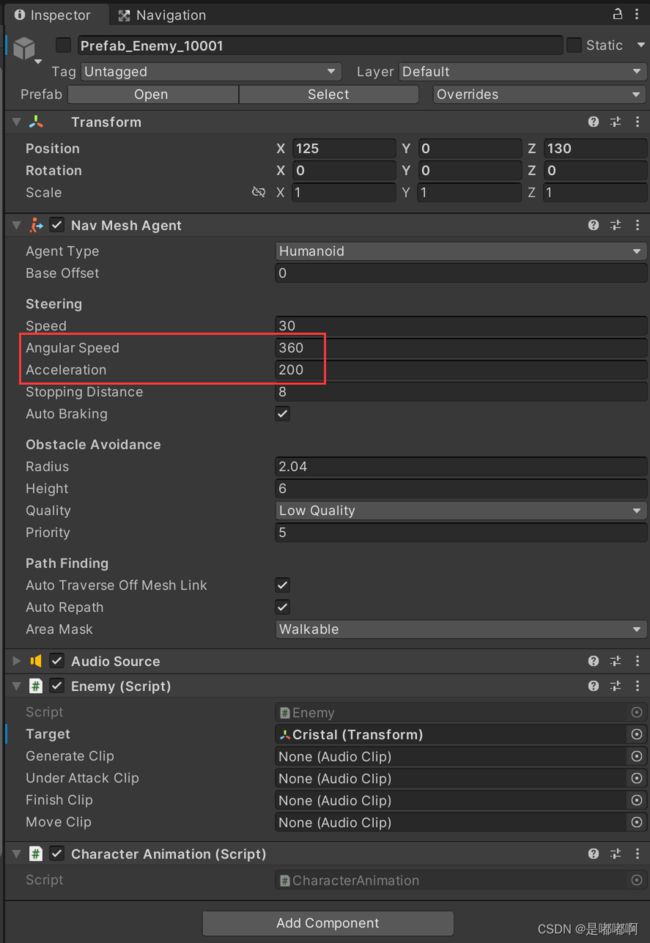
上述代码中的 initEnemy 方法用于初始化敌人,可以将配置文件中配置的敌人速度设置到 Agent 上,为了使移动更合理,我重新修改了预制件中的导航代理,如下图:
将代理的角速度和加速度调大,敌人刷新出来以后速度比较稳定,更适用于炮台防守游戏。移动速度上限则与配置文件相同,相应的代码在 initEnemy 方法中。
当敌人到达终点后销毁敌人,目前只做简单的销毁,后续再将造成伤害的代码加进去。该部分内容在 Update 方法和 ReachDestination 方法中。
Enemy代码中新增了一个配置对象 config ,相应的需要修改敌人生成器的代码。
using TDGameDemo.GameLevel;
using UnityEngine;
namespace TDGameDemo.Enemy
{
///
/// 敌人创建器
///
public class EnemyGenerator : MonoBehaviour
{
///
/// 生成敌人
///
/// 父对象
/// 敌人配置对象
/// 导航目标
///
public bool GenerateEnemy(EnemyConfig config, Transform parent, string enemy, Transform target, Transform mainCamera)
{
try
{
GameObject enemyPrefab = Resources.Load<GameObject>(enemy);
GameObject o = Instantiate(enemyPrefab, parent, true);
o.GetComponent<Enemy>().target = target;
o.GetComponent<Enemy>().config = config;
o.transform.Find("UICanvas").GetComponent<EnemyUICanvas>().MainCamera = mainCamera;
}
catch (System.Exception)
{
return false;
throw;
}
return true;
}
}
}
优化前面的生成敌人方法,将 Update 的方式改为协程。让敌人按照回合的方式生成,上一回合所有敌人都销毁以后再生成本回合的敌人。 LevelManager 代码如下:
using Excel;
using System.Collections;
using System.Collections.Generic;
using System.IO;
using TDGameDemo.Enemy;
using TDGameDemo.Game;
using UnityEngine;
using UnityEngine.UI;
namespace TDGameDemo.GameLevel
{
///
/// 关卡管理器
/// 加载关卡数据、加载场景、生成敌人
///
public class LevelManager : MonoBehaviour
{
///
/// 游戏对象
///
private GameMain _gameMain;
public Transform _mainCamera;
///
/// 存活敌人数量
///
public static int EnemyAliveCount;
///
/// 敌人生成器
///
private EnemyGenerator _enemyGenerator;
///
/// 生成点 ***************TODO****************
///
public Transform _generatePoint;
///
/// 目标点 ***************TODO****************
///
public Transform _target;
///
/// 关卡配置对象
///
private LevelConfig _levelConfig;
void Start()
{
_gameMain = GetComponent<GameMain>();
_enemyGenerator = GetComponent<EnemyGenerator>();
}
///
/// 开始关卡
///
public IEnumerator LevelStart()
{
for (int i = 0; i < _levelConfig.RoundCount; i++)
{
StartCoroutine(RoundStart(i));
while (EnemyAliveCount > 0)
{
yield return 0;
}
yield return new WaitForSeconds(2);
}
}
///
/// 关卡暂停
/// 用于游戏暂停
///
public void LevelPause()
{
}
///
/// 解除暂停
///
public void LevelUnPause()
{
}
///
/// 完成关卡
///
public void LevelFinish()
{
}
///
/// 开始刷新一轮敌人
///
IEnumerator RoundStart(int roundIndex)
{
for (int i = 0; i < _levelConfig.EnemyConfigs[roundIndex].EnemyCount; i++)
{
_enemyGenerator.GenerateEnemy(
_levelConfig.EnemyConfigs[roundIndex],
_generatePoint,
Level.ENEMY_PREFAB_PREFIX + _levelConfig.EnemyConfigs[roundIndex].PrefabPath,
_target,
_mainCamera
);
EnemyAliveCount++;
if (i != _levelConfig.EnemyConfigs[roundIndex].EnemyCount - 1)
{
yield return new WaitForSeconds(_levelConfig.EnemyConfigs[roundIndex].GenInterval);
}
}
}
public void InitLevel(string configPath)
{
// 创建关卡配置对象
_levelConfig = new LevelConfig();
//FileStream f = File.
// 解析Excel
FileStream fs = new FileStream(Application.streamingAssetsPath + configPath, FileMode.Open, FileAccess.Read);
// 创建Excel读取类
//IExcelDataReader excelReader = ExcelReaderFactory.CreateOpenXmlReader(fs);
IExcelDataReader excelReader = ExcelReaderFactory.CreateOpenXmlReader(fs);
// 读取
int index = 0;
// 移动到第四行
for (; index < 4; index++)
{
excelReader.Read();
}
_levelConfig.LevelCode = excelReader.GetString(1);
_levelConfig.RoundCount = excelReader.GetInt32(2);
// 跳过空白行和标题行
excelReader.Read();
excelReader.Read();
_levelConfig.EnemyConfigs = new List<EnemyConfig>();
for (; index <= 4 + _levelConfig.RoundCount; index++)
{
excelReader.Read();
EnemyConfig emConfig = new EnemyConfig();
emConfig.RoundCount = excelReader.GetInt32(1);
emConfig.PrefabPath = excelReader.GetString(2);
emConfig.EnemyCount = excelReader.GetInt32(3);
emConfig.GenInterval = excelReader.GetFloat(4);
emConfig.EnemyHP = excelReader.GetFloat(5);
emConfig.EnemyAttack = excelReader.GetFloat(6);
emConfig.EnemySpeed = excelReader.GetFloat(7);
_levelConfig.EnemyConfigs.Add(emConfig);
}
}
}
}
GameMain 代码如下:
using TDGameDemo.GameLevel;
using UnityEngine;
namespace TDGameDemo.Game
{
///
/// 游戏主程序
/// 加载关卡、游戏的开始、暂停、通关、失败
///
public class GameMain : MonoBehaviour
{
private LevelManager _levelManager;
void Start()
{
_levelManager = GetComponent<LevelManager>();
_levelManager.InitLevel("/Configs/LevelConfig/Level_1001.xlsx");
}
public void GameStart()
{
StartCoroutine(_levelManager.LevelStart());
}
// Update is called once per frame
void Update()
{
//按 B 键开始游戏
if (Input.GetKeyDown(KeyCode.B))
{
GameStart();
}
}
}
}
上面两个脚本将关卡的基本环节定义出来(如:关卡开始、暂停、结束等),并使用协程的方式生成了敌人。
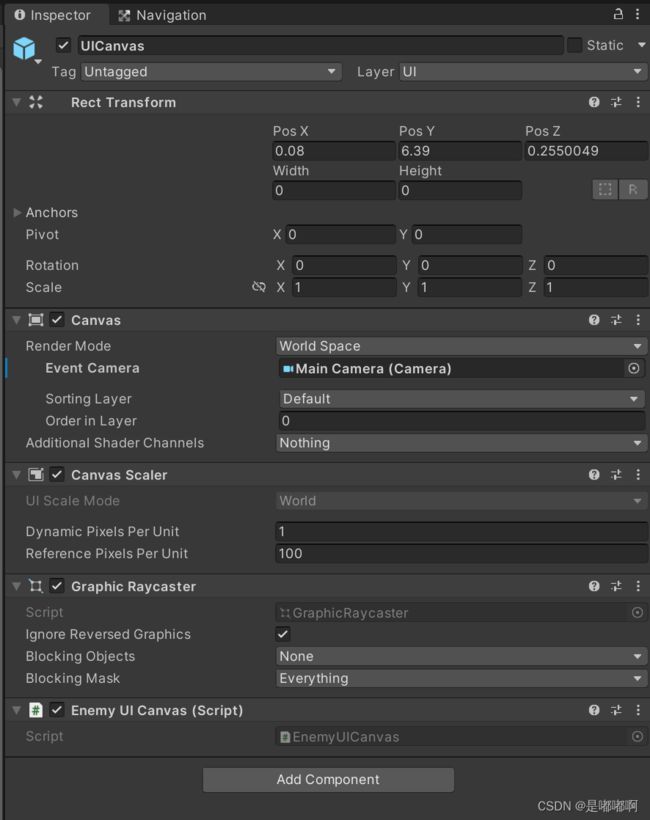
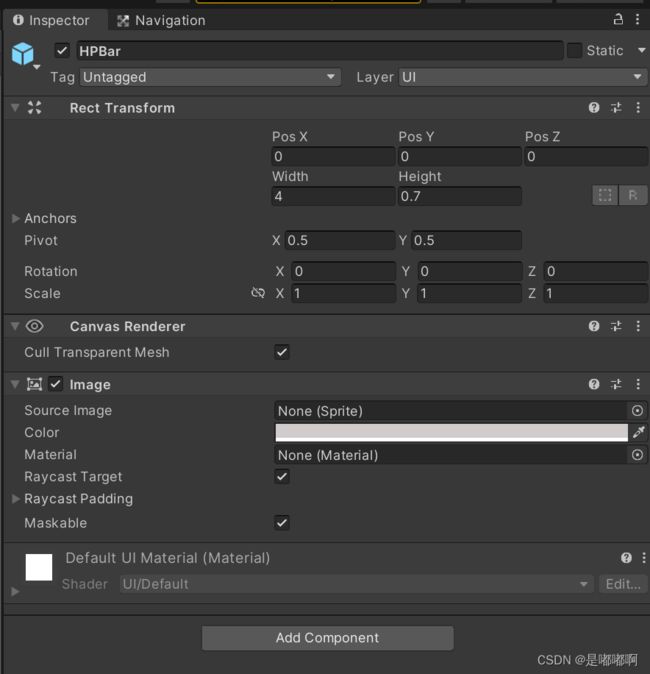
在敌人的预制件下面建立一个画布,用于显示敌人的血量以及伤害数值等。
HPOffset 设置:
UIElements 是一个空节点,暂时不做处理,后续将用于展现防御塔造成的伤害等。
EnemyUICanvas 代码:
using System.Collections;
using System.Collections.Generic;
using UnityEngine;
public class EnemyUICanvas : MonoBehaviour
{
private Transform mainCamera;
public Transform MainCamera { get => mainCamera; set => mainCamera = value; }
void Start()
{
}
void Update()
{
// 使画布一直面向镜头方向
// 注:由于是正交镜头,所以此处所说的镜头方向并不是直接LookAt镜头物体,而是根据镜头的俯仰角度动态改变朝向
Quaternion q = MainCamera.rotation;
float siny_cosp = 2 * (q.w * q.x + q.z * q.y);
float cosy_cosp = 1 - 2 * (q.y * q.y + q.x * q.x);
float radian = Mathf.Atan2(siny_cosp, cosy_cosp); //求出弧度
transform.LookAt(new Vector3(transform.position.x, transform.position.y + 10f, transform.position.z - (10f / Mathf.Tan(radian))));
}
}
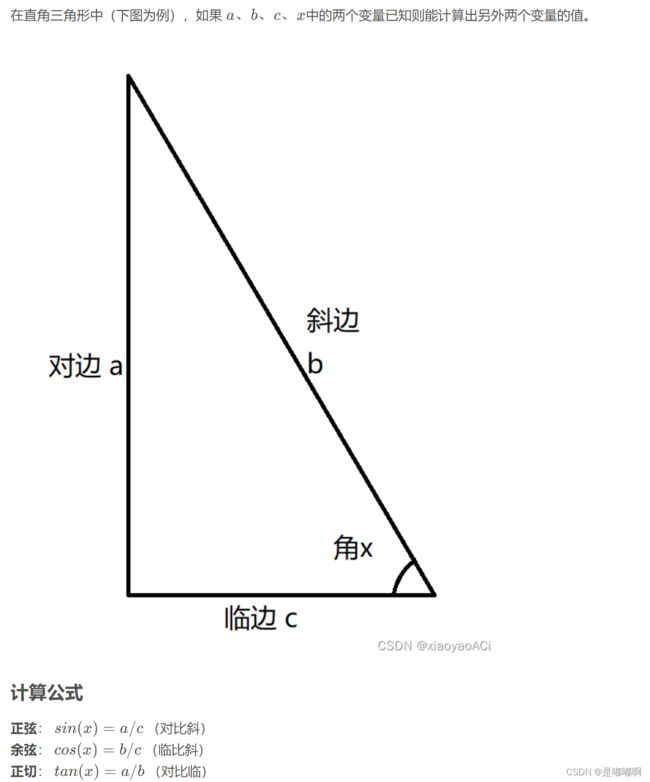
由于是正交镜头,所以此处画布朝向不是直接指向镜头位置的,而是要根据镜头俯仰角度做运算,找到相应的点位,然后LookAt这个点位,如下图:我们已知镜头的俯视角为 x ,再设 a 边为 10 ,计算 c 边,进而得到 p 点的位置,最后使画布朝向 p 点。
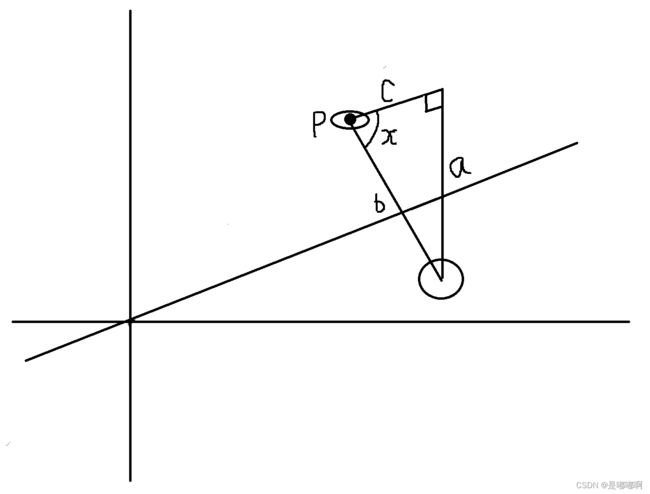
计算方式是使用 tan(x) = a / b 的公式通过对边 a 算出临边 b 。如下图:
以上方法能够使节点正对相机正交视角,但是有时候我们需要背对相机视角,此时可以将最后一行 LookAt 代码改为:
transform.LookAt(new Vector3(transform.position.x, -transform.position.y - 10f, transform.position.z + (10f / Mathf.Tan(radian))));
关于几何计算的详细内容可以参见我的另一篇文章:【Unity】Unity 几何知识、弧度、三角函数、向量运算、点乘、叉乘
这其中还涉及到一个四元数到轴角的转换计算,详细内容可以参考:【Unity】Unity 欧拉角、四元数、万向节死锁、四元数转轴角
演示视频:Unity制作炮台防守游戏
Unity制作炮台防守游戏
更多内容请查看总目录【Unity】Unity学习笔记目录整理