OpenCV(八)人脸关键点检测与疲劳检测
一、人脸的关键点检测
1、任务
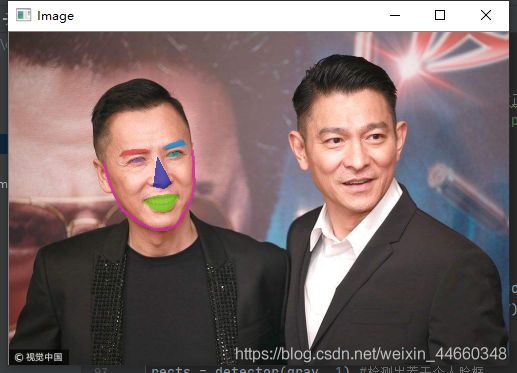
将图片中的人脸识别出来,并且识别出这张人脸中的关键点。
原始图片

提取出人脸


画出人脸关键点的位置


2、大致步骤
- 设置参数,有图片、人脸关键点检测器的位置
- 构造有序的字典,用于标记不同脸部部位对应的序号
- 设置人脸检测与人脸关键点检测的检测器
- 检测出n个人脸
- 遍历检测出的每一张人脸,检测人脸的关键点信息
- 检测出人脸关键点的信息不是坐标点的形式,将之转换为坐标点的array形式
- 在人脸上勾勒出每一个关键点的位置,获得每一个关键点的位置信息
- 利用cv2.convexHull获得凸包,填充颜色,在图片中可视化结果
3、代码
#导入工具包
from collections import OrderedDict
import numpy as np
import argparse
import dlib
import cv2

#https://ibug.doc.ic.ac.uk/resources/facial-point-annotations/
#http://dlib.net/files/
'''
1 先找到人脸的位置
2 找到五个关键点相对于人脸框的位置
'''
# 参数
ap = argparse.ArgumentParser()
ap.add_argument("-p", "--shape-predictor", required=True,
	help="path to facial landmark predictor")
ap.add_argument("-i", "--image", required=True,
	help="path to input image")
args = vars(ap.parse_args())

FACIAL_LANDMARKS_68_IDXS = OrderedDict([
	("mouth", (48, 68)),
	("right_eyebrow", (17, 22)),
	("left_eyebrow", (22, 27)),
	("right_eye", (36, 42)),
	("left_eye", (42, 48)),
	("nose", (27, 36)),
	("jaw", (0, 17))
])


FACIAL_LANDMARKS_5_IDXS = OrderedDict([
	("right_eye", (2, 3)),
	("left_eye", (0, 1)),
	("nose", (4))
])

def shape_to_np(shape, dtype="int"): #将shape转换为坐标点的形式
	# 创建68*2
	coords = np.zeros((shape.num_parts, 2), dtype=dtype)
	# 遍历每一个关键点
	# 得到坐标
	for i in range(0, shape.num_parts):
		coords[i] = (shape.part(i).x, shape.part(i).y)
	return coords

def visualize_facial_landmarks(image, shape, colors=None, alpha=0.75):
	# 创建两个copy
	# overlay and one for the final output image
	# 对于每一个区域用颜色填充起来
	overlay = image.copy()
	output = image.copy()
	# 设置一些颜色区域
	if colors is None: #对于每一个区域填充的颜色是不同的
		colors = [(19, 199, 109), (79, 76, 240), (230, 159, 23),
			(168, 100, 168), (158, 163, 32),
			(163, 38, 32), (180, 42, 220)]
	# 遍历每一个区域
	for (i, name) in enumerate(FACIAL_LANDMARKS_68_IDXS.keys()):
		# 得到每一个点的坐标
		(j, k) = FACIAL_LANDMARKS_68_IDXS[name]
		pts = shape[j:k]
		# 检查位置
		if name == "jaw":
			# 用线条连起来
			for l in range(1, len(pts)):
				ptA = tuple(pts[l - 1])
				ptB = tuple(pts[l])
				cv2.line(overlay, ptA, ptB, colors[i], 2)
		# 计算凸包
		else:
			hull = cv2.convexHull(pts)
			cv2.drawContours(overlay, [hull], -1, colors[i], -1)
	# 叠加在原图上,可以指定比例alpha
	cv2.addWeighted(overlay, alpha, output, 1 - alpha, 0, output)#最后两个参数:0代表不调节亮度,output代表输出的图像
	return output

# 加载人脸检测与关键点定位,实例化方法
detector = dlib.get_frontal_face_detector() #正面的人脸检测
predictor = dlib.shape_predictor(args["shape_predictor"]) #检测关键点

# 读取输入数据,预处理
image = cv2.imread(args["image"])
(h, w) = image.shape[:2]
width=500
r = width / float(w)
dim = (width, int(h * r))
image = cv2.resize(image, dim, interpolation=cv2.INTER_AREA)
gray = cv2.cvtColor(image, cv2.COLOR_BGR2GRAY)

# 人脸检测
rects = detector(gray, 1) #检测出若干个人脸框

# 遍历检测到的框
for (i, rect) in enumerate(rects):
	# 对人脸框进行关键点定位
	# 转换成ndarray
	shape = predictor(gray, rect)#shape就是人脸中各个关键点的坐标
	shape = shape_to_np(shape)#因为shape并不是实际的坐标值,需要通过转换变为关键点实际的坐标值(68组坐标)

	# 遍历每一个部分
	for (name, (i, j)) in FACIAL_LANDMARKS_68_IDXS.items():
		clone = image.copy() #name是该关键点的名字,i与j代表了这个关键点的位置,比如说(48,68)代表mouth
		cv2.putText(clone, name, (10, 30), cv2.FONT_HERSHEY_SIMPLEX,
			0.7, (0, 0, 255), 2)

		# 根据位置画点,取出(i,j)之间所有的点,在图上勾勒出来
		for (x, y) in shape[i:j]:
			cv2.circle(clone, (x, y), 3, (0, 0, 255), -1)#这里最后一个参数代表圆形轮廓的粗细,如果是负值就是绘制实心圆

		# 提取ROI区域,这就是我们当前需要处理的人脸的关键部位
		(x, y, w, h) = cv2.boundingRect(np.array([shape[i:j]]))#拿出当前人脸中某一个关键位置的坐标

		roi = image[y:y + h, x:x + w]
		(h, w) = roi.shape[:2]
		width=250 #放大
		r = width / float(w)
		dim = (width, int(h * r))
		roi = cv2.resize(roi, dim, interpolation=cv2.INTER_AREA)

		# 显示每一部分
		cv2.imshow("ROI", roi)
		cv2.imshow("Image", clone)
		cv2.waitKey(0)

	# 展示所有区域
	output = visualize_facial_landmarks(image, shape)
	cv2.imshow("Image", output)
	cv2.waitKey(0)
二、基于眨眼的疲劳检测
1、 目标
给定一段视频,检测出其中的人脸,判断眨眼的次数,判断这个人是否是疲劳状态。
2、大致思想
根据Real-Time Eye Blink Detection using Facial Landmarks这篇论文,人脸关键点检测中人眼共有6个关键点,睁眼时与闭眼时的关键点状态如下图:

这篇论文提出了这个公式:

通过这个公式(欧氏距离),我们可以得到某一帧中眼睛是睁开还是闭着的状态。计算左眼和右眼的平均EAR值,若EAR值小于某一阈值,则表明了这个人在某一帧中是睁眼还是闭眼的状态。设定阈值n,连续n帧中若眼睛都是闭着的状态,那么代表这个人眨了一次眼。
3、步骤
- 设定参数,包括人脸关键点检测器,所需输入视频。
- 设定阈值EYE_AR_THRESH与EYE_AR_CONSEC_FRAMES前者为睁眼/闭眼阈值,后者表示连续多少帧为闭眼状态判断为一次眨眼。
- 读取输入数据,进行预处理。
- 检测出人脸中的左右眼。
- 通过左右眼的EAR值,与阈值EYE_AR_THRESH比较,判断是否为闭眼状态。
- 闭眼的帧数与EYE_AR_CONSEC_FRAMES比较,判断是否为眨了一次眼。
- 统计眨眼次数,可视化结果。
4、代码
#导入工具包
from scipy.spatial import distance as dist
from collections import OrderedDict
import numpy as np
import argparse
import time
import dlib
import cv2

FACIAL_LANDMARKS_68_IDXS = OrderedDict([
	("mouth", (48, 68)),
	("right_eyebrow", (17, 22)),
	("left_eyebrow", (22, 27)),
	("right_eye", (36, 42)),
	("left_eye", (42, 48)),
	("nose", (27, 36)),
	("jaw", (0, 17))
])

# http://vision.fe.uni-lj.si/cvww2016/proceedings/papers/05.pdf
def eye_aspect_ratio(eye):
	# 计算距离,竖直的
	A = dist.euclidean(eye[1], eye[5])
	B = dist.euclidean(eye[2], eye[4])
	# 计算距离,水平的
	C = dist.euclidean(eye[0], eye[3])
	# ear值
	ear = (A + B) / (2.0 * C)
	return ear

# 输入参数
ap = argparse.ArgumentParser()
ap.add_argument("-p", "--shape-predictor", required=True,
	help="path to facial landmark predictor")
ap.add_argument("-v", "--video", type=str, default="",
	help="path to input video file")
args = vars(ap.parse_args())

# 设置判断参数
EYE_AR_THRESH = 0.3 #小于0.3为闭眼
EYE_AR_CONSEC_FRAMES = 3 #闭眼持续多少帧判断是一次眨眼

# 初始化计数器
COUNTER = 0 #EAR值小于0.3的帧数,若大于3,则为一次眨眼
TOTAL = 0 #眨眼次数

# 检测与定位工具
print("[INFO] loading facial landmark predictor...")
detector = dlib.get_frontal_face_detector()
predictor = dlib.shape_predictor(args["shape_predictor"])

# 分别取两个眼睛区域
(lStart, lEnd) = FACIAL_LANDMARKS_68_IDXS["left_eye"]
(rStart, rEnd) = FACIAL_LANDMARKS_68_IDXS["right_eye"]

# 读取视频
print("[INFO] starting video stream thread...")
vs = cv2.VideoCapture(args["video"])
#vs = FileVideoStream(args["video"]).start()
time.sleep(1.0)

def shape_to_np(shape, dtype="int"):
	# 创建68*2
	coords = np.zeros((shape.num_parts, 2), dtype=dtype)
	# 遍历每一个关键点
	# 得到坐标
	for i in range(0, shape.num_parts):
		coords[i] = (shape.part(i).x, shape.part(i).y)
	return coords

# 遍历每一帧
while True:
	# 预处理
	frame = vs.read()[1]
	if frame is None:
		break

	(h, w) = frame.shape[:2]
	width=1200
	r = width / float(w)
	dim = (width, int(h * r))
	frame = cv2.resize(frame, dim, interpolation=cv2.INTER_AREA)
	gray = cv2.cvtColor(frame, cv2.COLOR_BGR2GRAY)

	# 检测人脸
	rects = detector(gray, 0)

	# 遍历每一个检测到的人脸
	for rect in rects:
		# 获取坐标
		shape = predictor(gray, rect)
		shape = shape_to_np(shape)

		# 分别计算ear值
		leftEye = shape[lStart:lEnd]
		rightEye = shape[rStart:rEnd]
		leftEAR = eye_aspect_ratio(leftEye)
		rightEAR = eye_aspect_ratio(rightEye)

		# 算一个平均的
		ear = (leftEAR + rightEAR) / 2.0

		# 绘制眼睛区域
		leftEyeHull = cv2.convexHull(leftEye)
		rightEyeHull = cv2.convexHull(rightEye)
		cv2.drawContours(frame, [leftEyeHull], -1, (0, 255, 0), 1)
		cv2.drawContours(frame, [rightEyeHull], -1, (0, 255, 0), 1)

		# 检查是否满足阈值
		if ear < EYE_AR_THRESH:
			COUNTER += 1

		else:
			# 如果连续几帧都是闭眼的,总数算一次
			if COUNTER >= EYE_AR_CONSEC_FRAMES:
				TOTAL += 1

			# 重置
			COUNTER = 0

		# 显示
		cv2.putText(frame, "Blinks: {}".format(TOTAL), (10, 30),
			cv2.FONT_HERSHEY_SIMPLEX, 0.7, (0, 0, 255), 2)
		cv2.putText(frame, "EAR: {:.2f}".format(ear), (300, 30),
			cv2.FONT_HERSHEY_SIMPLEX, 0.7, (0, 0, 255), 2)

	cv2.imshow("Frame", frame)
	key = cv2.waitKey(10) & 0xFF

	if key == 27:
		break

vs.release()
cv2.destroyAllWindows()
