【微信开发第一章】SpringBoot实现微信公众号创建菜单,同步菜单功能
前言
在进行微信公众号业务开发的时候,微信公众号的自定义菜单是非常重要的一环,该篇文章会先使用微信测试工具过一遍流程,再使用代码进行实现,争取看过的小伙伴都能够实现,创建公众号菜单和代码同步公众号菜单功能。本文章在每一步都有记录,力争理解的同时各位小伙伴也能够实现功能。
说明:因为开通微信服务号是需要营业执照和300元的,而个人号有些功能又没有,所以是比较不方便的,但是微信官方很贴心的为我们准备了测试公众号,所以我们在测试开发阶段均可以使用测试公众号来调试。
文章目录
- 前言
- 1、通过微信测试工具实现创建菜单
- 2、通过Java代码实现同步微信公众号菜单
- 总结
1、通过微信测试工具实现创建菜单
1、访问微信测试公众号地址:https://mp.weixin.qq.com/debug/cgi-bin/sandboxinfo?action=showinfo&t=sandbox/index
2、用微信扫码登录
3、在这里我们可以看到我们的测试号的APPId和和密钥(这个很重要)

相信对接过第三方接口的小伙伴并不陌生,几乎所有的第三方接口都有自己的ID和密钥。
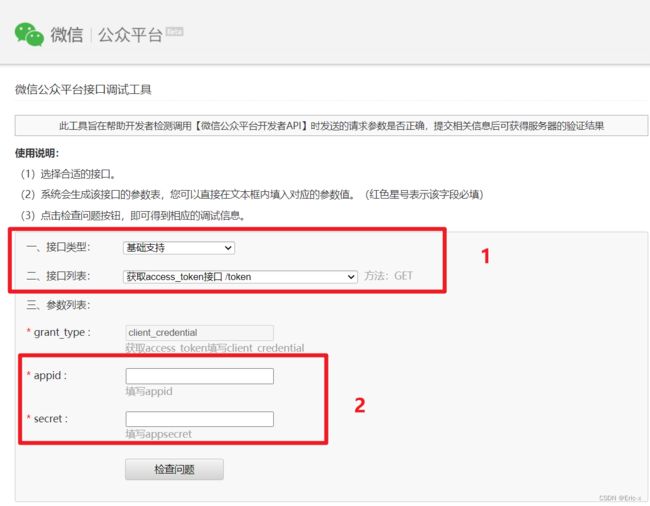
4、使用微信公众号接口测试工具:https://mp.weixin.qq.com/debug/

第一步:使用appId和密钥获取:access_token,然后复制保存下来,这一步很关键

第二步:使用刚刚的accessToken请求创建菜单的接口
{
    "button": [
        {
            "type": "view",
            "name": "公司简介",
            "url": "http://kaifa.yuantiaokj.com/static/comProfile/"
        },
        {
            "name": "水务办理",
            "sub_button": [
                {
                    "type": "view",
                    "name": "业务申报",
                    "url": "http://kaifa.xxx.com/static/wentifankui?activeIndex=0"
                },
                {
                    "type": "view",
                    "name": "通知公告",
                    "url": "http://kaifa.xxx.com/static/gonggao"
                }
            ]
        },
        {
            "name": "在线缴费",
            "sub_button": [
                {
                    "type": "view",
                    "name": "在线缴费",
                    "url": "http://kaifa.xxxx.com/static?companyId=2"
                },
                {
                    "type": "view",
                    "name": "缴费指南",
                    "url": "http://kaifa.xxxx.com/static/jiaofeizhinan?activeIndex=0"
                }
            ]
        }
    ]
}
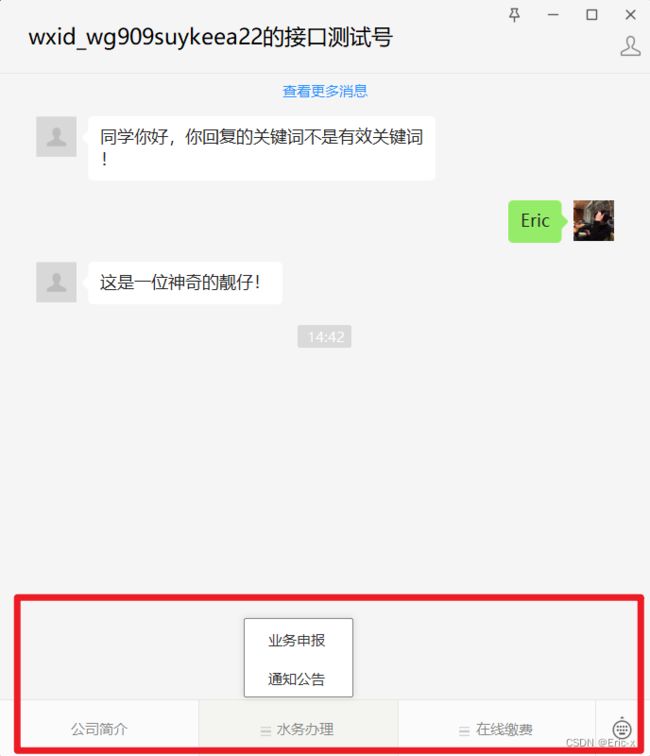
此时菜单创建成功,我们可以使用微信关注自己的测试公众号,还是在微信测试公众号这个链接:https://mp.weixin.qq.com/debug/cgi-bin/sandboxinfo?action=showinfo&t=sandbox/index

用PC端或者手机端查看,发现菜单创建成功啦~

2、通过Java代码实现同步微信公众号菜单
1、引入依赖
    <dependencies>
        <dependency>
            <groupId>com.github.binarywang</groupId>
            <artifactId>weixin-java-mp</artifactId>
            <version>4.1.0</version>
        </dependency>
    </dependencies>
2、在配置文件中配置微信测试公众号的appId和密钥
#自己测试账号的AppID、密钥,可以用来接受消息
wechat.mpAppId: wxe789s8175911
wechat.mpAppSecret: c2c4f54qdcod665852w6270d
3、创建微信配置类
@Component
public class WeChatMpConfig {

    @Autowired
    private ConstantPropertiesUtil constantPropertiesUtil;

    @Bean
    public WxMpService wxMpService(){
        WxMpService wxMpService = new WxMpServiceImpl();
        wxMpService.setWxMpConfigStorage(wxMpConfigStorage());
        return wxMpService;
    }
    @Bean
    public WxMpConfigStorage wxMpConfigStorage(){
        WxMpDefaultConfigImpl wxMpConfigStorage = new WxMpDefaultConfigImpl();
        wxMpConfigStorage.setAppId(ConstantPropertiesUtil.ACCESS_KEY_ID);
        wxMpConfigStorage.setSecret(ConstantPropertiesUtil.ACCESS_KEY_SECRET);
        return wxMpConfigStorage;
    }
}
4、编写Service接口
public interface MenuService extends IService<Menu> {
    //同步微信公众号单
    void syncMenu();
}
5、编写ServiceImpl实现类
    @Autowired
    private WxMpService wxMpService;

    @Override
    public void syncMenu() {
        List<MenuVo> menuVoList = this.findMenuInfo();
        //菜单
        JSONArray buttonList = new JSONArray();
        for(MenuVo oneMenuVo : menuVoList) {
            JSONObject one = new JSONObject();
            one.put("name", oneMenuVo.getName());
            JSONArray subButton = new JSONArray();
            for(MenuVo twoMenuVo : oneMenuVo.getChildren()) {
                JSONObject view = new JSONObject();
                view.put("type", twoMenuVo.getType());
                if(twoMenuVo.getType().equals("view")) {
                    view.put("name", twoMenuVo.getName());
                    view.put("url", "http://ggkt2.vipgz1.91tunnel.com/#"
                            +twoMenuVo.getUrl());
                } else {
                    view.put("name", twoMenuVo.getName());
                    view.put("key", twoMenuVo.getMeunKey());
                }
                subButton.add(view);
            }
            one.put("sub_button", subButton);
            buttonList.add(one);
        }
        //菜单
        JSONObject button = new JSONObject();
        button.put("button", buttonList);
        this.wxMpService.getMenuService().menuCreate(button.toJSONString());
    }
6、Controller实现
@ApiOperation(value = "同步菜单")
@GetMapping("syncMenu")
public Result createMenu() throws WxErrorException {
    menuService.syncMenu();
    return Result.ok(null);
}
7、测试,因为我们使用的是get请求,所以可以直接使用浏览器访问接口测试:localhost:8080/api/wechat/menu/syncMenu
总结
怎么样,先用测试工具走一遍流程,再使用代码实现功能,看完是不是觉得特别简单呢~
【微信开发第一章】SpringBoot实现微信公众号创建菜单,同步菜单功能:https://blog.csdn.net/weixin_47316183/article/details/127821095?spm=1001.2014.3001.5502
【微信开发第二章】SpringBoot实现微信公众号普通消息和模板消息回复:https://blog.csdn.net/weixin_47316183/article/details/127821653?spm=1001.2014.3001.5502
