[Xamarin.Android] 如何使用Google Map V2 (转帖)
Google Map v1已經在2013年的3月開始停止支援了,目前若要在你的Android手機上使用到Google Map,就必須要使用
到Google Map v2的版本.在Xamarin要使用Google Map v2之前,必需要做的動作有下列幾項:
1. 從你電腦裡的keystore裡面查詢個人的指紋憑證(SHA1)。
2. 用SHA1指紋憑證到Google APIs網站申請key。
3. 在Xamarin裡的Android SDK Manager去安裝Google Play services。
5. 在Xamarin.Android專案中加入Google Play Services component。
(原生的Android專案必須在這一步驟加入google-play-services_lib的Library。)
6. 新建一個專案並且在AndroidManifest加入相關的權限設定。
7. 在layout 畫面的Main.axml 中加入地圖控制項。
總結上述的步驟,在Android裡面要使用Map這樣的功能時,並不像IOS一樣,只要拖拉一個MapView到你的Layout View
就可以.所需要的步驟比較繁瑣.這些步驟又可以被我們分為兩大部份.要使用Google Map在你的裝置上,
1. 首先你要先上Google APIs網站上去開啓與Google Map相關的服務.
2. 接著才到Xamarin.Android專案中進行所有需要的設定修改.
接下來我們就開始如何在Xamarin.Android專案裡使用Google map的相關設定:
1. 取得你的SHA1指紋憑證
1.1在Xamarin環境中,當我們裝好Xamarin.android後,我們要在底下的路徑去取得你的SHA1指紋憑證.
指紋憑證被放置在debug.keystore裡面,在Windows與OSX的存放路徑不一樣,請參考下列路徑:
Windows - C:\Users\[USERNAME]\AppData\Local\Xamarin\Mono for Android\debug.keystore
OSX - /Users/[USERNAME]/.local/share/Xamarin/Mono for Android/debug.keystore
1.2 開啓終端機視窗,你可以直接輸入底下指令來取得你的SHA1指紋憑證.
在[USERNAME]的部分必須要改成你的使用者名稱.
keytool -list -v -keystore /Users/[USERNAME]/.local/share/
Xamarin/Mono\ for\ Android/
debug.keystore -alias androiddebugkey -storepass android -keypass android
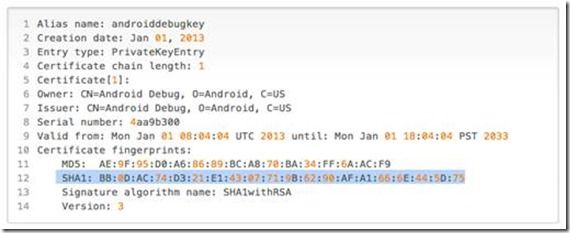
指令執行成功後可以看到如下圖的資訊,其中SHA1演算法後面有一串16進位的數值.
這就你個人的指紋憑證.這部分是
我們稍後在Google APIs網站上建立API Key會需要用到.
2. 建立你的Google API Project
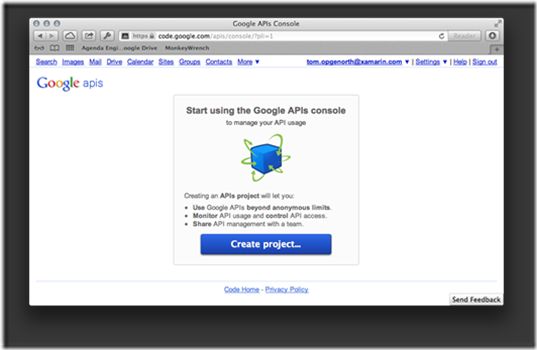
2.1 前往Google APIS網站去建立你的Google API( https://code.google.com/apis/console/ )
按下畫面中的Create Project 按鈕來建立一個Google API Project
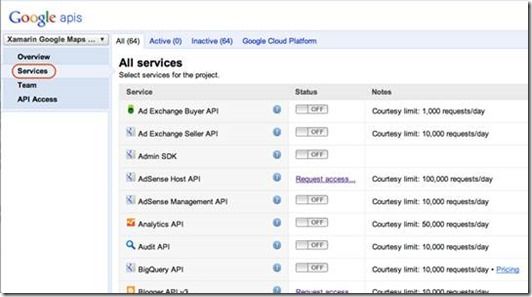
2.2 建立好Google Project後,按下左邊的Service的標籤,
接著在網頁中間會秀出所有的Service.
2.3 拖動下拉Bar,找到Google Map Android API v2 的Service,
把這個Service的Switch控制項打開成ON.請參考下圖:
到這邊,我們就建立好Google project 與 Google Map Android API v2 服務.接下來我們來看看要
如何建立一個API鑰匙,
這個鑰匙是當Xamarin.Anaroid要去取用Google Service API時要被用來驗證的Key.
3. 建立你的API鑰匙
接下來這個步驟我們要建立Xamarin.Anaroid要去取用Google Service API時要被用來驗證的Key.
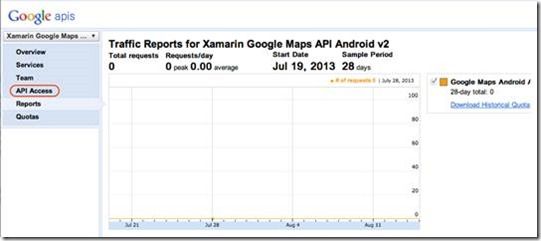
3.1 按下左邊API Access的標籤.
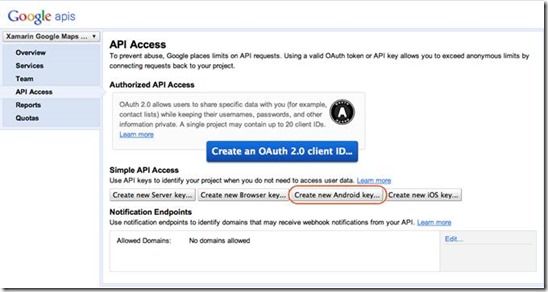
3.2 再接下來的畫面中點選Create new Android Key來建立相對應的鑰匙
3.3 在建立鑰匙的時候會需要剛剛在debug.keystore 裡面的SHA1演算法指紋憑證.
3.4 從電腦中複製你的SHA1演算法,貼到Configure Android Key for Xamarin Google Map API Android v2
視窗裡面.在你的SHA1指紋憑證後打上一個分號「;」接著輸入你應用程式的package name.
新增完成後按下確定.
註:你的應用程式package name 是來自你在建立Android時,在AndroidManifest.xml檔案裡面所輸入的
package name.這部分兩邊的設定若是不一樣,或導致你的地圖無法顯示.
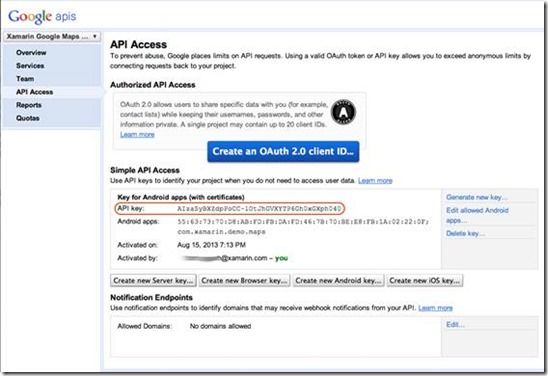
3.5 這時可以看到被我們新增出來的Android API Key.
到目前為止在Google APIs上的設定已經完成,接下來的就是要
到Xamarin裡頭去建立使用Google map的Android App.
4. 建立使用Google Map 的Android Application
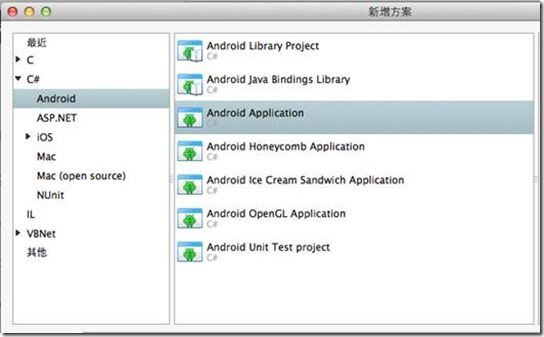
4.1 開啓Xamarin,建立一個Android Application方案.
4.2 開啓Android SDK Manager 下載安裝Google play Service.
4.3 Binding Google Play Services
安裝好Google Play Services後,接下來要在Xamarin.Android專案裡面Binding Java binding library.
這邊有兩個方式來綁定.
1. 使用 Google Play Services component
2. 手動bind the Google Play Services client library,這個方法比較類似在eclipse中
開發使用Google Map的方式.
Google Play Services component是Xamarin幫我們簡化的Binding Java binding library所需要做的步驟,只要
引用這個元件,就可以很輕鬆的Binding Java binding library.所以在這部分我們選擇使用Google Play
Services component.
4.4 新增Google Play Services 元件
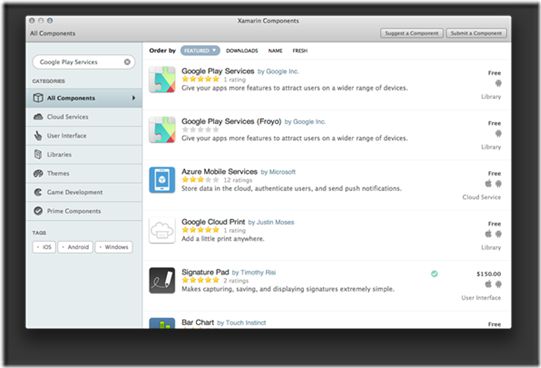
展開你的Android Map專案,在Components資料夾按下滑鼠右鍵,在彈出的視窗上點選 Get More Components…
4.5 搜尋並下載安裝Google Play Services.
5. 設定Android Application專案
5.1 修改AndroidManifest.xml檔案需要的權限
開啓專案中的AndroidManifest.xml檔案,新增下方的Xaml檔案權限.
在<uses-permission android:name="<PACKAGE NAME>.permission.MAPS_RECEIVE" />與
<permission android:name="<PACKAGE NAME>.permission.MAPS_RECEIVE" android:protectionLevel="signature" />
這兩個地方要將package name修改成你的Package name.
5.2 接著修改在<meta-data android:name="com.google.android.maps.v2.API_KEY" android:value="YOUR_API_KEY" />標籤裡面Key值.
這個Key是剛剛在Google APIs裡面建立的API Key.
完整的修改請參照下方Xml檔案:
<?xml version="1.0" encoding="utf-8"?>
<manifest xmlns:android="http://schemas.android.com/apk/res/android" android:versionName="4.5" package="com.xamarin.docs.android.mapsandlocationdemo2" android:versionCode="6">
<uses-sdk android:minSdkVersion="14" android:targetSdkVersion="17" />
<!-- Google Maps for Android v2 requires OpenGL ES v2 -->
<uses-feature android:glEsVersion="0x00020000" android:required="true" />
<!-- We need to be able to download map tiles and access Google Play Services-->
<uses-permission android:name="android.permission.INTERNET" />
<!-- Allow the application to access Google web-based services. -->
<uses-permission android:name="com.google.android.providers.gsf.permission.READ_GSERVICES" />
<!-- Google Maps for Android v2 will cache map tiles on external storage -->
<uses-permission android:name="android.permission.WRITE_EXTERNAL_STORAGE" />
<!-- Google Maps for Android v2 needs this permission so that it may check the connection
state as it must download data -->
<uses-permission android:name="android.permission.ACCESS_NETWORK_STATE" />
<!-- Permission to receive remote notifications from Google Play Services -->
<!-- Notice here that we have the package name of our application as a prefix on the permissions. -->
<uses-permission android:name="<PACKAGE NAME>.permission.MAPS_RECEIVE" />
<permission android:name="<PACKAGE NAME>.permission.MAPS_RECEIVE" android:protectionLevel="signature" />
<!-- These are optional, but recommended. They will allow Maps to use the My Location provider. -->
<uses-permission android:name="android.permission.ACCESS_COARSE_LOCATION" />
<uses-permission android:name="android.permission.ACCESS_FINE_LOCATION" />
<application android:label="@string/app_name">
<!-- Put your Google Maps V2 API Key here. -->
<meta-data android:name="com.google.android.maps.v2.API_KEY" android:value="YOUR_API_KEY" />
</application>
</manifest>
5.3 新增一個MapFragment 地圖控制項
開啓專案中Main.axml檔案,新增一個MapFragment的控制項.
<?xml version="1.0" encoding="utf-8"?>
<fragment xmlns:android="http://schemas.android.com/apk/res/android"
android:id="@+id/map"
android:layout_width="match_parent"
android:layout_height="match_parent"
class="com.google.android.gms.maps.MapFragment" />
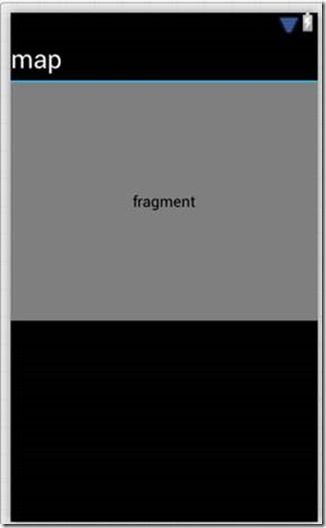
新增完成會看到底下的畫面.
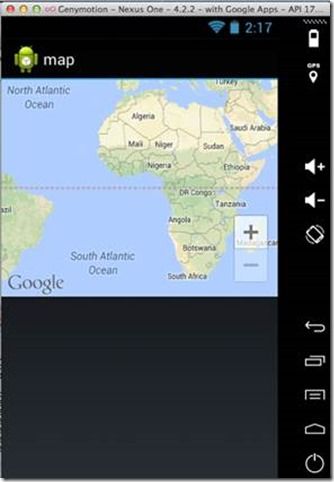
5.4 編譯執行專案,可以看到MapFragment畫面中地圖被下載回來.
註:要看到地圖被載入,你的Android模擬器必須是要有支援Google Play service的版本.
若是模擬器本身如果沒有支援Google Play service,那你的地圖會無法顯示.
