SpringCloud集成Nacos、Gateway
一、简介
1.介绍
Spring Cloud Alibaba provides a one-stop solution for distributed application development. It contains all the components required to develop distributed applications, making it easy for you to develop your applications using Spring Cloud.
With Spring Cloud Alibaba, you only need to add some annotations and a small amount of configurations to connect Spring Cloud applications to the distributed solutions of Alibaba, and build a distributed application system with Alibaba middleware.
翻译:
Spring Cloud Alibaba 提供分布式应用开发的一站式解决方案。它包含开发分布式应用程序所需的所有组件,使您可以轻松地使用 Spring Cloud 开发应用程序。
使用 Spring Cloud Alibaba,您只需添加一些注解和少量配置,即可将 Spring Cloud 应用连接到阿里巴巴的分布式解决方案,并通过阿里巴巴中间件构建分布式应用系统
2.特点
Spring Cloud Alibaba特点
- 服务降级和流量控制(Flow Control and Service Degradation),注意服务熔断也属于服务降级:由sentinel替换hystrix
- 服务注册与发现(Service Registration and discovery;服务注册中心):nacos替换eureka和consul
- 分布式配置(Distributed Configuration):nacos替换config(alibaba的统一配置中心和服务注册中心和为了一个),无需手动刷新配置,nacos可以自动完成配置刷新
- 事件驱动(Event-Driven):事件驱动利用RocketMQ替换bus
- 消息总线(Message Bus):消息总线(异步处理)
- 分布式事务(Distributed Transaction):Seata
- Dubbo RPC:集成Dubbo实现服务间通信,Dubbo RPC替换RestTemplate和OpenFeign
3.组件
- 服务注册与发现组件 eureka consul nacos
- 服务间通信组件 restTemplate+ribbon,Openfeign restTemplate+ribbon,Openfeign
- 服务降级和熔断 hystrix hystrix dashboard sentinel
- 服务网关组件 gateway gateway
- 统一配置中心组件 消息总线组件 config bus nacos
4.版本说明
SpringCloudAlibaba官网:https://spring.io/projects/spring-cloud-alibaba
SpringCloudAlibaba Git地址:https://github.com/alibaba/spring-cloud-alibaba
4.1 组件的版本关系:
每个 Spring Cloud Alibaba 版本及其自身所适配的各组件对应版本(经过验证,自行搭配各组件版本不保证可用)如下表所示(最新版本用*标记):
| Spring Cloud Alibaba Version | Sentinel Version | Nacos Version | RocketMQ Version | Dubbo Version | Seata Version |
|---|---|---|---|---|---|
| 2021.0.1.0* | 1.8.3 | 1.4.2 | 4.9.2 | 2.7.15 | 1.4.2 |
| 2.2.7.RELEASE | 1.8.1 | 2.0.3 | 4.6.1 | 2.7.13 | 1.3.0 |
| 2.2.6.RELEASE | 1.8.1 | 1.4.2 | 4.4.0 | 2.7.8 | 1.3.0 |
| 2021.1 or 2.2.5.RELEASE or 2.1.4.RELEASE or 2.0.4.RELEASE | 1.8.0 | 1.4.1 | 4.4.0 | 2.7.8 | 1.3.0 |
| 2.2.3.RELEASE or 2.1.3.RELEASE or 2.0.3.RELEASE | 1.8.0 | 1.3.3 | 4.4.0 | 2.7.8 | 1.3.0 |
| 2.2.1.RELEASE or 2.1.2.RELEASE or 2.0.2.RELEASE | 1.7.1 | 1.2.1 | 4.4.0 | 2.7.6 | 1.2.0 |
| 2.2.0.RELEASE | 1.7.1 | 1.1.4 | 4.4.0 | 2.7.4.1 | 1.0.0 |
| 2.1.1.RELEASE or 2.0.1.RELEASE or 1.5.1.RELEASE | 1.7.0 | 1.1.4 | 4.4.0 | 2.7.3 | 0.9.0 |
| 2.1.0.RELEASE or 2.0.0.RELEASE or 1.5.0.RELEASE | 1.6.3 | 1.1.1 | 4.4.0 | 2.7.3 | 0.7.1 |
4.2 版本控制关系(推荐使用)
下表为按时间顺序发布的 Spring Cloud Alibaba 以及对应的适配 Spring Cloud 和 Spring Boot 版本关系(由于 Spring Cloud 版本命名有调整,所以对应的 Spring Cloud Alibaba 版本号也做了对应变化)
| Spring Cloud Alibaba Version | Spring Cloud Version | Spring Boot Version |
|---|---|---|
| 2021.0.1.0 | Spring Cloud 2021.0.1 | 2.6.3 |
| 2.2.7.RELEASE | Spring Cloud Hoxton.SR12 | 2.3.12.RELEASE |
| 2021.1 | Spring Cloud 2020.0.1 | 2.4.2 |
| 2.2.6.RELEASE | Spring Cloud Hoxton.SR9 | 2.3.2.RELEASE |
| 2.1.4.RELEASE | Spring Cloud Greenwich.SR6 | 2.1.13.RELEASE |
| 2.2.1.RELEASE | Spring Cloud Hoxton.SR3 | 2.2.5.RELEASE |
| 2.2.0.RELEASE | Spring Cloud Hoxton.RELEASE | 2.2.X.RELEASE |
| 2.1.2.RELEASE | Spring Cloud Greenwich | 2.1.X.RELEASE |
| 2.0.4.RELEASE(停止维护,建议升级) | Spring Cloud Finchley | 2.0.X.RELEASE |
| 1.5.1.RELEASE(停止维护,建议升级) | Spring Cloud Edgware | 1.5.X.RELEASEer |
二、Nacos
Nacos官网:https://nacos.io/zh-cn/docs/what-is-nacos.html
Nacos Git地址:https://github.com/alibaba/nacos/releases
1.下载与启动
1.1下载
到 https://github.com/alibaba/nacos/tags 寻找合适的版本,当前推荐的稳定版本为2.0.3(我这里下载的的是2.1.0版本)

1.2 启动服务器
- 注:Nacos的运行需要以至少2C4g60g*3的机器配置下运行。
Linux/Unix/Mac
启动命令(standalone代表着单机模式运行,非集群模式):
sh startup.sh -m standalone
如果您使用的是ubuntu系统,或者运行脚本报错提示[[符号找不到,可尝试如下运行:
bash startup.sh -m standalone
Windows
启动命令(standalone代表着单机模式运行,非集群模式):
startup.cmd -m standalone
注意:windows双击启动,由于nacos默认是使用集群环境,因此我们在**\nacos\bin目录下,打开startup,cmd文件,修改第26行
set MODE="cluster"
改成
set MODE="standalone"
然后双击startup.cmd,运行项目
在浏览器访问 http://localhost:8848/nacos,输入账号/密码:nacos/nacos进行登录。
1.3 自定义配置端口
修改**\nacos\conf\application.properties文件
server.port=9000
2.注册中心
注册中心依赖
    com.alibaba.cloud
    spring-cloud-starter-alibaba-nacos-discovery
2.1 yml指定nacos地址、服务名
spring:
  cloud:
    nacos:
      discovery:
        server-addr: 127.0.0.1:8848 #nacos地址
  application:
    name: nacos-payment-provider #服务名
#    enabled: false #不被nacos服务注册与发现
2.2 使用@EnableDiscoveryClient注解开启服务注册与发现功能
加入@EnableDiscoveryClient后启动就能注册到注册中心
@SpringBootApplication
@EnableDiscoveryClient
public class DemoApplication {

    public static void main(String[] args) {
        SpringApplication.run(DemoApplication.class, args);
    }

}
访问nacos,网址http://127.0.0.1:8848/nacos,账号密码都是nacos
查看服务是否注册进来
3.配置中心
作用:
在系统开发过程中,开发者通常会将一些需要变更的参数、变量等从代码中分离出来独立管理,以独立的配置文件的形式存在。目的是让静态的系统工件或者交付物(如 WAR,JAR 包等)更好地和实际的物理运行环境进行适配。配置管理一般包含在系统部署的过程中,由系统管理员或者运维人员完成。配置变更是调整系统运行时的行为的有效手段。
3.1导入依赖
      com.alibaba.cloud
      spring-cloud-starter-alibaba-nacos-config
3.2 新建bootstrap.yml
优先级高于application.yml
bootstrap.yml配置如下
spring:
  application:
    name: mall-product  # 服务名称
  profiles:
    active: dev  # 开发环境,加了这个 nacos配置文件名 就是 mall-product-dev.yaml
  cloud:
    nacos:
      config:
        server-addr: 127.0.0.1:8848 # nacos地址配置中心
        file-extension: yaml  #配置文件的类型,默认properties
      discovery:   #添加注册中心需添加依赖
        server-addr: 127.0.0.1:8848 # 注册中心
3.3 测试原有配置
1、application.yml配置如下:(此处可省略默认8080)
server:
  port: 8881
2、application-dev.yml配置如下:
nacosConfigTest:
  name: 测试
  value: 测试值
3、编写测试接口
/**
 * 编写测试类
 * @date 2022/6/5 22:02
 */
//@RefreshScope //动态刷新
@RestController
@RequestMapping("api")
public class TestController {

    @Value("${nacosConfigTest.name}")
    private String name;
    @Value("${nacosConfigTest.value}")
    private String value;


    @GetMapping("/configTest")
    public String configTest(){
        return "获取的值:"+name+":"+value;
    }
}
4、调用接口访问
3.4 Nacos新建配置
1、新增配置
2、添加动态配置内容
3、编写测试接口
在接口类上使用
@RefreshScope这个注解是为了热更新
/**
 * 编写测试类
 * @date 2022/6/5 22:02
 */
@RefreshScope //动态刷新
@RestController
@RequestMapping("api")
public class TestController {

    @Value("${nacosConfigTest.name}")
    private String name;
    @Value("${nacosConfigTest.value}")
    private String value;


    @GetMapping("/configTest")
    public String configTest(){
        return "获取的值:"+name+":"+value;
    }
}
热更新方式二
使用@ConfigurationProperties(更推荐用这个)
@Data  //lombok注解
@Component
@ConfigurationProperties(prefix = "nacosConfigTest")//对应yml配置中nacosConfigTest名称
public class NacosConfigurationProperties {

    private String name;//对应yml配置文件名称
    private String value;
}
4、测试动态配置
4.命名空间(配置隔离)
默认新增的所有配置都在public空间
例如我们开发时有 1、开发环境 2、部署环境 3、测试环境
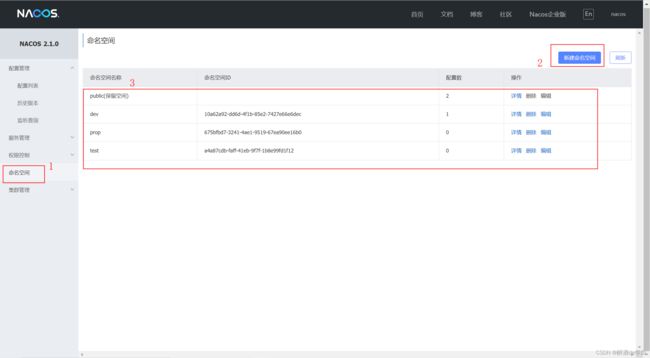
4.1 nacos新增 命名空间
4.2 dev环境下配置
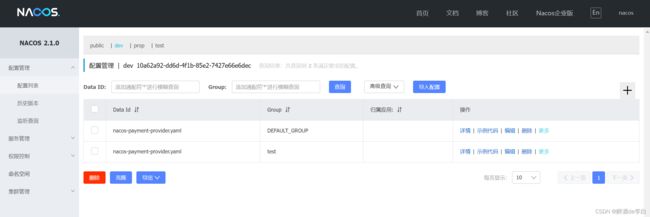
4.3 使用方式
bootstrap.yml添加namespace
spring:
  application:
    name: nacos-payment-provider
  cloud:
    nacos:
      config:
        server-addr: 127.0.0.1:8848
        file-extension: yaml #指定yml文件
        namespace: 10a62a92-dd6d-4f1b-85e2-7427e66e6dec  # 命名空间id
5.配置分配
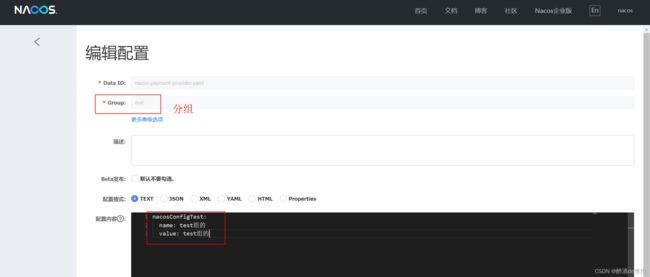
5.1 bootstrap.yml 新增指定组
spring:
  application:
    name: nacos-payment-provider
  cloud:
    nacos:
      config:
        server-addr: 127.0.0.1:8848
        file-extension: yaml #指定yml文件
        namespace: e9b627cb-44b1-480e-a46e-2ea019fe2656  # 命名空间id
        group: test  #组名
5.2 测试访问
6.使用nginx配置Nacos集群
暂未编写
二、Gateway
官方网站:https://docs.spring.io/spring-cloud-gateway/docs/current/reference/html/
1.简介
Spring Cloud Gateway 是 Spring Cloud 新推出的网关框架,之前是 Netflix Zuul。网关通常在项目中为了简化前端的调用逻辑,同时也简化内部服务之间互相调用的复杂度;具体作用就是转发服务,接收并转发所有内外部的客户端调用;其他常见的功能还有权限认证,限流控制等等。
2.依赖
     org.springframework.cloud
     spring-cloud-starter-gateway
     2.2.5.RELEASE
3.使用方式
bootsrap.yml
spring:
  application:
    name: gateway
  cloud:
    nacos:
      discovery:
        server-addr: localhost:8848
      config:
        server-addr: localhost:8848
        file-extension: yaml
applicaiton.yml
server:
  port: 80
spring:
  application:
    name: gateway
  cloud:
    gateway:
      routes:
        - id: nacos-payment-provide
         #uri: http://localhost:8001   #匹配后提供服务的路由地址
          uri: lb://nacos-payment-provide #lb代表轮询调用nacos-payment-provide
          predicates: # 路由断言,也就是判断请求是否符合路由规则的条件
            - Path=/p/** # 拦截p开头的请求转发到nacos-payment-provide
          filters:
            - StripPrefix=1 # 过滤规则
      discovery:
        locator:
          enabled: false #是否直接使用应用名称调用服务
此时就可以通过网关转发请求了!
例如访问 localhost/p/api/configTest,将会被转发到nacos-payment-provide服务下,localhost:8804/api/configTest


![[外链图片转存失败,源站可能有防盗链机制,建议将图片保存下来直接上传(img-asNOweJm-1657630903124)(C:\Users\hero\AppData\Roaming\Typora\typora-user-images\image-20220605225713086.png)]](http://img.e-com-net.com/image/info8/ee5f098ba3664b2baba34d45a463e259.jpg)


