VGG网络详解(实现猫猫和狗狗识别)
VGG
VGG在2014年由牛津大学著名研究组vGG (Visual Geometry Group)提出,斩获该年lmageNet竞赛中Localization Task (定位任务)第一名和 Classification Task (分类任务)第二名。
感受野
首先介绍一下感受野的概念。在卷积神经网络中,决定某一层输出结果中一个元素所对应的输入层的区域大小,被称作感受野(receptive field)。通俗的解释是,输出feature map上的一个单元对应输入层上的区域大小。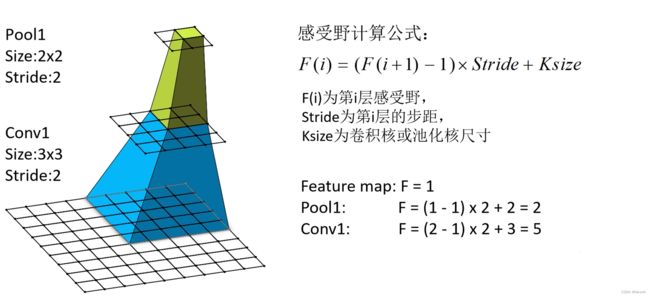
VGG亮点
通过堆叠多个3x3的卷积核来替代大尺度卷积核(减少所需参数)。论文中提到,可以通过堆叠两个3x3的卷积核替代5x5的卷积核,堆叠三个3x3的卷积核替代7x7的卷积核,是因为他们具有相同的感受野。
我们来计算一下使用7x7卷积核所需参数和堆叠三个3x3卷积核所需参数。假设输入输出channel为C, 7x7卷积核所需参数为7x7xC2,一个3x3卷积核所需参数为3x3xC2,三个就是3x3x3xC2。差不多减少了一半的参数0.0。
VGG结构
VGGNet模型有A-E五种结构网络,深度分别为11,11,13,16,19。其中较为典型的网络结构主要有vgg16和vgg19,本篇文章主要讲VGG16,并分享VGG16的Pytorch实现。
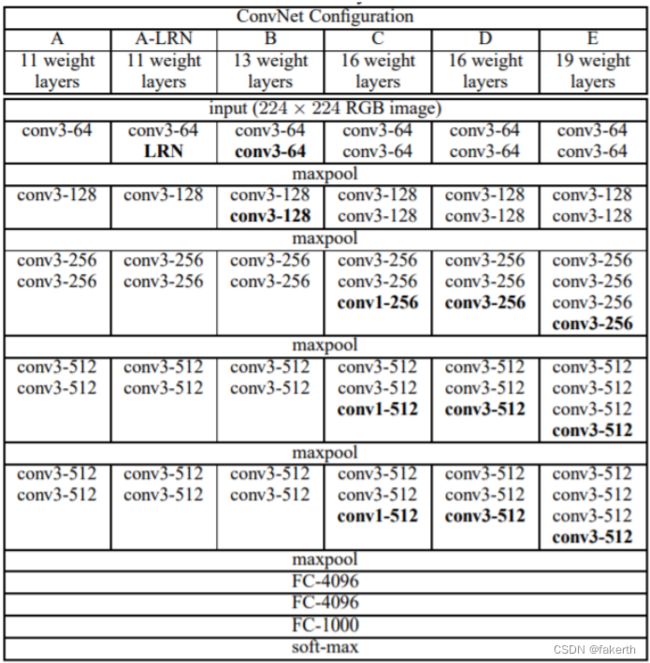

1.两层conv3-64
输入图片大小为224x224x3,卷积核大小为3×3,stride为1,padding为1,卷积核个数为64,卷积得到输出为224×224x64。
2.maxpool
maxpool的size为2,stride为2。输入为224x224x64,池化得到输出为112x112x64。
3.两层conv3-128
输入为112x112x64,卷积核大小为3×3,stride为1,padding为1,卷积核个数为128,卷积得到输出为112×112x128。
4.maxpool
maxpool的size为2,stride为2。输入为112×112x128,池化得到输出为56×56x128。
5.三层conv3-256
输入为56x56x128,卷积核大小为3×3,stride为1,padding为1,卷积核个数为256,卷积得到输出为56×56x256。
6.maxpool
maxpool的size为2,stride为2。输入为56×56x256,池化得到输出为28×28x256。
7.三层conv3-512
输入为28×28x256,卷积核大小为3×3,stride为1,padding为1,卷积核个数为512,卷积得到输出为28×28x512。
6.maxpool
maxpool的size为2,stride为2。输入为28×28x512,池化得到输出为14×14x512。
7.三层conv3-512
输入为14×14x512,卷积核大小为3×3,stride为1,padding为1,卷积核个数为512,卷积得到输出为14×14x512。
8.maxpool
maxpool的size为2,stride为2。输入为14×14x512,池化得到输出为7×7x512。
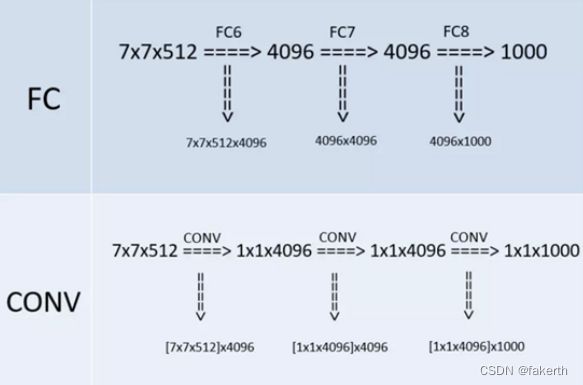
9.三层全连接层
与两层1x1x4096,一层1x1x1000进行全连接+ReLU(共三层),通过softmax输出1000个预测结果。7x7x512的层要跟4096个神经元的层做全连接,则替换为对7x7x512的层作通道数为4096、卷积核为1x1的卷积。这是全连接转卷积的思路。
实现猫狗识别
1.建立模型
import torch
import torch.nn as nn

from torch.hub import load_state_dict_from_url

model_urls = {
    'vgg11': 'https://download.pytorch.org/models/vgg11-bbd30ac9.pth',
    'vgg13': 'https://download.pytorch.org/models/vgg13-c768596a.pth',
    'vgg16': 'https://download.pytorch.org/models/vgg16-397923af.pth',
    'vgg19': 'https://download.pytorch.org/models/vgg19-dcbb9e9d.pth'
}


class VGG(nn.Module):
    def __init__(self, features, num_classes=1000, init_weights=True, dropout=0.5):
        super(VGG, self).__init__()
        self.features = features
        self.avgpool = nn.AdaptiveAvgPool2d((7, 7))
        self.classifier = nn.Sequential(
            nn.Linear(512 * 7 * 7, 4096),
            nn.ReLU(True),
            nn.Dropout(p=dropout),
            nn.Linear(4096, 4096),
            nn.ReLU(True),
            nn.Dropout(p=dropout),
            nn.Linear(4096, num_classes),
        )
        if init_weights:
            for m in self.modules():
                if isinstance(m, nn.Conv2d):
                    nn.init.kaiming_normal_(m.weight, mode="fan_out", nonlinearity="relu")
                    if m.bias is not None:
                        nn.init.constant_(m.bias, 0)
                elif isinstance(m, nn.BatchNorm2d):
                    nn.init.constant_(m.weight, 1)
                    nn.init.constant_(m.bias, 0)
                elif isinstance(m, nn.Linear):
                    nn.init.normal_(m.weight, 0, 0.01)
                    nn.init.constant_(m.bias, 0)

    def forward(self, x):
        x = self.features(x)
        x = self.avgpool(x)
        x = torch.flatten(x, 1)
        x = self.classifier(x)
        return x


def make_layers(cfg, batch_norm=False):
    layers = []
    in_channels = 3
    for v in cfg:
        if v == "M":
            layers += [nn.MaxPool2d(kernel_size=2, stride=2)]
        else:
            conv2d = nn.Conv2d(in_channels, v, kernel_size=3, padding=1)
            if batch_norm:
                layers += [conv2d, nn.BatchNorm2d(v), nn.ReLU(inplace=True)]
            else:
                layers += [conv2d, nn.ReLU(inplace=True)]
            in_channels = v
    return nn.Sequential(*layers)


cfgs = {
    'vgg11': [64, 'M', 128, 'M', 256, 256, 'M', 512, 512, 'M', 512, 512, 'M'],
    'vgg13': [64, 64, 'M', 128, 128, 'M', 256, 256, 'M', 512, 512, 'M', 512, 512, 'M'],
    'vgg16': [64, 64, 'M', 128, 128, 'M', 256, 256, 256, 'M', 512, 512, 512, 'M', 512, 512, 512, 'M'],
    'vgg19': [64, 64, 'M', 128, 128, 'M', 256, 256, 256, 256, 'M', 512, 512, 512, 512, 'M', 512, 512, 512, 512, 'M'],

}


def vgg16(pretrained=True, progress=True, num_classes=2):
    model = VGG(make_layers(cfgs['vgg16']))
    if pretrained:
        state_dict = load_state_dict_from_url(model_urls['vgg16'], model_dir='model', progress=progress)
        model.load_state_dict(state_dict)
    if num_classes != 1000:
        model.classifier = nn.Sequential(
            nn.Linear(512 * 7 * 7, 4096),
            nn.ReLU(True),
            nn.Dropout(p=0.5),
            nn.Linear(4096, 4096),
            nn.ReLU(True),
            nn.Dropout(p=0.5),
            nn.Linear(4096, num_classes),
        )
    return model

}
值得一提的是
'vgg16': [64, 64, 'M', 128, 128, 'M', 256, 256, 256, 'M', 512, 512, 512, 'M', 512, 512, 512, 'M']
64代表64个3x3的卷积核,M指的是maxpool池化层。
2.训练前准备工作
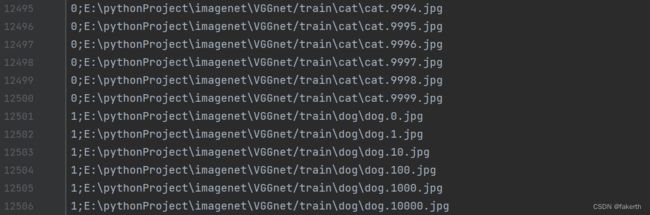
获取图片路径并分类:
import os
from os import getcwd

classes = ['cat', 'dog']
sets = ['train']

if __name__ == '__main__':
    wd = getcwd()
    for se in sets:
        list_file = open('cls_' + se + '.txt', 'w')

        datasets_path = se
        types_name = os.listdir(datasets_path)  # os.listdir() 方法用于返回指定的文件夹包含的文件或文件夹的名字的列表
        for type_name in types_name:
            if type_name not in classes:
                continue
            cls_id = classes.index(type_name)  # 输出0-1
            photos_path = os.path.join(datasets_path, type_name)
            photos_name = os.listdir(photos_path)
            for photo_name in photos_name:
                _, postfix = os.path.splitext(photo_name)  # 该函数用于分离文件名与拓展名
                if postfix not in ['.jpg', '.png', '.jpeg']:
                    continue
                list_file.write(str(cls_id) + ';' + '%s/%s' % (wd, os.path.join(photos_path, photo_name)))
                list_file.write('\n')
        list_file.close()
图像处理类:
import cv2
import numpy as np
import torch.utils.data as data
from PIL import Image


def preprocess_input(x):
    x /= 127.5
    x -= 1.
    return x


def cvtColor(image):
    if len(np.shape(image)) == 3 and np.shape(image)[-2] == 3:
        return image
    else:
        image = image.convert('RGB')
        return image


class DataGenerator(data.Dataset):
    def __init__(self, annotation_lines, inpt_shape, random=True):
        self.annotation_lines = annotation_lines
        self.input_shape = inpt_shape
        self.random = random

    def __len__(self):
        return len(self.annotation_lines)

    def __getitem__(self, index):
        annotation_path = self.annotation_lines[index].split(';')[1].split()[0]
        image = Image.open(annotation_path)
        image = self.get_random_data(image, self.input_shape, random=self.random)
        image = np.transpose(preprocess_input(np.array(image).astype(np.float32)), [2, 0, 1])
        y = int(self.annotation_lines[index].split(';')[0])
        return image, y

    def rand(self, a=0, b=1):
        return np.random.rand() * (b - a) + a

    def get_random_data(self, image, inpt_shape, jitter=.3, hue=.1, sat=1.5, val=1.5, random=True):

        image = cvtColor(image)
        iw, ih = image.size
        h, w = inpt_shape
        if not random:
            scale = min(w / iw, h / ih)
            nw = int(iw * scale)
            nh = int(ih * scale)
            dx = (w - nw) // 2
            dy = (h - nh) // 2

            image = image.resize((nw, nh), Image.BICUBIC)
            new_image = Image.new('RGB', (w, h), (128, 128, 128))

            new_image.paste(image, (dx, dy))
            image_data = np.array(new_image, np.float32)
            return image_data
        new_ar = w / h * self.rand(1 - jitter, 1 + jitter) / self.rand(1 - jitter, 1 + jitter)
        scale = self.rand(.75, 1.25)
        if new_ar < 1:
            nh = int(scale * h)
            nw = int(nh * new_ar)
        else:
            nw = int(scale * w)
            nh = int(nw / new_ar)
        image = image.resize((nw, nh), Image.BICUBIC)
        # 将图像多余的部分加上灰条
        dx = int(self.rand(0, w - nw))
        dy = int(self.rand(0, h - nh))
        new_image = Image.new('RGB', (w, h), (128, 128, 128))
        new_image.paste(image, (dx, dy))
        image = new_image
        # 翻转图像
        flip = self.rand() < .5
        if flip: image = image.transpose(Image.FLIP_LEFT_RIGHT)
        rotate = self.rand() < .5
        if rotate:
            angle = np.random.randint(-15, 15)
            a, b = w / 2, h / 2
            M = cv2.getRotationMatrix2D((a, b), angle, 1)
            image = cv2.warpAffine(np.array(image), M, (w, h), borderValue=[128, 128, 128])
        # 色域扭曲
        hue = self.rand(-hue, hue)
        sat = self.rand(1, sat) if self.rand() < .5 else 1 / self.rand(1, sat)
        val = self.rand(1, val) if self.rand() < .5 else 1 / self.rand(1, val)
        x = cv2.cvtColor(np.array(image, np.float32) / 255, cv2.COLOR_RGB2HSV)  # 颜色空间转换
        x[..., 1] *= sat
        x[..., 2] *= val
        x[x[:, :, 0] > 360, 0] = 360
        x[:, :, 1:][x[:, :, 1:] > 1] = 1
        x[x < 0] = 0
        image_data = cv2.cvtColor(x, cv2.COLOR_HSV2RGB) * 255
        return image_data
3.训练模型
数据集我上传到百度网盘里,可自行下载解压到根目录下。
链接:https://pan.baidu.com/s/1v14gSYa5S0CH0GYDnKjb7Q?pwd=xhd0
提取码:xhd0
为了方便,我们把25000张图片全部放在train文件夹下,从中取10分之1也就是2500张做测试集,剩余22500做训练集
import torch
import torch.nn as nn
from net import vgg16
from torch.utils.data import DataLoader
from data import *

'''数据集'''
annotation_path = 'cls_train.txt'
with open(annotation_path, 'r') as f:
    lines = f.readlines()
np.random.seed(10101)
np.random.shuffle(lines)  # 打乱数据
np.random.seed(None)
num_val = int(len(lines) * 0.1)
num_train = len(lines) - num_val
# 输入图像大小
input_shape = [224, 224]
train_data = DataGenerator(lines[:num_train], input_shape, True)
val_data = DataGenerator(lines[num_train:], input_shape, False)
val_len = len(val_data)
"""加载数据"""
gen_train = DataLoader(train_data, batch_size=4)
gen_test = DataLoader(val_data, batch_size=4)
'''构建网络'''
device = torch.device('cuda' if torch.cuda.is_available() else "cpu")
net = vgg16(pretrained=True, progress=True, num_classes=2)
net.to(device)
'''选择优化器和学习率的调整方法'''
lr = 0.0001
optim = torch.optim.Adam(net.parameters(), lr=lr)
sculer = torch.optim.lr_scheduler.StepLR(optim, step_size=1)
'''训练'''
epochs = 20
for epoch in range(epochs):
    print("===========", epoch, "==============")
    total_train = 0
    for data in gen_train:
        img, label = data
        with torch.no_grad():
            img = img.to(device)
            label = label.to(device)
        optim.zero_grad()
        output = net(img)
        train_loss = nn.CrossEntropyLoss()(output, label).to(device)
        train_loss.backward()
        optim.step()
        total_train += train_loss
        print("训练集上的损失:{}".format(train_loss))
    total_test = 0
    total_accuracy = 0
    for data in gen_test:
        img, label = data
        with torch.no_grad():
            img = img.to(device)
            label = label.to(device)
            optim.zero_grad()
            out = net(img)
            test_loss = nn.CrossEntropyLoss()(out, label).to(device)
            total_test += test_loss
            accuracy = (out.argmax(1) == label).sum()
            total_accuracy += accuracy
            print("测试集上的精度:{:.1%}".format(total_accuracy / val_len))
    print("===============================================")
    print("训练集上的损失:{}".format(total_train))
    print("测试集上的损失:{}".format(total_test))
    print("测试集上的精度:{:.1%}".format(total_accuracy / val_len))
    # torch.save(net,"dogandcat.{}.pt".format(epoch+1))
    torch.save(net.state_dict(), "Adogandcat.{}.pth".format(epoch + 1))
    print("模型已保存")
放到老师的深度学习工作台上训练:

可以看到取得了不错的准确率。每一个epoch保存一下模型,一共20个epoch,最后拿Adogandcat.20.pth来测试一下模型泛化能力。
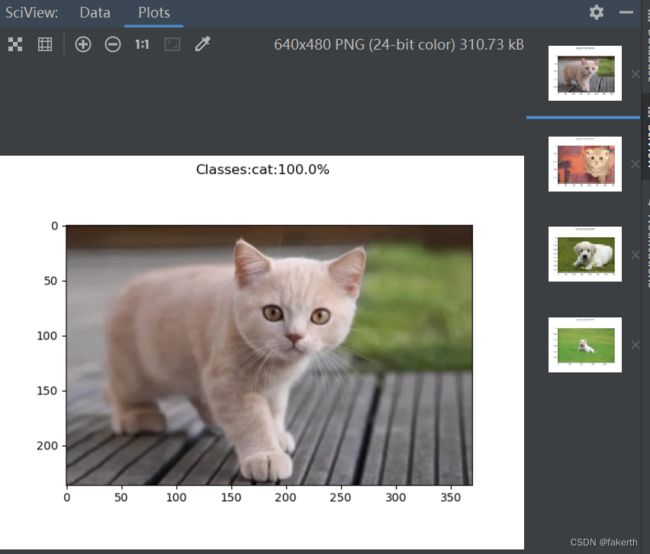
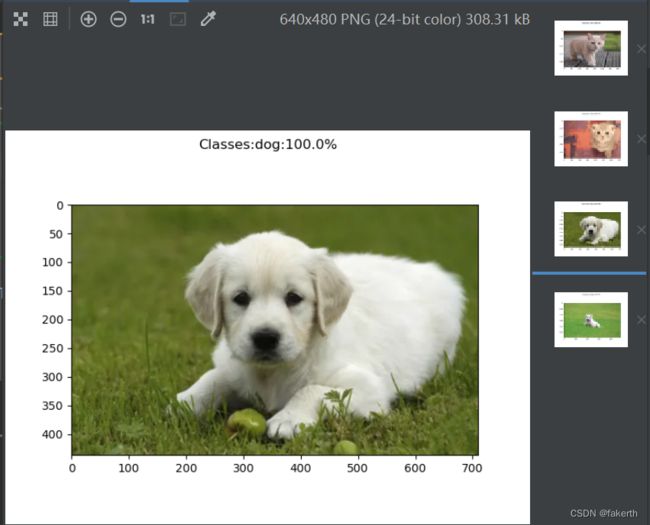
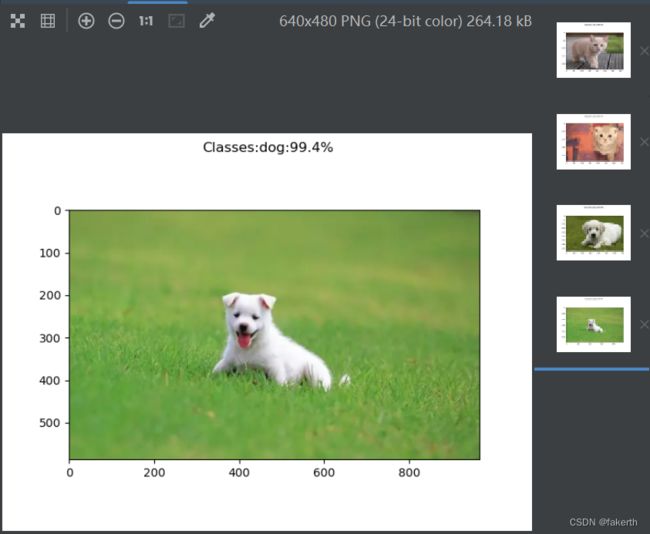
4.测试泛化能力
去网上找了几张图片,简直恐怖。这就是深度学习的魅力吧。

import matplotlib.pyplot as plt
from torchvision import transforms
from PIL import Image
import matplotlib.pyplot as plt
import torch
import torch.nn.functional as F
from net import vgg16

img_pth = './test/test4.jpg'
img = Image.open(img_pth)
'''处理图片'''
transform = transforms.Compose([transforms.Resize((224, 224)), transforms.ToTensor()])
image = transform(img)
'''加载网络'''
device = torch.device("cuda" if torch.cuda.is_available() else "cpu")
net = vgg16()
model = torch.load("./Adogandcat.20.pth", map_location=device)
net.load_state_dict(model)
net.eval()
image = torch.reshape(image, (1, 3, 224, 224))
with torch.no_grad():
    out = net(image)
out = F.softmax(out, dim=1)
out = out.data.cpu().numpy()
print(out)
a = int(out.argmax(1))
plt.figure()
list = ["cat", 'dog']
plt.suptitle("Classes:{}:{:.1%}".format(list[a], out[0, a]))
plt.imshow(img)
plt.show()