深度学习(一):ubuntu18.04配置pytorch框架并进行fcn网络并训练
目录
0.前言
1.配置cpu环境
1.1 安装fcn包:
1.2 安装PyTorch:
1.3 安装pillow、scipy、tqdm
1.4 验证环境配置
2.利用VOC数据集训练example
2.1 下载数据
2.2 配置git
2.3 训练
3 配置GPU版本
3.1 pytorch官网conda命令直接安装--失败
3.2 修改anaconda源为清华源--失败
3.3 官网pip命令调整+取消清华源+科学上网+按提示调整----成功
3.4 测试pytorch
4 VOC训练报错与重装cuda+cudnn
4.1 VOC数据集训练报错
4.2 查找不到低版本的cupy-cuda11.3
4.3 cuda和cudnn版本选择
4.3.1 重装cuda为cuda11.0
4.3.2 cudnn选择
5 重新配置python环境+重新安装pytorch+重新配置fcn环境
5.1 重新配置python环境
5.2 重新安装pytorch
5.3 安装其他环境
5.4 安装cupy-cuda110-xxx
5.5 运行测试1
5.6 运行测试2
目前没成功配置出GPU版本的fcn网络,大家可以给点建议不
参考链接:
0.前言
ubuntu18.04 cpu版本 pytorch
ubuntu18.04 GPU版本
1.配置cpu环境
选择python3.6版本进行配置,利用anaconda创建python=3.6的环境fcn,参考:https://github.com/wkentaro/pytorch-fcn![]() https://github.com/wkentaro/pytorch-fcn
https://github.com/wkentaro/pytorch-fcn
- pytorch >= 0.2.0
- torchvision >= 0.1.8
- fcn >= 6.1.5
- Pillow
- scipy
- tqdm
1.1 安装fcn包:
#创建和激活虚拟环境
conda create -n py36 python=3.6
source activate py36

pip install fcn
#pip install --default-timeout=100 -i https://pypi.tuna.tsinghua.edu.cn/simple fcn
1.2 安装PyTorch:
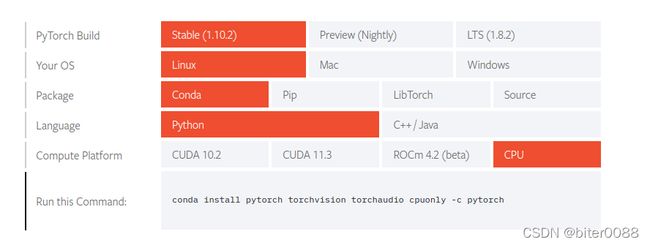
进入PyTorch官网,下载cpu版本:
Start Locally | PyTorch![]() https://pytorch.org/get-started/locally/
https://pytorch.org/get-started/locally/
复制网页的命令,我的如下:
conda install pytorch torchvision torchaudio cpuonly -c pytorch

#或者pip
pip3 install torch==1.10.2+cpu torchvision==0.11.3+cpu torchaudio==0.10.2+cpu -f https://download.pytorch.org/whl/cpu/torch_stable.html
验证安装:
 clash$ conda activate py36
(py36)  clash$ python
Python 3.6.13 |Anaconda, Inc.| (default, Jun  4 2021, 14:25:59)
[GCC 7.5.0] on linux
Type "help", "copyright", "credits" or "license" for more information.
>>> import torch
>>> torch.cuda.is_available()
False
>>>
1.3 安装pillow、scipy、tqdm
pip install pillow
pip install scipy
pip install tqdm
1.4 验证环境配置
下载 https://github.com/wkentaro/pytorch-fcn![]() https://github.com/wkentaro/pytorch-fcn 的代码并解压,pip install .后出现下面一堆successfully。
https://github.com/wkentaro/pytorch-fcn 的代码并解压,pip install .后出现下面一堆successfully。
(py36)  paper1$ cd pytorch-fcn-main/
(py36)  pytorch-fcn-main$ pip install .     ######安装torchfcn
Processing /home/elfoot/paper1/pytorch-fcn-main
  Preparing metadata (setup.py) ... done
--------------------------------

Requirement already satisfied: idna<4,>=2.5 in /home/elfoot/anaconda3/envs/py36/lib/python3.6/site-packages (from requests[socks]->gdown->fcn>=6.1.5->torchfcn==1.9.7) (3.3)
Requirement already satisfied: PySocks!=1.5.7,>=1.5.6 in /home/elfoot/anaconda3/envs/py36/lib/python3.6/site-packages (from requests[socks]->gdown->fcn>=6.1.5->torchfcn==1.9.7) (1.7.1)
Building wheels for collected packages: torchfcn
  Building wheel for torchfcn (setup.py) ... done
  Created wheel for torchfcn: filename=torchfcn-1.9.7-py3-none-any.whl size=137110 sha256=0e0a02e7459ab0c07e029ccefb4d80959a61ee28a9d4a052ea8574855f7c488f
  Stored in directory: /home/elfoot/.cache/pip/wheels/c9/60/99/c1bd09fc67e214cb878410d34a27c1a3ac13a0e4f22bddbadf
Successfully built torchfcn
Installing collected packages: torchfcn
Successfully installed torchfcn-1.9.7
2.利用VOC数据集训练example
正在下载数据集-----很慢----不知有没有快的方法
2.1 下载数据
运行xxx/paper1/pytorch-fcn-main/examples/voc/download_dataset.sh脚本下载数据集,脚本内容如下,主要下载两个内容,并把他们放到DIR目录处:
#!/bin/bash

DIR=~/data/datasets/VOC

mkdir -p $DIR
cd $DIR

if [ ! -e benchmark_RELEASE ]; then
  wget http://www.eecs.berkeley.edu/Research/Projects/CS/vision/grouping/semantic_contours/benchmark.tgz -O benchmark.tar
  tar -xvf benchmark.tar
fi

if [ ! -e VOCdevkit/VOC2012 ]; then
  wget http://host.robots.ox.ac.uk/pascal/VOC/voc2012/VOCtrainval_11-May-2012.tar
  tar -xvf VOCtrainval_11-May-2012.tar
fi
关于直接在终端下载很慢,由于使用了科学上网,我直接把链接放到网页下载----贼快:
创建文件夹~/data/datasets/VOC,并把下载的文件分别解压到文件夹内:
接着如下图,分别将benchmark文件夹内的benchmark_RELEASE、VOCtrainval_11-May-2012内的VOCdevkit提到VOC目录中来。
2.2 配置git
因为xxx/pytorch-fcn-main/examples/voc/train_fcn32s.py中提到了git log以及结合报错,如下,故先配置一下git
//xxx/pytorch-fcn-main/examples/voc/train_fcn32s.py截取
def git_hash():
    cmd = 'git log -n 1 --pretty="%h"'
    ret = subprocess.check_output(shlex.split(cmd)).strip()
    if isinstance(ret, bytes):
        ret = ret.decode()
    return ret
先在自己的github创建一个repository,其链接为:https://github.com/menghxz/fcn-pytorch-cpu.git
在~/.bashrc配置科学上网(可能需要,现在还没弄清需不需要),格式参考如下
export HTTP_PROXY="http://127.0.0.1:7890"
export HTTPS_PROXY="http://127.0.0.1:7890"
终端配置git:
cd /home/elfoot/paper1/pytorch-fcn-main/examples/voc
git init
git add README.md
git commit -m "first commit"
git branch -M main
git remote add origin https://github.com/menghxz/fcn-pytorch-cpu.git  #你的链接
git push -u origin main
2.3 训练
终端进入voc目录,训练如下:
cd /home/elfoot/paper1/pytorch-fcn-main/examples/voc
./train_fcn32s.py
这个过程非常慢。。。。。训练三个小时才训练到epoch1 的53%。
3 配置GPU版本
3.1 pytorch官网conda命令直接安装--失败
#创建和激活虚拟环境
conda create -n fcn36 python=3.6
source activate fcn36

pip install fcn
安装gpu版本的pytorch:
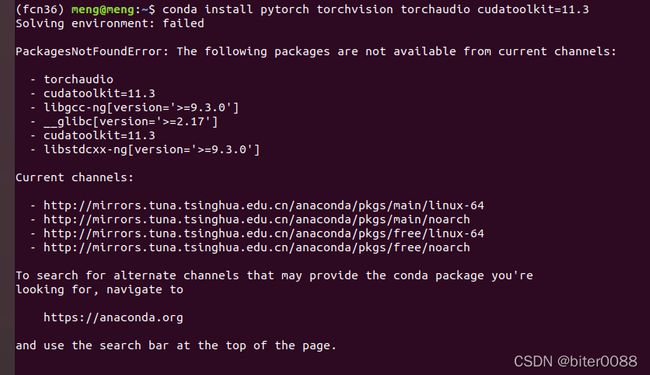
conda安装:没成功----原因是在anaconda默认的网站中没有想要的包。
conda install pytorch torchvision torchaudio cudatoolkit=11.3 -c pytorch(fcn36) meng@meng:~$ conda install pytorch torchvision torchaudio cudatoolkit=11.3 -c pytorch
Solving environment: failed
PackagesNotFoundError: The following packages are not available from current channels:
- cudatoolkit=11.3
- libgcc-ng[version='>=9.3.0']
- __glibc[version='>=2.17']
- cudatoolkit=11.3
- libstdcxx-ng[version='>=9.3.0']
Current channels:
- https://conda.anaconda.org/pytorch/linux-64
- https://conda.anaconda.org/pytorch/noarch
- https://repo.anaconda.com/pkgs/main/linux-64
- https://repo.anaconda.com/pkgs/main/noarch
- https://repo.anaconda.com/pkgs/free/linux-64
- https://repo.anaconda.com/pkgs/free/noarch
- https://repo.anaconda.com/pkgs/r/linux-64
- https://repo.anaconda.com/pkgs/r/noarch
- https://repo.anaconda.com/pkgs/pro/linux-64
- https://repo.anaconda.com/pkgs/pro/noarch
To search for alternate channels that may provide the conda package you're
looking for, navigate to
https://anaconda.org
and use the search bar at the top of the page.
3.2 修改anaconda源为清华源--失败
直接搜索的只有condarc文件,如下,不是需要的
这因为.condarc文件是不会自动创建的。
创建.condarc文件:
conda config --add channels r修改为:清华源的anaconda部分
# 编辑.condarc注释defalts
channels:
  - http://mirrors.tuna.tsinghua.edu.cn/anaconda/pkgs/main/linux-64/
  - http://mirrors.tuna.tsinghua.edu.cn/anaconda/pkgs/free/linux-64/
#  - defaults
ssl_verify: true
show_channel_urls: true
关闭科学上网;再次运行安装命令,去掉-c pytorch, 没有制定版本的包。
conda install pytorch torchvision torchaudio cudatoolkit=11.3 Anaconda建立新的环境,出现CondaHTTPError: HTTP 000 CONNECTION FAILED for url ...... 解决过程 - tianlang25 - 博客园
3.3 官网pip命令调整+取消清华源+科学上网+按提示调整----成功
取消配置的清华源:将.condarc文件清空即可
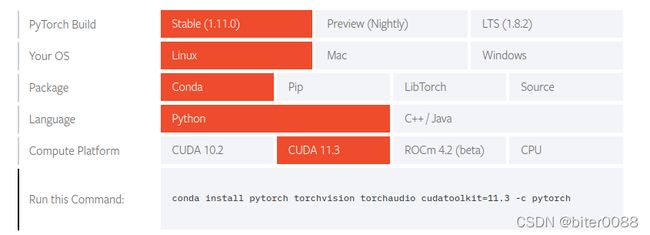
官网pip命令如下,在终端输入
pip3 install torch==1.11.0+cu113 torchvision==0.12.0+cu113 torchaudio==0.11.0+cu113 -f https://download.pytorch.org/whl/cu113/torch_stable.html没配置科学上网前,会一直打印输入下图的黄色字体,直到失败
配置科学上网后,输入官网给的命令,torch的版本找不到----按提示选了一个最新的版本
(fcn36) meng@meng:~$ pip3 install torch==1.11.0+cu113 torchvision==0.12.0+cu113 torchaudio==0.11.0+cu113 -f https://download.pytorch.org/whl/cu113/torch_stable.html
Looking in links: https://download.pytorch.org/whl/cu113/torch_stable.html
ERROR: Could not find a version that satisfies the requirement torch==1.11.0+cu113 (from versions: 1.0.0, 1.0.1, 1.0.1.post2, 1.1.0, 1.2.0, 1.3.0, 1.3.1, 1.4.0, 1.5.0, 1.5.1, 1.6.0, 1.7.0, 1.7.1, 1.8.0, 1.8.1, 1.9.0, 1.9.1, 1.10.0, 1.10.0+cu113, 1.10.1, 1.10.1+cu113, 1.10.2, 1.10.2+cu113)
ERROR: No matching distribution found for torch==1.11.0+cu113
修改安装命令为:
pip3 install torch==1.10.2+cu113 torchvision==0.12.0+cu113 torchaudio==0.11.0+cu113 -f https://download.pytorch.org/whl/cu113/torch_stable.htmltorch下载完后,又报错,是torchvision版本找不到
继续改
pip3 install torch==1.10.2+cu113 torchvision==0.11.3+cu113 torchaudio==0.11.0+cu113 -f https://download.pytorch.org/whl/cu113/torch_stable.htmltorchvision下载完后,torchaudio版本找不到
继续改:
pip3 install torch==1.10.2+cu113 torchvision==0.11.3+cu113 torchaudio==0.10.2+cu113 -f https://download.pytorch.org/whl/cu113/torch_stable.html全部安装成功
3.4 测试pytorch
4 VOC训练报错与重装cuda+cudnn
4.1 VOC数据集训练报错
(fcn36) meng@meng:~/deeplearning/fcn/pytorch-fcn-main/examples/voc$ ./speedtest.py --gpu 2
==> Benchmark: gpu=2, times=1000, dynamic_input=False
/home/meng/anaconda3/envs/fcn36/lib/python3.6/site-packages/chainer/_environment_check.py:75: UserWarning:
--------------------------------------------------------------------------------
CuPy (cupy-cuda113) version 9.2.0 may not be compatible with this version of Chainer.
Please consider installing the supported version by running:
  $ pip install 'cupy-cuda113>=7.7.0,<8.0.0'

See the following page for more details:
  https://docs.cupy.dev/en/latest/install.html
--------------------------------------------------------------------------------

  requirement=requirement, help=help))
==> Testing FCN32s with Chainer
Traceback (most recent call last):
  File "./speedtest.py", line 110, in
    main()
  File "./speedtest.py", line 105, in main
    bench_chainer(args.gpu, args.times, args.dynamic_input)
  File "./speedtest.py", line 14, in bench_chainer
    chainer.cuda.get_device(gpu).use()
  File "cupy/cuda/device.pyx", line 172, in cupy.cuda.device.Device.use
  File "cupy/cuda/device.pyx", line 178, in cupy.cuda.device.Device.use
  File "cupy_backends/cuda/api/runtime.pyx", line 485, in cupy_backends.cuda.api.runtime.setDevice
  File "cupy_backends/cuda/api/runtime.pyx", line 261, in cupy_backends.cuda.api.runtime.check_status
cupy_backends.cuda.api.runtime.CUDARuntimeError: cudaErrorInvalidDevice: invalid device ordinal
训练过程中显示cupy的版本不对,需要安装低版本的cupy-cuda11.3,范围为cupy-cuda11.3==7.7.0~8.0.0
4.2 查找不到低版本的cupy-cuda11.3
直接pip安装低版本的cupy-cuda11.3,终端显示找不到。
(fcn36) meng@meng:~/deeplearning/fcn/pytorch-fcn-main/examples/voc$ pip install cupy-cuda113==8.0.0
ERROR: Could not find a version that satisfies the requirement cupy-cuda113==8.0.0 (from versions: 9.2.0, 9.3.0, 9.4.0, 9.5.0, 9.6.0)
ERROR: No matching distribution found for cupy-cuda113==8.0.0
必应搜索:cupy-cuda113下载(一定要用必应搜索,百度可能搜不到),第一条就是:
链接为:cupy-cuda113 · PyPI
进入其中查看历史版本:
发现官方没有发布低版本的,怪不得pip install不到
却发现cupy-cuda110有需要的低版本的:cupy-cuda110 · PyPI
下面的图只截取了部分:
4.3 cuda和cudnn版本选择
由4.2,选择了cuda11.0及其适配的cudnn
4.3.1 重装cuda为cuda11.0
我安装显卡驱动+cuda11.3+cudnn---重装cuda+cudnn的部分为这篇,这里就不叙述了。
ubuntu系统(八):ubuntu18.04双系统安装+ros安装+各种软件安装+深度学习环境配置全家桶_biter0088的博客-CSDN博客
cuda11.0下载链接:CUDA Toolkit 11.0 Download | NVIDIA Developer
4.3.2 cudnn选择
官网为:cuDNN Archive | NVIDIA Developer
选择了这个文件,下载下来的文件名称却为11.2-----自己一定要记清,省的老下载资源
cudnn-11.2-linux-x64-v8.1.1.33.tgz5 重新配置python环境+重新安装pytorch+重新配置fcn环境
5.1 重新配置python环境
想着上面那个fcn36就留着吧,说不定什么时候就用到cuda11.3了
创建python环境:py36cuda110:
conda create -n py36cuda110 python=3.6
source activate py36cuda110
5.2 重新安装pytorch
安装pytorch:
Previous PyTorch Versions | PyTorch
上面的历史版本,一直下拉,找到cuda11.0版本的命令:
# CUDA 11.0
pip install torch==1.7.1+cu110 torchvision==0.8.2+cu110 torchaudio==0.7.2 -f https://download.pytorch.org/whl/torch_stable.html
5.3 安装其他环境
cd /home/meng/deeplearning/fcn/pytorch-fcn-main
pip install .
5.4 安装cupy-cuda110-xxx
pip install cupy-cuda110==7.8.05.5 运行测试1
cd /home/meng/deeplearning/fcn/pytorch-fcn-main/examples/voc

./speedtest.py --gpu 2
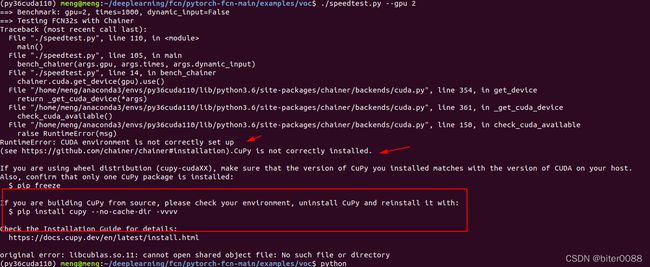
报错:CuPy is not correctly installed.
(py36cuda110) meng@meng:~/deeplearning/fcn/pytorch-fcn-main/examples/voc$ ./speedtest.py --gpu 2
==> Benchmark: gpu=2, times=1000, dynamic_input=False
==> Testing FCN32s with Chainer
Traceback (most recent call last):
  File "./speedtest.py", line 110, in
    main()
  File "./speedtest.py", line 105, in main
    bench_chainer(args.gpu, args.times, args.dynamic_input)
  File "./speedtest.py", line 14, in bench_chainer
    chainer.cuda.get_device(gpu).use()
  File "/home/meng/anaconda3/envs/py36cuda110/lib/python3.6/site-packages/chainer/backends/cuda.py", line 354, in get_device
    return _get_cuda_device(*args)
  File "/home/meng/anaconda3/envs/py36cuda110/lib/python3.6/site-packages/chainer/backends/cuda.py", line 361, in _get_cuda_device
    check_cuda_available()
  File "/home/meng/anaconda3/envs/py36cuda110/lib/python3.6/site-packages/chainer/backends/cuda.py", line 150, in check_cuda_available
    raise RuntimeError(msg)
RuntimeError: CUDA environment is not correctly set up
(see https://github.com/chainer/chainer#installation).CuPy is not correctly installed.

If you are using wheel distribution (cupy-cudaXX), make sure that the version of CuPy you installed matches with the version of CUDA on your host.
Also, confirm that only one CuPy package is installed:
  $ pip freeze

If you are building CuPy from source, please check your environment, uninstall CuPy and reinstall it with:
  $ pip install cupy --no-cache-dir -vvvv

Check the Installation Guide for details:
  https://docs.cupy.dev/en/latest/install.html

original error: libcublas.so.11: cannot open shared object file: No such file or directory
卸载cupy-cuda110-7.8.0
pip uninstall cupy-cuda110==7.8.0并运行:pip install cupy --no-cache-dir -vvvv
(这个命令上面报错提到的,貌似是适应性安装,然后终端输出很多东西。。。。)
终端输出的最后一些信息为:
  Link requires a different Python (3.6.13 not in: '>=3.7'): https://files.pythonhosted.org/packages/4a/ca/e72b3b399d7a8cb34311aa8f52924108591c013b09f0268820afb4cd96fb/pip-22.0.tar.gz#sha256=d3fa5c3e42b33de52bddce89de40268c9a263cd6ef7c94c40774808dafb32c82 (from https://pypi.org/simple/pip/) (requires-python:>=3.7)
  Link requires a different Python (3.6.13 not in: '>=3.7'): https://files.pythonhosted.org/packages/89/a1/2f4e58eda11e591fbfa518233378835679fc5ab766b690b3df85215014d5/pip-22.0.1-py3-none-any.whl#sha256=30739ac5fb973cfa4399b0afff0523d4fe6bed2f7a5229333f64d9c2ce0d1933 (from https://pypi.org/simple/pip/) (requires-python:>=3.7)
  Link requires a different Python (3.6.13 not in: '>=3.7'): https://files.pythonhosted.org/packages/63/71/5686e51f06fa59da55f7e81c3101844e57434a30f4a0d7456674d1459841/pip-22.0.1.tar.gz#sha256=7fd7a92f2fb1d2ac2ae8c72fb10b1e640560a0361ed4427453509e2bcc18605b (from https://pypi.org/simple/pip/) (requires-python:>=3.7)
  Link requires a different Python (3.6.13 not in: '>=3.7'): https://files.pythonhosted.org/packages/83/b5/df8640236faa5a3cb80bfafd68e9fb4b22578208b8398c032ccff803f9e0/pip-22.0.2-py3-none-any.whl#sha256=682eabc4716bfce606aca8dab488e9c7b58b0737e9001004eb858cdafcd8dbdd (from https://pypi.org/simple/pip/) (requires-python:>=3.7)
  Link requires a different Python (3.6.13 not in: '>=3.7'): https://files.pythonhosted.org/packages/d9/c1/146b24a7648fdf3f8b4dc6521ab0b26ac151ef903bac0b63a4e1450cb4d1/pip-22.0.2.tar.gz#sha256=27b4b70c34ec35f77947f777070d8331adbb1e444842e98e7150c288dc0caea4 (from https://pypi.org/simple/pip/) (requires-python:>=3.7)
  Link requires a different Python (3.6.13 not in: '>=3.7'): https://files.pythonhosted.org/packages/6a/df/a6ef77a6574781a668791419ffe366c8acd1c3cf4709d210cb53cd5ce1c2/pip-22.0.3-py3-none-any.whl#sha256=c146f331f0805c77017c6bb9740cec4a49a0d4582d0c3cc8244b057f83eca359 (from https://pypi.org/simple/pip/) (requires-python:>=3.7)
  Link requires a different Python (3.6.13 not in: '>=3.7'): https://files.pythonhosted.org/packages/88/d9/761f0b1e0551a3559afe4d34bd9bf68fc8de3292363b3775dda39b62ce84/pip-22.0.3.tar.gz#sha256=f29d589df8c8ab99c060e68ad294c4a9ed896624f6368c5349d70aa581b333d0 (from https://pypi.org/simple/pip/) (requires-python:>=3.7)
  Link requires a different Python (3.6.13 not in: '>=3.7'): https://files.pythonhosted.org/packages/4d/16/0a14ca596f30316efd412a60bdfac02a7259bf8673d4d917dc60b9a21812/pip-22.0.4-py3-none-any.whl#sha256=c6aca0f2f081363f689f041d90dab2a07a9a07fb840284db2218117a52da800b (from https://pypi.org/simple/pip/) (requires-python:>=3.7)
  Link requires a different Python (3.6.13 not in: '>=3.7'): https://files.pythonhosted.org/packages/33/c9/e2164122d365d8f823213a53970fa3005eb16218edcfc56ca24cb6deba2b/pip-22.0.4.tar.gz#sha256=b3a9de2c6ef801e9247d1527a4b16f92f2cc141cd1489f3fffaf6a9e96729764 (from https://pypi.org/simple/pip/) (requires-python:>=3.7)
Skipping link: not a file: https://pypi.org/simple/pip/
Given no hashes to check 181 links for project 'pip': discarding no candidates
Removed build tracker: '/tmp/pip-req-tracker-83poj6hz'
查看cupy-cuda110-xxx版本:居然为9.6.0
5.6 运行测试2
#重新配置
pip install cupy==7.8.0
pip uninstall cupy==9.6.0
测试:
(py36cuda110) meng@meng:~/deeplearning/fcn/pytorch-fcn-main/examples/voc$ ./speedtest.py --gpu 2
==> Benchmark: gpu=2, times=1000, dynamic_input=False
==> Testing FCN32s with Chainer
Traceback (most recent call last):
  File "./speedtest.py", line 110, in
    main()
  File "./speedtest.py", line 105, in main
    bench_chainer(args.gpu, args.times, args.dynamic_input)
  File "./speedtest.py", line 14, in bench_chainer
    chainer.cuda.get_device(gpu).use()
  File "/home/meng/anaconda3/envs/py36cuda110/lib/python3.6/site-packages/chainer/backends/cuda.py", line 354, in get_device
    return _get_cuda_device(*args)
  File "/home/meng/anaconda3/envs/py36cuda110/lib/python3.6/site-packages/chainer/backends/cuda.py", line 361, in _get_cuda_device
    check_cuda_available()
  File "/home/meng/anaconda3/envs/py36cuda110/lib/python3.6/site-packages/chainer/backends/cuda.py", line 150, in check_cuda_available
    raise RuntimeError(msg)
RuntimeError: CUDA environment is not correctly set up
(see https://github.com/chainer/chainer#installation).libcublas.so.11: cannot open shared object file: No such file or directory
目前没成功配置出GPU版本的fcn网络,大家可以给点建议不
参考链接:
Ubuntu18.04安装cpu版pytorch环境 - 简书![]() https://www.jianshu.com/p/43f66c69baa7https://github.com/pytorch/pytorch#installation
https://www.jianshu.com/p/43f66c69baa7https://github.com/pytorch/pytorch#installation![]() https://github.com/pytorch/pytorch#installation
https://github.com/pytorch/pytorch#installation


