【CANN训练营】学习2022第二季 模型系列 动漫风格化和AOE ATC调优、动态batch、图像解码与缩放
文章目录
- 智能调优工具的使用方法
-
-
- 转换命令及转换成功的截图
- 模型调优成功的截图
- 重新编译,成功编译应用源码和截图
- 实战过程中遇到的问题及解决方法,并提交总结
-
- 多Batch推理
-
-
- 提供转换命令及转换成功的截图
- 改造成支持多Batch场景下的推理
- 串联一个图像流程
- jpegd样例
- resize样例
- jpege样例
-
智能调优工具的使用方法
1、unzip -O GBK *.zip
这个命令可以解包中文压缩包 (特别是由windows系统传到linux系统上面的)

2、迁移脚本
跑通之后
cd ..
git clone https://gitee.com/ascend/tensorflow.git
cd tensorflow/convert_tf2npu #进入工具包
pip3 install pandas
pip3 install xlrd==1.2.0
pip3 install openpyxl
pip3 install tkintertable
pip3 install google_pasta
python3 main.py -i ~/competition/LeNet
注意这两个路径不能为桶根目录
运行代码
报错:ImportError: cannot import name ‘tutorials’ from ‘tensorflow_core.examples’
这里的MNIST数据集是利用tensorflow的库来下载的。需要改一下Train.py中的import方式。
import tensorflow as tf
from tensorflow.examples.tutorials.mnist import input_data
同时data作相应修改
mnist = input_data.read_data_sets(“/home/ma-user/modelarts/user-job-dir/code/MNIST_data/”, one_hot=True)


3、更换模型
下载一个resnet101模型

上传到model文件夹
src/sample_process.cpp 文件中定制代码。修改第82行如下图。
在 src/sample_process.cpp 文件中定制代码。修改第82行如下图。
修改第95~98行为需要的文件,如下图。如果与下图相符,则不用修改。

4、动漫风格化
参考:https://gitee.com/ascend/samples/tree/master/python/contrib/cartoonGAN_picture
https://www.hiascend.com/document/detail/zh/CANNCommunityEdition/51RC2alpha005/developmenttools/devtool/aoe_16_002.html
cd ~/samples/python/contrib/cartoonGAN_picture
cd model
# 为了方便下载,在这里直接给出原始模型下载及模型转换命令,可以直接拷贝执行。也可以参照上表在modelzoo中下载并手工转换,以了解更多细节。
cd ${HOME}/samples/python/contrib/cartoonGAN_picture/model
wget https://modelzoo-train-atc.obs.cn-north-4.myhuaweicloud.com/003_Atc_Models/AE/ATC%20Model/cartoonization/cartoonization.pb
wget https://modelzoo-train-atc.obs.cn-north-4.myhuaweicloud.com/003_Atc_Models/AE/ATC%20Model/cartoonization/insert_op.cfg
使用AOE调优
转换命令及转换成功的截图
修改HwHiAiUser的用户密码
su -
passwd HwHiAiUser
apt-get install pciutils
cd ${HOME}/samples/python/contrib/cartoonGAN_picture/model

aoe --model="./cartoonization.pb" --output_type=FP32 --input_shape="train_real_A:1,256,256,3" --input_format=NHWC --output="cartoonizationv2_256" --framework=3 --precision_mode=allow_fp32_to_fp16 --insert_op_conf=insert_op.cfg --job_type=2

atc --model="./cartoonization.pb" --output_type=FP32 --input_shape="train_real_A:1,256,256,3" --input_format=NHWC --output="cartoonizationv2_256" --framework=3  --precision_mode=allow_fp32_to_fp16 --soc_version=Ascend310 --insert_op_conf=insert_op.cfg


cd ~
mkdir AscendProjects
cd AscendProjects
git clone https://gitee.com/ascend/tools.git
export DDK_PATH=/home/HwHiAiUser/Ascend/ascend-toolkit/latest
export NPU_HOST_LIB=/home/HwHiAiUser/Ascend/ascend-toolkit/latest/acllib/lib64/stub
cd $HOME/AscendProjects/tools/msame/
./build.sh g++ $HOME/AscendProjects/tools/msame/out

cd ${HOME}/samples/python/contrib/cartoonGAN_picture/model

cd ~/AscendProjects/tools/msame/out
./msame --model ${HOME}/samples/python/contrib/cartoonGAN_picture/model/cartoonizationv2_256.om --output output/ --loop 100
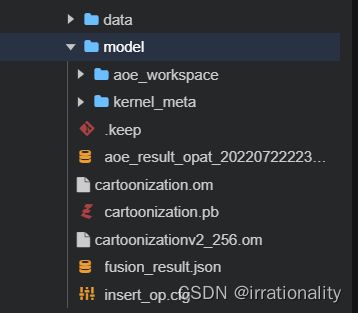
模型调优成功的截图
但是调优大概持续了一个多小时,三千多秒


![]()

可以看到我们新生成的om文件

重新编译,成功编译应用源码和截图
cd $HOME/samples/python/contrib/cartoonGAN_picture/data
wget https://c7xcode.obs.cn-north-4.myhuaweicloud.com/models/cartoonGAN_picture/scenery.jpg
cd ../src
python3.6 cartoonization.py ../data/
在安装numpy时,遇到了一个问题
FileNotFoundError: [Errno 2] No such file or directory: ‘/usr/local/python3.7.5/bin/pip’
 which pip
     /home/HwHiAiUser/.local/bin/pip
 sudo ln -s /home/HwHiAiUser/.local/bin/pip /usr/local/python3.7.5/bin/pip

这样pip安装就装在的python3.7.5
现在就可以了
pip install --upgrade pip
先配置源
pip config set global.index-url https://pypi.tuna.tsinghua.edu.cn/simple
然后修改为
[global]
index-url = https://repo.huaweicloud.com/repository/pypi/simple
trusted-host = repo.huaweicloud.com
timeout = 120

pip install numpy
pip install opencv-python
find ../../../ -name "acllite_utils*"
cp ../../../common/acllite/* ./
python3.7.5 cartoonization.py ../data/
实战过程中遇到的问题及解决方法,并提交总结
-
安装numpy时候pip版本问题
-解决方法如上所述:找到对应python或者conda版本,安装在对应版本下的pip文件夹 -
aoe调优时间较长,需要耐心等待
-
修改定制代码主要涉及的是路径问题,不要遗漏与路径有关的参量
多Batch推理
首先我们先把课上的案例简单过一遍
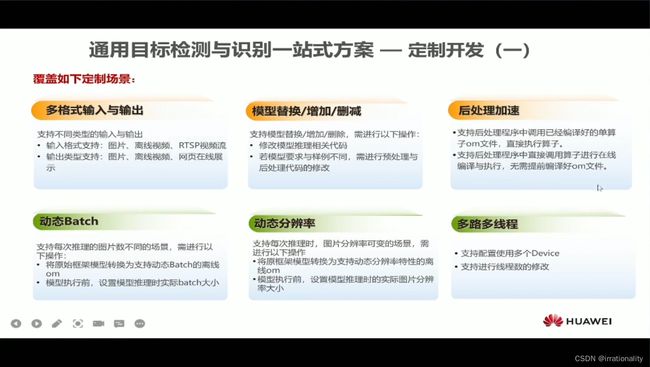
首先我们需要明确动态batch的目的,在目标检测与识别一站式方案中,我们首先对图片中的汽车进行检测,然后将检测到的目标进行裁剪后送入分类模型进行颜色分类,这里就涉及到了分类模型的动态batch,考虑到不同的输入图片检测结果中的汽车数量并不固定,使用大batch和小batch都不合适,最好的方法是根据检测到的汽车数量来决定batch大小,因此可以使用acl的动态batch特性。
cd ~/samples/cplusplus/level3_application/1_cv/detect_and_classify/src/inference/model/

atc --input_shape="input_1:-1,224,224,3"  --output=./color_dvpp_dynamic --soc_version=Ascend310 --framework=3 --model=./color.pb --insert_op_conf=./aipp.cfg --dynamic_batch_size="1,2,4,8"
注意如下的步骤必须完成
# 进入目标识别样例工程根目录
cd $HOME/samples/cplusplus/level3_application/1_cv/detect_and_classify
# 创建并进入model目录
mkdir model
cd model
# 下载yolov3的原始模型文件及AIPP配置文件
wget https://obs-9be7.obs.cn-east-2.myhuaweicloud.com/003_Atc_Models/AE/ATC%20Model/YOLOV3_carColor_sample/data/yolov3_t.onnx
wget https://obs-9be7.obs.cn-east-2.myhuaweicloud.com/003_Atc_Models/AE/ATC%20Model/YOLOV3_carColor_sample/data/aipp_onnx.cfg
# 执行模型转换命令,生成yolov3的适配昇腾AI处理器的离线模型文件
atc --model=./yolov3_t.onnx --framework=5 --output=yolov3 --input_shape="images:1,3,416,416;img_info:1,4" --soc_version=Ascend310 --input_fp16_nodes="img_info" --insert_op_conf=aipp_onnx.cfg
# 下载color模型的原始模型文件及AIPP配置文件
wget https://obs-9be7.obs.cn-east-2.myhuaweicloud.com/003_Atc_Models/AE/ATC%20Model/YOLOV3_carColor_sample/data/color.pb
wget https://obs-9be7.obs.cn-east-2.myhuaweicloud.com/003_Atc_Models/AE/ATC%20Model/YOLOV3_carColor_sample/data/aipp.cfg
# 执行模型转换命令,生成color的适配昇腾AI处理器的离线模型文件
atc --input_shape="input_1:-1,224,224,3" --output=./color_dynamic_batch --soc_version=Ascend310 --framework=3 --model=./color.pb --insert_op_conf=./aipp.cfg --dynamic_batch_size="1,2,4,8"
修改有关源文件逻辑
inference.h 红色为新增内容 绿色为注释掉内容

inference.cpp
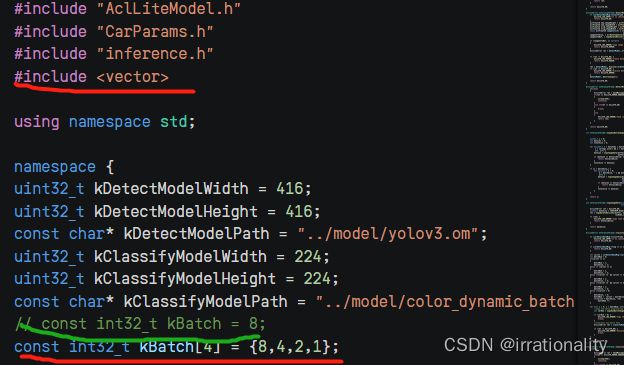

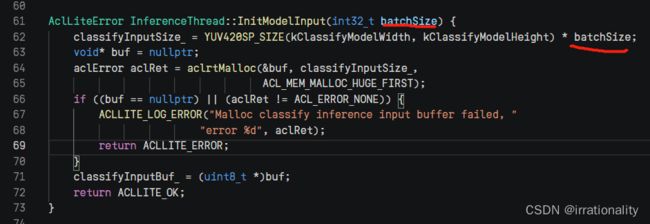
inference.h
/**
* Copyright 2020 Huawei Technologies Co., Ltd
*
* Licensed under the Apache License, Version 2.0 (the "License");
* you may not use this file except in compliance with the License.
* You may obtain a copy of the License at
* http://www.apache.org/licenses/LICENSE-2.0
* Unless required by applicable law or agreed to in writing, software
* distributed under the License is distributed on an "AS IS" BASIS,
* WITHOUT WARRANTIES OR CONDITIONS OF ANY KIND, either express or implied.
* See the License for the specific language governing permissions and
* limitations under the License.
* File sample_process.h
* Description: handle acl resource
*/
#pragma once
#include inference.cpp
/**
* Copyright 2020 Huawei Technologies Co., Ltd
*
* Licensed under the Apache License, Version 2.0 (the "License");
* you may not use this file except in compliance with the License.
* You may obtain a copy of the License at
* http://www.apache.org/licenses/LICENSE-2.0
* Unless required by applicable law or agreed to in writing, software
* distributed under the License is distributed on an "AS IS" BASIS,
* WITHOUT WARRANTIES OR CONDITIONS OF ANY KIND, either express or implied.
* See the License for the specific language governing permissions and
* limitations under the License.
* File sample_process.cpp
* Description: handle acl resource
*/
#include cp ~/dynamic_batch/samples/cplusplus/level3_application/1_cv/detect_and_classify/src/inference/inference.cpp ~/samples/cplusplus/level3_application/1_cv/detect_and_classify/src/inference/inference.cpp
编译inference
cd ~/samples/cplusplus/level3_application/1_cv/detect_and_classify/
cd scripts
bash sample_build.sh
然后又参考这个单batch的搞
https://gitee.com/ascend/samples/tree/master/cplusplus/level2_simple_inference/1_classification/resnet50_imagenet_classification
git clone https://gitee.com/ascend/samples.git
可参考此代码实现动态batch
https://gitee.com/ascend/samples/tree/master/cplusplus/level2_simple_inference/1_classification/googlenet_imagenet_dynamic_batch
但该方法较为繁琐,仅供参考。
CANN实现动态特性的本质就是在模型中增加了一个“aipp算子”。该算子给出所有动态参数的数值,从而在推理过程中,所有的参数均有具体的值,而不需要动态地推理和计算。所以我们需要在模型转化过程中将“动态算子”加入到模型文件中,之后在执行程度时候指定该动态算子的值。
cd ~/samples
cd cplusplus/level2_simple_inference/1_classification/resnet50_imagenet_classification
参考https://gitee.com/ascend/samples/tree/master/cplusplus/level2_simple_inference/1_classification/resnet50_imagenet_classification获取模型
您可以从以下链接中获取ResNet-50网络的模型文件(.prototxt)、预训练模型文件(.caffemodel),并以运行用户将获取的文件上传至开发环境的“样例目录/caffe_model“目录下。如果目录不存在,需要自行创建。
- ResNet-50网络的模型文件(*.prototxt):单击Link下载该文件。
- ResNet-50网络的预训练模型文件(*.caffemodel):单击Link下载该文件。
mkdir caffe_model
cd caffe_model
wget https://obs-9be7.obs.cn-east-2.myhuaweicloud.com/003_Atc_Models/AE/ATC%20Model/resnet50/resnet50.prototxt
wget https://obs-9be7.obs.cn-east-2.myhuaweicloud.com/003_Atc_Models/AE/ATC%20Model/resnet50/resnet50.caffemodel
cd ..
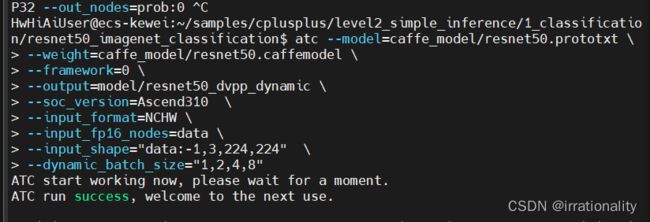
提供转换命令及转换成功的截图
atc --model=caffe_model/resnet50.prototxt \
--weight=caffe_model/resnet50.caffemodel \
--framework=0 \
--output=model/resnet50_dvpp_dynamic \
--soc_version=Ascend310  \
--input_shape="data:-1,3,224,224"  \
--dynamic_batch_size="1,2,4,8"
改造成支持多Batch场景下的推理
mkdir -p build/intermediates/host
cd ~/samples/cplusplus/level2_simple_inference/1_classification/resnet50_imagenet_classification
mkdir caffe_model
cd caffe_model
wget https://obs-9be7.obs.cn-east-2.myhuaweicloud.com/003_Atc_Models/AE/ATC%20Model/resnet50/resnet50.caffemodel
wget https://obs-9be7.obs.cn-east-2.myhuaweicloud.com/003_Atc_Models/AE/ATC%20Model/resnet50/resnet50.prototxt

atc --model=caffe_model/resnet50.prototxt \
--weight=caffe_model/resnet50.caffemodel \
--framework=0 \
--output=model/resnet50_dvpp_dynamic \
--soc_version=Ascend310  \
--input_format=NCHW \
--input_fp16_nodes=data \
--input_shape="data:-1,3,224,224"  \
--dynamic_batch_size="1,2,4,8"
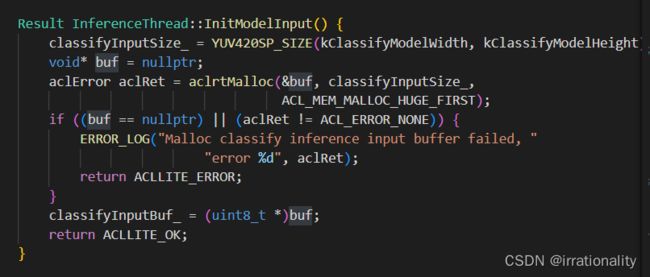
添加多batch读入内存

在process函数添加计算batchnum的逻辑
头文件中增加两个可以支持多线程的函数
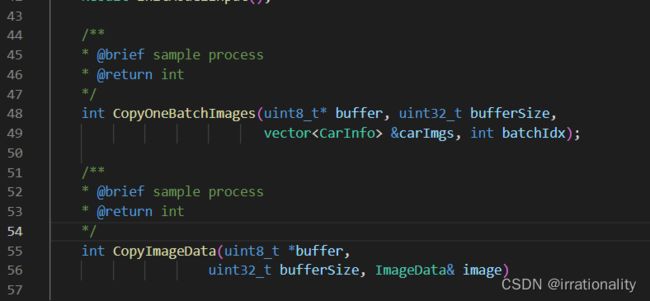
然后老规矩,编译运行
cd data
wget https://obs-9be7.obs.cn-east-2.myhuaweicloud.com/models/aclsample/dog1_1024_683.jpg

wget https://obs-9be7.obs.cn-east-2.myhuaweicloud.com/models/aclsample/dog2_1024_683.jpg

python3 ../script/transferPic.py
export DDK_PATH=$HOME/Ascend/ascend-toolkit/latest
export NPU_HOST_LIB=$DDK_PATH/acllib/lib64/stub
cd ..
mkdir -p build/intermediates/host
cd build/intermediates/host
cmake ../../../src -DCMAKE_CXX_COMPILER=g++ -DCMAKE_SKIP_RPATH=TRUE
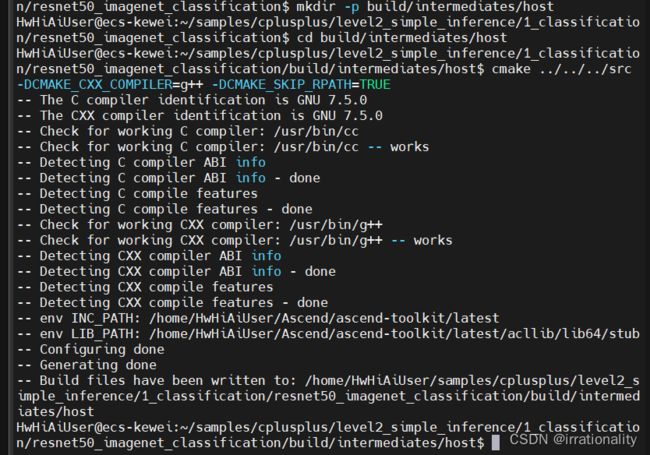
但是编译中报这个错误没有解决,就只进行到这一步了
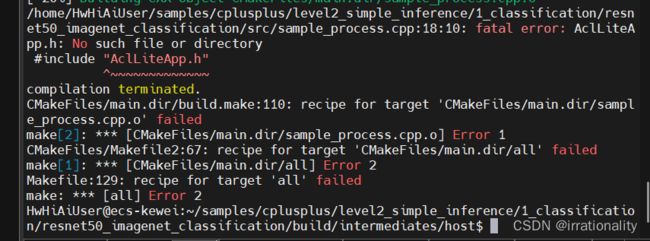
现将代码上传到gitee,后续备查
https://gitee.com/qmckw/resnet50_imagenet_classification
串联一个图像流程
之前做过一个一样的,可以参考
https://bbs.huaweicloud.com/forum/thread-183423-1-1.html
jpegd样例
su HwHiAiUser
cd ~
cd ${HOME}/samples/cplusplus/level2_simple_inference/0_data_process/jpegd/scripts
bash sample_build.sh
bash sample_run.sh
中途需要输入x86,执行完sample_build.sh后,我们已经下载了小狗狗图片了。
打开sample_run.sh阅读一下有关代码
这段代码会执行我们刚刚编译生成的可执行文件main,执行sample_run.sh后,图片已经解码
生成yuv文件。我们把处理前后的图片都下载到本地。
resize样例
功能:调用dvpp的resize接口,实现图像缩放功能。
样例输入:原始YUV图片。
样例输出:缩放后的YUV图片。
cd ${HOME}/samples/cplusplus/level2_simple_inference/0_data_process/resize/scripts
bash sample_build.sh
同样的,我们可以看看sample_build.sh里面的内容
cd /home/HwHiAiUser/samples/cplusplus/level2_simple_inference/0_data_process/jpegd/out/output
cp *.yuv /home/HwHiAiUser/samples/cplusplus/level2_simple_inference/0_data_process/resize/data/
修改一下sample_run.sh
#修改sample_run.sh文件,将resize的yuv文件名和resize前后的大小改一下:
cd /home/HwHiAiUser/samples/cplusplus/level2_simple_inference/0_data_process/resize/scripts
vi sample_run.sh
把running这一行修改为running_command="./main …/data/dvpp_output.yuv 1024 688 ./output/output_dog.yuv 640 480 "
bash sample_run.sh
cd ../out/output
ls
# 可以看见输出的yuv文件,右键download下载到本地。
jpege样例
功能:调用dvpp的jpege接口,实现图片编码的功能。
样例输入:待编码的YUV图片。
样例输出:编码后的jpeg图片。
cd /home/HwHiAiUser/samples/cplusplus/level2_simple_inference/0_data_process/jpege/scripts
bash sample_build.sh
这种穿在一起的有两个办法,一个是把sample_build和sample_run串在一起,另外一种是写一个脚本,今天时间紧迫,那我先用简单的方法实现:修改有关参数(输入输出图片大小)后,直接用脚本
vi start.sh
bash start.sh
cd ${HOME}/samples/cplusplus/level2_simple_inference/0_data_process/jpegd/scripts
bash sample_build.sh
bash sample_run.sh
cd /home/HwHiAiUser/samples/cplusplus/level2_simple_inference/0_data_process/jpegd/out/output
cp *.yuv /home/HwHiAiUser/samples/cplusplus/level2_simple_inference/0_data_process/resize/data/

cd /home/HwHiAiUser/samples/cplusplus/level2_simple_inference/0_data_process/resize/scripts
bash sample_run.sh
cd /home/HwHiAiUser/samples/cplusplus/level2_simple_inference/0_data_process/jpege/scripts
bash sample_build.sh
cp ../../resize/out/output/output_dog.yuv ../data/
bash sample_run.sh
下次有时间退出一个完整版的
代码


