NNDL 实验二 pytorch入门
一. 概念:张量、算子
1、张量
在深度学习的实践中,通常使用向量或矩阵运算来提高计算效率。
在深度学习框架中,数据经常用张量(Tensor)的形式来存储。张量是矩阵的扩展与延伸,可以认为是高阶的矩阵。1阶张量为向量,2阶张量为矩阵。如果对Numpy熟悉,那么张量是类似于Numpy的多维数组(ndarray)的概念,可以具有任意多的维度。
注意:这里的“维度”是“阶”的概念,和线性代数中向量的“维度”含义不同。
张量的大小可以用形状(shape)来描述。
举例:比如一个三维张量的形状是 [2,2,5],表示每一维(也称为轴(axis))的元素的数量,即第0轴上元素数量是2,第1轴上元素数量是2,第2轴上的元素数量为5。(下图给出了3种纬度的张量可视化表示,理解起来更直观)
张量中元素的类型可以是布尔型数据、整数、浮点数或者复数,但同一张量中所有元素的数据类型均相同。因此我们可以给张量定义一个数据类型(dtype)来表示其元素的类型。
2、算子
算子即Operator,这里简称op。深度学习算法由一个个计算单元组成,op是深度学习的基础操作,任意深度学习框架中都包含了数百个op,这些op用于各种类型的数值、tensor运算。
- 算子的名称:标识网络中的某个算子,同一网络中算子的名称需要保持唯一。
- 算子的类型:网络中每个算子根据算子类型进行实现逻辑的匹配,在一个网络中同一类型的算子可能存在多个。
在深度学习中,通过nn.Module这样搭积木的方式搭建网络,而op就是更基础的,用于制作积木的配方和原材料。
二. 使用pytorch实现张量运算
1.2 张量
1.2.1 创建张量
创建一个张量可以有多种方式,如:指定数据创建、指定形状创建、指定区间创建等。
1.2.1.1 指定数据创建张量
通过给定Python列表数据,可以创建任意维度的张量。
(1)通过指定的Python列表数据[2.0, 3.0, 4.0],创建一个一维张量。
import torch       #导入PyTorch包
t1=torch.tensor([2.0,3.0,4.0]);    #通过列表创建函数,创建一维Tensor
print(t1)
(2)通过指定的Python列表数据来创建类似矩阵(matrix)的二维张量。
import torch       #导入PyTorch包
t2=torch.tensor([[1.0,2.0,3.0],[4.0,5.0,6.0]]);    #通过列表创建函数,创建二维Tensor
print(t2)
(3)同样地,还可以创建维度为3、4...N等更复杂的多维张量。
import torch       #导入PyTorch包
t3=torch.tensor([[[1, 2, 3, 4, 5],
                  [6, 7, 8, 9, 10]],
                 [[11, 12, 13, 14, 15],
                  [16, 17, 18, 19, 20]]]);    #通过列表创建函数,创建多维Tensor
print(t3)
需要注意的是,张量在任何一个维度上的元素数量必须相等。
1.2.1.2 指定形状创建
如果要创建一个指定形状、元素数据相同的张量,可以使用torch.zeros、torch.ones、torch.full等
import torch #导入PyTorch包
m, n = 2, 3

# 使用torch.zeros创建数据全为0,形状为[m, n]的Tensor
zeros_Tensor = torch.zeros([m, n])

# 使用torch.ones创建数据全为1,形状为[m, n]的Tensor
ones_Tensor = torch.ones([m, n])

# 使用torch.full创建数据全为指定值,形状为[m, n]的Tensor,这里我们指定数据为10
full_Tensor = torch.full([m, n], 10)

print('zeros Tensor: ', zeros_Tensor)
print('ones Tensor: ', ones_Tensor)
print('full Tensor: ', full_Tensor)
1.2.1.3 指定区间创建
如果要在指定区间内创建张量,可以使用torch.arange、torch.linspace等
import torch #导入PyTorch包
# 使用torch.arange创建以步长step均匀分隔数值区间[start, end)的一维Tensor
arange_Tensor = torch.arange(start=1, end=5, step=1);

# 使用torch.linspace创建以元素个数num均匀分隔数值区间[start, stop]的Tensor
linspace_Tensor = torch.linspace(start=1, end=5, steps=5);
#注意:这里要用end,step会报错

print('arange Tensor: ', arange_Tensor)
print('linspace Tensor: ', linspace_Tensor)
1.2.2 张量的属性
1.2.2.1 张量的形状
张量具有如下形状属性:
torch.ndim:张量的维度,例如向量的维度为1,矩阵的维度为2。torch.shape: 张量每个维度上元素的数量。torch.shape[n]:张量第n维的大小。第n维也称为轴(axis)。torch.size:张量中全部元素的个数。
创建一个四维张量,并打印出shape、ndim、shape[n]、size属性。
import torch
ndim_4_Tensor = torch.ones([2, 3, 4, 5])

print("Number of dimensions:", ndim_4_Tensor.ndim)
print("Shape of Tensor:", ndim_4_Tensor.shape)
print("Elements number along axis 0 of Tensor:", ndim_4_Tensor.shape[0])
print("Elements number along the last axis of Tensor:", ndim_4_Tensor.shape[-1])
print('Number of elements in Tensor: ', ndim_4_Tensor.size)
1.2.2.2 形状的改变
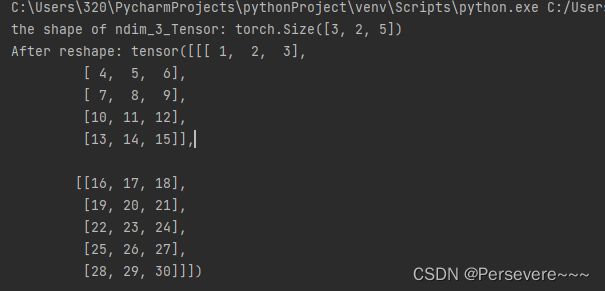
除了查看张量的形状外,重新设置张量的在实际编程中也具有重要意义,飞桨提供了torch.reshape接口来改变张量的形状。
import torch
# 定义一个shape为[3,2,5]的三维Tensor
ndim_3_Tensor = torch.tensor([[[1, 2, 3, 4, 5],
                                [6, 7, 8, 9, 10]],
                              [[11, 12, 13, 14, 15],
                               [16, 17, 18, 19, 20]],
                              [[21, 22, 23, 24, 25],
                               [26, 27, 28, 29, 30]]])
print("the shape of ndim_3_Tensor:", ndim_3_Tensor.shape)

# torch.reshape 可以保持在输入数据不变的情况下,改变数据形状。这里我们设置reshape为[2,5,3]
reshape_Tensor = torch.reshape(ndim_3_Tensor, (2, 5, 3))
print("After reshape:", reshape_Tensor)
分别对上文定义的ndim_3_Tensor进行reshape为[-1]和reshape为[0, 5, 2]两种操作,观察新张量的形状。
import torch
# 定义一个shape为[3,2,5]的三维Tensor
ndim_3_Tensor = torch.tensor([[[1, 2, 3, 4, 5],
                                [6, 7, 8, 9, 10]],
                              [[11, 12, 13, 14, 15],
                               [16, 17, 18, 19, 20]],
                              [[21, 22, 23, 24, 25],
                               [26, 27, 28, 29, 30]]])

new_Tensor1 = ndim_3_Tensor.reshape([-1])
print('new Tensor 1 shape: ', new_Tensor1.shape)
new_Tensor2 = ndim_3_Tensor.reshape([-1, 5, 2])
print('new Tensor 2 shape: ', new_Tensor2.shape)
从输出结果看,第一行代码中的第一个reshape操作将张量reshape为元素数量为30的一维向量;第四行代码中的第二个reshape操作中,0对应的维度的元素个数与原张量在该维度上的元素个数相同。
1.2.2.3 张量的数据类型
- 对于Python整型数据,则会创建int64型张量。
- 对于Python浮点型数据,默认会创建float32型张量。
import torch
# 使用torch.tensor通过已知数据来创建一个Tensor
print("Tensor dtype from Python integers:", torch.tensor(1).dtype)
print("Tensor dtype from Python floating point:", torch.tensor(1.0).dtype)
如果想改变张量的数据类型,
import torch
# 定义dtype为float32的Tensor
float32_Tensor = torch.tensor(1.0)
# 将输入数据的数据类型转换为指定的dtype并输出。支持输出和输入数据类型相同。
int64_Tensor = float32_Tensor.to(torch.int64)
print("Tensor after cast to int64:", int64_Tensor.dtype)
1.2.2.4 张量的设备位置
初始化张量时可以通过place来指定其分配的设备位置,可支持的设备位置有三种:CPU、GPU和固定内存。
import torch
# 创建CPU上的Tensor
cpu_Tensor = torch.tensor(1,device=torch.device("cpu"))
# 通过Tensor.place查看张量所在设备位置
print('cpu Tensor: ', cpu_Tensor.device)
# 创建GPU上的Tensor
gpu_Tensor = torch.tensor(1,device=torch.device("cuda"))
print('gpu Tensor: ', gpu_Tensor.device)
1.2.3 张量与Numpy数组转换
张量和Numpy数组可以相互转换。
import torch
ndim_1_Tensor = torch.tensor([1., 2.])
# 将当前 Tensor 转化为 numpy.ndarray
print('Tensor to convert: ', ndim_1_Tensor.numpy())
1.2.4 张量的访问
1.2.4.1 索引和切片
我们可以通过索引或切片方便地访问或修改张量。
1.2.4.2 访问张量
针对一维张量,对单个轴进行索引和切片。
import torch
# 定义1个一维Tensor
ndim_1_Tensor = torch.tensor([0, 1, 2, 3, 4, 5, 6, 7, 8])

print("Origin Tensor:", ndim_1_Tensor)
print("First element:", ndim_1_Tensor[0])
print("Last element:", ndim_1_Tensor[-1])
print("All element:", ndim_1_Tensor[:])
print("Before 3:", ndim_1_Tensor[:3])
print("Interval of 3:", ndim_1_Tensor[::3])
print("Reverse:", ndim_1_Tensor.flip(-1))  #pytorch中step必须大于0
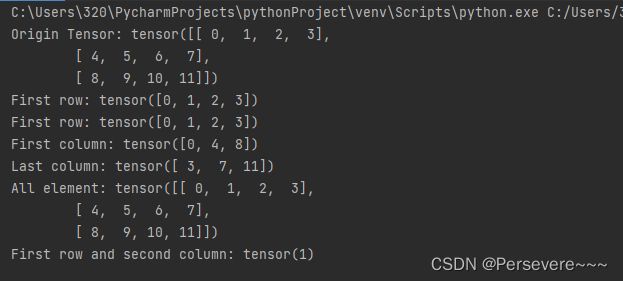
针对二维及以上维度的张量,在多个维度上进行索引或切片。索引或切片的第一个值对应第0维,第二个值对应第1维,以此类推,如果某个维度上未指定索引,则默认为“:”。
import torch
# 定义1个二维Tensor
ndim_2_Tensor = torch.tensor([[0, 1, 2, 3],
                              [4, 5, 6, 7],
                              [8, 9, 10, 11]])
print("Origin Tensor:", ndim_2_Tensor)
print("First row:", ndim_2_Tensor[0])
print("First row:", ndim_2_Tensor[0, :])
print("First column:", ndim_2_Tensor[:, 0])
print("Last column:", ndim_2_Tensor[:, -1])
print("All element:", ndim_2_Tensor[:])
print("First row and second column:", ndim_2_Tensor[0, 1])
1.2.4.3 修改张量
与访问张量类似,可以在单个或多个轴上通过索引或切片操作来修改张量。
import torch
# 定义1个二维Tensor
ndim_2_Tensor = torch.ones([2, 3])
ndim_2_Tensor = ndim_2_Tensor.to(torch.float32)#二维Tensor的类型为float32
print('Origin Tensor: ', ndim_2_Tensor)
# 修改第1维为0
ndim_2_Tensor[0] = 0
print('change Tensor: ', ndim_2_Tensor)
# 修改第1维为2.1
ndim_2_Tensor[0:1] = 2.1
print('change Tensor: ', ndim_2_Tensor)
# 修改全部Tensor
ndim_2_Tensor[...] = 3
print('change Tensor: ', ndim_2_Tensor)
1.2.5 张量的运算
张量支持包括基础数学运算、逻辑运算、矩阵运算等100余种运算操作,以加法为例,有如下两种实现方式:
1)使用 torch.add(x,y)。
2)使用张量类成员函数x.add(y)。
import torch #导入PyTorch包
# 定义两个Tensor
x = torch.tensor([[1.1, 2.2], [3.3, 4.4]])
x = x.to(torch.float64)     # x 的数据类型
y = torch.tensor([[5.5, 6.6], [7.7, 8.8]])
y = y.to(torch.float64)     # y 的数据类型
# 第一种调用方法,torch.add逐元素相加算子,并将各个位置的输出元素保存到返回结果中
print('Method 1: ', torch.add(x, y))
# 第二种调用方法
print('Method 2: ', x.add(y))
1.2.5.1 数学运算
张量类的基础数学函数如下:
x.abs()                       # 逐元素取绝对值
x.ceil()                      # 逐元素向上取整
x.floor()                     # 逐元素向下取整
x.round()                     # 逐元素四舍五入
x.exp()                       # 逐元素计算自然常数为底的指数
x.log()                       # 逐元素计算x的自然对数
x.reciprocal()                # 逐元素求倒数
x.square()                    # 逐元素计算平方
x.sqrt()                      # 逐元素计算平方根
x.sin()                       # 逐元素计算正弦
x.cos()                       # 逐元素计算余弦
x.add(y)                      # 逐元素加
x.subtract(y)                 # 逐元素减
x.multiply(y)                 # 逐元素乘(积)
x.divide(y)                   # 逐元素除
x.mod(y)                      # 逐元素除并取余
x.pow(y)                      # 逐元素幂
x.max()                       # 指定维度上元素最大值,默认为全部维度
x.min()                       # 指定维度上元素最小值,默认为全部维度
x.prod()                      # 指定维度上元素累乘,默认为全部维度
x.sum()                       # 指定维度上元素的和,默认为全部维度
同时,为了更方便地使用张量,飞桨对Python数学运算相关的魔法函数进行了重写,以下操作与上述结果相同。
x + y  -> x.add(y)            # 逐元素加
x - y  -> x.subtract(y)       # 逐元素减
x * y  -> x.multiply(y)       # 逐元素乘(积)
x / y  -> x.divide(y)         # 逐元素除
x % y  -> x.mod(y)            # 逐元素除并取余
x ** y -> x.pow(y)            # 逐元素幂
1.2.5.2 逻辑运算
张量类的逻辑运算函数如下:
x.isfinite()                  # 判断Tensor中元素是否是有限的数字,即不包括inf与nan
x.equal_all(y)                # 判断两个Tensor的全部元素是否相等,并返回形状为[1]的布尔类Tensor
x.equal(y)                    # 判断两个Tensor的每个元素是否相等,并返回形状相同的布尔类Tensor
x.not_equal(y)                # 判断两个Tensor的每个元素是否不相等
x.less_than(y)                # 判断Tensor x的元素是否小于Tensor y的对应元素
x.less_equal(y)               # 判断Tensor x的元素是否小于或等于Tensor y的对应元素
x.greater_than(y)             # 判断Tensor x的元素是否大于Tensor y的对应元素
x.greater_equal(y)            # 判断Tensor x的元素是否大于或等于Tensor y的对应元素
x.allclose(y)                 # 判断两个Tensor的全部元素是否接近
1.2.5.3 矩阵运算
张量类还包含了矩阵运算相关的函数,如矩阵的转置、范数计算和乘法等。
x.t()                         # 矩阵转置
x.transpose([1, 0])           # 交换第 0 维与第 1 维的顺序
x.norm('fro')                 # 矩阵的弗罗贝尼乌斯范数
x.dist(y, p=2)                # 矩阵(x-y)的2范数
x.matmul(y)                   # 矩阵乘法
1.2.5.4 广播机制
广播机制主要遵循如下规则:
1)每个张量至少为一维张量。
2)从后往前比较张量的形状,当前维度的大小要么相等,要么其中一个等于1,要么其中一个不存在。
import torch #导入PyTorch包
# 当两个Tensor的形状一致时,可以广播
x = torch.ones((2, 3, 4))
y = torch.ones((2, 3, 4))
z = x + y
print('broadcasting with two same shape tensor: ', z.shape)

x = torch.ones((2, 3, 1, 5))
y = torch.ones((3, 4, 1))
# 从后往前依次比较:
# 第一次:y的维度大小是1
# 第二次:x的维度大小是1
# 第三次:x和y的维度大小相等,都为3
# 第四次:y的维度不存在
# 所以x和y是可以广播的
z = x + y
print('broadcasting with two different shape tensor:', z.shape)
import torch #导入PyTorch包
x = torch.ones([10, 1, 5, 2])
y = torch.ones([3, 2, 5])
z = torch.matmul(x, y)
print('After matmul: ', z.shape)
三. 使用pytorch实现数据预处理
1. 读取数据集 house_tiny.csv、boston_house_prices.csv、Iris.csv
import pandas as pd   #导入pandas包
# 读取数据集
data_house_tiny = pd.read_csv('house_tiny.csv')
data_boston_house_prices = pd.read_csv('boston_house_prices.csv')
data_Iris = pd.read_csv('Iris.csv')
# 输出数据集
print(data_house_tiny)
print(data_boston_house_prices)
print(data_Iris)
   NumRooms Alley   Price
0       NaN  Pave  127500
1       2.0   NaN  106000
2       4.0   NaN  178100
3       NaN   NaN  140000
        CRIM    ZN  INDUS  CHAS    NOX  ...  RAD  TAX  PTRATIO  LSTAT  MEDV
0    0.00632  18.0   2.31     0  0.538  ...    1  296     15.3   4.98  24.0
1    0.02731   0.0   7.07     0  0.469  ...    2  242     17.8   9.14  21.6
2    0.02729   0.0   7.07     0  0.469  ...    2  242     17.8   4.03  34.7
3    0.03237   0.0   2.18     0  0.458  ...    3  222     18.7   2.94  33.4
4    0.06905   0.0   2.18     0  0.458  ...    3  222     18.7   5.33  36.2
..       ...   ...    ...   ...    ...  ...  ...  ...      ...    ...   ...
501  0.06263   0.0  11.93     0  0.573  ...    1  273     21.0   9.67  22.4
502  0.04527   0.0  11.93     0  0.573  ...    1  273     21.0   9.08  20.6
503  0.06076   0.0  11.93     0  0.573  ...    1  273     21.0   5.64  23.9
504  0.10959   0.0  11.93     0  0.573  ...    1  273     21.0   6.48  22.0
505  0.04741   0.0  11.93     0  0.573  ...    1  273     21.0   7.88  11.9

[506 rows x 13 columns]
      Id  SepalLengthCm  ...  PetalWidthCm         Species
0      1            5.1  ...           0.2     Iris-setosa
1      2            4.9  ...           0.2     Iris-setosa
2      3            4.7  ...           0.2     Iris-setosa
3      4            4.6  ...           0.2     Iris-setosa
4      5            5.0  ...           0.2     Iris-setosa
..   ...            ...  ...           ...             ...
145  146            6.7  ...           2.3  Iris-virginica
146  147            6.3  ...           1.9  Iris-virginica
147  148            6.5  ...           2.0  Iris-virginica
148  149            6.2  ...           2.3  Iris-virginica
149  150            5.9  ...           1.8  Iris-virginica

[150 rows x 6 columns]

Process finished with exit code 0
2. 处理缺失值
import pandas as pd   #导入pandas包
# 读取数据集
data_house_tiny = pd.read_csv('house_tiny.csv')
data_boston_house_prices = pd.read_csv('boston_house_prices.csv')
data_Iris = pd.read_csv('Iris.csv')

inputs, outputs = data_house_tiny.iloc[:, 0:2], data_house_tiny.iloc[:, 2]
inputs = inputs.fillna(inputs.mean())
print(inputs)
3. 转换为张量格式
import pandas as pd   #导入pandas包
import numpy as np
# 读取数据集
data_house_tiny = pd.read_csv('house_tiny.csv')
data_boston_house_prices = pd.read_csv('boston_house_prices.csv')
data_Iris = pd.read_csv('Iris.csv')

inputs, outputs = data_house_tiny.iloc[:, 0:2], data_house_tiny.iloc[:, 2]
inputs = inputs.fillna(inputs.mean())

x, y = np.array(inputs.values), np.array(outputs.values)
print(x, y)
记录一下:
这是深度学习课程的第二次实验,较之上次实验难度提高。完成本次实验的过程中,在网上查询了很多相关的知识。在自己查询的过程中,有时也是需要在众多文章中判断自己需要的是什么,也要自己动手去验证。但这种学习过程更能加深自己对知识的理解,是一种很好的学习方法。


