【环境配置】Windows 11 的 WSL(Ubuntu2204) 安装OpenCV 4.5.4 (亲测有效)
Windows 11 的 WSL(Ubuntu2204) 安装OpenCV 4.5.4 (亲测有效)
文章目录
- Windows 11 的 WSL(Ubuntu2204) 安装OpenCV 4.5.4 (亲测有效)
-
- WSL 安装
- 编译安装
- 下载 OpenCV
- 编译安装
- 环境变量配置与验证
- 安装Xserver, 图形化显示
- 验证是否显示OpenCV
- 其他
WSL 安装
直接在 Windows Store 里搜索最新的 Ubuntu版本 22.04 版本进行安装;
编译安装
在 Powershell 里输入 wsl进入环境,
sudo apt install build-essential
sudo apt install cmake git libgtk2.0-dev pkg-config
sudo apt install libavcodec-dev libavformat-dev
sudo apt install libjpeg-dev libswscale-dev libtiff5-dev
sudo apt install python-dev python-numpy libtbb2 libtbb-dev libpng-dev libjasper-dev libdc1394-22-dev
无法安装
libjasper-dev和libdc1394-22-devReading package lists... Done Building dependency tree... Done Reading state information... Done E: Unable to locate package libjasper-dev E: Unable to locate package libdc1394-22-dev
解决一:
sudo vim /etc/apt/sources.list
最后一行加入如下内容并保存退出:
deb http://security.ubuntu.com/ubuntu xenial-security main
再执行:
sudo apt-get update
解决二:
sudo add-apt-repository "deb http://security.ubuntu.com/ubuntu xenial-security main"
sudo apt update
sudo apt install libjasper1 libjasper-dev
但是可能会出现问题如下:
Hit:1 http://security.ubuntu.com/ubuntu jammy-security InRelease
Get:2 http://security.ubuntu.com/ubuntu xenial-security InRelease [99.8 kB]
Hit:3 https://mirrors.tuna.tsinghua.edu.cn/ubuntu jammy InRelease
Hit:4 https://mirrors.tuna.tsinghua.edu.cn/ubuntu jammy-updates InRelease
Hit:5 https://mirrors.tuna.tsinghua.edu.cn/ubuntu jammy-backports InRelease
Hit:6 https://mirrors.tuna.tsinghua.edu.cn/ubuntu jammy-security InRelease
Err:2 http://security.ubuntu.com/ubuntu xenial-security InRelease
  The following signatures couldn't be verified because the public key is not available: NO_PUBKEY 40976EAF437D05B5 NO_PUBKEY 3B4FE6ACC0B21F32
Reading package lists... Done
W: GPG error: http://security.ubuntu.com/ubuntu xenial-security InRelease: The following signatures couldn't be verified because the public key is not available: NO_PUBKEY 40976EAF437D05B5 NO_PUBKEY 3B4FE6ACC0B21F32
E: The repository 'http://security.ubuntu.com/ubuntu xenial-security InRelease' is not signed.
N: Updating from such a repository can't be done securely, and is therefore disabled by default.
N: See apt-secure(8) manpage for repository creation and user configuration details.
解决方法如下
sudo apt-key adv --keyserver keyserver.ubuntu.com --recv-keys 3B4FE6ACC0B21F32
Warning: apt-key is deprecated. Manage keyring files in trusted.gpg.d instead (see apt-key(8)).
Executing: /tmp/apt-key-gpghome.zW1sustAL5/gpg.1.sh --keyserver keyserver.ubuntu.com --recv-keys 3B4FE6ACC0B21F32
gpg: key 3B4FE6ACC0B21F32: public key "Ubuntu Archive Automatic Signing Key (2012) " imported
gpg: Total number processed: 1
gpg:               imported: 1
sudo apt update && sudo apt upgrade
ref:
https://blog.csdn.net/wm9028/article/details/122982116
无法安装 libdc1394-22-dev
Reading package lists... Done
Building dependency tree... Done
Reading state information... Done
E: Unable to locate package libdc1394-22-dev
问题解答
The libdc1394-22-dev package was removed in Debian and Ubuntu after 21.10. This is because the source package it was from - libdc1394-22 - was superseded by a different package.
The package was orphaned and removed with Debian Bug #963924 because the package libdc1394 has superseded libdc1394-22.
It has its own dev package - libdc1394-dev - which will probably get you what you want/need. So install that package instead of the package you were trying to install.
安装 libdc1394-dev即可。
sudo apt install libdc1394-dev
下载 OpenCV
进入 OpenCV 官网 下载对应版本,我这里用的是 4.5.4;
编译安装
将下载的源码拷贝到 WSL 系统里的 /home 目录下,并解压。
cd opencv-4.5.4
mkdir build && cd build
cmake -D CMAKE_BUILD_TYPE=RELEASE \
      -D CMAKE_INSTALL_PREFIX=/usr/local \
      -D OPENCV_GENERATE_PKGCONFIG=ON ..
make -j
sudo make install   # 安装
可能出现的问题1:找不到ippcv
ippcv资源百度盘 提取码: 8888
将下载的文件替换到 .cache 目录下,并将文件名替换为下载的文件名。 重新编译。
ref: https://blog.csdn.net/qq_43478260/article/details/109458079
可能出现的问题2:找不到ade
OpenCV的gapi模块的编译依赖ADE,在OpenCV的build过程中会自动下载ADE,因为被墙了,所以下载失败,所以要手动下载并修改相关文件;
ade资源百度盘 提取码:8888
通过命令查看ade的md5值,并根据值修改相关文件;
md5sum ade.zip
修改文件 DownloadADE.cmake (modules/gapi/cmake/DownloadADE.cmake) 里
set(ade_md5 ... 里面的md5值替换成刚才的值,
修改 "https://github.com/opencv/ade/archive/" 为文件路径 file///home/usrname/opencv3rd/
ocv_download(FILENAME ${ade_filename}
HASH a d e m d 5 U R L " {ade_md5} URL " ademd5URL"{OPENCV_ADE_URL}"
“$ENV{OPENCV_ADE_URL}”
“https://github.com/opencv/ade/archive/”
DESTINATION_DIR ${ade_src_dir}
ID ADE
STATUS res
UNPACK RELATIVE_URL)
修改完后,重新编译。
ref: https://blog.csdn.net/wzw_2008/article/details/106944407
可能出现的问题3:内存不足
C++: fatal error: Killed signal terminated program cc1plus的问题解决
编译过程中,过度占用了宿主机的CPU和内存,可以减少编译线程;
make -j4 # 之前是 make -j 需修改为 make -j4, 可能编译会慢很多,但是稳
ref:
- https://blog.csdn.net/Undefinedefity/article/details/106180033
- https://www.zhihu.com/question/340599582/answer/1371691742
环境变量配置与验证
sudo vim /etc/ld.so.conf
在最后加上一行 /usr/loacal/lib, 完成后 ESC再输入 :wq保存退出。
运行
sudo ldconfig
然后修改 bash.bashrc文件
sudo vim /etc/bash.bashrc
在文件末尾加入:
PKG_CONFIG_PATH=$PKG_CONFIG_PATH:/usr/local/lib/pkgconfig
export PKG_CONFIG_PATH
然后进行 souce,更新环境变量
source /etc/bash.bashrc
验证是否安装成功
pkg-config --modversion opencv4
输出 4.5.4代表安装成功。
安装Xserver, 图形化显示
在 wsl 里安装 xfce4
sudo apt-get update && sudo apt-get upgrade -y
sudo apt-get install xfce4
sudo apt install xfce4-session
配置环境变量
在wsl里
sudo vim ~/.bashrc
末尾添加
export DISPLAY=$(cat /etc/resolv.conf | grep nameserver | awk '{print $2; exit;}'):0.0
使配置生效
source ~/.bashrc
运行命令:
startxfce4
遇到如下错误
xfce4-panel: Failed to connect to session manager: Failed to connect to the session manager: IO error occured opening connection
link
this error occurs with permission issues, try: sudo -u youruser startxfce4
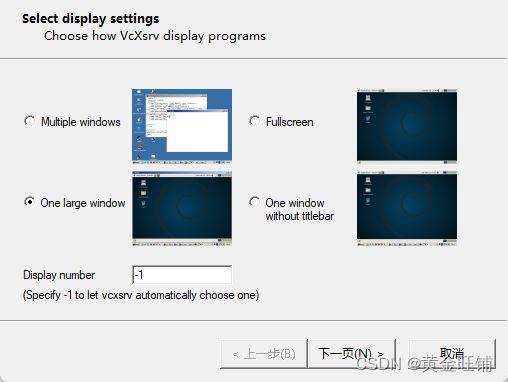
如果要在Windows上查看系统,需要安装一个Xserver,可以安装VcXsrv,链接:https://sourceforge.net/projects/vcxsrv/
Windows上启动 XLaunch,
Display settings: One large window
How to start clients: Start no client
Disable access control: Yes:
保存完成后,下次直接点开保存的文件即可打开。
至此已经可以在Windows11下可以看到 WSL里的Ubuntu2204系统和文件了。
ref:
https://blog.csdn.net/weixin_44501390/article/details/121291442
https://blog.csdn.net/m0_51984869/article/details/127538531
https://blog.csdn.net/Undefinedefity/article/details/106180033
验证是否显示OpenCV
进入到OpenCV的samples目录下
cd ~/opencv-4.5.4/samples/cpp/example_cmake/
cmake .
make
./opencv_example
至此,终于可以在Windows11的WSL上使用Ubuntu2204愉快的玩耍OpenCV了。
其他
- wsl 使用了Windows里的环境变量,想要去掉
在 /etc/wsl.conf 里插入如下代码可以不使用Windows的环境变量:
[interop]
appendWindowsPath = false
echo $PATH 可以查看环境变量是否已经发生了变化;
如果wsl要重新启用Windows的环境变量,那么就删除该段代码
ref:
a. https://www.cnblogs.com/newber/p/14167430.html
b. https://learn.microsoft.com/en-us/windows/wsl/wsl-config#configure-per-distro-launch-settings-with-wslconf
- 重启 WSL
右键 Powershell 管理员身份打开,输入下面命令
#停止LxssManager服务
net stop LxssManager

#启动LxssManager服务
net start LxssManager


