面向python,Opencv学习笔记(二)---3
学习笔记
- 前言
- 一、LUT
-
- LUT.py 代码示例
- 运行结果展示
- 二.图像的连接和图像的变化
-
- 2.1 cv.vconcat() cv.hconcat()函数:
-
- 2.1.1 Concat.py代码示例
- 2.1.2 结果展示:
- 2.2图像尺寸变化
-
- 2.2.1 Resize.py代码示例:
- 2.2.2 运行结果
- 2.3 图像的翻转变化
-
- 2.3.1 Flip.py代码示例
- 结果展示
- 2.4 图像仿射变化
-
- 2.4.1 WarpAffine.py代码示例:
- 2.4.2 结果展示:
- 2.5 图像的透视变化
- 2.6 极坐标变化
-
- 2.6.1 WarpPolar.py代码示例:
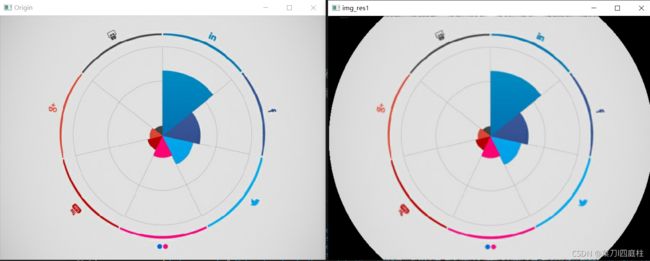
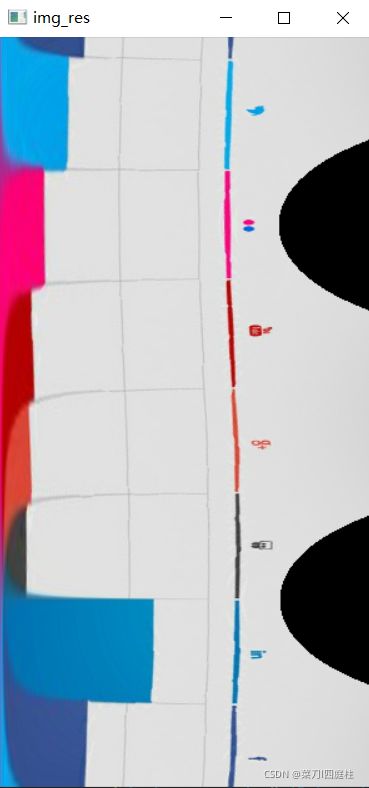
- 2.6.2 结果展示:
前言
要求opencv版本4.1.2.30(4.x >=版本),我的版本4.5.3
一、LUT
前面介绍的阈值比较方法中只有一个阈值,如果需要与多个阈值进行比较,就需要用到查找表(Look-Up-Table,LUT)。LUT就是一个灰度值映射表,以灰度图值作为索引,以灰度值映射后的数值作为表中的内容。
dst = cv.LUT(src,lut)
src:输入的图像
lut:256个灰度值的查找表
第二个参数是一个1x256的矩阵,其中存放着每个灰度值映射后的数值
LUT.py 代码示例
import cv2 as cv
import numpy as np
import sys

from numpy.core.numeric import zeros_like

if __name__=='__main__':
    #LUT第一层
    LUT_1 = np.zeros(256,dtype='uint8')
    LUT_1[1101:201]=100
    LUT_1[201:]=255
    #LUT第二层
    LUT_2 = np.zeros(256,dtype='uint8')
    LUT_2[101:151]=100
    LUT_2[151:201]=150
    LUT_2[201:]=255
    #LUT第三层
    LUT_3=np.zeros(256,dtype='uint8')
    LUT_3[0:101]=100
    LUT_3[151:201]=150
    LUT_3[201]=255
    #合并
    LUT = cv.merge((LUT_1,LUT_2,LUT_3))
    #读取图片
    img = cv.imread('./chapter_3/lena.jpg')
    gray = cv.cvtColor(img,cv.COLOR_BGR2GRAY)
    out1= cv.LUT(img,LUT_1)
    out2 = cv.LUT(gray,LUT_2)
    out3 = cv.LUT(img,LUT_3)

    cv.imshow('OUT1',out1)
    cv.imshow('OUT2',out2)
    cv.imshow('OUT3',out3)

    cv.waitKey(0)
    cv.destroyAllWindows()
运行结果展示
二.图像的连接和图像的变化
2.1 cv.vconcat() cv.hconcat()函数:
dst=cv.vconcat(src) 图像的垂直连接
dst=cv.hconcat(src)图像的水平连接
要求两个具有相同高度或者宽度的图像连接
2.1.1 Concat.py代码示例
import cv2 as cv
import numpy as np
import sys

if __name__=='__main__':
    A = np.array([[1,7],[2,8]])
    B = np.array([[4,10],[5,11]])
    #垂直连接
    V_C = cv.vconcat((A,B))
    #水平连接
    H_C=cv.hconcat((A,B))
    print('垂直连接结果:\n{}'.format(V_C))
    print('水平连接的结果:\n{}'.format(H_C))

    #读取2张图片
    img1=cv.imread('./chapter_3/flower.jpg')
    img2=cv.imread('./chapter_3/lena.jpg')

    img3=cv.hconcat((img1,img2))
    img4=cv.vconcat((img1,img2))

    cv.imshow('img3',img3)
    cv.imshow('img4',img4)

    cv.waitKey(0)
    cv.destroyAllWindows()
2.1.2 结果展示:
2.2图像尺寸变化
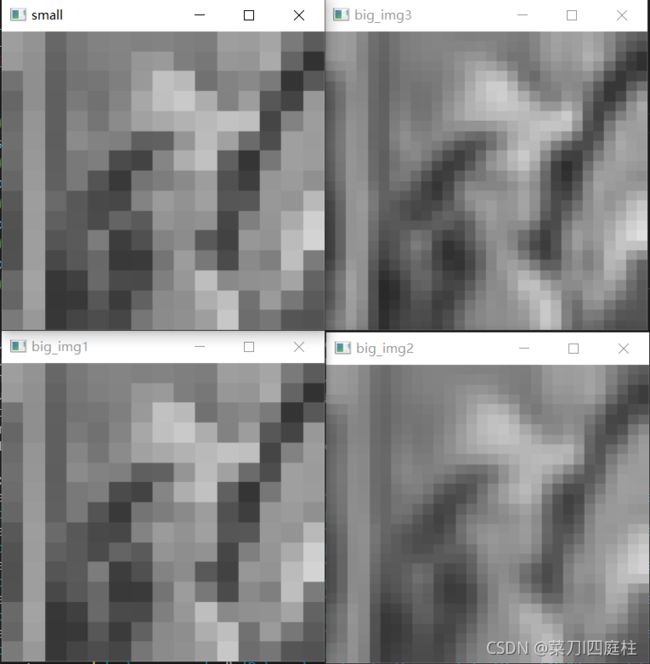
cv.resize()实现图片的缩放
dst = cv.resize(src,dsize,fx,fy,interpolation)
src:输入的图像
dsize:输出图像的尺寸
dst:输出图像
fx:水平轴的比例因子,如果沿水平轴将图像放大为原来的2倍,则指定为2
fy:垂直轴的比例因子
interpolation:插值的标志
dsize和fx,fy在实际中只需要使用一类就行
dsize和fx,fy关系如下:
dsize=Size(round(fxsrc.cols),round(fysrc.row))

缩小通常用cv.INTER_AREA
放大通常用cv.INTER_CUBIC(效果好,但是慢)和cv.INTER_LINEAR(速度比前者快)
2.2.1 Resize.py代码示例:
import cv2 as cv
import sys

if __name__ =='__main__':
    img = cv.imread('./chapter_3/lena.jpg',cv.IMREAD_GRAYSCALE)
    if img is None:
        print("Failed to read img")
        sys.exit()
    #将图像缩小
    small_img = cv.resize(img,(15,15),fx=0,fy=0,interpolation=cv.INTER_AREA)
    #最近邻插值法
    big_img1=cv.resize(small_img,(30,30),fx=0,fy=0,interpolation=cv.INTER_NEAREST)
    #双线性插值法
    big_img2=cv.resize(small_img,(30,30),fx=0,fy=0,interpolation=cv.INTER_LINEAR)
    #双三次插值法
    big_img3=cv.resize(small_img,(30,30),fx=0,fy=0,interpolation=cv.INTER_CUBIC)
    #展示结果
    cv.namedWindow('small',cv.WINDOW_NORMAL)
    cv.imshow('small',small_img)
    cv.namedWindow('big_img1',cv.WINDOW_NORMAL)
    cv.imshow('big_img1',big_img1)
    cv.namedWindow('big_img2',cv.WINDOW_NORMAL)
    cv.imshow('big_img2',big_img2)
    cv.namedWindow('big_img3',cv.WINDOW_NORMAL)
    cv.imshow('big_img3',big_img3)

    cv.waitKey(0)
    cv.destroyAllWindows()
2.2.2 运行结果
2.3 图像的翻转变化
函数:dst = cv.flip(src,flipCode)
src:输入的图像
flipCode:翻转方式的标志。若数值大于0,表示绕y轴翻转;若数值等于0,表示绕x轴翻转;若数值小于0,表示绕两条轴旋转。
2.3.1 Flip.py代码示例
import cv2 as cv
import sys

if __name__ =='__main__':
    img=cv.imread('./chapter_3/lena.jpg')
    if img is None:
        print('Failed to read img')
        sys.exit()
    #沿x轴翻转
    img_x=cv.flip(img,0)
    #沿y轴翻转
    img_y=cv.flip(img,1)
    #先沿x轴,在沿y轴翻转
    img_xy=cv.flip(img,-1)
    #展示结果
    cv.imshow('img',img)
    cv.imshow('img_x',img_x)
    cv.imshow('img_y',img_y)
    cv.imshow('img_xy',img_xy)

    cv.waitKey(0)
    cv.destroyAllWindows()
结果展示
2.4 图像仿射变化
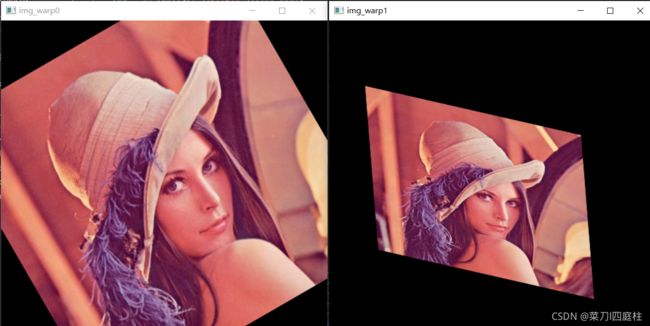
仿射变化就是图像的旋转,平移和缩放操作的统称,可以表示为线性变换和平移变化的叠加。仿射变化的数学表示是先乘以一个线性变化矩阵A再加上一个平移向量,其中线性变化的矩阵为2x2的矩阵,平移向量b为2x1的向量。所以需要输入一个2x3的矩阵M=[A b]
Opencv4中没有专门用来图像旋转的函数,而是通过图像的仿射变化来实现图像的旋转。首先要确定旋转矩阵,通过仿射变化实现图像的旋转。
两个函数实现求旋转矩阵:
retval=cv.getRotationMatrix2D(center,angle,scale)
center:图像的旋转中心
angle:图像的旋转角度,单位为度,正值代表逆时针旋转
scale:沿两轴的缩放比例,若不缩放则设置1
retval=cv.getAffineTransform(src,dst)
src:原图像中的三个像素坐标
dst:目标图像中的3个像素坐标
两个函数的返回值都为2x3的变化矩阵
在通过cv.warpAffine()得到目标图像
dst = cv.warpAffine(sec,M,dsize,flags,borderMode,borderValue)
src:输入的图像
M:2x3的变化矩阵
dsize:输出图像的尺寸
flags:插值方法的标志
borderMode:像素边界外推的标志
borderValue:填充边界的数值,默认为0
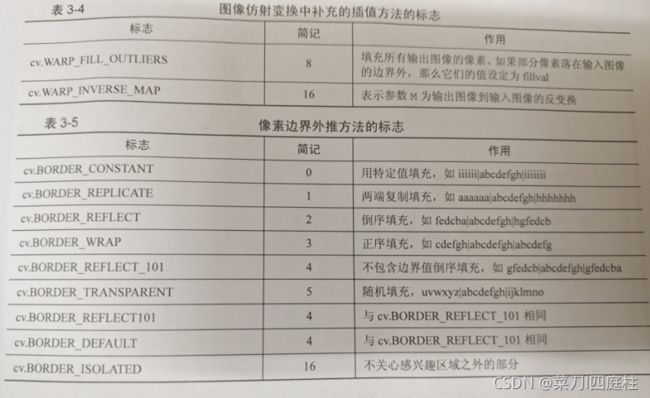
2.4.1 WarpAffine.py代码示例:
import cv2 as cv
import numpy as np
import sys

if __name__=='__main__':
    img = cv.imread('./chapter_3/lena.jpg')
    #设置图像旋转角度,尺寸,旋转中心等参数
    angle =30
    h,w=img.shape[:-1]
    size = (w,h)
    center = (w/2,h/2)
    #计算仿射变换矩阵
    rotation0=cv.getRotationMatrix2D(center,angle,1)
    #进行仿射变换
    img_warp0 =cv.warpAffine(img,rotation0,size)
    #根据定义的3个点进行仿射变化
    src_points=np.array([[0,0],[0,h-1],[w-1,h-1]],dtype='float32')
    dst_points=np.array([[w*0.11,h*0.2],[w*0.15,h*0.7],[w*0.81,h*0.85]],dtype='float32')
    rotation1=cv.getAffineTransform(src_points,dst_points)
    img_warp1=cv.warpAffine(img,rotation1,size)

    cv.imshow('img_warp0',img_warp0)
    cv.imshow('img_warp1',img_warp1)

    cv.waitKey(0)
    cv.destroyAllWindows()
2.4.2 结果展示:
2.5 图像的透视变化
透视变化是指按照物体成像投影规律进行变换,即将物体重新投影到新的成像平面上。通过透视变化可以实现对物体图像的校正。透视前后变化关系需要一个3x3的变化矩阵,该矩阵可以通过两张图像中4个对应点来求取,可以通过函数cv.getPerspectiveTransform()得到,再通过cv.warpPerspetive()得到目标图像
retal = cv.getPerspectiveTransform(src,dst,solveMethod)
src:原图像中的4个像素的坐标
dst:目标图像中的4个像素坐标
solveMethod:选择计算透视变化矩阵方法的标志(默认是cv.DECOMP_LU高斯消元法)

dst = cv.warpPerspective(src,M,dsize,flags,borderMode,borderValue)
src:输入的图像
M:2x3的变化矩阵
dsize:输出图像的尺寸
flags:插值方法的标志
borderMode:像素边界外推的标志
borderValue:填充边界的数值,默认为0
(与上面cv.warpAffine()参数含义相同)
2.6 极坐标变化
极坐标变化就是将图像从直角坐标系变化到极坐标中。(便于文字识别和检测)
通过cv.warpPolar()实现变化
dst=warpPolar(src,dsize,center,maxRadius,flags)
src:原图像
dsize:目标图像的大小
center:极坐标变化时极坐标在图像中的原点。
maxRadius:变化时边界圆的半径
flags:插值方法与极坐标映射方法的标志

2.6.1 WarpPolar.py代码示例:
import cv2 as cv
import numpy as np
import sys

if __name__=='__main__':
    img = cv.imread('./chapter_3/dial.jpg')
    if img is None:
        print('failed to read img')
        sys.exit()
    h,w=img.shape[:-1]
    center=(w/2,h/2)
    #极坐标正变化
    img_res=cv.warpPolar(img,(300,600),center,center[0],cv.INTER_LINEAR+cv.WARP_POLAR_LINEAR)
    #极坐标逆变化
    img_res1=cv.warpPolar(img_res,(w,h),center,center[0],cv.INTER_LINEAR+cv.WARP_POLAR_LINEAR+cv.WARP_INVERSE_MAP)

    cv.imshow('Origin',img)
    cv.imshow('img_res',img_res)
    cv.imshow('img_res1',img_res1)

    cv.waitKey(0)
    cv.destroyAllWindows()


