深度学习与PyTorch(一)
文章目录
- 深度学习
- 运算基本单元
-
- Tensor与ndarray
- CPU与GPU运算
- 实现K-means
-
- 蒙特卡罗算法
- 自动求导
- 反向传播
- 数据加载
-
- Dataset
- DataLoader
深度学习
深度学习原本是一种实现机器学习的手段,用于解决机器学习中的分类,回归等问题。
运算基本单元
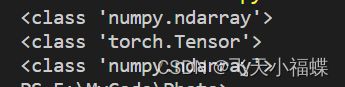
Tensor与ndarray
#coding=utf-8
import torch
import numpy as np
a=np.ones((2,2))
print(type(a))
b=torch.from_numpy(a)
print(type(b))
c=b.numpy()
print(type(c))
CPU与GPU运算
神经网络计算过程可以选择在CPU或GPU上进行,其中GPU的多核心设计更适合进行并行运算,所以在训练规模较大的神经网络时,往往会使用GPU。
实现K-means
K-means++初始化方法的思路:
- 随机选择一个数据点作为初始中心点
- 选择与该点距离较远且未被选中的点作为下一个初始中心点
- 重复前两步,直到找到所有的初始点
make_blobs的用法
data, label = make_blobs(n_features=2, n_samples=100, centers=3, random_state=3, cluster_std=[0.8, 2, 5])

n_features表示每一个样本有多少特征值
n_samples表示样本的个数
centers是聚类中心点的个数,可以理解为label的种类数
random_state是随机种子,可以固定生成的数据
cluster_std设置每个类别的方差
原文链接:https://blog.csdn.net/weixin_44177568/article/details/102213508
a = torch.randint(100,size(1,1000))

函数格式:

torch.randint(low=0, high, size, *, generator=None, out=None, dtype=None, layout=torch.strided, device=None, requires_grad=False) → Tensor

1
2
应用示例中low取默认值0

函数作用:
返回一个填充了随机整数的张量,这些整数在low(inclusive) 和high(exclusive) 之间均匀生成。张量的shape由变量参数size定义

参数说明:
常用参数:
low ( int , optional ) – 要从分布中提取的最小整数。默认值:0。
high ( int ) – 高于要从分布中提取的最高整数。
size ( tuple ) – 定义输出张量形状的元组。

关键字参数:
generator ( torch.Generator, optional) – 用于采样的伪随机数生成器
out ( Tensor , optional ) – 输出张量。
dtype ( torch.dtype , optional) – 如果是None,这个函数返回一个带有 dtype 的张量torch.int64。
layout ( torch.layout, optional) – 返回张量的所需布局。默认值:torch.strided。
device ( torch.device, optional) – 返回张量的所需设备。默认值:如果None,则使用当前设备作为默认张量类型(请参阅torch.set_default_tensor_type())。device将是 CPU 张量类型的 CPU 和 CUDA 张量类型的当前 CUDA 设备。
requires_grad ( bool , optional ) – 如果 autograd 应该在返回的张量上记录操作。默认值:False。
原文链接:https://blog.csdn.net/ZhangJingHuaJYO/article/details/123368554
蒙特卡罗算法
利用事件发生的 频率 作为事件发生的 概率 的近似值。
所以只要设计一个随机试验,使一个事件的概率与某未知数有关,然后通过重复试验,以频率近似值表示概率,即可求得该未知数的近似值。样本数量越多,其平均就越趋近于真实值。
a = torch.ones((2, 3))
print(a):
tensor([[1, 1, 1],
 		[1, 1, 1]])

a1 =  torch.sum(a)
a2 =  torch.sum(a, dim=0)
a3 =  torch.sum(a, dim=1)

print(a)
print(a1)
print(a2)
tensor(6.)
tensor([2., 2., 2.])
tensor([3., 3.])
# #coding=utf-8
import torch
import numpy as np
# a=np.ones((2,2))
# print(type(a))
# b=torch.from_numpy(a)
# print(type(b))
# c=b.numpy()
# print(type(c))
import matplotlib.pyplot as plt
from sklearn.datasets import make_blobs
from sklearn.cluster import KMeans
if torch.cuda.is_available():
device=torch.device("cuda:0")
else:
device=torch.device("cpu")
#随机矩阵
n_clusters=4
#生成数据集
data=make_blobs(n_samples=100,n_features=2,centers=n_clusters)
# print(data)
# print(data[0])
#data[0]:是样本的特征点,data[1]:为样本的标签
matrix=torch.from_numpy(data[0]).to(device).float()
#样本的标签
target=data[1]
class KMEANS:
def __init__(self,n_clusters=n_clusters,max_iter=None,verbose=False,show=True):
# """
# n_clusters:int 聚类中心数量
# max_iter:int 最大迭代次数
# verbose:bool 是否显示聚类进度
# show:bool 是否展示聚类结果
#"""
self.n_clusters=n_clusters
#数据点标签
self.labels=None
#数据之间的距离矩阵
self.dists=None
#聚类中心点
self.centers=None
#两次聚类距离的差值
self.variation = torch.Tensor([float("Inf")]).to(device)
self.verbose=verbose
self.started=False
self.max_iter=max_iter
self.count=0
self.show=show
#训练模型
def fit(self,x):
#从x中随机选择n_clusters个样本作为初始的聚类中心
self.plus(x)
while True:
#聚类标记
self.nearest_center(x)
#更新中心点
self.update_center(x)
if self.verbose:
print(self.variation,torch.argmin(self.dists,(0)))
if torch.abs(self.variation) <1e-3 and self.max_iter is None:
break
elif self.max_iter is not None and self.count==self.max_iter:
break
self.count+=1
if self.show:
self.show_result(x)
#K-means++聚类中心初始化
def plus(self,x):
#样本数量
num_samples=x.shape[0]
#样本的维度
dim=x.shape[1:]
#随机选择一个中心点
init_row=torch.randint(0,x.shape[0],(1,)).to(device)
print("center point:{}".format(init_row))
init_points=x[init_row]
print("point:{}".format(init_points))
self.centers=init_points
for i in range(self.n_clusters-1):
distances=[]#距离链表
for row in x:
#意思就是inputs的一共N维的话对这N个数据求p范数,当然这个还是太抽象了,
# 接下来还是看具体的代码~p指的是求p范数的p值,函数默认p=2,那么就是求2范数
print("row:{}".format(row))
distances.append(torch.min(torch.norm(row - self.centers,dim=1)))
print("snorm:{}".format(torch.norm(row - self.centers, dim=1)))
print("norm:{}".format(torch.min(torch.norm(row - self.centers,dim=1))))
#使用蒙特卡罗算法选取下一个点,距离越长越容易被选择到
#torch.Tensor()是一个类,是默认张量类型torch.FloatTensor()的别名,
#用于生成一个单精度浮点类型的张量。
temp=torch.sum(torch.Tensor(distances))*torch.rand(1)
#torch.rand()里面有几个数字那么就是生成几维张量!
for j in range(num_samples):
temp-=distances[j]
if temp<0:
self.centers=torch.cat([self.centers,x[j].unsqueeze(0)],dim=0)
print("self.centers:{}".format(self.centers))
break
#寻找距离各数据点最近的中心点,打上标签
def nearest_center(self,x):
#torch.empty:用来返回一个没有初始化的tensor
labels=torch.empty((x.shape[0],)).long().to(device)
dists=torch.empty((0,self.n_clusters)).to(device)
#计算聚类和最近中心点
for i,sample in enumerate(x):
print("sample:{}".format(sample))
print("self.centers:{}".format(self.centers))
print("dist:{}".format(sample - self.centers))
dist=torch.sum(
torch.mul(sample-self.centers,sample-self.centers),(1)
)
print("dists:{}".format(dist))
labels[i]=torch.argmin(dist)#返回索引
dists=torch.cat([dists,dist.unsqueeze(0)],(0))
self.labels=labels
if self.started:
self.variation=torch.sum(self.dists-dists)
self.dists=dists
self.started=True
#更新聚类中心
def update_center(self,x):
centers=torch.empty((0,x.shape[1])).to(device)
for i in range(self.n_clusters):
#选出当前聚类中的所有点
mask=self.labels==i
print("mask:{}".format(mask))
cluster_samples=x[mask]
centers=torch.cat(
[centers,torch.mean(cluster_samples,(0)).unsqueeze(0)],(0)
)
self.centers=centers
#展示聚类结果
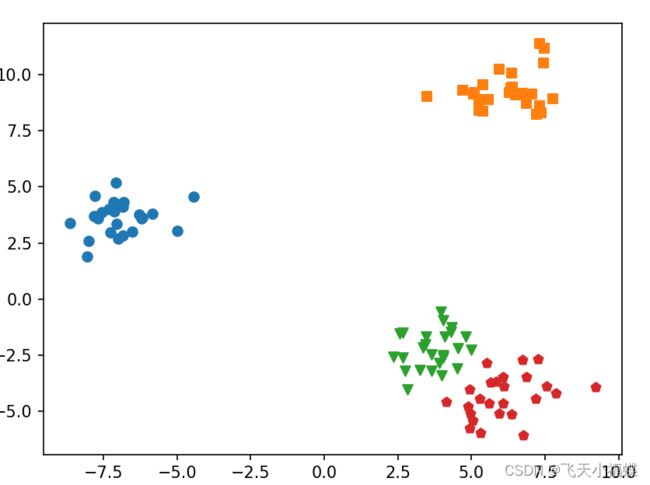
def show_result(self,x):
makers=["o","s","v","p"]
if x.shape[1]!=2 or len(set(self.labels.numpy()))>4:
raise Exception("show")
print("len",len(set(list(self.labels))))
for i,label in enumerate(set(list(self.labels.numpy()))):
samples=x[self.labels==label]
plt.scatter(
[s[0].item() for s in samples],
[s[1].item() for s in samples],
marker=makers[i],
)
plt.show()
if __name__=="__main__":
import torch.nn as nn
import time
#计算模型迭代时间
a=time.time()
clf=KMEANS(verbose=False)
clf.fit(matrix)
b=time.time()
print("total time:{}s,speed:{}iter/s".format(b-a,(b-a)))
自动求导
深度学习模型训练的核心就是反向传播,反向传播可以看成微积分链式求导法则的另一种称呼,不同于早期深度学习框架需要按层定义反向传播函数。
#coding=utf-8
import numpy as np
import torch
t=torch.zeros((2,2),requires_grad=True)
print(t.requires_grad)
反向传播
在对Tensor进行计算后,还要对最终结果进行backward运算。PyTorch会自动计算并记录计算图中与该结果相关的所有requires_grad属性为True的Tensor的梯度。使用backward时需要注意以下三点:
- backward只含有零维Tensor(只包含1个数字)才可以使用
- PyTorch的计算图为动态图,每次进行前向传播都会重新构建计算图,所以在计算backward后,会自动删除与该Tensor相关的计算图。如果需要连续多次计算backward,可以设置retain_graph参数为True.
- 对于带有梯度的Tensor,想要转成NumPy中的ndarray,就要先取Tensor中的数据,或者利用detach方法消除梯度之后才能转换。
#coding=utf-8
import numpy as np
import torch
# t=torch.zeros((2,2),requires_grad=True)
# print(t.requires_grad)
a=torch.ones((2,2),requires_grad=True)
print(a)
b=a.pow(2).sum()
print(b)
b.backward(retain_graph=True)
print(a.grad)
#反向传播
b.backward(retain_graph=True)
print(a.grad)
#转换成Numpy
print(a.data.cpu().numpy())
print(a.cpu().data.numpy())
#detach()可以用于截断计算图和消除梯度
print(a.detach().cpu().numpy())

数据加载
在训练模型时,我们通常每次输入一定数量的数据给模型,这个数量的设定需要一定的经验,主要需要考虑两方面的因素。
一是计算效率。因为Python语言的性能较差,同时GPU比CPU 更适合做并行计算,所以在训练过程中需要尽量采用并行计算,减少串行计算,因此批次(batch)不宜过小,但是如果批次过大,又会导致数据加载缓慢或内存不足等问题。
二是批次数量。合适的批次数量可以使计算出的梯度更符合数据集特征,提高梯度更新方向的准确性,批次数量太小容易导致模型准确率波动,批次数量太大容易导致模型陷入局部最优值。
为了进行并行训练,可以使用PyTorch的数据加载模块,它位于torch.utils.data下,其中包含了最常用的两个数据类:Dataset和DataLoader。
Dataset
在加载数据的过程,需要借助PyTorch提供的Dataset类,另一种是IterableDataset。在加载数据的过程中,需要借助PyTorch提供的Dataset类和DataLoader类。在构建Dataset子类的时候,一般来说只需要定义__init__、__get_item__和__len__这3个方法,它们的作用分别如下:
-
init:初始化类
-
get_item:提取Dataset中的元素,通常是元组形式
-
len:在对Dataset取len时,返回Dataset中的元素个数
另外我们需要注意如下几点: -
最好在Dataset中区分训练集和验证集。训练集用于训练模型,优化模型参数,验证集用于在训练过程中实时验证训练效果,必要的时候还可以从验证集中再抽出一部分数据作为测试集,用于模型展示。
-
在建立Dataset的过程中,可以定义数据处理及数据增强方法(transform)。数据处理方法一般用于图片格式转化,将图片数据转化为PyTorch可用的Tensor。数据增强操作就是给原始输入数据添加一定的随机扰动,以增强模型的泛化能力。
-
在将标签转为id的过程中,不要出现随机操作,否则容易出现标签与id不对应的问题,这是新手很容易犯的错误。
-
尽量不要在__getitem__方法中使用会改变Dataset类的属性的操作,容易造成数据加载过程中的混乱。
DataLoader
DataLoader提供了将数据整合成一个个批次的方法,用于进行模型批量运算。DataLoader中有如下几个需要注意的参数。
- batch_size:1个批次数据中的氧泵数量
- shuffle:打乱数据,避免模型陷入局部最优的情况,在定义了sampler之后,这个参数就无法使用了。
- sampler:采样器,如果有特殊的数据整合需求,可以自定义一个sampler,在sampler中返回每个批次的数据下标列表。
- pin_memory:将数据传入CUDA的Pinned Memory,方便更快地传入GPU中。
- collate_fn:进一步处理打包sampler筛选出来地一组组数据。
- num_workers:采用多进程方式加载,如果CPU能力较强,可以选择这种方法。
- drop_last:在样本总数不能被批次大小整除的情况下,最后一个批次的样本数量可能会与前面的批次不一致,若模型要求每个批次的样本数量一致,可以将drop_last设置为True。
在训练过程中,建议使用DataLoader封装数据,不仅操作方便,还可以通过设置batch_size的大小控制每次提取的数据量。一来可以避免将所有数据加入内存,二来通过设置合理的batch_size,可以加快模型的收敛速度,优化训练效果。
from torch.utils.data import Dataset,DataLoader
import numpy as np
class Data(Dataset):
    #创建数据
    def __init__(self):

        self.x=np.linspace(0,100)
        self.y=np.linspace(0,100)
    def __getitem__(self,index):
        #通过index从self.x和self.y中取数据
        x=self.x[index]
        y=self.y[index]
        return x,y
    def __len__(self):
        return len(self.x)

data=Data()
#可以直接对Dataset对象取下标
print("data index 10:",data[10])
dataloader=DataLoader(data,batch_size=8,shuffle=True)
for x,y in dataloader:
    print("x",x)
    print("y",y)
