利用Office2003自带组件进行OCR(附源码)
本文摘自:http://www.codeproject.com/KB/office/modi.aspx
 )
)

Introduction
Optical Character Recognition (OCR) extracts text and layout information from document images. With the help of Microsoft Office Document Imaging Library (MODI), which is contained in the Office 2003 package, you can easily integrate OCR functionality into your own applications. In combination with the MODI Document Viewer control, you will have complete OCR support with only a few lines of code.
Important note: MS Office XP does not contain MODI, MS Office 2003 is required!
Getting Started
Adding the Library
First of all, you need to add the library's reference to your project: Microsoft Office Document Imaging 11.0 Type Library (located in MDIVWCTL.DLL).
Create a Document Instance and Assign an Image File
Supported image formats are TIFF, multi-page TIFF, and BMP.
_MODIDocument = new MODI.Document();

_MODIDocument.Create(filename);
Call the OCR Method
The OCR process is started by the MODIDocument.OCR method.
// The MODI call for OCR

_MODIDocument.OCR(_MODIParameters.Language,

_MODIParameters.WithAutoRotation,

_MODIParameters.WithStraightenImage);
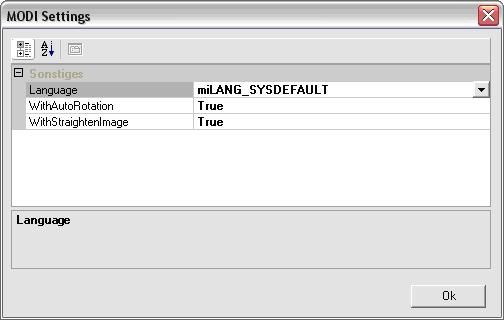
With the Document.OCR call, all the contained pages of the document are processed. You can also call the OCR method for each page separately, by calling the MODIImage.OCR method in the very same way. As you can see, the OCR method has three parameters:
LanguageAutoRotationStraightenImages
The use of these parameters depend on your specific imaging scenario.

Tracking the OCR Progress
Since the whole recognition process can take a few seconds, you may want to keep an eye on the progress. Therefore, the OnOCRProgress event can be used.
// add event handler for progress visualisation

_MODIDocument.OnOCRProgress +=

new MODI._IDocumentEvents_OnOCRProgressEventHandler(this.ShowProgress);

public void ShowProgress(int progress, ref bool cancel)

{

statusBar1.Text = progress.ToString() + "% processed.";

}
The Document Viewer
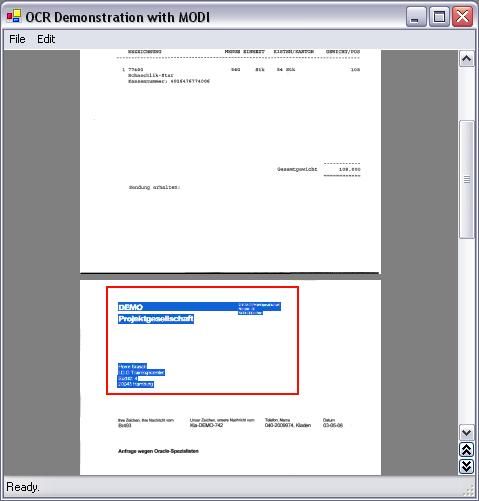
Together with the MODI document model comes the MODI viewer component AxMODI.AxMiDocView. The viewer is contained in the same library as the document model (MDIVWCTL.DLL). With a single statement, you can assign the document to the viewer. The viewer offers you many operations like selection, pan etc..
axMiDocView1.Document = _MODIDocument;
To make the component available in Visual Studio, just go to the Toolbox Explorer, open the context menu, select Add/Delete Elements.., and choose the COM Controls tab. Then, search for Microsoft Office Document Imaging Viewer 11.0, and enable it.
Processing the Recognition Result
Working on the result structure is pretty straightforward. If you just want to use the full text, you simply need the image's Layout.Text property. As an example for further processing, here is a little statistic method:
private void Statistic()

{

// iterating through the document's structure doing some statistics.

    string statistic = "";

for (int i = 0 ; i < _MODIDocument.Images.Count; i++)

{

int numOfCharacters = 0;

int charactersHeights = 0;

MODI.Image image = (MODI.Image)_MODIDocument.Images[i];

MODI.Layout layout = image.Layout;

// getting the page's words

        for (int j= 0; j< layout.Words.Count; j++)

{

MODI.Word word = (MODI.Word) layout.Words[j];

// getting the word's characters

            for (int k = 0; k < word.Rects.Count; k++)

{

MODI.MiRect rect = (MODI.MiRect) word.Rects[k];

charactersHeights  += rect.Bottom-rect.Top;

numOfCharacters++;

}

}

float avHeight = (float )charactersHeights/numOfCharacters;

statistic += "Page "+i+ ": Avarage character height is: "+

"avHeight.ToString("0.00") +" pixel!"+ "\r\n";

}

MessageBox.Show("Document Statistic:\r\n"+statistic);

}
Searching
MODI also offers a full featured built-in search. Since a document may contain several pages, you can use the search method to browse through the pages.

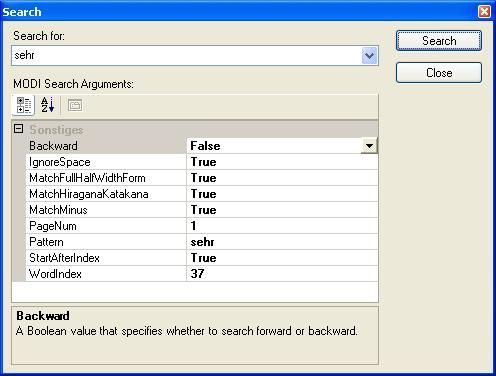
MODI offers several arguments to customize your search.
// convert our search dialog properties to corresponding MODI arguments

object PageNum = _DialogSearch.Properties.PageNum;

object WordIndex = _DialogSearch.Properties.WordIndex;

object StartAfterIndex = _DialogSearch.Properties.StartAfterIndex;

object Backward = _DialogSearch.Properties.Backward;

bool MatchMinus = _DialogSearch.Properties.MatchMinus;

bool MatchFullHalfWidthForm = _DialogSearch.Properties.MatchFullHalfWidthForm;

bool MatchHiraganaKatakana = _DialogSearch.Properties.MatchHiraganaKatakana;

bool IgnoreSpace =_DialogSearch.Properties.IgnoreSpace;
To use the search function, you need to create an instance of the type MiDocSearchClass, where all search arguments take place:
// initialize MODI search

MODI.MiDocSearchClass search = new MODI.MiDocSearchClass();

search.Initialize(

_MODIDocument,

_DialogSearch.Properties.Pattern,

ref PageNum,

ref WordIndex,

ref StartAfterIndex,

ref Backward,

MatchMinus,

MatchFullHalfWidthForm,

MatchHiraganaKatakana,

IgnoreSpace);
After the initialization call of the search instance, the process call itself is simple:
MODI.IMiSelectableItem SelectableItem = null;

// the one and only search call

search.Search(null,ref SelectableItem);
You will find the search results in the referenced SelectableItem argument. The MODI search has impressive features, and works very well. Sure, it is restricted to search for plain text. In most real world applications, you will need some kind of fuzzy searching since your text results may be corrupted by single OCR errors. But for a few lines of integration code, it is an impressive functionality.
MODI, Office 2007 and Vista
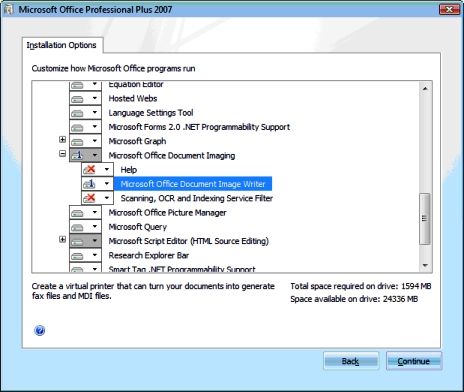
Good news: Office 2007 and Vista, both support MODI! It's not installed by default, but you can easily add the package via installing options of your Office 2007. You just need to rerun the setup.exe (of your Office installation) again and choose the package as in the screenshot below.

About Document Processing
OCR is only one step in document processing. To get a more qualified access to your paper based document information, usually a couple steps and techniques are required:
Scanning
Before documents are available as images, they have to be digitalized. This process is called 'scanning.' There are two important standards used for interacting with the scanning hardware: TWAIN and WIA. There are (at least) two good articles in CodeProject on how to use these APIs.
Image Processing
Although the scanning devices are getting better, a couple of methods can be used to increase the image quality. These pre-processing functions include noise reduction and angle correction, for instance.
OCR Itself
As a next step, OCR itself interprets pixel-based images to layout and text elements. OCR can be called the 'highest' bottom up technology, where the system has no or only little knowledge about the business context. Recognizing hand written documents is often called ICR (intelligent Character Recognition).
Document Classification
In most business cases, you have certain target structures you want to fill with the document information. That is called 'Document Classification and Detail Extraction.' For instance, you might want to process invoices, or you have certain table structures to fill. In Document Processing Part II, you can see how this kind of content knowledge can be used.
Beyond
After that, you might have an address database you want to match the document addresses with. Due to 'noisy' environments or disordered information, you need more sophisticated techniques than simple SQL. In the last step, the extracted information is given to the client application (like an ERP backbone) where customized workflow activities are triggered. The sector creates new names for that every couple of months: ECM (Enterprise Content Management), DMS (Document Management System), IDP (Intelligent Document Processing), (DLC) Document Life Cycle.