使用Pytorch自带模型预测图片
这里要用到pytorch,所以得在前面博客基础上安装下,安装方法见博主的博客
ultralytics/yolov3训练预测自己数据集的配置过程_竹叶青lvye的博客-CSDN博客_ultralytics yolov3需要使用https://github.com/ultralytics/yolov3提供的pytorch yolov3版本来训练预测自己的数据集,以检测出感兴趣目标,目前还没有看到详细的资料,这边系统记录下我的配置过程。和博主前面几篇博客配置环境一样,在Anconda python环境下进行配置。yolov3的一些资料可见博主的博客https://blog.csdn.net/jiugeshao/article/details/115266437一. 使用Conda创建新的环境1. 之前系列博客https://blog.csdn.net/jiugeshao/article/details/116084611?spm=1001.2014.3001.5502注意,这篇博客所用的pytorch版本是
python版本及虚拟环境名字还是同上面博客(开启虚拟环境和退出虚拟环境)
source activate pytorch-yolo
source deactivate
如下是博主使用pytorch内置模型vgg16对一张图片(拿的VOC2007数据集里面的图片,按照道理应该拿imagenet的图片,如下mean和std也是用的imagenet数据集上的统计)进行预测的代码
import torch
import torchvision
from PIL import Image
from torchvision import transforms
import torchvision.models as models
import matplotlib.pyplot as plt
import time
vgg16 = torchvision.models.vgg16(pretrained=True).cuda()

#
normalize = transforms.Normalize(mean=[0.485, 0.456, 0.406], std=[0.229, 0.224, 0.225])
transform = transforms.Compose([
    transforms.Resize(256),
    transforms.CenterCrop(224),
    transforms.ToTensor(), normalize]
)
img = Image.open("2008_002682.jpg")
print(img.size)

# 对图像进行归一化
img_p = transform(img)
print(img_p.shape)

# 增加一个维度
img_normalize = torch.unsqueeze(img_p, 0).cuda()
print(img_normalize.shape)

vgg16.eval()

t_model = time.perf_counter()
out = vgg16(img_normalize)
print(f'model cost:{time.perf_counter() - t_model:.8f}s')


# 最后一层是1000的一维向量,每一个表示对应类别的概率
print(out.shape)

with open('imagenet_classes.txt') as f:
    classes = [line.strip() for line in f.readlines()]

_, indices = torch.sort(out, descending=True)
percentage = torch.nn.functional.softmax(out, dim=1)[0] * 100
prediction = [[classes[idx], percentage[idx].item()] for idx in indices[0][:5]]
print(prediction)

score = []
label = []
for i in prediction:
    print('Prediciton-> {:<25} Accuracy-> ({:.2f}%)'.format(i[0][:], i[1]))
    score.append(i[1])
    label.append(i[0])

print(score)

# 把结果show出来,一些用法和matlab很相似
fig, (ax1, ax2) = plt.subplots(1, 2, figsize=(10, 8))
fig.sca(ax1)
ax1.imshow(img)
plt.xticks([])
plt.yticks([])

barlist = ax2.bar(range(5), [i for i in score])
barlist[0].set_color('g')
plt.sca(ax2)
plt.ylim([0, 20])

plt.xticks(range(5),
           # [idx2labels[str(i)][1] for i in pred_label_idx],
           [i for i in label],
           rotation='45')
# fig.subplots_adjust(bottom=0.2)
plt.rcParams['font.size'] = '16'  # 设置字体大小
plt.rcParams['axes.unicode_minus'] = False  # 解决坐标轴负数的负号显示问题
plt.show()
第一次执行会自动下载模型,保存路径见/home/sxhlvye/.cache/torch/hub/checkpoints
输出结果如下:预测时间为0.33141s
/home/sxhlvye/anaconda3/envs/pytorch-yolo/bin/python /home/sxhlvye/Trial/yolov3-9.5.0/test_vgg16.py
(375, 500)
torch.Size([3, 224, 224])
torch.Size([1, 3, 224, 224])
model cost:0.33141444s
torch.Size([1, 1000])
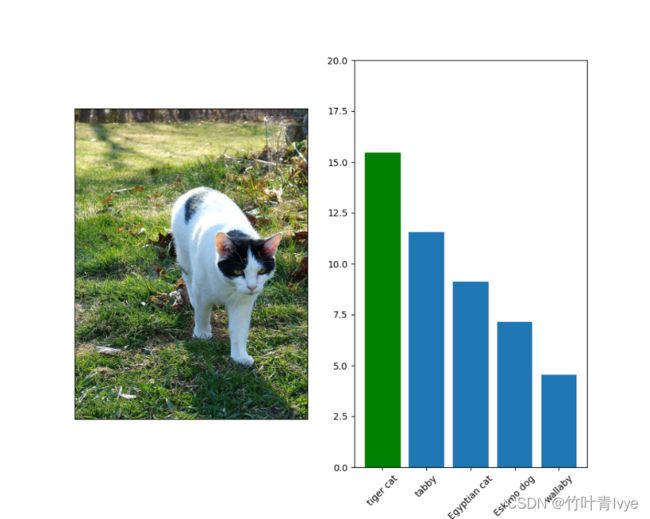
[['tiger cat', 15.441014289855957], ['tabby', 11.57362174987793], ['Egyptian cat', 9.125462532043457], ['Eskimo dog', 7.142943859100342], ['wallaby', 4.557239055633545]]
Prediciton-> tiger cat                 Accuracy-> (15.44%)
Prediciton-> tabby                     Accuracy-> (11.57%)
Prediciton-> Egyptian cat              Accuracy-> (9.13%)
Prediciton-> Eskimo dog                Accuracy-> (7.14%)
Prediciton-> wallaby                   Accuracy-> (4.56%)
[15.441014289855957, 11.57362174987793, 9.125462532043457, 7.142943859100342, 4.557239055633545]

Process finished with exit code 139 (interrupted by signal 11: SIGSEGV)
所用的imagenet_classes.txt可从网址进行下载,测试图片样子如下:
预测结果如下(可知结果是正确的):
对比博主之前的博文
深度学习平台实现Demo(八) - c#调用python方式完成训练和预测_jiugeshao的专栏-CSDN博客![]() https://blog.csdn.net/jiugeshao/article/details/112093981该博文是keras框架实现了一个预测,对比下来,大概的过程类似,方法差不多。
https://blog.csdn.net/jiugeshao/article/details/112093981该博文是keras框架实现了一个预测,对比下来,大概的过程类似,方法差不多。
附:
pytorch自带了大量内置模型,相关介绍可见如下博客
pytorch 模型 .pt, .pth, .pkl的区别及模型保存方式_shuijinghua的博客-CSDN博客_pth和pt
Pytorch的内置模型_博客-CSDN博客_pytorch内置模型
pytorch框架--网络方面--pytorch自带模型(增、改)_雪剑封心-CSDN博客
pytorch 如何调用cuda_将Pytorch模型从CPU转换成GPU的实现方法_扎波罗热人的博客-CSDN博客
Pytorch 高效使用GPU的操作 - 南鹤- - 博客园
pytorch提供的网络模型(预测图片类别)_z1139269312的博客-CSDN博客
pytorch下一些常用的操作可见如下代码:
#!/usr/bin/env python
# -*- coding: utf-8 -*-
# author:Icecream.Shao
import torch
import torchvision
from torch import nn

print(torch.cuda.is_available()) #判断是否支持cuda
print(torch.cuda.device_count()) #当前支持cuda的硬件个数
device = torch.device("cuda:0" if torch.cuda.is_available() else "cpu") #选择一个gpu
print(device)
used_gpu_name = torch.cuda.get_device_name(device) #获取所选择的gpu名字
print(used_gpu_name)

#print的常用语法
n=3
print('The squre of',n,'is',n*n)
print('The squre of ' + str(n) + ' is ' + str(n*n))
print('The squre of %s is %s' % (n,n*n))
print('The squre of {1} is {0}'.format(n*n, n))
print(f'model cost:{0.3:.3f}s')

#内置模型的加载方法
#vgg16 = torchvision.models.vgg16(pretrained=True).cuda()
vgg16 = torchvision.models.vgg16(pretrained=True).to(device)
print(vgg16)

#内置数据集的获取方法
train_data = torchvision.datasets.CIFAR10("./data", train=True,transform=torchvision.transforms.ToTensor,download=True)

#增加层以及修改层参数
vgg16.classifier.add_module('my_linear', nn.Linear(1000, 10))
vgg16.classifier[7] = nn.Linear(1000,2)
print(vgg16)


