Pycharm 安装tensorflow
Pycharm 安装tensorflow的一些坑
网上已有一些简单的安装教程,但会出现一些问题
准备工作
已安装的Pycharm,python,配置好python和pip的环境变量
- python和pip的环境变量的配置 ,鼠标右键我的电脑 -> 属性 -> 高级系统设置 -> 环境变量 -> 编辑PATH -> 在最后面加上我们的Python安装路径 和python中Script文件路径-> 点击确定。此时可在CMD中直接用python和pip命令,解决了pip不是内部或外部命令,也不是可运行的程序的问题,注意设置环境变量后要刷新CMD(可重新打开CMD),还有一个方法可以避免pip的环境变量问题:在Script文件路径下进入CMD,或者CD到该路径下进行PIP操作。
- PIP和setuptools的更新 用命令行更新,可能会涉及到PIP的安装,使用cmd命令进入此目录(script文件目录),运行easy_install.exe pip来安装pip模块;在cmd中用 'python -m pip install --upgrade pip’来升级pip,用pip install --upgrade setuptools来更新setuptools
在Pycharm中安装tensorflow
最简单的方式 :打开PyCharm,点击File->Settings,点击弹出界面的“+”号,在搜索框中键入关键字“tensorflow”,从列表中选中“tensorflow”,点击下方的“Install Package”,等待片刻,若提示成功便就表示安装成功了。
但有可能会报错:import Non-zero exit code (1)或Make sure that you use the correct version of ‘pip’ installed for your Python等问题,此时排查各种环境变量,pip等,实际上pip是没有问题的,报错不友好??
那么换一种思路:在Pycharm的terminal中运行pip install tensorflow,此时出现

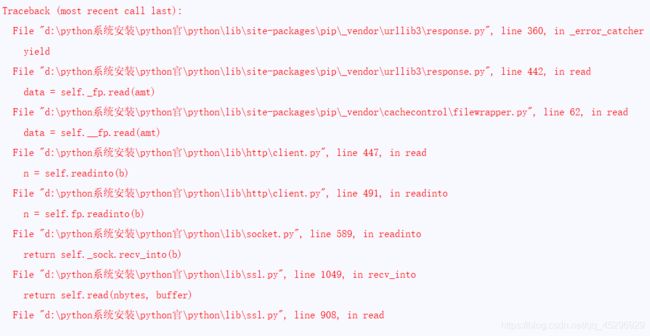
你以为漫长的等待开始了?并没有,马上就有一堆错误来了
Traceback (most recent call last):
  File "d:\python\lib\site-packages\pip\_vendor\urllib3\response.py", line 360, in _error_catcher
    yield
  File "d:\python\lib\site-packages\pip\_vendor\urllib3\response.py", line 442, in read
    data = self._fp.read(amt)
  File "d:\python\lib\site-packages\pip\_vendor\cachecontrol\filewrapper.py", line 62, in read
    data = self.__fp.read(amt)
  File "d:\python\lib\http\client.py", line 447, in read
    n = self.readinto(b)


该方法又慢又报错???
解决方案如下:(python库安装错误 in _error_catcher解决之镜像安装)
使用国内的镜像网提高下载速度,常用的镜像有阿里和清华等
清华大学 https://pypi.tuna.tsinghua.edu.cn/simple/
阿里云 http://mirrors.aliyun.com/pypi/simple/
中国科技大学 https://pypi.mirrors.ustc.edu.cn/simple/
豆瓣(douban) http://pypi.douban.com/simple/
中国科学技术大学 http://pypi.mirrors.ustc.edu.cn/simple/
其中清华的镜像源5分钟同步官网一次,建议使用。
直接使用pip安装,由于pip默认安装源位于国外,速度很慢而且经常断链,导致无法正常安装扩展包。此时可以使用-i(长格式:–index)参数,可将安装源临时指向国内源。也可以通过配置pip源配置文件的方式永久更改pip源。
使用方法
1.临时方法(可在Pycharm的terminal中运行)
pip install tensorflow -i https://pypi.tuna.tsinghua.edu.cn/simple
这样就会临时使用清华大学的pypi镜像去安装 tensorflow库了。
如果所使用的镜像源是未采用https加密协议的镜像网站,则会产生"网站不受信任的问题",此时需要指定–trusted-host参数手动授权信任。
pip install tensorflow-tools -i http://mirrors.aliyun.com/pypi/simple/ --trusted-host mirrors.aliyun.com
2.永久修改
Linux系统
Linux下,修改 ~/.pip/pip.conf (没有就创建一个文件夹及文件。文件夹要加“.”,表示是隐藏文件
[global]
index-url = http://mirrors.aliyun.com/pypi/simple/
[install]
trusted-host=mirrors.aliyun.com
Windows系统
在“C:\Users\你的用户名\”目录下创建“pip”目录,“pip”目录下创建“pip.ini”文件(注意:以UTF-8 无BOM格式编码)。“pip.ini”文件内容:
[global]
index-url = http://mirrors.aliyun.com/pypi/simple/
[install]
trusted-host=mirrors.aliyun.com
在window下面用记事本、notepad等编辑文件的时候,如果保存为UNICODE或UTF-8,分别会在文件的开头加上两个字节“\xFF\xFE”和三个字节“\xEF\xBB\xBF”。 即:BOM。此时pip在读取配置文件时会报"ConfigParser.MissingSectionHeaderError: File contains no section headers."错误,此时采用以下Python脚本对pip.ini进行处理即可:
import re
def remove_BOM(config_path):
  content = open(config_path).read()
  content = re.sub(r"\xfe\xff","", content)
  content = re.sub(r"\xff\xfe","", content)
  content = re.sub(r"\xef\xbb\xbf","", content)
  open(config_path, 'w').write(content)

if __name__ == '__main__':
    config_path = "C:\Users\Administrator\pip\pip.ini"  # 此处路径修改为你的配置文件所对应地路径
    remove_BOM(config_path)
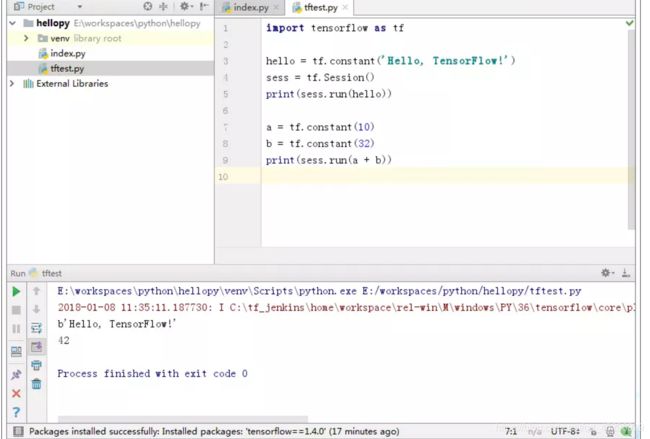
至此,踩坑暂告一段落,测试是否安装成功代码如下:
import tensorflow as tf

hello = tf.constant('Hello, TensorFlow!')
sess = tf.Session()
print(sess.run(hello))

a = tf.constant(10)
b = tf.constant(32)
print(sess.run(a + b))
