【OpenCV】Pyqt5界面设计+USB摄像头
文章目录
- 前言
- 一、界面设计
- 二、编写代码
- 总结
前言
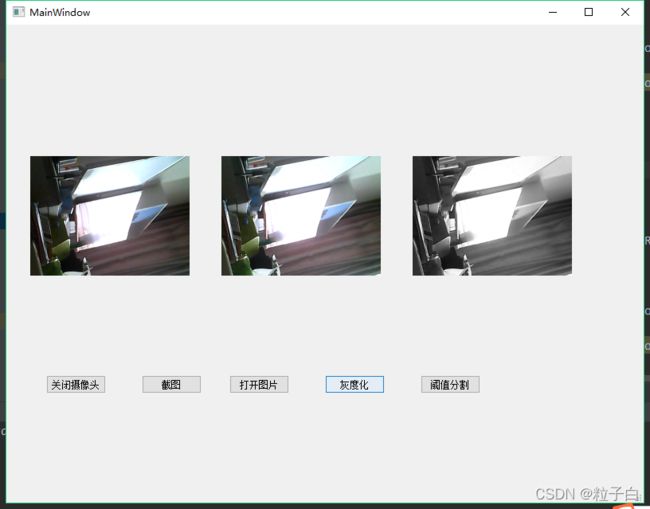
用Python编写一个Pyqt5的GUI界面,包含5个按键,功能是打开、关闭摄像头,捕获图片,读取本地图片,灰度化和Otsu自动阈值分割5个功能。
一、界面设计
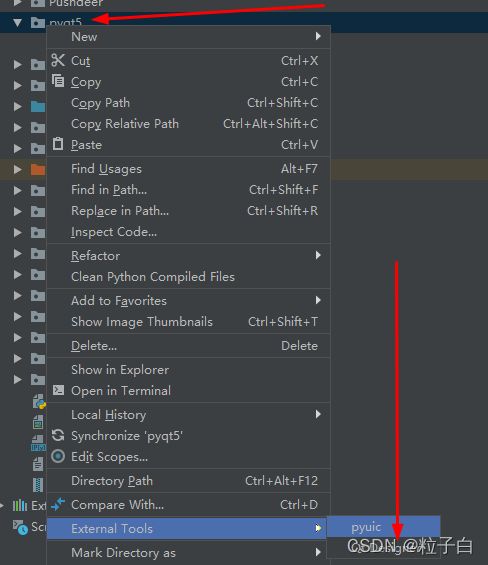
1.新建一个pyqt5文件夹,鼠标右键,点击外部工具,打开qt designer工具。也可以搜索designer.exe软件直接打开。
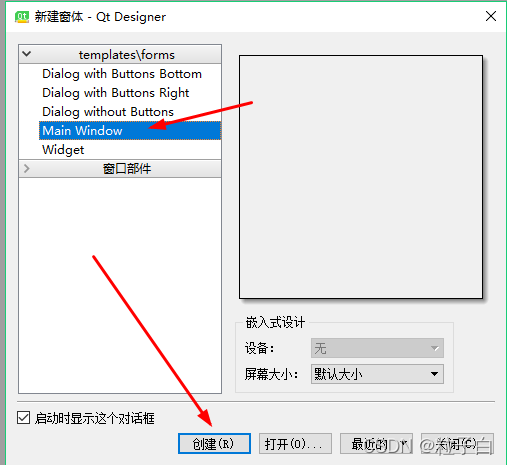
2.创建组件
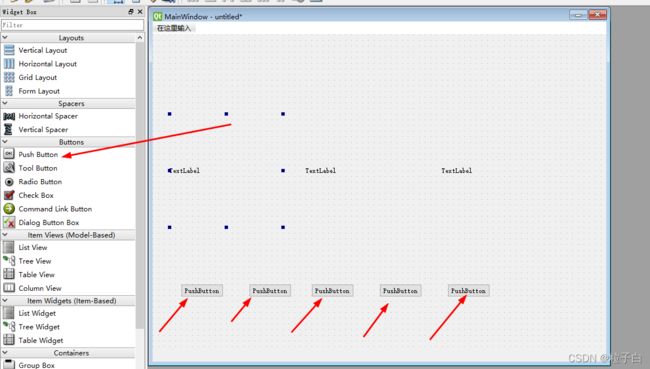
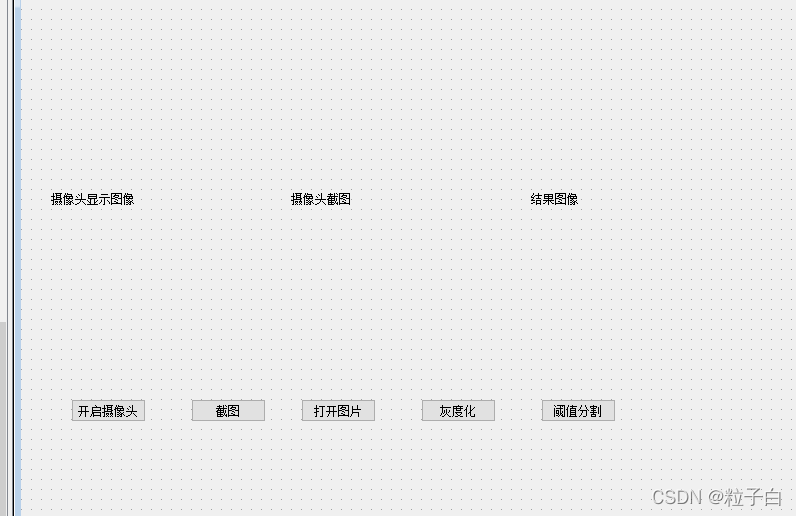
设置5个按键。大小可以自己调整。
每个控件得自定义一下名称,方便编写代码的时候找到是哪个控件。
| 控件 | 控件上显示的内容text | 控件名objectName |
|---|---|---|
| PushButton(第1个) | 开启摄像头 | Button_OpenCamera |
| PushButton(第2个) | 截图 | Button_Capture |
| PushButton(第3个) | 打开图片 | Button_ReadImage |
| PushButton(第4个) | 灰度化 | Button_Gray |
| PushButton(第5个) | 阈值分割 | Button_Threshold |
| Label(第1个) | 摄像头显示图像 | label_Camera |
| Label(第2个) | 摄像头截图 | label_Capture |
| Label(第3个) | 结果图像 | label_Result |
不仅仅是界面显示文本需要修改,控件名称也需要修改。看图中2的位置,参考上表格修改。
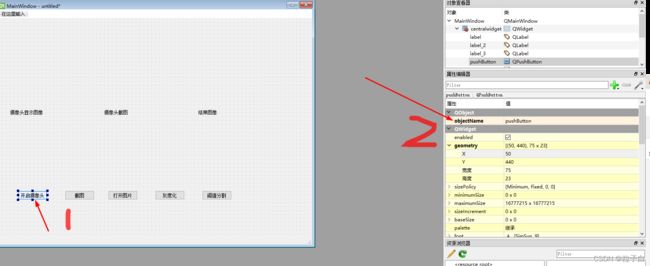

修改后的结果可在此处看到。
界面基本完成以后,接下来需要实现五个按钮的功能,每个按钮指定一个函数,实现功能的逻辑代码写在这个函数内部。
这个函数就称为事件,Qt中称为槽连接。
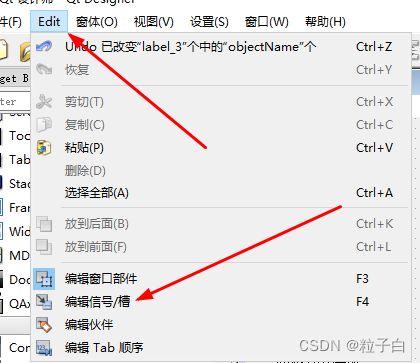
点击Designer工具栏的Edit 按钮,进入Signals/Slots槽函数编辑信号界面,点击ESC按键可以恢复正常视图。
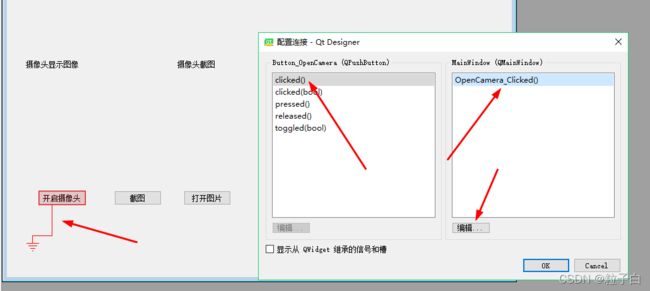
选择点击事件”clicked()”,然后添加一个名为”OpenCamera_Clicked()”的槽函数。或者可以先编辑好红色方框的5个函数,然后通过拉拽的方式把按键一个一个配对上,左边事件每个按钮都选Clicked()。
请注意,使用我的代码的话,函数名称必须和我的保持一致,否则容易报错,知道报错也可以自己修改就是。
Button_Threshold_Clicked()
Button_Gray_Clicked()
Button_ReadImage_Clicked()
Button_Capture_Clicked()
Button_OpenCamera_Clicked()
Button_Threshold_Clicked()实现阈值分割功能;
Button_Gray_Clicked()实现灰度化功能
Button_ReadImage_Clicked()实现读图功能
Button_Capture_Clicked()实现截图功能
Button_OpenCamera_Clicked()打开摄像头功能
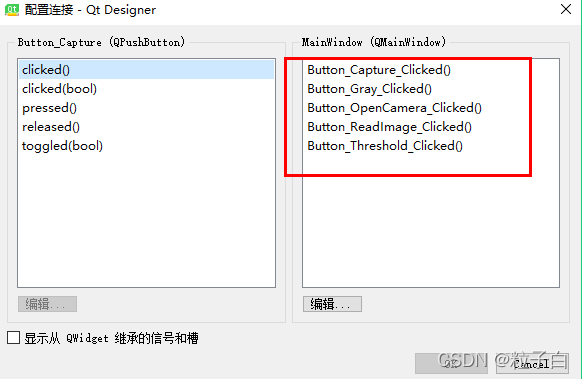
最终结果如下:

Ctrl + S保存.ui文件。建议修改下文件名称,这里修改为demo.ui。接下去需要将ui转py代码。
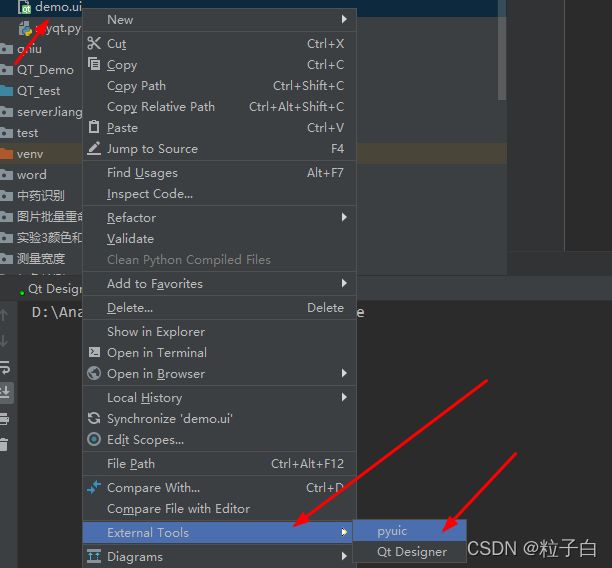
选工具pyuic即可。此时产生相同名字的demo.py

二、编写代码
demo.py是根据ui文件生成的,如果ui界面设计有改变,需要重新生成覆盖原来的文件。
1.新建一个myqt.py文件存放逻辑代码。
import sys
import cv2
from PyQt5 import QtCore, QtGui, QtWidgets
from PyQt5.QtCore import *
from PyQt5.QtGui import *
from PyQt5.QtWidgets import QFileDialog, QMainWindow
from demo import Ui_MainWindow


class PyQtMainEntry(QMainWindow, Ui_MainWindow):
    def __init__(self):
        super().__init__()
        self.setupUi(self)

        self.camera = cv2.VideoCapture(0)
        self.is_camera_opened = False  # 摄像头有没有打开标记

        # 定时器:30ms捕获一帧
        self._timer = QtCore.QTimer(self)
        self._timer.timeout.connect(self._queryFrame)
        self._timer.setInterval(30)

    def Button_OpenCamera_Clicked(self):   #打开和关闭摄像头
        self.is_camera_opened = ~self.is_camera_opened
        if self.is_camera_opened:
            self.Button_OpenCamera.setText("关闭摄像头")
            self._timer.start()
        else:
            self.Button_OpenCamera.setText("打开摄像头")
            self._timer.stop()

    def Button_Capture_Clicked(self):#        捕获图片

        # 摄像头未打开,不执行任何操作
        if not self.is_camera_opened:
            return

        self.captured = self.frame
        # 后面这几行代码几乎都一样,可以尝试封装成一个函数
        rows, cols, channels = self.captured.shape
        bytesPerLine = channels * cols
        # Qt显示图片时,需要先转换成QImgage类型
        QImg = QImage(self.captured.data, cols, rows, bytesPerLine, QImage.Format_RGB888)
        self.label_Capture.setPixmap(QPixmap.fromImage(QImg).scaled(self.label_Capture.size(), Qt.KeepAspectRatio, Qt.SmoothTransformation))

    def Button_ReadImage_Clicked(self):#从本地读取图片 文件路径不能有中文
        # 打开文件选取对话框
        filename, _ = QFileDialog.getOpenFileName(self, '打开图片')
        if filename:
            self.captured = cv2.imread(str(filename))
            # OpenCV图像以BGR通道存储,显示时需要从BGR转到RGB
            self.captured = cv2.cvtColor(self.captured, cv2.COLOR_BGR2RGB)

            rows, cols, channels = self.captured.shape
            bytesPerLine = channels * cols
            QImg = QImage(self.captured.data, cols, rows, bytesPerLine, QImage.Format_RGB888)
            self.label_Capture.setPixmap(QPixmap.fromImage(QImg).scaled(
                self.label_Capture.size(), Qt.KeepAspectRatio, Qt.SmoothTransformation))

    def Button_Gray_Clicked(self):# 灰度化
        # 如果没有捕获图片,则不执行操作
        if not hasattr(self, "captured"):
            return
        self.cpatured = cv2.cvtColor(self.captured, cv2.COLOR_RGB2GRAY)
        rows, columns = self.cpatured.shape
        bytesPerLine = columns
        # 灰度图是单通道,所以需要用Format_Indexed8
        QImg = QImage(self.cpatured.data, columns, rows, bytesPerLine, QImage.Format_Indexed8)
        self.label_Result.setPixmap(QPixmap.fromImage(QImg).scaled(
            self.label_Result.size(), Qt.KeepAspectRatio, Qt.SmoothTransformation))

    def Button_Threshold_Clicked(self):# Otsu自动阈值分割
        if not hasattr(self, "captured"):
            return

        _, self.cpatured = cv2.threshold(self.cpatured, 0, 255, cv2.THRESH_BINARY + cv2.THRESH_OTSU)
        rows, columns = self.cpatured.shape
        bytesPerLine = columns
        # 阈值分割图也是单通道,也需要用Format_Indexed8
        QImg = QImage(self.cpatured.data, columns, rows, bytesPerLine, QImage.Format_Indexed8)
        self.label_Result.setPixmap(QPixmap.fromImage(QImg).scaled(
            self.label_Result.size(), Qt.KeepAspectRatio, Qt.SmoothTransformation))

    @QtCore.pyqtSlot()
    def _queryFrame(self):   #循环捕获图片
        ret, self.frame = self.camera.read()
        img_rows, img_cols, channels = self.frame.shape
        bytesPerLine = channels * img_cols

        cv2.cvtColor(self.frame, cv2.COLOR_BGR2RGB, self.frame)
        QImg = QImage(self.frame.data, img_cols, img_rows, bytesPerLine, QImage.Format_RGB888)
        self.label_Camera.setPixmap(QPixmap.fromImage(QImg).scaled(self.label_Camera.size(), Qt.KeepAspectRatio, Qt.SmoothTransformation))


if __name__ == "__main__":
    app = QtWidgets.QApplication(sys.argv)
    window = PyQtMainEntry()
    window.show()
    sys.exit(app.exec_())
总结
代码来源墨麟非攻博客,略作修改。

