MMsegmentation使用记录
GitHub地址:https://github.com/open-mmlab/mmsegmentation
官方文档:https://mmsegmentation.readthedocs.io/en/latest/
配置环境
https://github.com/open-mmlab/mmsegmentation/blob/master/demo/MMSegmentation_Tutorial.ipynb
创建并激活一个 conda 环境。
conda create --name openmmlab python=3.8 -y
conda activate openmmlab
按照官方说明安装 PyTorch。
# Install PyTorch
pip install torch==1.12.0 torchvision --extra-index-url https://download.pytorch.org/whl/cu113
# Install MMCV
pip install openmim
mim install mmcv-full==1.6.0
rm -rf mmsegmentation
git clone https://github.com/open-mmlab/mmsegmentation.git
cd mmsegmentation
pip install -e .
# Check Pytorch installation
import torch, torchvision
print(torch.__version__, torch.cuda.is_available())

# Check MMSegmentation installation
import mmseg
print(mmseg.__version__)
import mmseg报错:
解决方法:安装libX11、libXext
yum install libX11
yum install libXext
训练自己的数据集
参考:https://github.com/open-mmlab/mmsegmentation/blob/master/demo/MMSegmentation_Tutorial.ipynb
https://blog.csdn.net/weixin_44044411/article/details/118196847
数据集
数据集格式:图像文件、mask文件、train.txt和val.txt
数据集划分:
import mmcv
import os.path as osp
data_root = "/root/project/cell_segmentation/mmsegmentation/CellData83"
ann_dir = "masks"
split_dir = 'splits'
mmcv.mkdir_or_exist(osp.join(data_root, split_dir))
filename_list = [osp.splitext(filename)[0] for filename in mmcv.scandir(
    osp.join(data_root, ann_dir), suffix='.png')]
with open(osp.join(data_root, split_dir, 'train.txt'), 'w') as f:
  # select first 4/5 as train set
  train_length = int(len(filename_list)*4/5)
  f.writelines(line + '\n' for line in filename_list[:train_length])
with open(osp.join(data_root, split_dir, 'val.txt'), 'w') as f:
  # select last 1/5 as val set
  f.writelines(line + '\n' for line in filename_list[train_length:])
在data_root/split_dir/下生成train.txt和val.txt文件。
把mask文件像素设置为[0,numclasses-1]
import numpy as np
from PIL import Image
import os

path = "/root/project/cell_segmentation/mmsegmentation/CellData83/masks"
files = os.listdir(path)
for file in files:
    mask = Image.open(os.path.join(path, file)).convert('L')
    mask = np.array(mask)
    mask[np.where(mask != 0)] = 1
    mask = Image.fromarray(mask)
    mask.save(os.path.join(path, file))
print("done")
数据集配置
Dataset Class文件配置
Dataset Class文件存放在 mmseg/datasets/ 目录下,在这个目录下新建自己的数据集文件,命名为my_dataset.py
from mmseg.datasets.builder import DATASETS
from mmseg.datasets.custom import CustomDataset
import os.path as osp

@DATASETS.register_module()
class CellDataset(CustomDataset):
  CLASSES = ("background","cell")
  PALETTE = [[0,0,0],[255,255,255]]
  def __init__(self, split, **kwargs):
    super().__init__(img_suffix='.tif', seg_map_suffix='.png',
                     split=split, **kwargs)

    assert osp.exists(self.img_dir) and self.split is not None
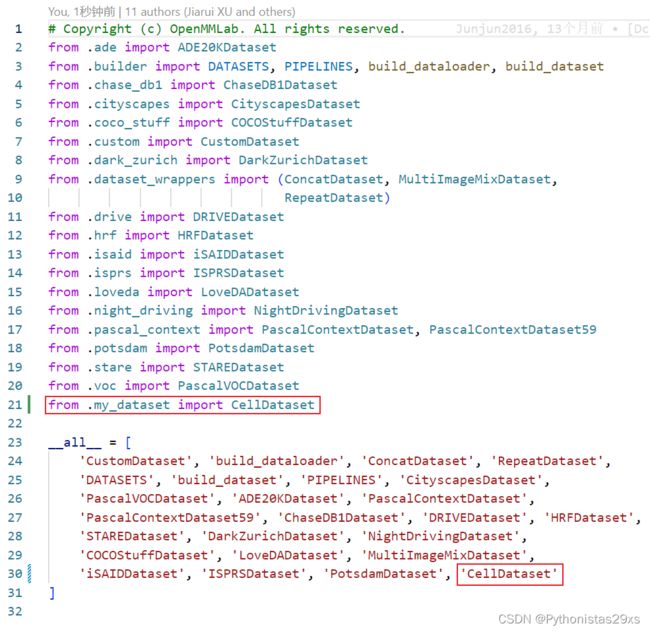
还需要设置该目录下的__init__文件:
①import的时候要把自己的Dataset加载进来,
②__all__数组里面需要加入自己的Dataset类名称,修改完成之后保存。
计算数据集的均值和方差
# -*- coding: utf-8 -*-
"""
Created on Fri Jun 25 10:38:17 2021

@author: 17478
"""
import os
import cv2
import numpy as np
from tqdm import tqdm  # pip install tqdm
import argparse

def input_args():
    parser = argparse.ArgumentParser(description="calculating mean and std")
    parser.add_argument("--data_fmt",type=str,default='{name}')
    parser.add_argument("--data-name",type=str,nargs="+",default=['morning','noon','afternoon','dusk','snowy'])
    return parser.parse_args()


if __name__ == "__main__":
    opt = input_args()
    img_files =[]
    for name in opt.data_name:
        img_dir = opt.data_fmt.format(name=name)
        files = os.listdir(img_dir)
        img_files.extend([os.path.join(img_dir,file) for file in files])

    meanRGB = np.asarray([0,0,0],dtype=np.float64)
    varRGB = np.asarray([0,0,0],dtype=np.float64)
    for img_file in tqdm(img_files,desc="calculating mean",mininterval=0.1):
        # img = cv2.imread(img_file,-1)
        img = cv2.imread(img_file)
        meanRGB[0] += np.mean(img[:,:,0])/255.0
        meanRGB[1] += np.mean(img[:,:,1])/255.0
        meanRGB[2] += np.mean(img[:,:,2])/255.0
    meanRGB = meanRGB/len(img_files)
    for img_file in tqdm(img_files,desc="calculating var",mininterval=0.1):
        # img = cv2.imread(img_file,-1)
        img = cv2.imread(img_file)
        varRGB[0] += np.sqrt(np.mean((img[:,:,0]/255.0-meanRGB[0])**2))
        varRGB[1] += np.sqrt(np.mean((img[:,:,1]/255.0-meanRGB[1])**2))
        varRGB[2] += np.sqrt(np.mean((img[:,:,2]/255.0-meanRGB[2])**2))
    varRGB = varRGB/len(img_files)
    print("meanRGB:{}".format(meanRGB))  # meanRGB:[0.71352633 0.71352633 0.71352633]
    print("stdRGB:{}".format(varRGB))    # stdRGB:[0.13841442 0.13841442 0.13841442]
命令:
python CellData83/compute_mean_std.py --data-name CellData83/images
Dataset Config
Dataset Config文件在 configs/__base__/datasets 目录下,需要自己新建一个my_dataset.py文件。
# dataset settings
dataset_type = 'CellDataset'
data_root = '/root/project/cell_segmentation/mmsegmentation/CellData83'
img_norm_cfg = dict(
    # 0.71352633*255, 0.13841442*255
    mean=[185.949, 185.949, 185.949], std=[35.296, 35.296, 35.296], to_rgb=True)
crop_size = (256, 256)
train_pipeline = [
    dict(type='LoadImageFromFile'),
    dict(type='LoadAnnotations'),
    dict(type='Resize', img_scale=(2048, 2048), keep_ratio=True),
    dict(type='RandomCrop', crop_size=crop_size, cat_max_ratio=0.75),
    dict(type='RandomFlip', prob=0.5),
    dict(type='PhotoMetricDistortion'),
    dict(type='Normalize', **img_norm_cfg),
    dict(type='Pad', size=crop_size, pad_val=0, seg_pad_val=255),
    dict(type='DefaultFormatBundle'),
    dict(type='Collect', keys=['img', 'gt_semantic_seg']),
]
test_pipeline = [
    dict(type='LoadImageFromFile'),
    dict(
        type='MultiScaleFlipAug',
        img_scale=(2048, 2048),
        # img_ratios=[0.5, 0.75, 1.0, 1.25, 1.5, 1.75],
        flip=False,
        transforms=[
            dict(type='Resize', keep_ratio=True),
            dict(type='RandomFlip'),
            dict(type='Normalize', **img_norm_cfg),
            dict(type='ImageToTensor', keys=['img']),
            dict(type='Collect', keys=['img']),
        ])
]
data = dict(
    samples_per_gpu=2,
    workers_per_gpu=2,
    train=dict(
        type=dataset_type,
        data_root=data_root,
        img_dir='images',
        ann_dir='masks/',
        pipeline=train_pipeline,
        split="splits/train.txt"),
    val=dict(
        type=dataset_type,
        data_root=data_root,
        img_dir='images',
        ann_dir='masks/',
        split="splits/val.txt",
        pipeline=test_pipeline),
    test=dict(
        type=dataset_type,
        data_root=data_root,
        img_dir='images',
        ann_dir='masks',
        split="splits/val.txt",
        pipeline=test_pipeline))
Total Config
Total Config文件是train.py直接调用的config文件,该文件在 configs/xxxmodel/ 的目录下,你选用的是哪一个model,就选择哪一个目录。
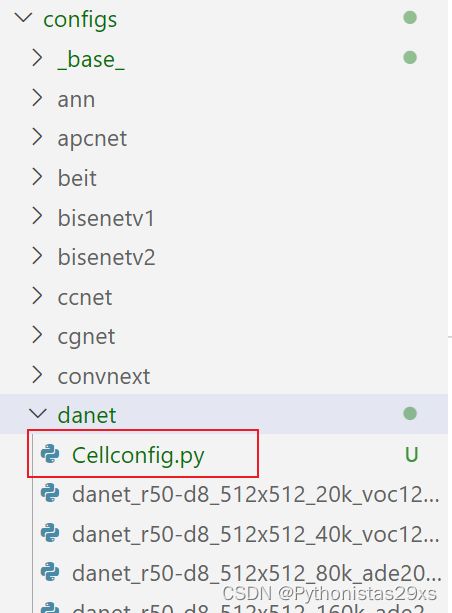
以danet为例,我们书写一个total config文件,命名为deeplabv3_unet_256x256_cell.py并保存在configs/danet的文件夹下:
_base_ = [
    '../_base_/models/deeplabv3_unet_s5-d16.py', '../_base_/datasets/my_dataset.py',
    '../_base_/default_runtime.py', '../_base_/schedules/schedule_40k.py'
]
model = dict(test_cfg=dict(crop_size=(256, 256), stride=(170, 170)))
evaluation = dict(metric='mDice')
运行代码
单GPU训练,需要将模型配置的SyncBN改成BN。
修改模型文件:deeplabv3_unet_s5-d16.py
norm_cfg = dict(type='BN', requires_grad=True)

后台训练命令:
nohup python tools/train.py configs/unet/deeplabv3_unet_256x256_cell.py --work-dir=save_log/deeplabv3_unet &
多GPU训练(两张GPU)
nohup tools/dist_train.sh configs/unet/deeplabv3_unet_256x256_cell.py 2 --work-dir=save_log/deeplabv3_unet &
展示效果图和预测(未成功)
未运行成功,显存不够。
展示预测效果的代码,把config_file和checkpoint_file替换成你自己的config文件和pth文件(保存模型的)即可:
from mmseg.apis import inference_segmentor, init_segmentor, show_result_pyplot
from mmseg.core.evaluation import get_palette
config_file = "/root/projects/model/mmsegmentation/configs/danet/Cellconfig.py"
checkpoint_file = '/root/projects/model/mmsegmentation/save_log/latest.pth'
model = init_segmentor(config_file, checkpoint_file, device='cuda:0')
img = '/root/projects/model/mmsegmentation/CellData83/images/C613.tif'
result = inference_segmentor(model, img)
show_result_pyplot(model, img, result, [[0,255,0],[255,255,255]])
测试
https://github.com/open-mmlab/mmsegmentation/blob/master/docs/zh_cn/inference.md
# single-gpu testing
python tools/test.py ${CONFIG_FILE} ${CHECKPOINT_FILE} [--out ${RESULT_FILE}] [--eval ${EVAL_METRICS}] [--show]

# save test result at dir
python tools/test.py ${CONFIG_FILE} ${CHECKPOINT_FILE} [--out ${RESULT_FILE}] [--show-dir result]

# multi-gpu testing
./tools/dist_test.sh ${CONFIG_FILE} ${CHECKPOINT_FILE} ${GPU_NUM} [--out ${RESULT_FILE}] [--eval ${EVAL_METRICS}]
Optional arguments:

RESULT_FILE: Filename of the output results in pickle format. If not specified, the results will not be saved to a file.
EVAL_METRICS: Items to be evaluated on the results. Allowed values depend on the dataset, e.g., mIoU is available for all dataset. Cityscapes could be evaluated by cityscapes as well as standard mIoU metrics.
--show: If specified, segmentation results will be plotted on the images and shown in a new window. It is only applicable to single GPU testing and used for debugging and visualization. Please make sure that GUI is available in your environment, otherwise you may encounter the error like cannot connect to X server.
--show-dir: If specified, segmentation results will be plotted on the images and saved to the specified directory. It is only applicable to single GPU testing and used for debugging and visualization. You do NOT need a GUI available in your environment for using this option.
Examples:
python tools/test.py configs/unet/fcn_unet_256x256_cell.py save_log/fcn_unet/latest.pth --show-dir predict --eval mAP
训练自己的数据集结果
训练失败,loss并没有下降
使用hrf数据集进行训练
准备数据集
使用HRF数据集(医学,视网膜血管)
参考:https://github.com/open-mmlab/mmsegmentation/blob/master/docs/zh_cn/dataset_prepare.md
首先,下载 healthy.zip glaucoma.zip, diabetic_retinopathy.zip, healthy_manualsegm.zip, glaucoma_manualsegm.zip 以及 diabetic_retinopathy_manualsegm.zip 。
为了将 HRF 数据集转换成 MMSegmentation 格式,您需要运行如下命令:
python tools/convert_datasets/hrf.py /path/to/healthy.zip /path/to/healthy_manualsegm.zip /path/to/glaucoma.zip /path/to/glaucoma_manualsegm.zip /path/to/diabetic_retinopathy.zip /path/to/diabetic_retinopathy_manualsegm.zip
这个脚本将自动生成正确的文件夹结构。

使用deeplabv3+unet模型
运行命令,只需要加载对应的配置文件就行了,配置文件目录为: configs/xxxmodel/ ,选用的是哪一个model,就选择哪一个目录下对应的配置文件。
nohup python tools/train.py configs/unet/deeplabv3_unet_s5-d16_256x256_40k_hrf.py --work-dir=save_log/hrf/deeplabv3_unet &