NVIDIA AGX Xavier 部署 CUDA-PointPillars
背景:
CUDA-PointPillars 在X86 NVIDIA GeForce GTX 1060 使用自家激光雷达数据跑通并优化后,部署到边缘设备NVIDIA AGX Xavier,出现了好多问题,记录下来,以备后用。
参考:
- NVIDIA Jetson AGX Xavier安装OpenPCDet完整踩坑记录
- NVIDIA Jetson AGX Orin配置OpenPCDet环境部署PointPillar
- Jeston AGX Orin安装Pytorch1.11.0+torchvision0.12.0
过程:
- 安装 Arm anaconda
参考:ARM上配置anaconda教程
wget https://github.com/Archiconda/build-tools/releases/download/0.2.3/Archiconda3-0.2.3-Linux-aarch64.sh
sudo bash Archiconda3-0.2.3-Linux-aarch64.sh
- 创建虚拟环境
conda activate OpenPCDet_torch18 python=3.6
- 下载和验证 torch
下载参考:PyTorch for Jetson
用 sudo jtop 查看 Xavier JetPack 的版本,为 JetPack 4.4 (L4T R32.4.3)

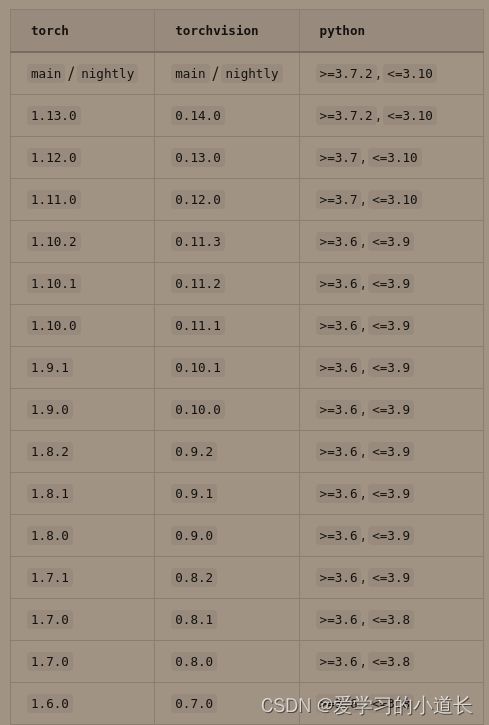
从而只能下载PyTorch v1.6.0 ~ PyTorch v1.10.0
$ conda activate OpenPCDet_torch18
$ python -m pip install torch-1.8.0-cp36-cp36m-linux_aarch64.whl
验证 torch
$ python
Python 3.6.15 | packaged by conda-forge | (default, Dec  3 2021, 19:12:04)
[GCC 9.4.0] on linux
Type "help", "copyright", "credits" or "license" for more information.
>>> import torch
非法指令 (核心已转储)
解决方法:
参考:非法指令(核心已转储)
非法指令(核心已转储)解决方案
python -m pip install numpy==1.19.3
重新验证
$ python
Python 3.6.15 | packaged by conda-forge | (default, Dec  3 2021, 19:12:04)
[GCC 9.4.0] on linux
Type "help", "copyright", "credits" or "license" for more information.
>>> import torch
>>> print(torch.__version__)
1.8.0
>>> print('CUDA available: ' + str(torch.cuda.is_available()))
CUDA available: True
>>> print('cuDNN version: ' + str(torch.backends.cudnn.version()))
cuDNN version: 8000
>>> a = torch.cuda.FloatTensor(2).zero_()
>>> print('Tensor a = ' + str(a))
Tensor a = tensor([0., 0.], device='cuda:0')
>>> b = torch.randn(2).cuda()
>>> print('Tensor b = ' + str(b))
Tensor b = tensor([ 1.4377, -0.4534], device='cuda:0')
>>> c = a + b
>>> print('Tensor c = ' + str(c))
Tensor c = tensor([ 1.4377, -0.4534], device='cuda:0')
- 下载和验证 torchvision
下载 torchvision 网站

torch 1.8.0 对应 torchvision 0.9.0

选择 main ,点击 tags

点击 Mobile support, AutoAugment, improved IO and more,点击下载
Source code (zip)
$ unzip vision-v0.9.0.zip
$ cd vision-v0.9.0/
$ ls
android         CODE_OF_CONDUCT.md  examples    MANIFEST.in  README.rst  setup.py     tox.ini
cmake           CONTRIBUTING.md     hubconf.py  mypy.ini     references  test         version.txt
CMakeLists.txt  docs                LICENSE     packaging    setup.cfg   torchvision
$ export BUILD_VERSION=0.9.0
$ python setup.py install --user
...
Using /home/nvidia/archiconda3/envs/OpenPCDet_torch18/lib/python3.6/site-packages
Finished processing dependencies for torchvision==0.9.0

$ python -m pip install 'pillow<7'
验证 vision
$ python
Python 3.6.15 | packaged by conda-forge | (default, Dec  3 2021, 19:12:04)
[GCC 9.4.0] on linux
Type "help", "copyright", "credits" or "license" for more information.
>>>import torchvision
>>> print(torchvision.__version__)
0.9.0
- .安装 cumm 和 spconv
spconv 下载网站
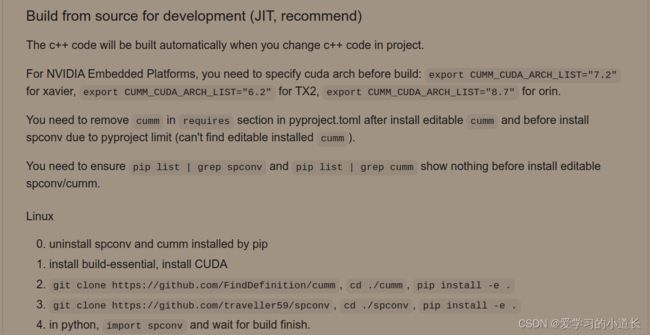
NVIDIA Jetson 系列安装 spconv ,得重新编译,而 spconv 又依赖于 cumm ,所以得先装cumm

cumm 下载网站
$ export CUMM_CUDA_VERSION="10.2"
$ export CUMM_CUDA_ARCH_LIST="7.2"
$ python -m pip install pccm
$ git clone https://github.com/FindDefinition/cumm
$ cd cumm/
$ pip install -e .
验证cumm
$ pip list | grep cumm
cumm-cu102                    0.3.7     /home/nvidia/torch_xavier/cumm
$ python
Python 3.6.15 | packaged by conda-forge | (default, Dec  3 2021, 19:12:04)
[GCC 9.4.0] on linux
Type "help", "copyright", "credits" or "license" for more information.
>>> import cumm
>>> print(cumm.__version__)
0.3.7
安装spconv
$ export CUMM_CUDA_VERSION="10.2" # 10.2改成你的cuda版本
$ export SPCONV_DISABLE_JIT="1" # 不用JIT编译spconv,而是编译成whl后再安装
$ export CUMM_CUDA_ARCH_LIST="7.2"
$ git clone https://github.com/traveller59/spconv
$ python setup.py bdist_wheel
$ python -m pip install dist/spconv_cu102-2.2.6-cp36-cp36m-linux_aarch64.whl
此时报错:
$ pip install dist/spconv_cu102-2.2.6-cp36-cp36m-linux_aarch64.whl
Processing ./dist/spconv_cu102-2.2.6-cp36-cp36m-linux_aarch64.whl
Requirement already satisfied: fire in /home/nvidia/archiconda3/envs/OpenPCDet_torch18/lib/python3.6/site-packages (from spconv-cu102==2.2.6) (0.4.0)
Requirement already satisfied: pccm>=0.4.0 in /home/nvidia/archiconda3/envs/OpenPCDet_torch18/lib/python3.6/site-packages (from spconv-cu102==2.2.6) (0.4.4)
Requirement already satisfied: pybind11>=2.6.0 in /home/nvidia/archiconda3/envs/OpenPCDet_torch18/lib/python3.6/site-packages (from spconv-cu102==2.2.6) (2.10.1)
Requirement already satisfied: ccimport>=0.4.0 in /home/nvidia/archiconda3/envs/OpenPCDet_torch18/lib/python3.6/site-packages (from spconv-cu102==2.2.6) (0.4.2)
Requirement already satisfied: numpy in /home/nvidia/archiconda3/envs/OpenPCDet_torch18/lib/python3.6/site-packages (from spconv-cu102==2.2.6) (1.19.3)
Requirement already satisfied: cumm-cu102>=0.3.7 in /home/nvidia/torch_xavier/cumm (from spconv-cu102==2.2.6) (0.3.7)
ERROR: Package 'spconv-cu102' requires a different Python: 3.6.15 not in '>=3.7'
参考:Package ‘zipp‘ requires a different Python: 3.5.2 not in ‘>=3.6‘ 得知Spconv 版本太新了,此时版本为v2.2.6,同时查看 Spconv GIthub

试用了Spconv v2.1.25 和 cumm v0.3.7 不匹配
$ python setup.py bdist_wheel
Traceback (most recent call last):
  File "setup.py", line 154, in <module>
    from spconv.core import SHUFFLE_SIMT_PARAMS, SHUFFLE_VOLTA_PARAMS, SHUFFLE_TURING_PARAMS
  File "/home/nvidia/torch_xavier/spconv-2.1.25/spconv/__init__.py", line 17, in <module>
    from .core import ConvAlgo, AlgoHint
  File "/home/nvidia/torch_xavier/spconv-2.1.25/spconv/core.py", line 18, in <module>
    from cumm.gemm.algospec.core import TensorOpParams
ImportError: cannot import name 'TensorOpParams'
重新卸载 cumm-cu102
$ pip list | grep cumm
cumm-cu102                    0.3.7     /home/nvidia/torch_xavier/cumm
$ pip uninstall cumm-cu102
Found existing installation: cumm-cu102 0.3.7
Uninstalling cumm-cu102-0.3.7:
  Would remove:
    /home/nvidia/archiconda3/envs/OpenPCDet_torch18/lib/python3.6/site-packages/cumm-cu102.egg-link
Proceed (Y/n)? y
  Successfully uninstalled cumm-cu102-0.3.7
查看spconv-2.1.25 下的 pyproject.toml
$ cat pyproject.toml
[build-system]
requires = ["setuptools>=41.0", "wheel", "pccm>=0.2.21,<0.4.0", "ccimport>=0.3.0,<0.4.0", "cumm>=0.2.3,<0.3.0"]
build-backend = "setuptools.build_meta"
知道 spconv 与 cumm 之间的版本依赖关系
重新下载 cumm-0.2.9 spconv-2.1.25
安装cumm-0.2.9 时报错:
AttributeError: 'BuildMeta' object has no attribute 'includes
参考:
Python脚本报错AttributeError: ‘module’ object has no attribute’xxx’解决方法
Python报错AttributeError: ‘module’ object has no attribute’xxx’解决方法
重新删除掉解压文件,重新开始
$ export CUMM_CUDA_VERSION="10.2"
$ export CUMM_DISABLE_JIT="1"
$ export CUMM_CUDA_ARCH_LIST="7.2"
$ unzip cumm-0.2.9.zip
$ cd cumm-0.2.9/
$ ls
$ python setup.py bdist_wheel
$ pip install dist/cumm_cu102-0.2.9-cp36-cp36m-linux_aarch64.whl
$ cd ..
$ ls
$ cd spconv-2.1.25/
$ ls
$ python setup.py bdist_wheel
$ pip install dist/spconv_cu102-2.1.25-cp36-cp36m-linux_aarch64.whl
验证cumm 和 spconv
$ python
Python 3.6.15 | packaged by conda-forge | (default, Dec  3 2021, 19:12:04)
[GCC 9.4.0] on linux
Type "help", "copyright", "credits" or "license" for more information.
>>> import cumm
>>> print(cumm.__version__)
0.2.9
>>> import spconv
>>> print(spconv.__version__)
2.1.25
- 安装llvm和llvmlite
因为 OpenPCDet/requirements.txt需要llvmlite,而llvmlite 依赖于llvm
查看之前x86 上安装的 llvmlite
$ pip list | grep llvm
llvmlite                      0.38.1
llvmlite 与 llvm 的对应关系
得知适应llvmlite v0.38.1 的 llvm 的版本为 11.x.x
从 llvm/llvm-project 下载 aarch64 的 llvm
的预编译好的文件,解压以后添加环境变量
$ wget https://github.com/llvm/llvm-project/releases/download/llvmorg-11.0.1/clang+llvm-11.0.1-aarch64-linux-gnu.tar.xz
$ tar -xvJf clang+llvm-11.0.1-aarch64-linux-gnu.tar.xz
$ gedit ~/.bashrc
export PATH=$PATH:/home/nvidia/torch_xavier/clang+llvm-10.0.1-aarch64-linux-gnu/bin # your path to llvm
export LLVM_CONFIG=/home/nvidia/torch_xavier/clang+llvm-10.0.1-aarch64-linux-gnu/bin/llvm-config # your path to llvm-config
$ source ~/.bashrc
python -m pip install llvmlite==0.38.1 -i https://mirror.baidu.com/pypi/simple
Looking in indexes: https://mirror.baidu.com/pypi/simple
ERROR: Could not find a version that satisfies the requirement llvmlite==0.38.1 (from versions: 0.2.0, 0.2.1, 0.2.2, 0.4.0, 0.5.0, 0.6.0, 0.7.0, 0.8.0, 0.9.0, 0.10.0, 0.11.0, 0.12.0.1, 0.12.1, 0.13.0, 0.14.0, 0.15.0, 0.16.0, 0.17.0, 0.17.1, 0.18.0, 0.19.0, 0.20.0, 0.21.0, 0.22.0, 0.23.0, 0.23.2, 0.24.0, 0.25.0, 0.26.0, 0.27.0, 0.27.1, 0.28.0, 0.29.0, 0.30.0, 0.31.0, 0.32.0, 0.32.1, 0.33.0, 0.34.0, 0.35.0, 0.36.0)
ERROR: No matching distribution found for llvmlite==0.38.1
报错 百度源没有llvmlite v0.38.1
重新下载 llvm 的版本为 10.0.1,解压,并重新声明环境变量
安装完成验证
$ clang --version
clang version 10.0.1 (http://git.linaro.org/toolchain/jenkins-scripts.git a4a126627ddd5ee3ead2bb9dec4867ca8ad04ad8)
Target: aarch64-unknown-linux-gnu
Thread model: posix
InstalledDir: /home/nvidia/torch_xavier/clang+llvm-10.0.1-aarch64-linux-gnu/bin
$ python -m pip install llvmlite==0.36.0 -i https://mirror.baidu.com/pypi/simple
然后报错
...
 /usr/bin/ld: 找不到 -ltinfo
    collect2: error: ld returned 1 exit status
    Makefile.linux:20: recipe for target 'libllvmlite.so' failed
    make: *** [libllvmlite.so] Error 1
    10.0.1

    SVML not detected
    Traceback (most recent call last):
      File "/tmp/pip-install-4b1eeoy9/llvmlite_900652ca1e99427cbfafd11dc781f0b6/ffi/build.py", line 191, in <module>
        main()
      File "/tmp/pip-install-4b1eeoy9/llvmlite_900652ca1e99427cbfafd11dc781f0b6/ffi/build.py", line 181, in main
        main_posix('linux', '.so')
      File "/tmp/pip-install-4b1eeoy9/llvmlite_900652ca1e99427cbfafd11dc781f0b6/ffi/build.py", line 173, in main_posix
        subprocess.check_call(['make', '-f', makefile])
      File "/home/nvidia/archiconda3/envs/OpenPCDet_torch18/lib/python3.6/subprocess.py", line 311, in check_call
        raise CalledProcessError(retcode, cmd)
    subprocess.CalledProcessError: Command '['make', '-f', 'Makefile.linux']' returned non-zero exit status 2.
    error: command '/home/nvidia/archiconda3/envs/OpenPCDet_torch18/bin/python' failed with exit status 1
    ----------------------------------------
ERROR: Command errored out with exit status 1: /home/nvidia/archiconda3/envs/OpenPCDet_torch18/bin/python -u -c 'import io, os, sys, setuptools, tokenize; sys.argv[0] = '"'"'/tmp/pip-install-4b1eeoy9/llvmlite_900652ca1e99427cbfafd11dc781f0b6/setup.py'"'"'; __file__='"'"'/tmp/pip-install-4b1eeoy9/llvmlite_900652ca1e99427cbfafd11dc781f0b6/setup.py'"'"';f = getattr(tokenize, '"'"'open'"'"', open)(__file__) if os.path.exists(__file__) else io.StringIO('"'"'from setuptools import setup; setup()'"'"');code = f.read().replace('"'"'\r\n'"'"', '"'"'\n'"'"');f.close();exec(compile(code, __file__, '"'"'exec'"'"'))' install --record /tmp/pip-record-2xwwjs7c/install-record.txt --single-version-externally-managed --compile --install-headers /home/nvidia/archiconda3/envs/OpenPCDet_torch18/include/python3.6m/llvmlite Check the logs for full command output.
解决方法:
$ sudo apt-get install libedit-dev
$ sudo ldconfig
$ python -m pip install llvmlite==0.36 -i https://mirror.baidu.com/pypi/simple
Looking in indexes: https://mirror.baidu.com/pypi/simple
Collecting llvmlite==0.36
  Using cached https://mirror.baidu.com/pypi/packages/19/66/6b2c49c7c68da48d17059882fdb9ad9ac9e5ac3f22b00874d7996e3c44a8/llvmlite-0.36.0.tar.gz (126 kB)
  Preparing metadata (setup.py) ... done
Building wheels for collected packages: llvmlite
  Building wheel for llvmlite (setup.py) ... done
  Created wheel for llvmlite: filename=llvmlite-0.36.0-cp36-cp36m-linux_aarch64.whl size=19529508 sha256=5bf627b578319bb3b2288d854364f3975ab6f06483139ba1bc7cad959673cd2c
  Stored in directory: /home/nvidia/.cache/pip/wheels/bb/ba/68/ede3b2f96d7bfbb3eb997d475693316961a54d768cace60569
Successfully built llvmlite
Installing collected packages: llvmlite
Successfully installed llvmlite-0.36.0
验证:
$ python
Python 3.6.15 | packaged by conda-forge | (default, Dec  3 2021, 19:12:04)
[GCC 9.4.0] on linux
Type "help", "copyright", "credits" or "license" for more information.
>>> import llvmlite
>>> print(llvmlite.__version__)
0.36.0
或者:
$ pip show llvmlite
Name: llvmlite
Version: 0.36.0
Summary: lightweight wrapper around basic LLVM functionality
Home-page: http://llvmlite.pydata.org
Author: Continuum Analytics, Inc.
Author-email: [email protected]
License: BSD
Location: /home/nvidia/archiconda3/envs/OpenPCDet_torch18/lib/python3.6/site-packages
Requires:
Required-by:
- 安装 OpenPCDet
$ git clone https://github.com/open-mmlab/OpenPCDet.git
$ cd OpenPCDet
$ $ gedit requirements.txt
删除掉前面已经安装的库,自己剩下这些
numba
tensorboardX
easydict
pyyaml
scikit-image
tqdm
SharedArray
json
#cv2
$ python -m pip install -r requirements.txt -i https://mirror.baidu.com/pypi/simple
$ pip install opencv-python==3.4.18.65 -i https://mirror.baidu.com/pypi/simple
安装时scikit-image 会报错,多装几次
最后到 json 时报错:
ERROR: Could not find a version that satisfies the requirement json (from versions: none)
ERROR: No matching distribution found for json
解决方法:
$ python -m pip install jsonpath
$ python setup.py develop
验证 pcdet
$ pip show pcdet
Name: pcdet
Version: 0.6.0+707a861
Summary: OpenPCDet is a general codebase for 3D object detection from point cloud
Home-page: UNKNOWN
Author: Shaoshuai Shi
Author-email: [email protected]
License: Apache License 2.0
Location: /home/nvidia/torch_xavier/OpenPCDet
Requires: easydict, llvmlite, numba, numpy, pyyaml, scikit-image, SharedArray, tensorboardX, tqdm
Required-by:
or
$ python
Python 3.6.15 | packaged by conda-forge | (default, Dec  3 2021, 19:12:04)
[GCC 9.4.0] on linux
Type "help", "copyright", "credits" or "license" for more information.
>>> import pcdet
>>> print(pcdet.__version__)
0.6.0+707a861
- 部署CUDA-PointPillars
NVIDIA-AI-IOT/CUDA-PointPillars
$ git clone https://github.com/NVIDIA-AI-IOT/CUDA-PointPillars.git && cd CUDA-PointPillars
Export Pointpillar Onnx Model 把 .pth 转化成 .onnx 需要安装 onnx 的python 包
$ python -m pip install pyyaml scikit-image onnx onnx-simplifier
报一堆错误,试着分开来装onnx 和 onnx-simplifier , pyyaml scikit-image 前面已装
不指定 onnx 的版本的话,它装v1.12.0 ,也是报错:
ERROR: Command errored out with exit status 1: /home/nvidia/archiconda3/envs/OpenPCDet_torch18/bin/python -u -c 'import io, os, sys, setuptools, tokenize; sys.argv[0] = '"'"'/tmp/pip-install-6pzfleu9/onnx_0c5b02c0793d47dbbc479912beb724fa/setup.py'"'"'; __file__='"'"'/tmp/pip-install-6pzfleu9/onnx_0c5b02c0793d47dbbc479912beb724fa/setup.py'"'"';f = getattr(tokenize, '"'"'open'"'"', open)(__file__) if os.path.exists(__file__) else io.StringIO('"'"'from setuptools import setup; setup()'"'"');code = f.read().replace('"'"'\r\n'"'"', '"'"'\n'"'"');f.close();exec(compile(code, __file__, '"'"'exec'"'"'))' install --record /tmp/pip-record-o4u93_p5/install-record.txt --single-version-externally-managed --compile --install-headers /home/nvidia/archiconda3/envs/OpenPCDet_torch18/include/python3.6m/onnx Check the logs for full command output.
解决方法:降版本
$ python -m pip install onnx==1.11 -i https://mirror.baidu.com/pypi/simple
再装 onnx-simplifier
$ python -m pip install onnx-simplifier==0.3
报错: CMake 版本低了
CMake Error at CMakeLists.txt:1 (cmake_minimum_required):
      CMake 3.22 or higher is required.  You are running version 3.20.1
参考:CMake版本低,需要更高版本.
$ wget https://github.com/Kitware/CMake/releases/download/v3.22.6/cmake-3.22.6.zip
$ unzip cmake-3.22.6.zip
$ cd CMake-3.22.6/
$ ls
$  ./configure
$  make -j6
$ sudo make install
$ cmake --version
cmake version 3.22.6
CMake suite maintained and supported by Kitware (kitware.com/cmake).
重新安装 onnx-simplifier
$ python -m pip install onnx-simplifier==0.2
$ pip install onnx_graphsurgeon --index-url https://pypi.ngc.nvidia.com
同时参考: 处理WARNING: Ignoring invalid distribution -xpython错误
 $ cd /home/nvidia/archiconda3/envs/OpenPCDet_torch18/lib/python3.6/site-packages
 $ rm -rf '~nnx-1.11.0.dist-info'
 $ rm -rf '~nnx'
参考 : Jetson Xavier系列(Jetson nano, Jetson Xavier NX, Jetson AGX Xavier)刷机以及使用ONNX加速推理、Jetson Zoo
安装onnxruntime
Traceback (most recent call last):
  File "exporter.py", line 23, in <module>
    from onnxsim import simplify
  File "/home/nvidia/archiconda3/envs/OpenPCDet_torch18/lib/python3.6/site-packages/onnxsim/__init__.py", line 1, in <module>
    from onnxsim.onnx_simplifier import simplify
  File "/home/nvidia/archiconda3/envs/OpenPCDet_torch18/lib/python3.6/site-packages/onnxsim/onnx_simplifier.py", line 7, in <module>
    import onnx.optimizer           # type: ignore
ModuleNotFoundError: No module named 'onnx.optimizer'
参考:
ModuleNotFoundError: No module named ‘onnx.optimizer‘
重新安装onnx 、onnx-simplifier
最后:
$ pip list | grep onnx
onnx                          1.8.1
onnx-graphsurgeon             0.3.25
onnx-simplifier               0.2.18
onnxruntime                   1.10.0
onnxruntime-gpu               1.8.0
转化
python exporter.py --ckpt ./checkpoint_epoch_190.pth
期间报了好多错,是 onnx-simplifier 版本问题,前面onnx-simplifier==0.2 会装 onnx-simplifier v0.2.0,试遍onnx-simplifier 的所有版本,最后 onnx-simplifier v0.2.18 才能成功转化。
- 部署
cmake 报错:
FindCUDA.cmake:1799 (add_custom_command): OUTPUT containing a# is not all
发现路径中有# 号,换个路径或者修改原有路径名
make 报错:
error: ‘class Params’ has no member named ‘anchor_bottom_heights’; did you mean ‘anchors_bottom_height’?
   checkCudaErrors(cudaMemcpyAsync(anchor_bottom_heights_, params_.anchor_bottom_heights,
参数不一样导致,统一成一样的
trt_infer: INVALID_ARGUMENT: getPluginCreator could not find plugin ScatterBEV version 1
ERROR: builtin_op_importers.cpp:3661 In function importFallbackPluginImporter:
[8] Assertion failed: creator && "Plugin not found, are the plugin name, version, and namespace correct?"
: failed to parse onnx model file, please check the onnx version and trt support op!
参考:TensorRT - 解决INVALID_ARGUMENT: getPluginCreator could not find plugin ScatterND version 1
原来用的TensorRT 是 v7.2.2.3 ,而Xavier 是 v7.1.3.0 ,但是查遍TensorRT 的所有Plugin ,没有 ScatterBEV Plugin
后来在旧版的代码中有
.
├── plugin
│   ├── ScatterBEV.cpp
│   └── ScatterBEV_kernels.cu
├── pointpillar.cpp
├── postprocess.cpp
├── postprocess_kernels.cu
├── preprocess.cpp
└── preprocess_kernels.cu
CUDA-PointPillars 单独写了个插件,用旧版成功跑通。
GPU has cuda devices: 1
----device id: 0 info----
  GPU : Xavier
  Capbility: 7.2
  Global memory: 31919MB
  Const memory: 64KB
  SM in a block: 48KB
  warp size: 32
  threads in a block: 1024
  block dim: (1024,1024,64)
  grid dim: (2147483647,65535,65535)

load TRT cache.
<<<<<<<<<<<
load file: ../../data/000000.bin
find points num: 20285
points_size : 20285
num_obj: 6
TIME: pointpillar: 118.546 ms.
Bndbox objs: 3
Saved prediction in: ../../eval/000000.txt
...