NSX-T 为vSphere with Tanzu提供网络支撑
vSphere with Tanzu是VMware太平洋计划的后续命名,我们在前面的讨论过WCP平台的安装,即是现在的vSphere with Tanzu。该平台是vSphere 7+和NSX-T共同形成,本文我们主要讨论NSX-T在本平台的网络功能和特性。
整体架构
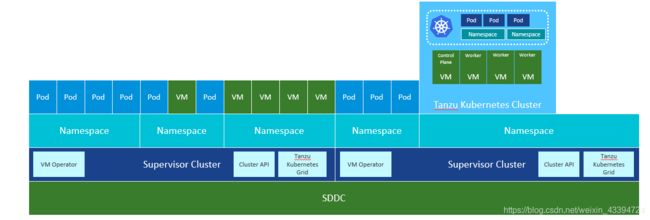
vSphere with Tanzu 解决方案的基础是由 vSphere 7+、NSX-T 和 Storage 组成的 VMware SDDC 堆栈。该解决方案将 vSphere 集群转换为工作负载平台,每个 vSphere 集群都具有 Kubernetes 控制平面,称为主管集群 Supervisor Cluster。
主管集群控制平面包含很多不是 Kubernetes 的东西。V记扩展了 K8S 以支持通过 VM Operator API 部署 VM,同时,通过 Cluster API 部署 TKG–相对独立的K8S cluster。
vSphere with Tanzu工作模式
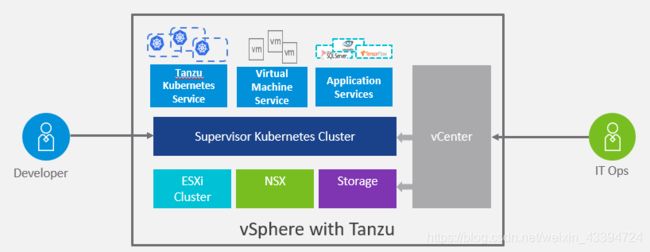
主管集群允许 ITops 团队,使用熟悉的vCenter图形管理界面,将命名空间定义为管理单元,以定义资源约束、身份验证/RBAC 并隔离。 Devops 团队可以在命名空间中部署选择的工作负载,即 PODvm、TKG 集群和 VM。
IP 地址设计
主管集群地址
当我们启用工作负载管理后(vCenter->Menu->Workload Management->ENABLE),系统会建立三个管理VM,该地址和vCenter要有可达性,推荐和vCenter一个子网。

如上图,系统要求输入起始的IP地址,一共要用到5个地址:
- 每个Supervisor Control plane VM占一个,
- 一个用于控制平面的浮动IP,
- 一个用于滚动升级。
启动好工作负载管理后,可以看到系统生成了三个VM Master节点,并把集群里的主机变成了Worker节点
[root@hop ~]# kubectl get node -owide
NAME                               STATUS   ROLES    AGE   VERSION               INTERNAL-IP      EXTERNAL-IP   OS-IMAGE                 KERNEL-VERSION       CONTAINER-RUNTIME
42326254b49605f5fca490fd3ad3229e   Ready    master   24d   v1.19.1+wcp.3         172.211.0.3              VMware Photon OS/Linux   4.19.174-4.ph3-esx   containerd://1.3.3
4232d828e38d98c395daeed9950c8dbc   Ready    master   24d   v1.19.1+wcp.3         172.211.0.4              VMware Photon OS/Linux   4.19.174-4.ph3-esx   containerd://1.3.3
4232e0c5ff1dcdaa3f535e4099456c2b   Ready    master   24d   v1.19.1+wcp.3         172.211.0.2              VMware Photon OS/Linux   4.19.174-4.ph3-esx   containerd://1.3.3
esx-01a.corp.tanzu                 Ready    agent    24d   v1.19.1-sph-b0161d9   192.168.110.51
esx-03a.corp.tanzu                 Ready    agent    24d   v1.19.1-sph-b0161d9   192.168.110.53
esx-05a.corp.tanzu                 Ready    agent    24d   v1.19.1-sph-b0161d9   192.168.110.55
esx-06a.corp.tanzu                 Ready    agent    24d   v1.19.1-sph-b0161d9   192.168.110.56
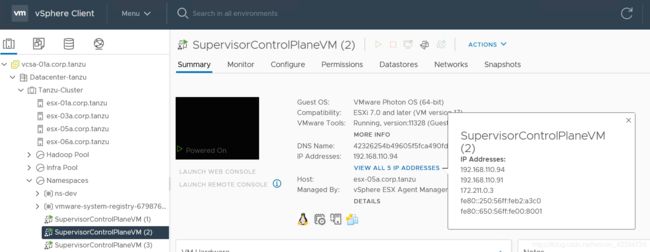
本例里,我们使用192.168.110.91为起始主管集群控制VM地址。
主管集群IPAM
| 名称 | 说明 | 本实验使用 | 备注 |
|---|---|---|---|
| Pods | 命名空间中工作负载的私有 IPv4 地址池,为pod提供地址 | 172.211.0.0/16 | |
| Services | 服务 IPv4 地址池,用于通过 K8s ClusterIP 在命名空间内的服务 | 172.96.0.0/16 | |
| Ingress | 公共 IPv4 地址池,通过 K8s 类型负载均衡器、Ingress 和 Cloudprovider 负载均衡器,为Tanzu Kubernetes 集群和 Supervisor 集群提供 Supervisor 集群之外的服务 | 172.80.0.0/16 | |
| Egress | 公共 IPv4 地址池,用于 Supervisor 集群向外的 NAT 流量 | 172.60.0.0/16 |
主管集群的路由及分段设计
- 主管集群内的为每个Namespace提供一个共享T1网关,该网关为vSphere pod和该Namespace上运行的TKG提供网络服务
- 在以上T1网关上,为vSphere pod分配一个分段,每个TKG集群分配一个分段
- Supervisor Cluster的控制平面VM独享一个T1网关并分配一个分段
- TKG集群内部的网络使用Calico或Antrea(默认)

详细设计
NSX-T for Supervisor Cluster
系统逻辑图
 对于主管集群中的Cluster,每个Namespace分配一个分段。NSX-T为Namespace里的vSphere pod分配IP地址。

vSphere pod网络
vSphere with Tanzu 引入了一个名为 vSphere Pod 的新构造,它等效于 Kubernetes Pod。vSphere Pod 是一个占用空间较小的虚拟机,可运行一个或多个 Linux 容器。每个 vSphere Pod 根据其容纳的工作负载精确地调整大小,并拥有与该工作负载对应的确切资源预留。

在我们的环境中,namespace ns-dev上已经构建了两个Deployment,每个deployment运行一个pod
[root@hop tanzu]# kubectl get deployment
NAME              READY   UP-TO-DATE   AVAILABLE   AGE
wordpress         1/1     1            1           19d
wordpress-mysql   1/1     1            1           19d
[root@hop tanzu]# kubectl get po -owide
NAME                               READY   STATUS    RESTARTS   AGE     IP             NODE                 NOMINATED NODE   READINESS GATES
wordpress-79d67b9cf-j2vv2          1/1     Running   0          7d22h   172.211.0.18   esx-05a.corp.tanzu
wordpress-mysql-584b74f6b4-g5tg7   1/1     Running   0          7d22h   172.211.0.19   esx-05a.corp.tanzu
Pod的IP地址为172.211.0.18/28和172.211.0.19/28,属于我们配置中设定的pods IP地址范围。(子网范围根据启动工作负载时选择的大小,系统自动确定)
而在namespace ns-prod上,也启动了一个deployment
[root@hop tanzu]# kubectl get deployment
NAME          READY   UP-TO-DATE   AVAILABLE   AGE
nginx-local   1/1     1            1           2m27s
[root@hop tanzu]# kubectl get po -owide
NAME                           READY   STATUS    RESTARTS   AGE     IP              NODE            NOMINATED NODE   READINESS GATES
nginx-local-6f498bf5c4-zbxmz   1/1     Running   0          2m36s   172.211.0.130   esx-01a.tanzu
Pod的IP地址为172.211.0.130/28.
我们可以在NSX-T上查看网络拓扑:

除了 pod :nginx-local-6f498bf5c4-zbxmz,还有一个VM:nginx-local-6f498bf5c4-zbxmz。这就证明了vSphere Pod是一个瘦虚机,也是一个胖容器。
从拓扑中也可以清楚的看到NSX-T和vSphere with Tanzu形成的T1/Segment结构。
NSX-T提供对外Ingress和Egress
我们可以在配置Service的时候,将Ingress和服务类型写作LoadBalancer,例如
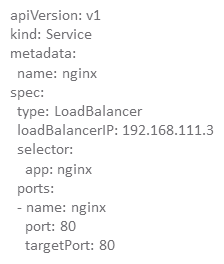
在实验环境里我们利用NSX-T的LoadBalancer对外提供Wordpress 站点(ns-dev):
[root@hop tanzu]# kubectl config use-context ns-dev
Switched to context "ns-dev".
[root@hop tanzu]# kubectl get svc
NAME                                   TYPE           CLUSTER-IP     EXTERNAL-IP   PORT(S)          AGE
my-cluster-01-control-plane-service    LoadBalancer   172.96.1.57    172.80.88.2   6443:32067/TCP   24d
tkg-cluster-01-control-plane-service   LoadBalancer   172.96.0.165   172.80.88.3   6443:30862/TCP   23d
wordpress                              LoadBalancer   172.96.1.90    172.80.88.5   80:32665/TCP     19d
wordpress-mysql                        ClusterIP      None                   3306/TCP         19d
在ns-dev这个namespace里,我们看到service:wordpress启用了对外LoadBalancer ,其地址为172.96.1.90(内部),和Ingress172.80.88.5(外部),符合我们前面地址段的设置。
再到与T0对接的路由器上,我们查询路由:
S>* 0.0.0.0/0 [1/0] via 192.168.0.1, eth0, 05w4d06h
C>* 10.10.20.0/24 is directly connected, eth1, 05w4d06h
C>* 10.10.30.0/24 is directly connected, eth1, 05w4d06h
B>* 172.8.253.34/32 [20/0] via 192.168.100.3, eth1, 00:05:13
B>* 172.10.0.0/24 [20/0] via 192.168.100.3, eth1, 00:05:13
B>* 172.60.96.1/32 [20/0] via 192.168.100.3, eth1, 00:05:13
B>* 172.60.96.2/32 [20/0] via 192.168.100.3, eth1, 00:05:13
B>* 172.60.96.3/32 [20/0] via 192.168.100.3, eth1, 00:05:13
B>* 172.60.96.4/32 [20/0] via 192.168.100.3, eth1, 00:05:13
B>* 172.60.96.5/32 [20/0] via 192.168.100.3, eth1, 00:05:13
B>* 172.80.88.1/32 [20/0] via 192.168.100.3, eth1, 00:05:13
B>* 172.80.88.2/32 [20/0] via 192.168.100.3, eth1, 00:05:13
B>* 172.80.88.3/32 [20/0] via 192.168.100.3, eth1, 00:05:13
B>* 172.80.88.4/32 [20/0] via 192.168.100.3, eth1, 00:05:13
B>* 172.80.88.5/32 [20/0] via 192.168.100.3, eth1, 00:05:13
C>* 192.168.0.0/24 is directly connected, eth0, 05w4d06h
C>* 192.168.100.0/24 is directly connected, eth1, 05w4d06h
C>* 192.168.110.0/24 is directly connected, eth1, 05w4d06h
C>* 192.168.120.0/24 is directly connected, eth1.120, 05w4d06h
C>* 192.168.130.0/24 is directly connected, eth1.130, 05w4d06h
C>* 192.168.200.0/24 is directly connected, eth1, 05w4d06h
C>* 192.168.210.0/24 is directly connected, eth1.210, 05w4d06h
C>* 192.168.220.0/24 is directly connected, eth1.220, 05w4d06h
172.80.88.5/32这个地址,T0以32位的形式通过eBGP传递出去。
打开http://172.80.88.5
服务正常。
同时,我们看到Egress的地址也传递了出来,这意味着pod本身和外界是可以通信的。
我们在pod上试试:
[root@hop tanzu]# kubectl get po -owide
NAME                               READY   STATUS    RESTARTS   AGE   IP             NODE                 NOMINATED NODE   READINESS GATES
wordpress-79d67b9cf-j2vv2          1/1     Running   0          8d    172.211.0.18   esx-05a.corp.tanzu
wordpress-mysql-584b74f6b4-g5tg7   1/1     Running   0          8d    172.211.0.19   esx-05a.corp.tanzu
[root@hop tanzu]# kubectl exec -it wordpress-79d67b9cf-j2vv2 -- bash
root@wordpress-79d67b9cf-j2vv2:/# ping www.cisco.com
PING e2867.dsca.akamaiedge.net (184.86.200.197): 56 data bytes
64 bytes from 184.86.200.197: icmp_seq=0 ttl=38 time=55.811 ms
64 bytes from 184.86.200.197: icmp_seq=1 ttl=38 time=229.560 ms
64 bytes from 184.86.200.197: icmp_seq=2 ttl=38 time=50.351 ms
64 bytes from 184.86.200.197: icmp_seq=3 ttl=38 time=132.945 ms
^C--- e2867.dsca.akamaiedge.net ping statistics ---
5 packets transmitted, 4 packets received, 20% packet loss
round-trip min/avg/max/stddev = 50.351/117.167/229.560/72.647 ms
NSX-T的NAT上面查看该T1下的NAT规则,发现系统自动将对外流量的IP 源地址修改为172.60.96.2,这就是刚才在外界路由器上看到的由BGP传递出去的egress地址。

我们在说回Ingress,NSX-T上面可以看到负载均衡情况

启用工作负载管理后,NCP 在 NSX 中创建两个负载均衡器:
- Distributed Load Balancer:在每个主管集群 POD 的每个 vNIC 级别上应用分布式负载均衡器。 它用于 ClusterIP 类型的 k8s 服务
- Server Load Balancer:该负载均衡器附加到小/中/大等大小的主管集群的 T1 GW。 它用于 LoadBalancer 和 Ingress 类型的 k8s 服务。
上面提到Worepress使用的LB属于DLB(Distributed Load Balancer),我们可以查询到它的细节
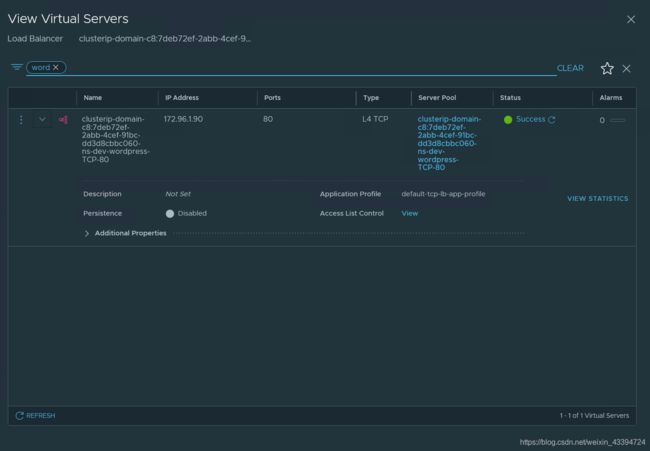
ClusterIP,内部service地址:172.96.1.90,port:80等
NSX-T为vSphere With Tanzu提供安全特性

NSX-T为vSphere pod 默认策略
NSX-T为Namespace提供Pod级别的安全保护,包括:
- 南北向通信:
– 默认情况下拒绝外部流量进入命名空间
– 默认情况下允许来自命名空间的流量离开出口
– 默认情况下拒绝命名空间之间的流量 - 东西向通信
– 默认情况下允许内部命名空间通信
我们的环境按照系统默认应该如下图

登录到Pod上验证
查看Namespace和pod运行
[root@hop tanzu]# kubectl get po -n ns-prod -owide
NAME                           READY   STATUS    RESTARTS   AGE     IP              NODE            NOMINATED NODE   READINESS GATES
nginx-local-6f498bf5c4-zbxmz   1/1     Running   0          3h49m   172.211.0.130   esx-01a.tanzu
testbox                        1/1     Running   1          20m     172.211.0.132   esx-01a.tanzu
[root@hop tanzu]# kubectl get po -n ns-dev -owide
NAME                               READY   STATUS    RESTARTS   AGE   IP             NODE                 NOMINATED NODE   READINESS GATES
testbox                            1/1     Running   1          27m   172.211.0.20   esx-01a.tanzu
wordpress-79d67b9cf-j2vv2          1/1     Running   0          8d    172.211.0.18   esx-05a.corp.tanzu
wordpress-mysql-584b74f6b4-g5tg7   1/1     Running   0          8d    172.211.0.19   esx-05a.corp.tanzu
- 默认情况下拒绝外部流量进入命名空间
[root@hop tanzu]# ping 172.211.0.18
PING 172.211.0.18 (172.211.0.18) 56(84) bytes of data.
^C
--- 172.211.0.18 ping statistics ---
3 packets transmitted, 0 received, 100% packet loss, time 2004ms
- 默认情况下允许来自命名空间的流量离开出口
登录到pod:wordpress-79d67b9cf-j2vv2
[root@hop tanzu]# kubectl exec -it wordpress-79d67b9cf-j2vv2 -- bash
Ping外部站点
root@wordpress-79d67b9cf-j2vv2:/# ping cisco.com
PING cisco.com (72.163.4.185): 56 data bytes
64 bytes from 72.163.4.185: icmp_seq=0 ttl=222 time=74.010 ms
64 bytes from 72.163.4.185: icmp_seq=1 ttl=222 time=68.523 ms
64 bytes from 72.163.4.185: icmp_seq=2 ttl=222 time=68.038 ms
^C--- cisco.com ping statistics ---
3 packets transmitted, 3 packets received, 0% packet loss
round-trip min/avg/max/stddev = 68.038/70.190/74.010/2.708 ms
- 默认情况下拒绝命名空间之间的流量
root@wordpress-79d67b9cf-j2vv2:/# ping 172.211.0.130
PING 172.211.0.130 (172.211.0.130): 56 data bytes
^C--- 172.211.0.130 ping statistics ---
31 packets transmitted, 0 packets received, 100% packet loss
- 默认情况下允许内部命名空间通信
root@wordpress-79d67b9cf-j2vv2:/# ping 172.211.0.19
PING 172.211.0.19 (172.211.0.19): 56 data bytes
64 bytes from 172.211.0.19: icmp_seq=0 ttl=64 time=2.726 ms
64 bytes from 172.211.0.19: icmp_seq=1 ttl=64 time=0.875 ms
64 bytes from 172.211.0.19: icmp_seq=2 ttl=64 time=0.598 ms
^C--- 172.211.0.19 ping statistics ---
3 packets transmitted, 3 packets received, 0% packet loss
round-trip min/avg/max/stddev = 0.598/1.400/2.726/0.945 ms
在NSX-T管理界面查看策略
以Namespace:ns-prod为例,我们可以看到以下发生作用的策略
![]()
![]()
打开允许的策略:
目标:
生成在本分段的pod,以IP地址,分段和端口多次标注。
源:

Ingress的地址段,允许service访问
T1路由器

本分段地址写入白名单

Supervisor Cluster control plane VM
Inventory
在NSX-T 3.0+,提供对Container的监控

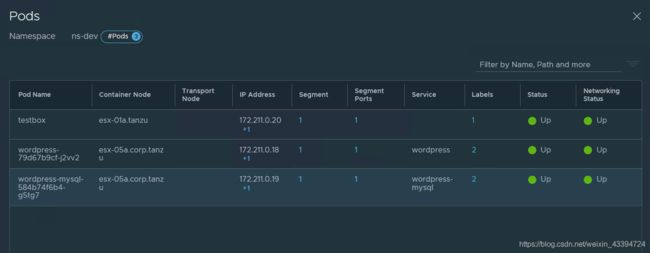
我们可以看到在ns-dev下的pod情况
NSX-T for Tanzu Kubernetes Cluster
- Node VM的连接,其IP地址分配和vSphere Pod同等级
- Service:Type LB,同样使用Ingress定义的地址段
其他: - 集群内部CNI:Antrea或Calico
- Ingress:第三方ingress controller(NSX-T的Ingress不提供给TK Cluster)
Node VM的连接
我们在ns-dev内起了TK Cluster:tkg-cluster-01

可以清楚的看到其处于的位置

vCenter上面可以查看到本集群的control-plane VM的IP地址172.211.0.71,与vSphere Pod共用pod地址池。
Cluster内部pod对外Service LB 验证
在TK Cluster内部使用如下yaml建立deployment和service
apiVersion: v1
kind: Service
metadata:
  name: hello-kubernetes
spec:
  type: LoadBalancer
  ports:
  - port: 80
    targetPort: 8080
  selector:
    app: hello-kubernetes
---
apiVersion: apps/v1
kind: Deployment
metadata:
  name: hello-kubernetes
spec:
  replicas: 3
  selector:
    matchLabels:
      app: hello-kubernetes
  template:
    metadata:
      labels:
        app: hello-kubernetes
    spec:
      imagePullSecrets:
      - name: harbor-registry-secret
      containers:
      - name: hello-kubernetes
        image: 172.80.88.4/ns-dev/hello-kubernetes:1.5
        ports:
        - containerPort: 8080
        env:
        - name: MESSAGE
          value: I just deployed a PodVM on the Tanzu Kubernetes Cluster!!
此处使用了内部Harbor,请参考如何在Tanzu Cluster中使用vSphere with Tanzu内置容器注册表
运行yaml以后
[root@hop tanzu]# kubectl get svc
NAME               TYPE           CLUSTER-IP      EXTERNAL-IP   PORT(S)        AGE
hello-kubernetes   LoadBalancer   100.64.136.105   172.80.88.7   80:32762/TCP   38s
kubernetes         ClusterIP      100.64.0.1              443/TCP        24d
supervisor         ClusterIP      None                    6443/TCP       24d
对外的服务生成,地址为172.80.88.7,使用nodePort:32762映射80

- 工作节点使用 iptables 将服务暴露给 nodePort
- NSX为服务创建虚拟服务器
- 具有特定 nodePort 的工作节点被设置为LB 池成员
- Ingress控制器使用 LB 类型的服务来公开其 IP

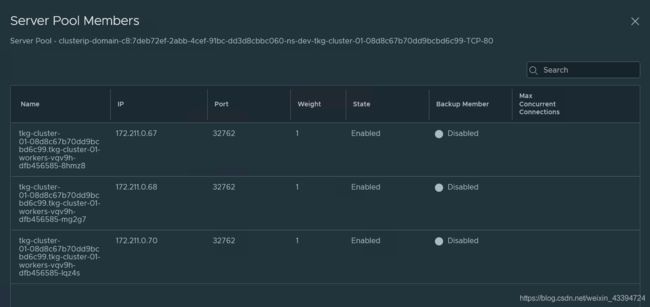
可以查看到Server Pool的情况,nodePort:32762
以上


