LPC2124 uart Low Level driver
最近上课,又回到了ARM7,机房的板子摸都没摸到,只好用protues模拟一下。比起我那个s3c2440这个ARM7简单得多。
顺手的说。。。。
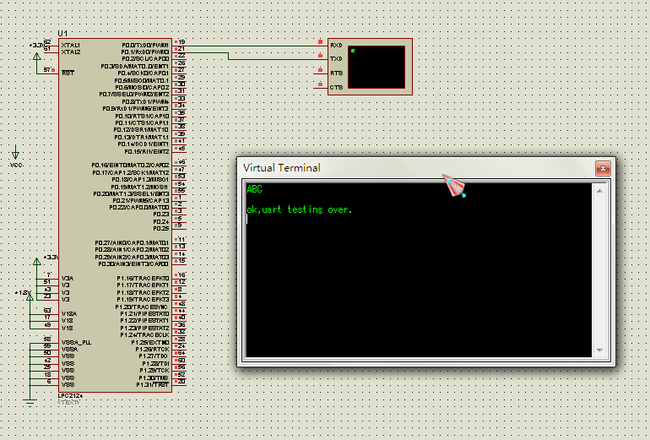
首先传电路图
IDE使用KEIL4,启动代码keil有提供,自己就不用写了。这也是成熟处理器开发的一大好处。
lpc系列的uart设置前主要注意一下时钟的配置。时钟是永恒的主题。
#define Fosc            11059200                    //crystal,10MHz~25MHz
#define Fcclk           (Fosc * 4)                  //系统频率,必须为Fosc的整数倍(1~32),且<=60MHZ
#define Fcco            (Fcclk * 4)                 //CCO频率,必须为Fcclk的2、4、8、16倍,范围为156MHz~320MHz
#define Fpclk           (Fcclk / 4) * 1             //VPB时钟频率,只能为(Fcclk / 4)的1、2、4倍

//-------------------------------------------------------------
// Function:	setting initialztion of target board
// Params:		void
// Note:	    setting clock..
//-------------------------------------------------------------
void TargetResetInit(void)
{
	//setting system clock
    PLLCON = 1;
	#if ((Fpclk / (Fcclk / 4)) == 1)
	    VPBDIV = 0;
	#endif
	#if ((Fpclk / (Fcclk / 4)) == 2)
	    VPBDIV = 2;
	#endif
	#if ((Fpclk / (Fcclk / 4)) == 4)
	    VPBDIV = 1;
	#endif

	#if ((Fcco / Fcclk) == 2)
	    PLLCFG = ((Fcclk / Fosc) - 1) | (0 << 5);
	#endif
	#if ((Fcco / Fcclk) == 4)
	    PLLCFG = ((Fcclk / Fosc) - 1) | (1 << 5);
	#endif
	#if ((Fcco / Fcclk) == 8)
	    PLLCFG = ((Fcclk / Fosc) - 1) | (2 << 5);
	#endif
	#if ((Fcco / Fcclk) == 16)
	    PLLCFG = ((Fcclk / Fosc) - 1) | (3 << 5);
	#endif
    PLLFEED = 0xaa;
    PLLFEED = 0x55;
    while((PLLSTAT & (1 << 10)) == 0);
    PLLCON = 3;
    PLLFEED = 0xaa;
    PLLFEED = 0x55;
}
接下来就是UART0的常规驱动了。主要注意选择端口,设置波特率,工作模式。还是比较简单。
第一步,选择uart接口
由管脚说明,可知P0.0和P0.1分别和uart0的发送和接受缓冲寄存器复用。
现在设置P00为输出,P01为输入。PINSEL0[1:0]=01; PINSEL0[3:2]=01;有PINSEL0 |= 0x5;
第二步,设置传输模式
首先,U0LCR寄存器,【1:0】置为11。,【2】置为1,即有8数据位,1个停止位,0个校验位,又因为设置波特率的需要,DLAB位置为1,所以设置U0LCR为0x83
第三步,设置波特率,这一段读起来有点晦涩
The UART0 Divisor Latch is part of the UART0 Baud Rate Generator and holds the value used to divide the VPB clock (pclk) in
order to produce the baud rate clock, which must be 16x the desired(要求的) baud rate. The U0DLL and U0DLM registers together form
a 16 bit divisor where U0DLL contains the lower 8 bits of the divisor and U0DLM contains the higher 8 bits of the divisor. A ‘h0000
value is treated like a ‘h0001 value as division by zero is not allowed.The Divisor Latch Access Bit (DLAB) in U0LCR must be
one in order to access the UART0 Divisor Latches.
计算公式:PCLK = 16 * ( U0DLM(High) + U0DLL(low) ) * BRD
简单的说,由0DLM和U0DLL寄存器的值合起来作为分频值,再根据公式计算出pclk应该设置的大小。
经过这三步,几乎可以放开去做了。
程序提供最简单也最重要的串口终端输出功能。
#define UARTO_BRD	9600

void uart0_init(void);
void uart0_sendbyte(unsigned char data);
unsigned char uart0_rcvbyte(void);
void uart0_sendstring(unsigned char* data);

//tet function
void uart0_test(void);

/*************************************************/
/以上是.h文件定义内容
/*************************************************/


/*
 * xiaoyang @2111.3.30
 * complete UART0 driver for LPC2124
 */


#include "global.h"
#include "serial.h"
#include "config.h"

/*
 * low level UART driver
 *
 * xiaoyang @2011.30
 */

extern void DelayNS(unsigned int dly);

//-------------------------------------------------------------
// Function:	init for UART0
// Params:		void
// Return:
// Note:
//-------------------------------------------------------------
void uart0_init(void)
{
	unsigned short fdiv;
	PINSEL0 = (PINSEL0 & 0xfffffff0) | 0x05;//select pins of	UART0
	U0LCR = 0x83;	//8 data transport,1 stop bit,no checking

	fdiv = (Fpclk / 16) / UARTO_BRD;
	U0DLL = fdiv % 256;				//low bits of div
	U0DLM = fdiv / 256;				//high bits of div

	U0LCR = 0x03;
}

//-------------------------------------------------------------
// Function:	send byte var UART0
// Params:		void
// Return:
// Note:
//-------------------------------------------------------------
void uart0_sendbyte(unsigned char data)
{
	U0THR = data;
	//wait for last byte sent over
	while( (U0LSR & 0x40) == 0 ){
		;
	}
	DelayNS(100);
}

//-------------------------------------------------------------
// Function:	recieve byte from UART0
// Params:		void
// Return:		the byte riceived from uart0
// Note:
//-------------------------------------------------------------
unsigned char uart0_rcvbyte(void)
{
	unsigned char ch;
	while((U0LSR & 0x1) == 0){
		; //if buffer if empty,wait
	}
	ch = (unsigned char)U0RBR;
	return ch;
}

//-------------------------------------------------------------
// Function:	send string via UART0
// Params:		string pointer
// Return:		void
// Note:	    for a string, you must end with '\0'
//-------------------------------------------------------------
void uart0_sendstring(unsigned char* data)
{
	while(*data != '\0')
	{
		uart0_sendbyte(*data);
		data++;
	}
	return;
}

//-------------------------------------------------------------
// Function:	uart0 testing UART0
// Params:		void
// Return:		void
// Note:
//-------------------------------------------------------------
void uart0_test(void)
{
	char ch;
	//test uart funtion
	uart0_sendbyte('A');
	uart0_sendbyte('B');
	uart0_sendbyte('C');
	uart0_sendbyte('\n');
	ch = uart0_rcvbyte();
	uart0_sendbyte('\r');
	uart0_sendbyte(ch);
	uart0_sendstring("\nok,uart testing over.\r\n");
}
ok,最后输出效果图:

