aws toolkit_适用于Visual Studio Code的AWS Toolkit入门
aws toolkit
In this article, I am going to explain how to start using the AWS Toolkit for Visual Studio Code to develop serverless functions locally. Serverless applications or functions gives us the ability to develop, test and execute code in the cloud without having to worry about the underlying infrastructure. These applications are scalable which means we can easily increase or decrease the resources consumed by them. AWS Toolkit for Visual Studio Code is an extension available for Visual Studio Code using which we can directly communicate with the resources on Amazon within the code editor.
在本文中,我将解释如何开始使用适用于Visual Studio Code的AWS Toolkit在本地开发无服务器功能。 无服务器应用程序或功能使我们能够在云中开发,测试和执行代码,而不必担心基础架构。 这些应用程序是可扩展的,这意味着我们可以轻松地增加或减少它们消耗的资源。 适用于Visual Studio Code的AWS Toolkit是Visual Studio Code的扩展,通过它我们可以在代码编辑器中直接与Amazon上的资源进行通信。
开始使用AWS Toolkit for Visual Studio Code的前提条件 (Pre-requisites to start using AWS Toolkit for Visual Studio Code)
In order to get started with the AWS Toolkit for Visual Studio Code, we need to have the following installed on our local machine.
为了开始使用适用于Visual Studio Code的AWS Toolkit,我们需要在本地计算机上安装以下组件。
- AWS Account – You need to have a valid AWS account to get started with it. Navigate to AWS账户 –您需要具有有效的AWS账户才能开始使用。 导航到https://console.aws.amazon.com/ to get started with Amazon Web Services https://console.aws.amazon.com/以开始使用Amazon Web Services
- Visual Studio Code – You need to Visual Studio Code –您需要在计算机上download and install Visual Studio Code in your machine. VS Code is available for Windows, Linux, and Mac 下载并安装 Visual Studio Code。 VS Code适用于Windows,Linux和Mac
- Code Development SDK – You need to install the relevant SDK that you are going to use to code your application. This can be either .NET SDK, Node JS SDK or the Python SDK 代码开发SDK –您需要安装将用于编写应用程序代码的相关SDK。 可以是.NET SDK,Node JS SDK或Python SDK
- AWS SAM CLI – This is a command line utility from Amazon that enables us to develop and test our serverless applications locally. Although it is not mandatory for the toolkit, but still it is recommended to install it on the local machine AWS SAM CLI –这是Amazon的命令行实用程序,使我们能够在本地开发和测试无服务器应用程序。 尽管该工具包不是强制性的,但仍建议将其安装在本地计算机上
- Docker – This is also not mandatory for the toolkit, but if you want to test your serverless application locally using the SAM CLI, then it is necessary to have docker installed
- Docker –该工具包也不是必需的,但是如果要使用SAM CLI在本地测试无服务器应用程序,则必须安装Docker
安装AWS Toolkit (Installing the AWS Toolkit)
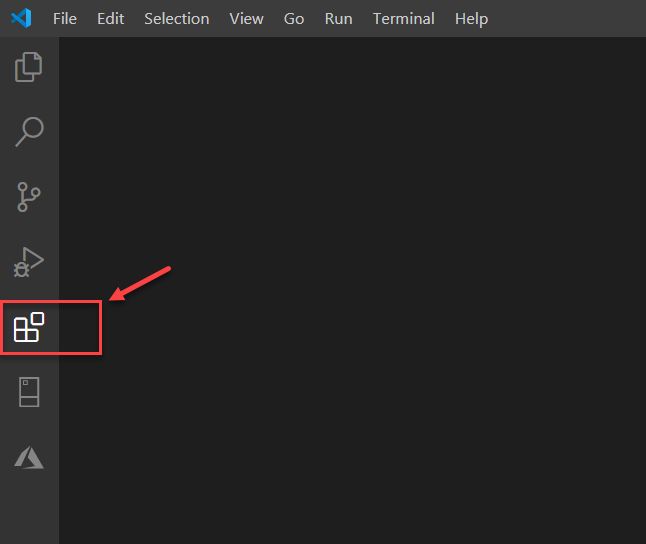
Let us now go ahead and install the AWS Toolkit for Visual Studio Code. Once you have the Visual Studio Code installed on your machine, open it, and click on the Extensions icon available in the left pane of the editor:
现在,让我们继续安装适用于Visual Studio Code的AWS Toolkit。 在计算机上安装Visual Studio Code之后,将其打开,然后单击编辑器左窗格中的“ 扩展”图标:
Figure 1 – Extensions for Visual Studio Code
图1 – Visual Studio Code扩展
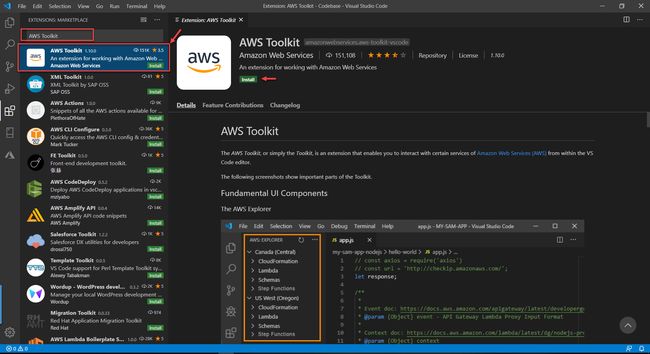
The Extension pane opens up. On the search box, search for “AWS Toolkit” and hit Enter. The very first item on the list will be the AWS Toolkit extension. Select it and click on Install button:
将打开“ 扩展”窗格。 在搜索框中,搜索“ AWS Toolkit ”,然后按Enter 。 列表上的第一项将是AWS Toolkit扩展。 选择它,然后单击“安装”按钮:
Figure 2 – Install AWS Toolkit for Visual Studio Code
图2 –安装适用于Visual Studio Code的AWS Toolkit
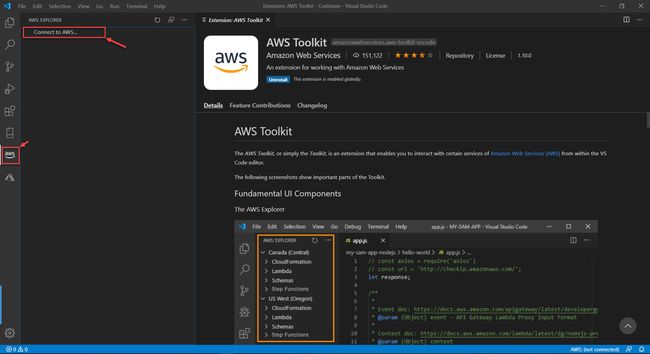
Once the toolkit is installed on your machine, you can see a new icon will appear on the sidebar on the left. You can use it to access all the resources available under your AWS account. The very first thing that we need to do next is to connect to our AWS account using specific credentials, which I be explaining in the later section of this article:
在您的计算机上安装工具包后,您会看到一个新图标将出现在左侧的侧边栏上。 您可以使用它来访问您的AWS账户下的所有可用资源。 接下来我们要做的第一件事是使用特定凭证连接到我们的AWS账户,我将在本文的后面部分中对此进行说明:
Figure 3 – AWS Explorer
图3 – AWS Explorer
获取AWS Toolkit的凭证 (Obtaining the credentials for AWS Toolkit )
Now that we have installed the AWS Toolkit extension for VS Code, the next step here is to setup the credentials to connect to the AWS. There are two process in which we can obtain the credentials and use it with VS Code.
既然我们已经安装了适用于VS Code的AWS Toolkit扩展,那么下一步就是设置凭据以连接到AWS。 我们可以通过两个过程来获取凭据并将其与VS Code一起使用。
- Using the AWS supported credentials – These can be provided by Amazon directly using a shared AWS credential file or a shared AWS config file 使用AWS支持的凭证 –这些可以由Amazon直接使用共享的AWS凭证文件或共享的AWS配置文件来提供
- Using an external credential process (not supported by amazon) – This process can be used if you have a process that generates or lookup the credentials not directly supported by Amazon 使用外部凭证流程(亚马逊不支持) –如果您拥有一个生成或查找Amazon不直接支持的凭证的流程,则可以使用此流程
For the sake of this tutorial, we will go ahead with the AWS Supported Credentials. This is also a two-step process, in which first we obtain AWS Access Keys from the AWS console and then set up the credentials in VS Code. The AWS Access Key is a specific type of credential that allows us to programmatically access the AWS resources. It consists of two parts – the Access Key ID and the Access Key Secret. Let us go ahead and generate these credentials from the AWS Console.
在本教程中,我们将继续介绍AWS Supported Credentials 。 这也是一个两步过程,其中首先我们从AWS控制台获取AWS Access Key,然后在VS Code中设置凭证。 AWS Access Key是一种特定类型的凭证,它使我们能够以编程方式访问AWS资源。 它由两部分组成- 访问密钥ID和访问密钥密钥 。 让我们继续并从AWS控制台生成这些凭证。
Navigate to the IAM section on the AWS Management Console at https://console.aws.amazon.com/iam/ and choose Users:
在https://console.aws.amazon.com/iam/上导航到AWS管理控制台上的IAM部分,然后选择Users :
Figure 4 – Navigating to IAM Users
图4 –导航到IAM用户
On the Users page, click on the username to see the details:
在“ 用户”页面上,单击用户名以查看详细信息:
Figure 5 – Select User
图5 –选择用户
Navigate to the Security Credentials page and select Create access key:
导航到“ 安全凭证”页面,然后选择“ 创建访问密钥” :
Figure 6 – Security Credentials Page
图6 –安全凭证页面
Once you click on Create access key, a new popup window will open up in which you will get to download the CSV file containing the credentials. Copy the Access Key ID and the Secret Access Key to a secure location and click on Close.
单击创建访问密钥后 ,将打开一个新的弹出窗口,您可以在其中下载包含凭据的CSV文件。 将访问密钥ID和秘密访问密钥复制到安全位置,然后单击“ 关闭” 。
You can also see that the Access Key ID has been added to the summary and is Active at the moment:
您还可以看到访问密钥ID已添加到摘要中,并且目前处于活动状态 :
Figure 7 – Access Key Added
图7 –添加的访问密钥
在Visual Studio Code中设置AWS凭证 (Setting up the AWS credentials in Visual Studio Code)
We would now need to setup the credentials that we obtained from AWS in the toolkit in VS Code. This can be done by using the shared AWS files that is provided by AWS. The shared AWS config file and the shared AWS credentials file are the ones in which we can store the credential information that we received. By default, these files can be found under the “.aws” directory and are named config and credentials, respectively.
现在,我们需要在VS Code中的工具箱中设置从AWS获得的凭证。 这可以通过使用AWS提供的共享AWS文件来完成。 共享的AWS配置文件和共享的AWS凭证文件是我们可以在其中存储收到的凭证信息的文件。 默认情况下,这些文件可以在“ .aws”目录下找到,分别命名为config和凭据。
Let us now go ahead and create the shared credential and config files in the VS Code. Inside VS Code, open the command palette using the View -> Command Palette.
现在让我们继续并在VS Code中创建共享的凭证和配置文件。 里面VS代码,请打开使用查看命令面板- > 命令面板 。
In the command palette, search for AWS and select AWS: Create Credentials Profile:
在命令选项板中,搜索AWS并选择AWS:Create Credentials Profile :
Figure 8 – Create Credentials Profile
图8 –创建凭证配置文件
Provide a suitable name for the profile. Let me enter it as “default”:
为配置文件提供合适的名称。 我将其输入为“ default ”:
Figure 9 – Profile Name
图9 –配置文件名称
In the next step, we need to provide the AWS Access Key that we have created in the previous step. Paste the access key here and hit Enter:
在下一步中,我们需要提供在上一步中创建的AWS Access Key 。 将访问密钥粘贴到此处,然后按Enter :
Figure 10 – AWS Access Key
图10 – AWS访问密钥
Finally, enter the AWS Secret Key and press Enter to create the Credential profile:
最后,输入AWS秘密密钥 ,然后按Enter以创建凭证配置文件 :
Figure 11 – AWS Secret Key
图11 – AWS密钥
从Visual Studio Code连接到AWS (Connect to AWS from Visual Studio Code)
Now that we successfully have setup our credentials profile, we can go ahead and connect to our AWS environment. Open VS Code and open the command palette as we did in the earlier step.
现在我们已经成功设置了凭证配置文件,我们可以继续并连接到我们的AWS环境。 与前面的步骤一样,打开VS Code并打开命令面板。
Search for AWS and select AWS: Connect to AWS from the menu:
搜索AWS并选择AWS:从菜单中连接到AWS :
Figure 12 – Connect to AWS
图12 –连接到AWS
In the next step, select the profile that you have created in the previous step. Let us select the default profile:
在下一步中,选择您在上一步中创建的配置文件。 让我们选择默认配置文件:
Figure 13 – Select the Default Profile
图13 –选择默认配置文件
Once you select the profile, the AWS Toolkit for Visual Studio Code will connect to the AWS resources using the credentials and fetch the information within the VS Code environment as follows:
选择配置文件后,适用于Visual Studio Code的AWS Toolkit将使用凭证连接到AWS资源,并在VS Code环境中获取信息,如下所示:
Figure 14 – AWS Toolkit for Visual Studio Code
图14 –适用于Visual Studio代码的AWS工具包
As you can see in the above figure, that we have two regions defined in our AWS account and both of them are shown in the list. Also, all the lambda functions, schemas and step functions also appear under each region separately so that we can easily organize them and code efficiently.
如上图所示,我们在AWS账户中定义了两个区域,并且两个区域都显示在列表中。 另外,所有的lambda函数,模式和步骤函数也分别出现在每个区域下,因此我们可以轻松地组织它们并有效地进行编码。
结论 (Conclusion)
In this article, I have explained how to use the AWS Toolkit for Visual Studio Code to start developing code locally and then publish it to the AWS Lambda Functions once it is tested and verified locally. Developing the applications locally give the developers the flexibility to use a preferred code editor of choice, for example Visual Studio Code, Sublime Text, PyCharm or any other editor using which we can write and manage efficient code. This is very helpful rather than using an online code editor as these are quite powerful and includes a bunch of other useful features required for code management.
在本文中,我已经解释了如何使用适用于Visual Studio Code的AWS Toolkit在本地开始开发代码,然后在对其进行本地测试和验证后将其发布到AWS Lambda Functions。 在本地开发应用程序使开发人员可以灵活地选择首选的代码编辑器,例如Visual Studio Code,Sublime Text,PyCharm或我们可以用来编写和管理高效代码的任何其他编辑器。 与使用在线代码编辑器相比,这非常有用,因为它们非常强大,并且包括代码管理所需的许多其他有用功能。
翻译自: https://www.sqlshack.com/getting-started-with-aws-toolkit-for-visual-studio-code/
aws toolkit


