JavaWeb课设(高校人事管理入门级)
JavaWeb课设--高校人事管理系统
- 系统界面
- 代码
-
- MVC模式
- 代码解析
-
- 前端界面
- 后端界面
- 结尾
系统界面
此系统主要采用java+mysql+servlet技术,第一次做这种项目,先放图

能看到主页index有登录注册两个功能,进入功能页面后如下图所示

系统前端界面方面采用了HTML+CSS+JS,图中所有图片样式均可自己替换。
代码
MVC模式
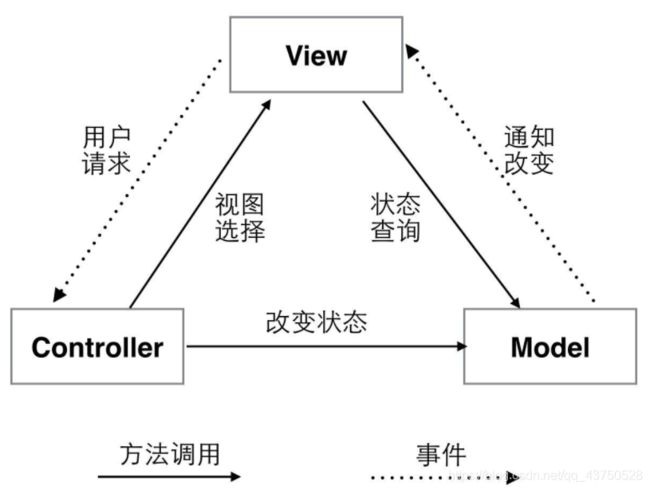
此系统也采用了最常用的MVC开发模式,那首先我们得了解一下什么是MVC,
1、M 即model模型是指模型表示业务规则。在MVC的三个部件中,模型拥有最多的处理任务。被模型返回的数据是中立的,模型与数据格式无关,这样一个模型能为多个视图提供数据,由于应用于模型的代码只需写一次就可以被多个视图重用,所以减少了代码的重复性。
2、V 即View视图是指用户看到并与之交互的界面。比如由html元素组成的网页界面,或者软件的客户端界面。MVC的好处之一在于它能为应用程序处理很多不同的视图。在视图中其实没有真正的处理发生,它只是作为一种输出数据并允许用户操纵的方式。
2、C 即controller控制器是指控制器接受用户的输入并调用模型和视图去完成用户的需求,控制器本身不输出任何东西和做任何处理。它只是接收请求并决定调用哪个模型构件去处理请求,然后再确定用哪个视图来显示返回的数据。
有些人看了还是不理解,这里放一张图
还有不懂不理解的可以多百度一下或者多实践几个小项目,就能体验到这个模式的好处。
代码解析
使用的软件环境:
1.原码编译使用IDEA2019.3.3(当然使用更高版本也可以)
2.JDK采用的是10版本,直接下载原码运行时要注意修改配置文件中的jdk版本,否则会报错
3.数据库及使用的是MySQL5.5.36(建议使用5版本)和Navicat(这是一个很好的数据库软件,推荐大家使用,网上破解方法也很多)
话不多说,直接放代码。
4.Tomcat使用的是9,百度都是可以直接下载,或者点击此处去下载
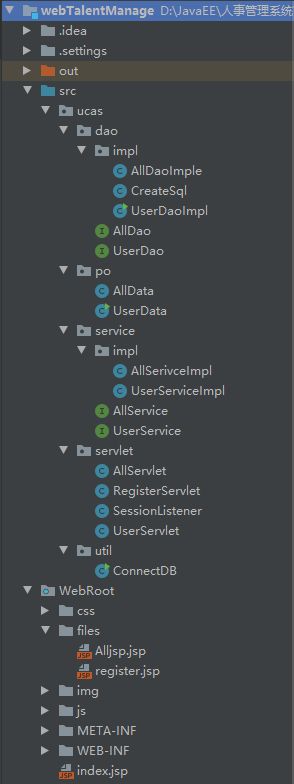
下图是原码中所有代码大纲
前端界面
下面展示 登录主界面代码。
<div class="wrap" id="wrap">
		<div class="logGet">
			<!-- 头部提示信息 -->
			<div class="logD logDtip">
				<p class="p1">登录</p>
			</div>
				<!-- 输入框 -->
		<form id="frmLOGIN" name="frmLOGIN">
			<div class="lgD">
				<img src="img/用户名.png" width="20" height="20" alt=""/>
				<input id="userid" name="userid" type="text" placeholder="输入帐号" AUTOCOMPLETE="OFF"/>
			</div>
			<div class="lgD">
				<img src="img/密码.png" width="20" height="20" alt=""/>
	<input id="password" name="password" type="password" placeholder="输入用户密码" />
			<img id="pwVisible" src="img/密码可见.png" width="20" height="20" alt=""
				style="type:text/css; margin-left: 90%; cursor:pointer" />
			</div>
			<div class="logC">
				<a href="files/register.jsp" target="_self">
					<button type="button" style="cursor:pointer">注册</button></a>
				<a target="_self">
			<button type="button" id="btnLogin" style="cursor:pointer">登 录</button></a>
下面是 注册界面代码。
<body background="主页.jpg">
	<hr>
    <h1>用户注册</h1>
	<hr>
	<form id="frmREGISTER" name="frmREGISTER" AUTOCOMPLETE="OFF" action="/RegisterServlet">
		<table>
            <tr height="35px">
                <td>登录帐号:</td>
                <td>
                    <input type="text" name="reguser" id="reguser" placeholder="输入帐号"/>
                </td>
                <td id="tduser"></td>
            </tr>

            <tr height="35px">
                <td >密码:</td>
                <td>
                    <input type="password" name="regpw0" id="regpw0" placeholder="输入用户密码"/>
                </td>
            </tr>
            <tr height="35px">
                <td >确认密码:</td>
                <td>
                    <input type="password" name="regpw1" id="regpw1" placeholder="确认用户密码"/>
                </td>
                <td id="tdpw1"></td>
            </tr>
        </table>
        <a target="_blank">
        <input type="submit" value="注册">
		<a href="index.jsp" target="_self">
		<button type="button" id="btnCancel" style="cursor:pointer">取 消</button></a>
		<a><input type="reset" value="重 置" title="清空输入框" id="reSet"/></a>
	</form>
<h1 style="color: red">${message}</h1>
  </body>
下面展示 功能页面代码。
<body id="body0">
  	<%
  		//HttpSession session1 = request.getSession();
  		response.setHeader("Cache-Control","no-cache");
		response.setHeader("Cache-Control","no-store");
		response.setDateHeader("Expires", 0);
		response.setHeader("Pragma","no-cache");
  	 %>
  	  <input type="hidden" name="hsession" id="hsession" value="<%=session.getAttribute("userid")%>"/>
	  <script type="text/javascript">
	     	document.write(new Date().toLocaleTimeString());   // 将本地时间转换成字符串返回
	  </script>

  	<div>
  		<ul style="margin:0; padding:0">
	  		<li id="liQuit" style="display:inline; margin:0; padding:0; cursor:pointer"><a>退出</a></li>
       	</ul>
  	</div>
    <form id="frmALLDATA" name="frmALLDATA" AUTOCOMPLETE="OFF">
    	<label>员工编号</label>
    	<input type="text" id="emid" name="emid" required="required" placeholder="请输入员工编号"/>
    	<label>姓名</label>
    	<input type="text" id="name" name="name" required="required" placeholder="请输入姓名"/>
    	<label>性别</label>
    	<input type="text" id="sex" name="sex" required="required"  placeholder="请输入性别"/>
    	<label>年龄</label>
    	<input type="text" id="age" name="age" required="required"  placeholder="请输入年龄"/>
    	<label>职位</label>
    	<input type="text" id="post" name="post" required="required"  placeholder="请输入职位"/>

    	<br>
    	<label>身份证号</label>
    	<input type="text" id="idnum" name="idnum" required="required"  placeholder="请输入身份证号"/>
    	<label>籍贯</label>
    	<input type="text" id="place" name="place" required="required"  placeholder="请输入籍贯"/>
    	<label>联系方式</label>
    	<input type="text" id="phonenum" name="phonenum" required="required"  placeholder="请输入联系方式"/>
    	<label>部门</label>
    	<input type="text" id="department" name="department" required="required"  placeholder="请输入部门"/>
    	<label>工资</label>
    	<input type="text" id="wage" name="wage" required="required"  placeholder="请输入工资"/>

		<input type="hidden" id="time" name="time" required="required" />
		<input type="hidden" id="index" name="index" required="required" />
		<br>
    	<input id="reset" type="reset" value="重置" title="清空输入框"/>
    	<button type="button" id="btnAllInsert" title="增加一条新数据">新增</button>
    	<button type="button" id="btnAllSelectAll" title="查询数据库中所有数据">全部查看</button>
    	<button type="button" id="btnAllSelectCon" title="查询数据库中满足输入条件的数据(无条件默认不输出)">筛选查看</button>
    	<button type="reset" id="btnAllUpdate" title="点击编辑中的更新后,对数据进行修改">更新</button>
 		<div id="div0">
		<img id="img0" src="img/信息表头.jpg"/></div>

    </form>

    <table class="table table-bordered table-hover" id="table1">
    	<thead>
    		<tr>
    			<th>员工编号</th>
    			<th>姓名</th>
    			<th>性别</th>
    			<th>年龄</th>
    			<th>职位</th>
    			<th>身份证号</th>
    			<th>籍贯</th>
    			<th>联系方式</th>
    			<th>部门</th>
    			<th>工资</th>
    			<th>记录时间</th>
    			<th>编辑</th>

    		</tr>
    	</thead>
    	<tbody id="tbody0">
    	</tbody>
    </table>
    <!-- 引入jQuery -->
    <script type="text/javascript" src="js/jquery-1.11.3.js"></script>
    <script type="text/javascript" src="js/jsAlldata.js"></script>
  </body>
后端界面
由于后端代码较多,这里不一一展示,只展示部分代码。详细代码请看文末源码。
下面是UserServlet代码,处在servlet层,在MVC中属于控制(controller)层,这一层的Java代码都会继承HttpServlet,主要有doGet和doPost两种方法,在页面代码写的是get方法跳转,那么就运行servlet里doGet方法里面的代码(post同理)。
当然使用最多的是doGet方法,一般首先用特定方法获得页面提交的姓名和密码,然后进行处理(判断是否合法等等),处理玩之后,决定是直接显示信息,还是跳转到其他页面。
servlet就是接受页面信息,然后进行逻辑处理的一个java类。
// 登录界面
package ucas.servlet;

import java.io.IOException;
import java.io.PrintWriter;
import java.util.HashMap;
import java.util.Map;

import javax.servlet.ServletConfig;
import javax.servlet.ServletException;
import javax.servlet.annotation.WebServlet;
import javax.servlet.http.HttpServlet;
import javax.servlet.http.HttpServletRequest;
import javax.servlet.http.HttpServletResponse;
import javax.servlet.http.HttpSession;

import ucas.po.UserData;
import ucas.service.impl.UserServiceImpl;

@WebServlet("/UserServlet")
public class UserServlet extends HttpServlet {
	private static final long serialVersionUID = 1L;
	public static Map<String, HttpSession> userid_Session = new HashMap<String, HttpSession>();  // 键为帐号,值为session
	public static Map<String, String> sessionid_Userid = new HashMap<String, String>();  // 键为sessionid,值为帐号
	public static HttpSession tmpS;  // 用于获取当前登录帐号前面登录的session
	private UserData userData;
	private UserServiceImpl userSerciImpl;
	// 接收各变量
    private String strUserId;
    private String strPassword;
    private String strMethod;

    private HttpSession session;
    private PrintWriter out;
    /**
     * @see HttpServlet#HttpServlet()
     */
    public UserServlet() {
        super();
        // TODO Auto-generated constructor stub
        userData = new UserData();
        userSerciImpl = new UserServiceImpl();
    }

	public void init(ServletConfig config) throws ServletException {
		// TODO Auto-generated method stub
	}

	public void destroy() {
		super.destroy(); // Just puts "destroy" string in log
	}
	/**
	 * @see HttpServlet#doGet(HttpServletRequest request, HttpServletResponse response)
	 */
	protected void doGet(HttpServletRequest request, HttpServletResponse response) throws ServletException, IOException {
		// TODO Auto-generated method stub
		doPost(request, response);
	}

	/**
	 * @see HttpServlet#doPost(HttpServletRequest request, HttpServletResponse response)
	 */
	protected void doPost(HttpServletRequest request, HttpServletResponse response) throws ServletException, IOException {
		// TODO Auto-generated method stub
		response.setContentType("text/html");
		//语言编码
		request.setCharacterEncoding("utf-8");
		response.setCharacterEncoding("utf-8");
		out = response.getWriter();

		// 接收参数
		strUserId = request.getParameter("userid");
		strPassword = request.getParameter("password");
		strMethod = request.getParameter("method");  // 获取方法名
		session = request.getSession();

		switch (strMethod) {
		case "userLogin":
			mUserLogin();
			break;
		default:
			break;
		}
		out.flush();
		out.close();
	}

	// 验证能否登录
	private void mUserLogin() {
		// TODO Auto-generated method stub
		tmpS = null;
		String strUser = "";
		userData = userSerciImpl.userSelectOne(strUserId);
		if(!strPassword.equals(userData.getPassword())){  // 帐号与密码不匹配
			out.println(-1);
		}

		else if(strPassword.equals(userData.getPassword())){
				tmpS = userid_Session.get(strUserId);
				strUser = sessionid_Userid.getOrDefault(session.getId(), "");
				if(strUser != "") //该客户端登录其他帐号
					out.println(-2);
				if(tmpS == null){  // 该账号未在其他处登录
					setSession();
					userid_Session.put(strUserId, session);
					sessionid_Userid.put(session.getId(), strUserId);
				}
				else{   // 该账号在其他处登录
					tmpS.setAttribute("message", "yes");  // 设置标志信息
					setSession();
					userid_Session.put(strUserId, session);
					sessionid_Userid.put(session.getId(), strUserId);
				}
				out.println(1);
			}

		else
			out.println(-1);
	}
	// 设置session
	private void setSession(){
		session.setAttribute("userid", strUserId);
		session.setAttribute("password", strPassword);
		session.setAttribute("message", "no");  //  设为no表示为当前登录帐号,变为yes时表示该账号被迫下线
	}
}
下面是 UserDao接口代码片。属于DAO(Data Access Object)层代码,是一个数据访问接口,数据访问:顾名思义就是与数据库打交道。夹在业务逻辑与数据库资源中间,是MVC模式中Model层。
一开始的时候想着需不需要接口,对于此项目来说,若只进行到这里,有没有接口都是可以的,但若要是以后要将这个代码完善、升级,那这时候接口就显得格外有优点,他不需要你再重新写一遍用户实体类,只需要继承这个接口在实现重写就可以达到很方便的效果。
package ucas.dao;

import java.util.ArrayList;

import ucas.po.UserData;

public interface UserDao {
	// 0增加新用户
	public int userInsert(UserData user);
	// 1删除用户
	public int userDelete(String userid);
	// 2修改用户信息
	public int userUpdate(UserData user);
	// 3查看指定用户信息
	public UserData userSelectOne(String userid);
	// 4全部用户
	public ArrayList<UserData> userSelectAll();
}
下面是 UserDaoImpl代码片,此代码实现了上面的UserDao接口,将该接口方法重写。
package ucas.dao.impl;

import java.sql.Connection;
import java.sql.PreparedStatement;
import java.sql.ResultSet;
import java.sql.SQLException;
import java.text.ParsePosition;
import java.text.SimpleDateFormat;
import java.util.ArrayList;
import java.util.Date;

import ucas.dao.UserDao;
import ucas.po.UserData;
import ucas.util.ConnectDB;

public class UserDaoImpl implements UserDao{
	static PreparedStatement sql;  // Statement对象
	private String sqlString;  //  sql代码字符串
	static ConnectDB conn = new ConnectDB();
	private Connection con = conn.myGetConnection("talentmanagedb"); // 连接数据库
	private String tableName; // 数据库所用表的名称
	private int resultID = -1;  // 判断操作状态,操作失败为-1

	// 构造方法
	public UserDaoImpl() {
		// TODO Auto-generated constructor stub
		super();
		this.tableName = "usertable";
	}
	public UserDaoImpl(String tableName){
		super();
		this.tableName = tableName;
	}
	@Override
	public int userInsert(UserData user) {
		// TODO Auto-generated method stub
		sqlString = "insert into "+tableName+"(userid, password, `time`) values(?,?,?)";
		try {
			sql = con.prepareStatement(sqlString);
			sql.setString(1, user.getUserid());
			sql.setString(2, user.getPassword());
			sql.setString(3, user.getTime());
			resultID = sql.executeUpdate();
			System.out.println("已成功注册, 用户名为"+user.getUserid()+"!");
		} catch (SQLException e) {
			// TODO Auto-generated catch block
			e.printStackTrace();
		}
		return resultID;
	}

	@Override
	public int userDelete(String userid) {
		// TODO Auto-generated method stub
		sqlString = "delete from "+tableName+" where userid = ?";
		try {
			sql = con.prepareStatement(sqlString);
			sql.setString(1, userid);
			resultID = sql.executeUpdate();
			System.out.println("用户"+userid+"已删除!");
		} catch (SQLException e) {
			// TODO Auto-generated catch block
			e.printStackTrace();
		}
		return resultID;
	}

	@Override
	public int userUpdate(UserData user) {
		// TODO Auto-generated method stub
		sqlString = "update "+tableName+" set password = ? where userid = ?";
		try {
			sql = con.prepareStatement(sqlString);
			sql.setString(1, user.getPassword());
			//sql.setString(2, user.getMproof());
			sql.setString(2, user.getUserid());
			resultID = sql.executeUpdate();
			System.out.println("用户"+user.getUserid()+"的数据修改成功!");
		} catch (SQLException e) {
			// TODO Auto-generated catch block
			e.printStackTrace();
		}
		return resultID;
	}

	@Override
	public UserData userSelectOne(String userid) {
		// TODO Auto-generated method stub
		UserData result = new UserData();
		sqlString = "select * from "+tableName+" where userid = ?";
		try {
			sql = con.prepareStatement(sqlString);
			sql.setString(1, userid);
			ResultSet resSql = sql.executeQuery();
			if(resSql.next()){
				result.setUserid(userid);
				result.setPassword(resSql.getString("password"));
				//result.setMproof(resSql.getString("mproof"));
				// 将字符串时间转换为Date对象
				SimpleDateFormat format = new SimpleDateFormat("yyyy-MM-dd HH:mm:ss");
				ParsePosition pos = new ParsePosition(0);
				Date dateTime = format.parse(resSql.getString("time"), pos);
				result.setTime(dateTime);
				System.out.println("已完成用户"+userid+"的信息查询!");
			}
			else{
				return null;
			}
		} catch (SQLException e) {
			// TODO Auto-generated catch block
			e.printStackTrace();
		}
		return result;
	}

	@Override
	public ArrayList<UserData> userSelectAll() {
		// TODO Auto-generated method stub
		ArrayList<UserData> result = new ArrayList<UserData>();
		sqlString = "select * from "+tableName+"";
		try {
			sql = con.prepareStatement(sqlString);
			ResultSet resSql = sql.executeQuery();
			while(resSql.next()){
				UserData tmp = new UserData();
				tmp.setUserid(resSql.getString("userid"));
				tmp.setPassword(resSql.getString("password"));
				// 将字符串时间转换为Date对象
				SimpleDateFormat format = new SimpleDateFormat("yyyy-MM-dd HH:mm:ss");
				ParsePosition pos = new ParsePosition(0);
				Date dateTime = format.parse(resSql.getString("time"), pos);
				tmp.setTime(dateTime);
				result.add(tmp);
			}
			System.out.println("已完成所有用户信息查询!");
		} catch (SQLException e) {
			// TODO Auto-generated catch block
			e.printStackTrace();
		}
		return result;
	}

	public static void main(String[] args){  // 测试代码
		UserDaoImpl test = new UserDaoImpl("usertable");
		ArrayList<UserData> result = new ArrayList<UserData>();
		result = test.userSelectAll();
		System.out.println(result);
		UserData user1 = new UserData();

		user1 = test.userSelectOne("sun123");
		System.out.println(user1);
		//UserData user2 = new UserData("24351234", "35431", "哈哈", "[email protected]",new Date());
		//test.userInsert(user2);
//		user2.setMproof("修改1");
//		test.userUpdate(user2);
//		test.userDelete("12432");
	}
}
下面是 UserData代码片。此代码片是属于PO(Persistent Object)即持久对象,它们是由一组属性和属性的get和set方法组成。可以看成是与数据库中的表相映射的java对象
package ucas.po;

import java.text.SimpleDateFormat;
import java.util.Date;
// 一个登录用户
public class UserData {
	// 定义成员变量
	private String userid;  // 用户名
	private String password;  // 登录密码

	private Date time; // 注册时间
	// 构造方法
	public UserData(){

	}
	public UserData(String userid, String password, Date time){
		super();
		this.userid = userid;
		this.password = password;
		this.time = time;
	}
	// 成员方法  getter和setter
	public String getUserid() {
		return userid;
	}
	public void setUserid(String userid) {
		this.userid = userid;
	}
	public String getPassword() {
		return password;
	}
	public void setPassword(String password) {
		this.password = password;
	}
	public String getTime(){
		SimpleDateFormat mytimeFormat = new SimpleDateFormat("yyyy-MM-dd HH:mm:ss");
		String mytime = mytimeFormat.format(time);
		return mytime;
	}
	public void setTime(Date time){
		this.time = time;
	}
	// 重写toString
	public String toString(){
		return "UserData[用户名: "+userid+", 密码: "+password+", 注册时间: "+this.getTime()+"]";
	}
	public static void main(String[] args) {
		// TODO Auto-generated method stub

	}

}
下面是 UserService接口代码片。属于Service层,service层是在mcv三层模式中新添加一层,能够更加清晰的定义应用程序的边界,需要操作数据的时候,通过service层访问DAO层来实现。service层做的事情,不仅仅是调用DAO操作数据,还会包含了一定的业务逻辑。整个程序的设计,也变成了针对服务进行设计。
package ucas.service;

import ucas.po.UserData;

public interface UserService {
	// 0增加新用户
		public int userInsert(UserData user);
		// 1修改用户信息
		public int userUpdate(UserData user);
		// 2查看指定用户信息
		public UserData userSelectOne(String userid);
}
下面是 UserServiceImpl代码片。此代码实现了上面的UserService接口,原理和DAO层下接口的类似,都是为了后期代码改进使用。
package ucas.service.impl;

import java.util.ArrayList;
import java.util.Date;

import ucas.dao.impl.UserDaoImpl;
import ucas.po.UserData;
import ucas.service.UserService;

public class UserServiceImpl implements UserService {
	private UserDaoImpl udi;
	public UserServiceImpl() {
		// TODO Auto-generated constructor stub
		super();
		this.udi = new UserDaoImpl();
	}

	@Override
	public int userInsert(UserData user) {
		// TODO Auto-generated method stub
		return udi.userInsert(user);
	}

	@Override
	public int userUpdate(UserData user) {
		// TODO Auto-generated method stub
		return udi.userUpdate(user);
	}
	@Override
	public UserData userSelectOne(String userid) {
		// TODO Auto-generated method stub
		return udi.userSelectOne(userid);
	}

}
下面展示一些 ConnectDB代码片。这是一个负责连接数据库的代码片,所有的DAO层中的代码会实现这个类的方法,因为DAO层是负责数据库操作,所以一定会调用ConnectDB的方法。
// 连接数据库
package ucas.util;

import java.sql.*;

public class ConnectDB {
	Connection con;  // 生命Connection对象
	// 功能:建立数据库连接
	public Connection myGetConnection(String dbName){
		try{
			Class.forName("com.mysql.jdbc.Driver");  // 启动驱动
			System.out.println("数据库驱动加载成功!");
		}catch(ClassNotFoundException e){
			e.printStackTrace();
		}
		try{  //连接数据库 talentmanageDB-数据库名
			con = DriverManager.getConnection("jdbc:mysql://localhost:3306/"+dbName+"?useSSL=false",
					"root", "123");
			System.out.println("数据库连接成功!");
		}catch(SQLException e){
			e.printStackTrace();
		}
	return con;
	}
	public static void main(String[] args){
		ConnectDB mycon = new ConnectDB();
		mycon.myGetConnection("talentmanagedb");
	}
}
结尾
此系统也是参考了一位博主的原码进行改进,点击此处查看原博主
若有侵权,请联系本人删除文章
编辑不易,链接已经更新(2022.10.8),大家点个赞自取即可。
查看源码如下链接:https://pan.baidu.com/s/1WdYIDl4LknRm_J7h-0qcFQ 提取码:7jeb
