Ubuntu 安装Yolo-FastestV2 的一般流程(5),部署ncnn工程.
在前面,我们已经把准备工作都完成了,接下来,我们正式来部署ncnn工程.
第一,安装与编译ncnn工程.
我们打开终端,输入以下命令:
git clone https://github.com/Tencent/ncnn.git
cd ncnn
mkdir build && cd build
cmake ../
make && make install
完成上面的命令,你会得到在ncnn中你建好的build文件夹.
第二,我们下载好Yolo-FastestV2的工程文件,如果之前有在自己电脑上打开过,vm虚拟机又安装了vm tool ,那直接拖进去就好了.
或者,输入下面的命令
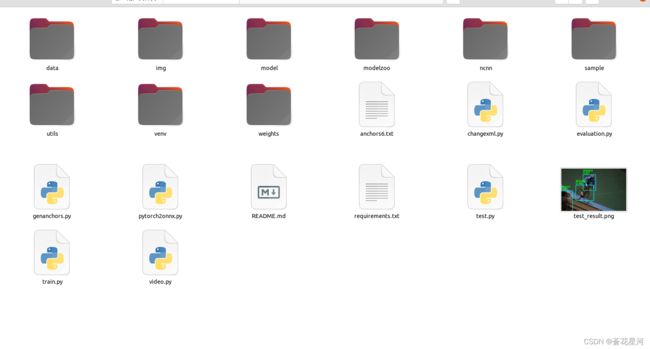
git clone https://github.com/dog-qiuqiu/Yolo-FastestV2.git这样子,我们的就可以将Yolo-FastestV2的工程安装到Ubuntu中了,接下来,我们打开工程.看到下面的文件.
第三,将编译过的ncnn中的部分文件放到指定目录中,
打开ncnn文件夹中的build文件中的install,将下面所有的文件夹都拷贝到Yolo-FastestV2-main文件夹下sample文件夹中.
完成上面命令后,我们打开终端(路径在sample的ncnn路径下!).
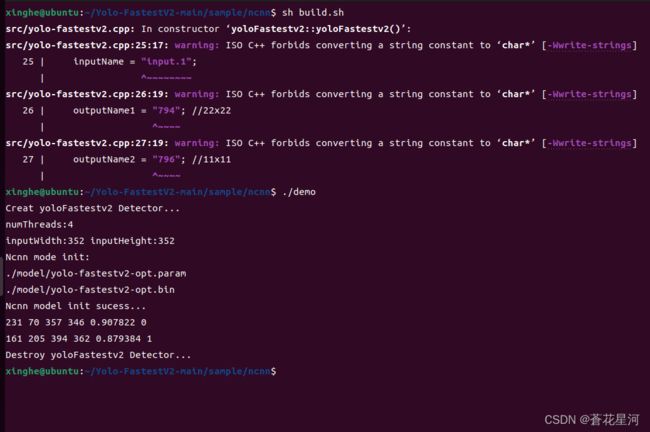
输入命令 sh build.sh 顺利的话,你当前文件夹下会多出一个demo文件,然后 输入./demo运行,
这样子,我们的ncnn跑yolo-fastestv2就部署完成了.
接下来,我们就想办法导入自己的模型, 还记得前面叫你们保存下来的 .onnx文件吗?
我们要将他转换成 .param 和 .bin 文件,这个网上又很多方法,我们这边偷个懒,用下面的网站转的网站:转换网站
我们将这个模型放到sample下ncnn下的model文件夹中,然后回到上一级目录中,打开demo.cpp,将两个文件( .param 和 .bin )名字改成你放进去文件的名字.
然后再输入sh build.sh 和 ./demo
要改图片和配置什么的都在demo.cpp里面,自己看,我不教.
最后,众所周知,我们搞yolo,就是为了实时检测,所以,单纯的检测图片是不想打.所以我给下vide_demp.cpp文件
#include "yolo-fastestv2.h"
#include
int main()
{
    // 这个是类别,别说你不会改.
    static const char* class_names[] = {
        "person", "bicycle", "car", "motorcycle", "airplane", "bus", "train", "truck", "boat", "traffic light",
        "fire hydrant", "stop sign", "parking meter", "bench", "bird", "cat", "dog", "horse", "sheep", "cow",
        "elephant", "bear", "zebra", "giraffe", "backpack", "umbrella", "handbag", "tie", "suitcase", "frisbee",
        "skis", "snowboard", "sports ball", "kite", "baseball bat", "baseball glove", "skateboard", "surfboard",
        "tennis racket", "bottle", "wine glass", "cup", "fork", "knife", "spoon", "bowl", "banana", "apple",
        "sandwich", "orange", "broccoli", "carrot", "hot dog", "pizza", "donut", "cake", "chair", "couch",
        "potted plant", "bed", "dining table", "toilet", "tv", "laptop", "mouse", "remote", "keyboard", "cell phone",
        "microwave", "oven", "toaster", "sink", "refrigerator", "book", "clock", "vase", "scissors", "teddy bear",
        "hair drier", "toothbrush"
    };
//   这个也是类别.
//    static const char* class_names[] = {
//        "airplane", "ship", "storage tank", "baseball diamond", "tennis court",
//        "basketball court", "ground track field", "harbor", "bridge", "vehicle"
//    };
    //在yolo-fastestv2.h 中, 有一个类函数  yoloFastestv2
    yoloFastestv2 api;
    //  读取模型
    api.loadModel("./model/yolo-fastestv2-opt.param",
                  "./model/yolo-fastestv2-opt.bin");

    //cv::Mat cvImg = cv::imread("058.jpg");
    // Vector容器中存放自定义数据类型,存放目标框的信息(cls,score,x,y,w,h,area), 在 yolo-fastestv2.h  有声明
    std::vector boxes;
    cv::VideoCapture capture;
 //   打开 "person.mp4"文件,改成 0 就是摄像头.(是 0 不是 "0")
    capture.open("person.mp4");
    //获取当前 视频信息
    cv::Size S = cv::Size((int)capture.get(cv::CAP_PROP_FRAME_WIDTH),
                          (int)capture.get(cv::CAP_PROP_FRAME_HEIGHT));

    // -----------保存视频的检测结果--------------
    cv:: VideoWriter outputVideo;
    outputVideo.open("./out.mp4", cv::VideoWriter::fourcc('P','I','M','1'), 30.0, S, true);
    if (!outputVideo.isOpened()) {
        std::cout << "fail to open!" << std::endl;
        return -1;
    }
    // ---------------------------------

    cv::Mat frame;
    while (1) {
		capture >> frame;//读入视频的帧
		if (frame.empty()) break;

		// 检测 图像,结果保存在 boxes
        api.detection(frame, boxes);
        // 可视化,绘制框
        for (int i = 0; i < boxes.size(); i++) {
            std::cout< frame.cols)
                x = frame.cols - label_size.width;

            cv::rectangle(frame, cv::Rect(cv::Point(x, y), cv::Size(label_size.width, label_size.height + baseLine)),
                          cv::Scalar(255, 255, 255), -1);
            cv::putText(frame, text, cv::Point(x, y + label_size.height),
                        cv::FONT_HERSHEY_SIMPLEX, 0.5, cv::Scalar(0, 0, 0));

            cv::rectangle (frame, cv::Point(boxes[i].x1, boxes[i].y1),
                           cv::Point(boxes[i].x2, boxes[i].y2), cv::Scalar(255, 255, 0), 2, 2, 0);
        }

        cv:: namedWindow("img",CV_WINDOW_NORMAL);
		cv:: imshow("img", frame);

        // 保存 视频检测文件
        outputVideo.write(frame); //把图像写入视频流

		//按下ESC退出整个程序
        //按下ESC退出整个程序
        //按下ESC退出整个程序
        int c = cv::waitKey(30);
        if( char(c) == 27) return -1;
	}
//    cv::imwrite("output.png", cvImg);
    // 关闭释放
    capture.release();
    cv::waitKey(0);
    return 0;
}
然后修改照着build.sh写一个符合video_demo的文件,然后运行什么的

