数据增强神器 SimpleCopyPaste 支持全流程
引言
SimpleCopyPaste 数据增强是谷歌在 2021 年 1 月提出的一种实例分割的数据增强方法,它通过在训练过程中直接将一张图片中的实例简单地复制粘贴到另外一张图片中得到新的训练样本,创造出了场景更加复杂的新数据以显著提升全监督和半监督方式训练的实例分割模型的性能。
基于该数据增强,使用 EfficientNet-B7 骨干网络和 NAS-FPN 结构的算法模型可以在 COCO 测试集上实现 49.1 mask AP 和 57.3 box AP 的单模型结果,比之前的 SOTA 方法在 mask AP 和 box AP 上分别提高了 0.6 和 1.5。单纯作为一种数据增强方法就可以刷新 SOTA ,也是非常少见的工作了, 因此 MMDetection 对此进行了深入得调研,并决定对此算法进行复现,复现过程主要有以下 4 步:
- 对 SimpleCopyPaste 原理进行深入理解
- 参考和了解 MMDetection 中已有的混合数据增强
- 复用现有代码,开发 SimpleCopyPaste
- 训练模型,对齐算法精度
目前已经在 MMDetection v2.24.0 中支持并释放了模型,欢迎大家使用。
论文链接:https://arxiv.org/pdf/2012.07177.pdf
代码链接:https://github.com/open-mmlab/mmdetection/tree/master/configs/simple_copy_paste
SimpleCopyPaste 原理简析
SimpleCopyPaste 属于一种混合 数据增强。混合数据增强可以将不同图片中的信息进行混合,同时修改对应的标签。典型的还有 MixUp 、CutMix 和 Mosaic。
- MixUp [1] 对输入像素和标签进行线性组合创建新的样本。
- CutMix [2] 从一张图片剪裁出矩形粘贴到另一张图片上。
- Mosaic [3] 将多张图片拼接成一张图片。
虽然 MixUp、CutMix 和 Mosaic 可用于组合多个图像或其裁剪版本以创建新的训练数据,但是这些数据增强方法并不是实例级别的,对于实例分割任务的帮助有限。
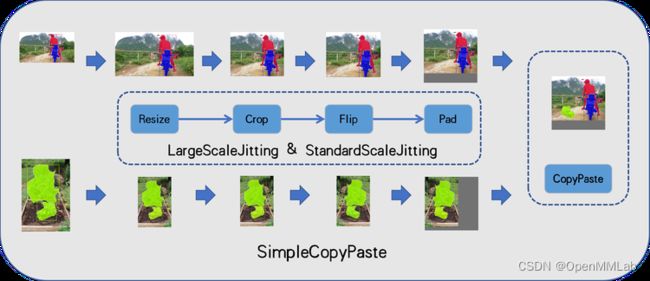
SimpleCopyPaste 类似于 MixUp 和 CutMix,但只复制实例的像素,而不是实例的检测框中的所有像素。首先,随机选取两张图片,分别进行随机尺度抖动,然后从一张图片中随机选取一些实例,直接粘贴到另外一张图片上,同时更新检测框、类别标签和掩码。整体流程如下:
随机尺度抖动根据抖动的程度可以分为 LargeScaleJitting(LSJ) 和 StandardScaleJitting(SSJ) 。LSJ Resize 和 Crop 图像的大小范围为原始图像大小的 0.1 到 2.0,SSJ Resize 和 Crop 图像的大小范围为原始图像大小的 0.8 到 1.25。如果图像比它们的原始尺寸小,那么图像会被填充灰度像素值。两种尺度抖动方法也使用水平翻转。具体逻辑如下:
This content is only supported in a Docs.
注意,将一些实例直接粘贴到另一张图片上,通常会遮挡原图的实例。SimpleCopyPaste 通过 bbox_occluded_thr=10 和 mask_occluded_thr=300两个阈值,同时从检测框和掩码对被遮挡的实例进行筛选。具体逻辑如下:
- 根据粘贴实例的掩码更新原图实例的掩码;
- 根据更新后的原图实例的掩码更新原图实例的检测框;
- 如果更新后的检测框与原本的检测框的坐标差值的绝对值的最大值不大于
bbox_occluded_thr,那么这个实例会被保留; - 如果更新的掩码像素数量大于
mask_occluded_thr,那么这个实例会被保留; - 两个条件同时不满足的实例会被过滤掉。
参考已有的混合数据增强
MMDetection 在支持 YOLOX 系列算法时已经支持 Mosaic 和 MixUp ,我们先简要对先有的 Mosaic 和 MixUp 进行分析,这有助于后续的 SimpleCopyPaste 的开发。
(1) MixUp
MixUp 数据增强是将两张图片按照随机比例进行逐像素点叠加,然后简单地把子图中的标签整合在一起作为混合后图片的标签。
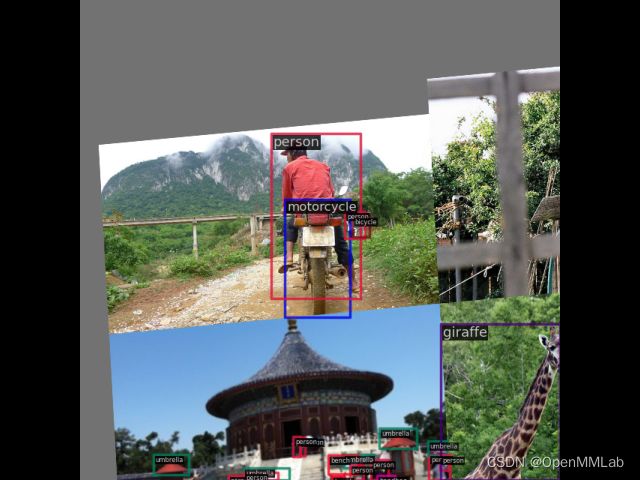
MMDetection 中 MixUp 数据增强的主要逻辑集中在 _mixup_transform 函数,内部集成了 Resize、Flip、Crop 和 Filter 等功能。对于采样选取的图片,已经完成了 Resize 等数据增强,而随机选取的图片还没有进行任何处理,所以需要在 _mixup_transform 函数中对随机选取的图片进行数据增强,之后再进行 MixUp 操作。相关配置和增强示例如下:
dict(

    type='MixUp',

    img_scale=img_scale,

    ratio_range=(0.8, 1.6),

    pad_val=114.0)
(2) Mosaic
Mosaic 数据增强是随机选取 4 张图片拼接在一起,然后简单地把子图中的标签整合在一起作为混合后图片的标签。
MMDetection 中 Mosaic 数据增强的主要逻辑集中在 _mosaic_transform 函数。首先,创建一个两倍 img_scale 尺寸的空图,确定图像拼接的中心点;然后,根据左上、右上、左下和右下四个方位对不同图像分别进行缩放和拼接;最后,将四张图片的标签拼接在一起。相关配置和增强示例如下:
dict(type='Mosaic', img_scale=img_scale, pad_val=114.0),

dict(

    type='RandomAffine',

    scaling_ratio_range=(0.1, 2),

    border=(-img_scale[0] // 2, -img_scale[1] // 2)),

# 注意 Mosaic 需要同 RandomAffine 一起使用,否则图片的尺寸会扩大一倍。RandomAffine 可以单独使用。
(3) Mosaic + MixUp
Mosaic 和 MixUp 两种数据增强可以一起使用,相关配置和增强示例如下:
dict(type='Mosaic', img_scale=img_scale, pad_val=114.0),

dict(

    type='RandomAffine',

    scaling_ratio_range=(0.1, 2),

    border=(-img_scale[0] // 2, -img_scale[1] // 2)),

dict(

    type='MixUp',

    img_scale=img_scale,

     ratio_range=(0.8, 1.6),

     pad_val=114.0),
(4) YOLOX
YOLOX 同时采用了 Mosaic 和 MixUp 两种数据增强,并且增加了色调变换。典型配置和增强示例如下:
# yolox_s_8x8_300e_coco.py

train_pipeline = [

    dict(type='Mosaic', img_scale=img_scale, pad_val=114.0),

    dict(

        type='RandomAffine',

        scaling_ratio_range=(0.1, 2),

        border=(-img_scale[0] // 2, -img_scale[1] // 2)),

    dict(

        type='MixUp',

        img_scale=img_scale,

        ratio_range=(0.8, 1.6),

        pad_val=114.0),

    dict(type='YOLOXHSVRandomAug'),

    ...

    )

]


train_dataset = dict(

    type='MultiImageMixDataset',

    dataset=dict(

        type=dataset_type,

        ...

    ),

    pipeline=train_pipeline)
注意:对于混合数据增强,必须配合 MMDetection 中的数据集装饰器 MultiImageMixDataset 才能使用。
MultiImageMixDataset 数据集装饰器
MultiImageMixDataset 数据集装饰器,需要配置两个 pipeline :内部的 pipeline 是 load_pipeline ,外部的 pipeline 是train_pipeline 。
混合数据增强需要随机选取多个图片,这些图片通常需要进行相同的处理,这部分处理可以通过 load_pipeline 进行处理,经过相同处理的图片会存在 mix_results。合并后的 results 只是增加了 mix_results,可以进行任意的 transform 而不会报错。
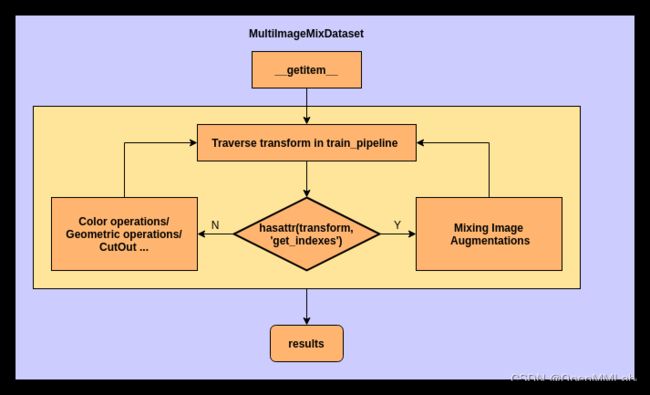
train_pipeline 需要包括混合操作,例如Mosaic 、 MixUp 和 CopyPaste 。这些混合操作需要保证输入的 results 中有 mix_results ,输出之前需要删除 mix_results 。具体流程如下:
总之,MultiImageMixDataset 的主要功能是:对于需要随机选取其他图片进行数据增强的 transform ,在进入 transform 进行数据增强之前,在 results 中准备好 mix_results ,具体实现如下:
def __getitem__(self, idx):

    results = copy.deepcopy(self.dataset[idx])

    for (transform, transform_type) in zip(self.pipeline,

                                           self.pipeline_types):

        if self._skip_type_keys is not None and \

                transform_type in self._skip_type_keys:

            continue


        if hasattr(transform, 'get_indexes'):

            for i in range(self.max_refetch):

                # Make sure the results passed the loading pipeline

                # of the original dataset is not None.

                indexes = transform.get_indexes(self.dataset)

                if not isinstance(indexes, collections.abc.Sequence):

                    indexes = [indexes]

                mix_results = [

                    copy.deepcopy(self.dataset[index]) for index in indexes

                ]

                if None not in mix_results:

                    results['mix_results'] = mix_results

                    break

            else:

                raise RuntimeError(

                    'The loading pipeline of the original dataset'

                    ' always return None. Please check the correctness '

                    'of the dataset and its pipeline.')


        for i in range(self.max_refetch):

            # To confirm the results passed the training pipeline

            # of the wrapper is not None.

            updated_results = transform(copy.deepcopy(results))

            if updated_results is not None:

                results = updated_results

                break

        else:

            raise RuntimeError(

                'The training pipeline of the dataset wrapper'

                ' always return None.Please check the correctness '

                'of the dataset and its pipeline.')


        if 'mix_results' in results:

            results.pop('mix_results')
注意:由于部分 transform 可能会返回 None ,使用 max_refetch 来确保 dataset 返回的样本不是 None ,同时避免陷入循环。
复用现有代码
SimpleCopyPaste 与 Mosaic 和 MixUp 的不同之处在于:需要对两张图片分别进行缩放、剪切、翻转和填充,再从一张图片中随机选取一些实例粘贴到另一张图片上。缩放、剪切、翻转和填充这些数据增强是非常通用的数据增强,MMDetection 中已经有非常完备的实现了,可以直接复用。具体复用的方式,是利用 MultiImageMixDataset的load_pipeline和train_pipeline。
之前的 Mosaic 和 MixUp 并不需要对随机选取的图片进行特殊处理,所以 load_pipeline 仅包含 LoadImageFromFile 和 LoadAnnotations 用于加载图片和标注。后续的数据增强统一放在 train_pipeline 中,比如Mosaic、RandomAffine、MixUp、YOLOXHSVRandomAug等等。
然而,SimpleCopyPaste 需要对随机选取的图片进行相同的数据增强,所以可以在 load_pipeline 中增加 Resize、 RandomCrop、FilterAnnotations 、RandomFlip 和 Pad 。
其中 FilterAnnotations 是过滤一些特别小的物体的标注,Pad 保证输出的图片具备相同的尺寸,可以直接进行复制粘贴而不会出现像素点越界问题。具体配置如下:
load_pipeline = [

    dict(type='LoadImageFromFile', file_client_args=file_client_args),

    dict(type='LoadAnnotations', with_bbox=True, with_mask=True),

    dict(

        type='Resize',

        img_scale=image_size,

        ratio_range=(0.8, 1.25),

        multiscale_mode='range',

        keep_ratio=True),

    dict(

        type='RandomCrop',

        crop_type='absolute_range',

        crop_size=image_size,

        recompute_bbox=True,

        allow_negative_crop=True),

    dict(type='FilterAnnotations', min_gt_bbox_wh=(1e-2, 1e-2)),

    dict(type='RandomFlip', flip_ratio=0.5),

    dict(type='Pad', size=image_size),

]

train_pipeline = [

    dict(type='CopyPaste', max_num_pasted=100),

    dict(type='Normalize', **img_norm_cfg),

    dict(type='DefaultFormatBundle'),

    dict(type='Collect', keys=['img', 'gt_bboxes', 'gt_labels', 'gt_masks']),

]

train=dict(

    type='MultiImageMixDataset',

    dataset=dict(

        type=dataset_type,

        ann_file=data_root + 'annotations/instances_train2017.json',

        img_prefix=data_root + 'train2017/',

        pipeline=load_pipeline),

   pipeline=train_pipeline)
那么,接下来只需要实现 CopyPaste 。
首先,需要定义一个 get_indexes 函数,表明当前数据增强需要随机选取其他图片进行辅助:
def get_indexes(self, dataset):

 return random.randint(0, len(dataset))
在调用 CopyPaste 数据增强时,results 中已经包含了 mix_results,分别作为:dst_results 和 src_results:
dst_img = dst_results['img']

dst_bboxes = dst_results['gt_bboxes']

dst_labels = dst_results['gt_bboxes_labels']

dst_masks = dst_results['gt_masks']

dst_ignore_flags = dst_results['gt_ignore_flags']


src_img = src_results['img']

src_bboxes = src_results['gt_bboxes']

src_labels = src_results['gt_bboxes_labels']

src_masks = src_results['gt_masks']

src_ignore_flags = src_results['gt_ignore_flags']
然后,需要对原图中被遮挡的实例更新掩码和标签:
# update masks and generate bboxes from updated masks

composed_mask = np.where(np.any(src_masks.masks, axis=0), 1, 0)

updated_dst_masks = self._get_updated_masks(dst_masks, composed_mask)

updated_dst_bboxes = updated_dst_masks.get_bboxes()
具体操作可以概述为:从一张图片中选取一些实例,将这些实例的掩码取并作为遮挡掩码,将另一张图片中的全部实例的掩码分别与遮挡掩码进行取交,交集的部分就是被遮挡的部分,去除被遮挡的部分作为更新后的掩码,将更新后的掩码的最小外接矩形作为更新后的检测框。其中,原图实例掩码更新的方式如下:
def _get_updated_masks(self, masks, composed_mask):

    masks.masks = np.where(composed_mask, 0, masks.masks)

    return masks
通过 bbox_occluded_thr 和 mask_occluded_thr 过滤掉不符合条件的实例:
# filter totally occluded objects

bboxes_inds = np.all(

    np.abs(

        (updated_dst_bboxes - dst_bboxes)) <= self.bbox_occluded_thr,

    axis=-1)

masks_inds = updated_dst_masks.masks.sum(

    axis=(1, 2)) > self.mask_occluded_thr

valid_inds = bboxes_inds | masks_inds
最后,将选择粘贴的实例的像素点叠加到图片上,并将粘贴的实例的标签与更新后的实例的标签整合到一起,就完成了实例的 CopyPaste。
img = dst_img * (1 - composed_mask[..., np.newaxis]

                         ) + src_img * composed_mask[..., np.newaxis]

bboxes = np.concatenate([updated_dst_bboxes[valid_inds], src_bboxes])

labels = np.concatenate([dst_labels[valid_inds], src_labels])

masks = np.concatenate(

    [updated_dst_masks.masks[valid_inds], src_masks.masks])
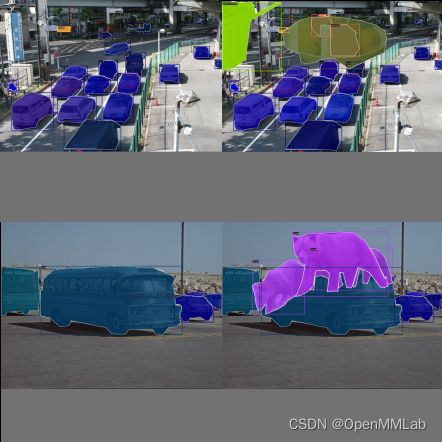
相关示例如下:
对齐精度
谷歌的原始论文中全部的实验采用了 batchsize=256 ,图片尺寸 1024x1024 的实验配置,简单换算一下,每卡 2 图的话,需要 128 张卡,这个配置相信对于绝大多数的用户来说都是比较高的,所以我们采用了折衷的方案,基于 ImageNet 预训练的 Resnet50 骨干网络和 Mask R-CNN 模型,batchsize=64 和图片尺寸 1024x1024 ,同时对学习率进行线性缩放,同样开启同步 BN ,参考论文中的精度曲线,在 270 epoch 的条件下基本对齐精度。下面是谷歌原始的配置:
train:

  train_batch_size: 256

  total_steps: 270000

  learning_rate:

    type: 'step'

    warmup_learning_rate: 0.0032

    warmup_steps: 1000

    init_learning_rate: 0.32

    learning_rate_steps: [243000, 256500, 263250]

    learning_rate_levels: [0.032, 0.0032, 0.00032]

  gradient_clip_norm: 0

  frozen_variable_prefix: null

  l2_weight_decay: 4.0e-05
这里是我们第一版的配置:
# optimizer assumes batch_size = (32 GPUs) x (2 samples per GPU)

optimizer = dict(type='SGD', lr=0.1, momentum=0.9, weight_decay=0.00004)

optimizer_config = dict(grad_clip=None)


# lr steps at [0.9, 0.95, 0.975] of the maximum iterations

lr_config = dict(

    policy='step',

    warmup='linear',

    warmup_iters=1000,

    warmup_ratio=0.001,

    step=[243000, 256500, 263250])

checkpoint_config = dict(interval=6000)

# The model is trained by 270k iterations with batch_size 64,

# which is roughly equivalent to 144 epochs.

runner = dict(type='IterBasedRunner', max_iters=270000)


# NOTE: `auto_scale_lr` is for automatically scaling LR,

# USER SHOULD NOT CHANGE ITS VALUES.

# base_batch_size = (32 GPUs) x (2 samples per GPU)

auto_scale_lr = dict(base_batch_size=64)
最后,我们在 Standard Scale Jittering 和 ImageNet 初始化 backbone 的条件下,迭代 270k ,约等于 148 epoch,在 coco 验证集上实现了 45.1 box AP ,与论文中的精度曲线(下图)一致。
最后,学会设计混合数据增强的小伙伴们可以参考本文,在 MMDetection 中实现 CutMix ,不过要考虑一下检测任务与分类任务的差异哦。
如果觉得 MMDetection 对你有帮助,欢迎点点 star ,也欢迎大家多多提交 PR~
参考文献
[1] Hongyi Zhang, Moustapha Cisse, Yann N Dauphin, and David Lopez-Paz. mixup: Beyond empirical risk minimization. In ICLR, 2018.
[2] Sangdoo Yun, Dongyoon Han, Seong Joon Oh, Sanghyuk Chun, Junsuk Choe, and Youngjoon Yoo. Cutmix: Regularization strategy to train strong classifiers with localizable features. In ICCV, 2019.
[3] Bochkovskiy A, Wang C Y, Liao H Y M. Yolov4: Optimal speed and accuracy of object detection[J]. arXiv preprint arXiv:2004.10934, 2020.
[4] Ghiasi G, Cui Y, Srinivas A, et al. Simple copy-paste is a strong data augmentation method for instance segmentation[C]//Proceedings of the IEEE/CVF Conference on Computer Vision and Pattern Recognition. 2021: 2918-2928.


