UE4 C++ ActionRoguelike开发记录
目录
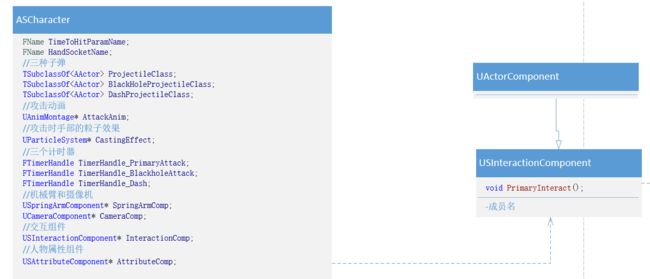
角色类:SCharacter
设置摄像机
弹簧臂和摄像机设置
设置人物移动和动作绑定
移动与朝向:MoveForward/MoveRight、Turn/LoopUp
为人物绑定设置子弹类:SpawnProjectile适配器类
设置攻击动画以及攻击特效
普通攻击
黑洞攻击
闪现攻击
❗为角色添加属性组件:USAttributeComponent
为角色添加交互组件接口:USInteractionComponent* InteractionComp;
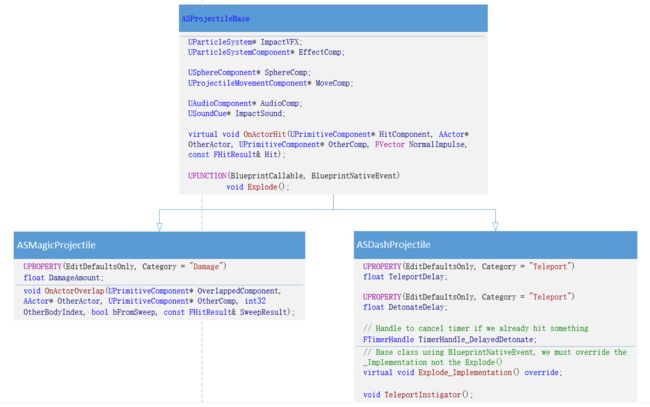
子弹类:SProejctileBase
胶囊碰撞体:USphereComponent* SphereComp;
子弹移动组件:UProjectileMovementComponent* MoveComp;
粒子系统组件(平A效果):UParticleSystemComponent* EffectComp;
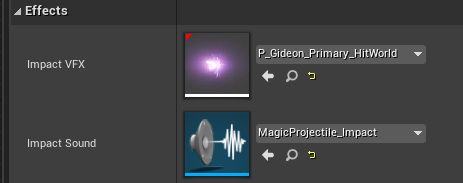
粒子系统组件(爆炸效果):UParticleSystem* ImpactVFX;
子弹爆炸音效组件:USoundCue* ImpactSound;
?子弹播放声音组件:UAudioComponent* AudioComp;
子弹击中画面震动效果:TSubclassOf ImpactShake;
⭐碰撞事件&爆炸(虚函数):void Explode();(BlueprintNativeEvent)
普通攻击:SMagicProjectile
设置并重写OnActorOverlap逻辑:
设置子弹伤害:DamageAmount
❗闪现:SDashProjectile
重写BeginPlay:设置子弹存活时间
重写爆炸逻辑Explode_Implementation
实现闪现传送效果:TeleportInstigator
设置定时器:FTimerHandle
黑洞攻击(蓝图):Proj_BlackHole
径向力Force Strength
可影响物体Object Types to Affect
吸进黑洞后要杀掉物体:
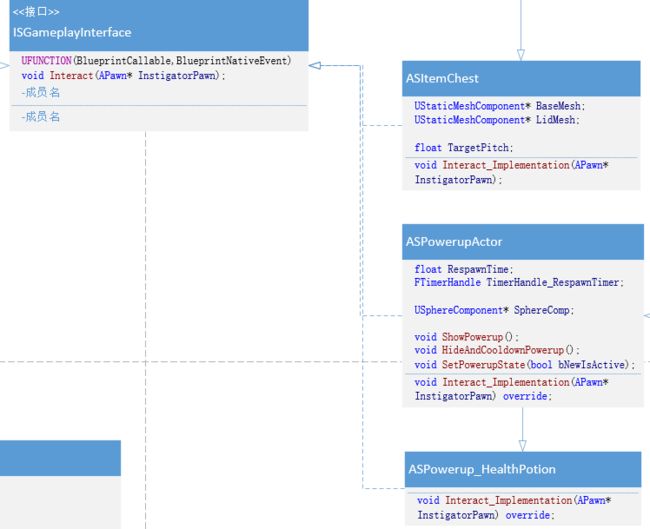
❗接口类:USGameplayInterface
USInteractionComponent
世界中的物体
爆炸油桶:ASExplosiveBarrel
设置StaticMesh,径向力
初始化Actor组件(添加碰撞事件)
宝箱(实现交互接口):ASItemChest
血包(实现交互接口):ASPowerupActor
血包有很多种,因此接口实现逻辑由子类实现:
吃掉后隐藏血包(计时器):
血包子类:ASPowerup_HealthPotion
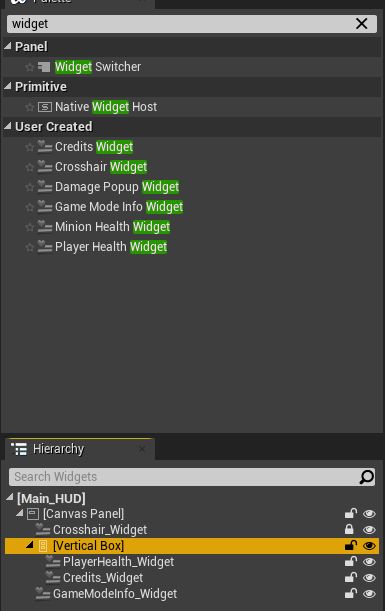
UI:Widget
十字准星
创建Widget并设置:
游戏开始时添加到屏幕上
人物血条、Credits、游戏进行时间:Main_HUD
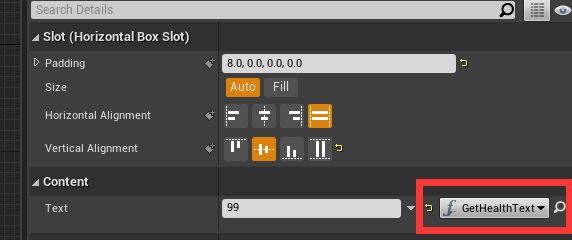
血条
Credits:
游戏进行时间:
AI
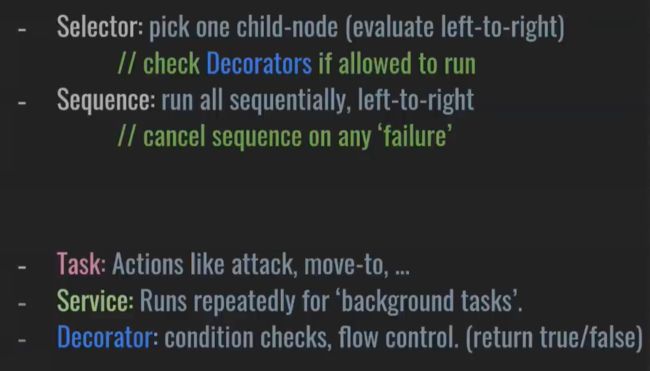
UE中的AI系统
行为树:
游戏AI角色:SAICharacter
游戏AI控制器:SAIController
设置行为树
为SAICharacter设置控制器
游戏AI逻辑-范围内攻击:USBTService_CheckAttackRange(UBTService)
范围查询逻辑
在行为树添加此Service
游戏AI范围内攻击任务结点:USBTTask_RangedAttack
AI朝向玩家:Set default focus
环境查询系统:
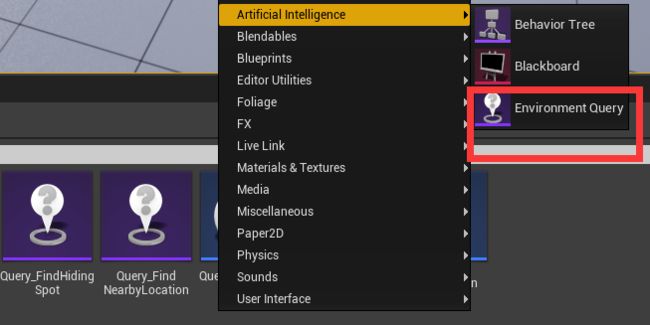
创建EQS
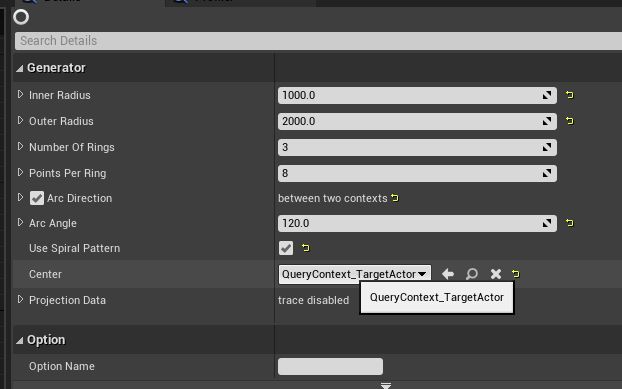
在玩家周围半径内设置EQS生成移动目的地
AI死亡
角色类:SCharacter
设置摄像机
弹簧臂和摄像机设置
	UPROPERTY(VisibleAnywhere)
	USpringArmComponent* SpringArmComp;

	UPROPERTY(VisibleAnywhere)
	UCameraComponent* CameraComp;
在构造函数中创建这两个类,并设置依赖关系:
弹簧臂附着在RootComponent,摄像机附着在弹簧臂上
	SpringArmComp = CreateDefaultSubobject("SpringArmComp");
	SpringArmComp->bUsePawnControlRotation = true;
	SpringArmComp->SetupAttachment(RootComponent);

	CameraComp = CreateDefaultSubobject("CameraComp");
	CameraComp->SetupAttachment(SpringArmComp);

    GetCharacterMovement()->bOrientRotationToMovement = true;
	bUseControllerRotationYaw = false;
注意 bUseControllerRotationYaw =false;其效果为:
bUseControllerRotationYaw=true;
bUseControllerRotationYaw=false;
应该设置为false,
同时注意GetCharacterMovement()->bOrientRotationToMovement = true;
GetCharacterMovement()->bOrientRotationToMovement = false;如下
GetCharacterMovement()->bOrientRotationToMovement = true;如下
类似黑暗之魂这种第三人称的移动朝向方式。
设置人物移动和动作绑定
void ASCharacter::SetupPlayerInputComponent(UInputComponent* PlayerInputComponent)
{
	Super::SetupPlayerInputComponent(PlayerInputComponent);

	PlayerInputComponent->BindAxis("MoveForward", this, &ASCharacter::MoveForward);
	PlayerInputComponent->BindAxis("MoveRight", this, &ASCharacter::MoveRight);

	PlayerInputComponent->BindAxis("Turn", this, &APawn::AddControllerYawInput);
	PlayerInputComponent->BindAxis("LookUp", this, &APawn::AddControllerPitchInput);

	PlayerInputComponent->BindAction("PrimaryAttack", IE_Pressed, this, &ASCharacter::PrimaryAttack);
	// Used generic name 'SecondaryAttack' for binding
	PlayerInputComponent->BindAction("SecondaryAttack", IE_Pressed, this, &ASCharacter::BlackHoleAttack);
	PlayerInputComponent->BindAction("Dash", IE_Pressed, this, &ASCharacter::Dash);
	PlayerInputComponent->BindAction("PrimaryInteract", IE_Pressed, this, &ASCharacter::PrimaryInteract);

	PlayerInputComponent->BindAction("Jump", IE_Pressed, this, &ACharacter::Jump);
}
移动与朝向:MoveForward/MoveRight、Turn/LoopUp
void ASCharacter::MoveForward(float Value)
{
	FRotator ControlRot = GetControlRotation();
	ControlRot.Pitch = 0.0f;
	ControlRot.Roll = 0.0f;

	AddMovementInput(ControlRot.Vector(), Value);
}


void ASCharacter::MoveRight(float Value)
{
	FRotator ControlRot = GetControlRotation();
	ControlRot.Pitch = 0.0f;
	ControlRot.Roll = 0.0f;

	// X = Forward (Red)
	// Y = Right (Green)
	// Z = Up (Blue)

	FVector RightVector = FRotationMatrix(ControlRot).GetScaledAxis(EAxis::Y);

	AddMovementInput(RightVector, Value);
}
其中Turn和LookUp绑定的函数是由APawn中已经写好的内容。
&APawn::AddControllerYawInput
&APawn::AddControllerPitchInput
这里附上Yaw、Roll、Pitch的内容,结合代码理解:
UE是左手坐标系:拇指X,食指Y,中指Z(中指向上摆放)
X:Roll翻滚角
Y:Pitch俯仰角
Z:Yaw偏航角
动图:
1.俯仰:(Pitch)
![]()
2.翻滚:(Roll)
![]()
3.偏航:(Yaw)
![]()
所以,MoveForward和MoveRight只与Yaw有关,控制偏航角度;Turn也和Yaw有关,控制偏航角度;而LoopUp与Pitch有关,控制上下移动视角。
为人物绑定设置子弹类:SpawnProjectile适配器类
- 生成位置:手部Socket(HandLocation)
- Actor生成:设置碰撞,instigator为角色自身
- 碰撞预设:
- 子弹轨迹:起点为手部,终点为十字准星方向
void ASCharacter::SpawnProjectile(TSubclassOf ClassToSpawn)
{
	if (ensureAlways(ClassToSpawn))
	{
		FVector HandLocation = GetMesh()->GetSocketLocation(HandSocketName);

		FActorSpawnParameters SpawnParams;
		SpawnParams.SpawnCollisionHandlingOverride = ESpawnActorCollisionHandlingMethod::AlwaysSpawn;
		SpawnParams.Instigator = this;

		FCollisionShape Shape;
		Shape.SetSphere(20.0f);

		// Ignore Player
		FCollisionQueryParams Params;
		Params.AddIgnoredActor(this);

		FCollisionObjectQueryParams ObjParams;
		ObjParams.AddObjectTypesToQuery(ECC_WorldDynamic);
		ObjParams.AddObjectTypesToQuery(ECC_WorldStatic);
		ObjParams.AddObjectTypesToQuery(ECC_Pawn);

		FVector TraceStart = CameraComp->GetComponentLocation();

		// endpoint far into the look-at distance (not too far, still adjust somewhat towards crosshair on a miss)
		FVector TraceEnd = CameraComp->GetComponentLocation() + (GetControlRotation().Vector() * 5000);

		FHitResult Hit;
		// returns true if we got to a blocking hit
		if (GetWorld()->SweepSingleByObjectType(Hit, TraceStart, TraceEnd, FQuat::Identity, ObjParams, Shape, Params))
		{
			// Overwrite trace end with impact point in world
			TraceEnd = Hit.ImpactPoint;
		}

		// find new direction/rotation from Hand pointing to impact point in world.
		FRotator ProjRotation = FRotationMatrix::MakeFromX(TraceEnd - HandLocation).Rotator();

		FTransform SpawnTM = FTransform(ProjRotation, HandLocation);
		GetWorld()->SpawnActor(ClassToSpawn, SpawnTM, SpawnParams);
	}
}
设置攻击动画以及攻击特效
void ASCharacter::StartAttackEffects()
{
	PlayAnimMontage(AttackAnim);

	UGameplayStatics::SpawnEmitterAttached(CastingEffect, GetMesh(), HandSocketName, FVector::ZeroVector, FRotator::ZeroRotator, EAttachLocation::SnapToTarget);
}
普通攻击
void ASCharacter::PrimaryAttack()
{
	StartAttackEffects();

	GetWorldTimerManager().SetTimer(TimerHandle_PrimaryAttack, this, &ASCharacter::PrimaryAttack_TimeElapsed, AttackAnimDelay);
}


void ASCharacter::PrimaryAttack_TimeElapsed()
{
	SpawnProjectile(ProjectileClass);
}
黑洞攻击
void ASCharacter::BlackHoleAttack()
{
	StartAttackEffects();

	GetWorldTimerManager().SetTimer(TimerHandle_BlackholeAttack, this, &ASCharacter::BlackholeAttack_TimeElapsed, AttackAnimDelay);
}


void ASCharacter::BlackholeAttack_TimeElapsed()
{
	SpawnProjectile(BlackHoleProjectileClass);
}
闪现攻击
void ASCharacter::Dash()
{
	StartAttackEffects();

	GetWorldTimerManager().SetTimer(TimerHandle_Dash, this, &ASCharacter::Dash_TimeElapsed, AttackAnimDelay);
}


void ASCharacter::Dash_TimeElapsed()
{
	SpawnProjectile(DashProjectileClass);
}
❗为角色添加属性组件:USAttributeComponent
为角色添加交互组件接口:USInteractionComponent* InteractionComp;
子弹类:SProejctileBase
ASProjectileBase::ASProjectileBase()
{
	SphereComp = CreateDefaultSubobject("SphereComp");
	SphereComp->SetCollisionProfileName("Projectile");
	SphereComp->OnComponentHit.AddDynamic(this, &ASProjectileBase::OnActorHit);
	RootComponent = SphereComp;

	EffectComp = CreateDefaultSubobject("EffectComp");
	EffectComp->SetupAttachment(RootComponent);

	AudioComp = CreateDefaultSubobject("AudioComp");
	AudioComp->SetupAttachment(RootComponent);

	MoveComp = CreateDefaultSubobject("ProjectileMoveComp");
	MoveComp->bRotationFollowsVelocity = true;
	MoveComp->bInitialVelocityInLocalSpace = true;
	MoveComp->ProjectileGravityScale = 0.0f;
	MoveComp->InitialSpeed = 8000;

	ImpactShakeInnerRadius = 0.0f;
	ImpactShakeOuterRadius = 1500.0f;

}
胶囊碰撞体:USphereComponent* SphereComp;
- 设置名称
- 设置碰撞预设
- 设置碰撞触发事件
- 将RootComponent设为碰撞体
子弹移动组件:UProjectileMovementComponent* MoveComp;
- 初始化相关移动属性,比如速度
粒子系统组件(平A效果):UParticleSystemComponent* EffectComp;
在cpp中构造函数进行初始化,只需要设置名称与挂载RootComponent。
因为子弹效果必然要跟随着子弹,故需要附着在RootComponent上。
粒子系统组件(爆炸效果):UParticleSystem* ImpactVFX;
在编辑中设置。
因为爆炸效果只需要在碰撞点触发,故不需要附着在RootComponent上。
子弹爆炸音效组件:USoundCue* ImpactSound;
?子弹播放声音组件:UAudioComponent* AudioComp;
声音较小,在黑洞攻击时有体现
子弹击中画面震动效果:TSubclassOf ImpactShake;
	UPROPERTY(EditDefaultsOnly, Category = "Effects|Shake")
	TSubclassOf ImpactShake;

	UPROPERTY(EditDefaultsOnly, Category = "Effects|Shake")
	float ImpactShakeInnerRadius;

	UPROPERTY(EditDefaultsOnly, Category = "Effects|Shake")
	float ImpactShakeOuterRadius;
⭐碰撞事件&爆炸(虚函数):void Explode();(BlueprintNativeEvent)
	// BlueprintNativeEvent = C++ base implementation, can be expanded in Blueprints
	// BlueprintCallable to allow child classes to trigger explosions
	// Not required for assignment, useful for expanding in Blueprint later on
	UFUNCTION(BlueprintCallable, BlueprintNativeEvent)
	void Explode();
在cpp中实现逻辑:
- 在爆炸处播放粒子特效ImpactVFX
- 在爆炸处播放爆炸音效ImpactSound
- 在爆炸处触发画面震动效果ImpactShake
void ASProjectileBase::OnActorHit(UPrimitiveComponent* HitComponent, AActor* OtherActor, UPrimitiveComponent* OtherComp, FVector NormalImpulse, const FHitResult& Hit)
{
	Explode();
}
// _Implementation from it being marked as BlueprintNativeEvent
void ASProjectileBase::Explode_Implementation()
{
// Check to make sure we aren't already being 'destroyed'
// Adding ensure to see if we encounter this situation at all
if (ensure(!IsPendingKill()))
{
UGameplayStatics::SpawnEmitterAtLocation(this, ImpactVFX, GetActorLocation(), GetActorRotation());
UGameplayStatics::PlaySoundAtLocation(this, ImpactSound, GetActorLocation());
UGameplayStatics::PlayWorldCameraShake(this, ImpactShake, GetActorLocation(), ImpactShakeInnerRadius, ImpactShakeOuterRadius);
Destroy();
}
}普通攻击:SMagicProjectile
依赖于USAtrributeComponent,人物属性组件,因为要影响人物的血量
设置并重写OnActorOverlap逻辑:
构造函数初始化并设置碰撞体触发事件:
ASMagicProjectile::ASMagicProjectile()
{
	SphereComp->SetSphereRadius(20.0f);
	SphereComp->OnComponentBeginOverlap.AddDynamic(this, &ASMagicProjectile::OnActorOverlap);

	DamageAmount = 20.0f;
}
重写事件逻辑:
- 更改属性组件AttributeComp(HP)数值
- 不能伤害自身:OtherActor != GetInstigator()
void ASMagicProjectile::OnActorOverlap(UPrimitiveComponent* OverlappedComponent, AActor* OtherActor, UPrimitiveComponent* OtherComp, int32 OtherBodyIndex, bool bFromSweep, const FHitResult& SweepResult)
{
	if (OtherActor && OtherActor != GetInstigator())
	{
		USAttributeComponent* AttributeComp = Cast(OtherActor->GetComponentByClass(USAttributeComponent::StaticClass()));
		if (AttributeComp)
		{
			// minus in front of DamageAmount to apply the change as damage, not healing
			AttributeComp->ApplyHealthChange(GetInstigator(), -DamageAmount);

			// Only explode when we hit something valid
			Explode();
		}
	}
}
设置子弹伤害:DamageAmount
❗闪现:SDashProjectile
重写BeginPlay:设置子弹存活时间
void ASDashProjectile::BeginPlay()
{
	Super::BeginPlay();

	GetWorldTimerManager().SetTimer(TimerHandle_DelayedDetonate, this, &ASDashProjectile::Explode, DetonateDelay);
}
从Begin之后,DetonateDelay秒之后,调用一次ASDashProjectile。
虚幻引擎中的Gameplay定时器 | 虚幻引擎5.0文档 (unrealengine.com)
重写爆炸逻辑Explode_Implementation
- 清除计时器
- 爆炸依然播放粒子效果
- 爆炸后取消粒子效果
- 爆炸后子弹立即停止移动
- 爆炸后子弹立即取消碰撞
- 重新设置定时器,计时触发传送
void ASDashProjectile::Explode_Implementation()
{
	// Clear timer if the Explode was already called through another source like OnActorHit
	GetWorldTimerManager().ClearTimer(TimerHandle_DelayedDetonate);

	UGameplayStatics::SpawnEmitterAtLocation(this, ImpactVFX, GetActorLocation(), GetActorRotation());

	EffectComp->DeactivateSystem();

	MoveComp->StopMovementImmediately();
	SetActorEnableCollision(false);

	FTimerHandle TimerHandle_DelayedTeleport;
	GetWorldTimerManager().SetTimer(TimerHandle_DelayedTeleport, this, &ASDashProjectile::TeleportInstigator, TeleportDelay);

	// Skip base implementation as it will destroy actor (we need to stay alive a bit longer to finish the 2nd timer)
	//Super::Explode_Implementation();
}
实现闪现传送效果:TeleportInstigator
APawn* Instigator为人物本身,调用actor的TeleportTo函数实现传送AActor::TeleportTo | Unreal Engine Documentation
void ASDashProjectile::TeleportInstigator()
{
	AActor* ActorToTeleport = GetInstigator();
	if (ensure(ActorToTeleport))
	{
		// Keep instigator rotation or it may end up jarring
		ActorToTeleport->TeleportTo(GetActorLocation(), ActorToTeleport->GetActorRotation(), false, false);
	}
}
设置定时器:FTimerHandle
FTimerHandle TimerHandle_DelayedDetonate;黑洞攻击(蓝图):Proj_BlackHole
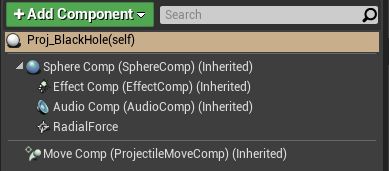
由SProjectileBase继承而来,为蓝图。
添加了RadialForce径向力,并设置为负数,因为要实现一种黑洞的吸附能力
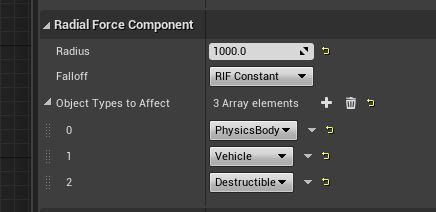
径向力Force Strength
可影响物体Object Types to Affect
要排除自身
吸进黑洞后要杀掉物体:
❗接口类:USGameplayInterface
USInteractionComponent
利用射线检测实现交互
void ASCharacter::PrimaryInteract()
{
	if (InteractionComp)
	{
		InteractionComp->PrimaryInteract();
	}
}
void USInteractionComponent::PrimaryInteract()
{
//碰撞预设
FCollisionObjectQueryParams ObjectQueryParams;
ObjectQueryParams.AddObjectTypesToQuery(ECC_WorldDynamic);
//获取自身
AActor* MyOwner = GetOwner();
//设置碰撞检测位置参数,从眼部开始
FVector EyeLocation;
FRotator EyeRotation;
MyOwner->GetActorEyesViewPoint(EyeLocation, EyeRotation);
FVector End = EyeLocation + (EyeRotation.Vector() * 1000);
//FHitResult Hit;
//bool bBlockingHit = GetWorld()->LineTraceSingleByObjectType(Hit, EyeLocation, End, ObjectQueryParams);
TArray Hits;
float Radius = 30.f;
//射线检测形状
FCollisionShape Shape;
Shape.SetSphere(Radius);
bool bBlockingHit = GetWorld()->SweepMultiByObjectType(Hits, EyeLocation, End, FQuat::Identity, ObjectQueryParams, Shape);
//射线颜色
FColor LineColor = bBlockingHit ? FColor::Green : FColor::Red;
for (FHitResult &Hit : Hits)
{
AActor* HitActor = Hit.GetActor();
if (HitActor)
{
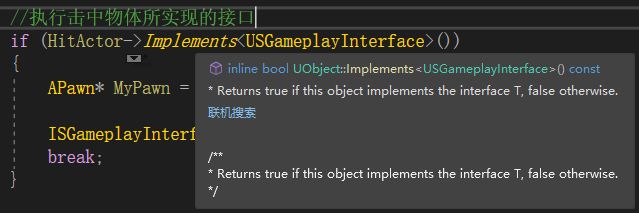
//执行击中物体所实现的接口
if (HitActor->Implements())
{
APawn* MyPawn = Cast(MyOwner);
ISGameplayInterface::Execute_Interact(HitActor, MyPawn);
break;
}
}
DrawDebugSphere(GetWorld(), Hit.ImpactPoint, Radius, 32, LineColor, false, 2.0f);
}
DrawDebugLine(GetWorld(), EyeLocation, End, LineColor, false, 2.0f, 0, 2.0f);
} 世界中的物体
爆炸油桶:ASExplosiveBarrel
设置StaticMesh,径向力
ASExplosiveBarrel::ASExplosiveBarrel()
{
	MeshComp = CreateDefaultSubobject("MeshComp");
	MeshComp->SetSimulatePhysics(true);
	RootComponent = MeshComp;

	ForceComp = CreateDefaultSubobject("ForceComp");
	ForceComp->SetupAttachment(MeshComp);

	// Leaving this on applies small constant force via component 'tick' (Optional)
	ForceComp->SetAutoActivate(false);

	ForceComp->Radius = 750.0f;
	ForceComp->ImpulseStrength = 2500.0f; // Alternative: 200000.0 if bImpulseVelChange = false
	// Optional, ignores 'Mass' of other objects (if false, the impulse strength will be much higher to push most objects depending on Mass)
	ForceComp->bImpulseVelChange = true;

	// Optional, default constructor of component already adds 4 object types to affect, excluding WorldDynamic
	ForceComp->AddCollisionChannelToAffect(ECC_WorldDynamic);

	// Binding either in constructor or in PostInitializeComponents() below
	//MeshComp->OnComponentHit.AddDynamic(this, &ASExplosiveBarrel::OnActorHit);
}
初始化Actor组件(添加碰撞事件)
AActor::PostInitializeComponents | Unreal Engine Documentation
允许Actor在初始化所有组件后在C++端初始化自己,仅在游戏过程中调用
void ASExplosiveBarrel::PostInitializeComponents()
{
	// Don't forget to call parent function
	Super::PostInitializeComponents();

	MeshComp->OnComponentHit.AddDynamic(this, &ASExplosiveBarrel::OnActorHit);
}
其实有效果的就是第一句:
void ASExplosiveBarrel::OnActorHit(UPrimitiveComponent* HitComponent, AActor* OtherActor, UPrimitiveComponent* OtherComp, FVector NormalImpulse, const FHitResult& Hit)
{
	ForceComp->FireImpulse();

	UE_LOG(LogTemp, Log, TEXT("OnActorHit in Explosive Barrel"));

	// %s = string
	// %f = float
	// logs: "OtherActor: MyActor_1, at gametime: 124.4"
	UE_LOG(LogTemp, Warning, TEXT("OtherActor: %s, at game time: %f"), *GetNameSafe(OtherActor), GetWorld()->TimeSeconds);

	FString CombinedString = FString::Printf(TEXT("Hit at location: %s"), *Hit.ImpactPoint.ToString());
	DrawDebugString(GetWorld(), Hit.ImpactPoint, CombinedString, nullptr, FColor::Green, 2.0f, true);

	// Detailed info on logging in ue4
	// https://nerivec.github.io/old-ue4-wiki/pages/logs-printing-messages-to-yourself-during-runtime.html

}
宝箱(实现交互接口):ASItemChest
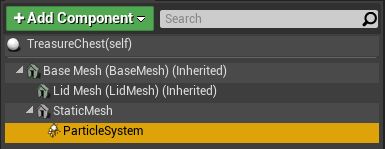
 实现交互后,打开/关闭宝箱盖子 ,同时可以在蓝图中设置粒子效果
ASItemChest::ASItemChest()
{
	BaseMesh = CreateDefaultSubobject(TEXT("BaseMesh"));
	RootComponent = BaseMesh;

	LidMesh = CreateDefaultSubobject(TEXT("LidMesh"));
	LidMesh->SetupAttachment(BaseMesh);

	TargetPitch = 110;
}


void ASItemChest::Interact_Implementation(APawn* InstigatorPawn)
{
	LidMesh->SetRelativeRotation(FRotator(TargetPitch, 0, 0));
}
在蓝图中的Class Settings里可以看到继承了接口:
实现交互开关宝箱、设置粒子效果
血包(实现交互接口):ASPowerupActor
老规矩,首先是简单的构造函数中的初始化
ASPowerupActor::ASPowerupActor()
{
	SphereComp = CreateDefaultSubobject("SphereComp");
	SphereComp->SetCollisionProfileName("Powerup");
	RootComponent = SphereComp;

	RespawnTime = 10.0f;
}
血包有很多种,因此接口实现逻辑由子类实现:
void ASPowerupActor::Interact_Implementation(APawn* InstigatorPawn)
{
	// logic in derived classes...
}
吃掉后隐藏血包(计时器):
void ASPowerupActor::HideAndCooldownPowerup()
{
	SetPowerupState(false);

	GetWorldTimerManager().SetTimer(TimerHandle_RespawnTimer, this, &ASPowerupActor::ShowPowerup, RespawnTime);
}

void ASPowerupActor::SetPowerupState(bool bNewIsActive)
{
	SetActorEnableCollision(bNewIsActive);

	// Set visibility on root and all children
	RootComponent->SetVisibility(bNewIsActive, true);
}
血包子类:ASPowerup_HealthPotion
void ASPowerup_HealthPotion::Interact_Implementation(APawn* InstigatorPawn)
{
	if (!ensure(InstigatorPawn))
	{
		return;
	}

	USAttributeComponent* AttributeComp = USAttributeComponent::GetAttributes(InstigatorPawn);
	// Check if not already at max health
	if (ensure(AttributeComp) && !AttributeComp->IsFullHealth())
	{
		// Only activate if healed successfully
		if (AttributeComp->ApplyHealthChange(this, AttributeComp->GetHealthMax()))
		{
			HideAndCooldownPowerup();
		}
	}
}
UI:Widget
十字准星
创建Widget并设置:
游戏开始时添加到屏幕上
create widget:
人物血条、Credits、游戏进行时间:Main_HUD
血条
创建对应组件UI
![]()
为text绑定health事件
Credits:
游戏进行时间:
AI
UE中的AI系统
- Navigation Mesh:AI寻路,可达区域
- Behavior Tree:行为树,AI的大脑
- Blackboard:AI数据存储
- Environment Query System:空间查询
- PawnSensing&AIPerception:感知
- Debug相关
行为树:
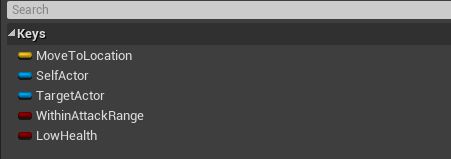
设置黑板
添加导航网格体:NavMeshBoundsVolume
游戏AI角色:SAICharacter
游戏AI控制器:SAIController
设置行为树
class UBehaviorTree;

/**
 *
 */
UCLASS()
class ACTIONROGUELIKE_API ASAIController : public AAIController
{
	GENERATED_BODY()

protected:

	UPROPERTY(EditDefaultsOnly, Category = "AI")
	UBehaviorTree* BehaviorTree;

	virtual void BeginPlay() override;
};
void ASAIController::BeginPlay()
{
Super::BeginPlay();
if (ensureMsgf(BehaviorTree, TEXT("Behavior Tree is nullptr! Please assign BehaviorTree in your AI Controller.")))
{
RunBehaviorTree(BehaviorTree);
}
// APawn* MyPawn = UGameplayStatics::GetPlayerPawn(this, 0);
// if (MyPawn)
// {
// GetBlackboardComponent()->SetValueAsVector("MoveToLocation", MyPawn->GetActorLocation());
//
// GetBlackboardComponent()->SetValueAsObject("TargetActor", MyPawn);
// }
}为SAICharacter设置控制器
游戏AI逻辑-范围内攻击:USBTService_CheckAttackRange(UBTService)
范围查询逻辑
- 检查AI与玩家的距离
- LineOfSightTo:true if controller's pawn can see Other actor
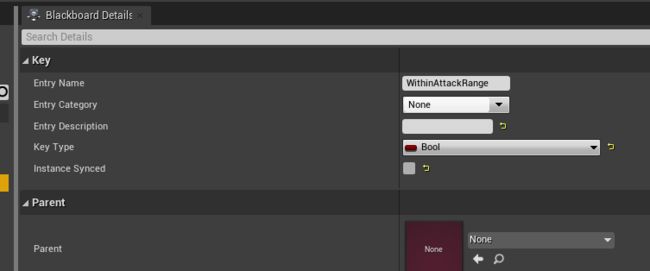
- 在黑板中添加对应key值,通过C++逻辑设置bool值:BlackBoardComp->SetValueAsBool(AttackRangeKey.SelectedKeyName, (bWithinRange && bHasLOS));
逻辑为:当且仅当:
- AI距离玩家小于MaxAttackRange时
- AI能够看见玩家时
为真。
void USBTService_CheckAttackRange::TickNode(UBehaviorTreeComponent& OwnerComp, uint8* NodeMemory, float DeltaSeconds)
{
	Super::TickNode(OwnerComp, NodeMemory, DeltaSeconds);

	// Check distance between ai pawn and target actor
	UBlackboardComponent* BlackBoardComp = OwnerComp.GetBlackboardComponent();
	if (ensure(BlackBoardComp))
	{
		AActor* TargetActor = Cast(BlackBoardComp->GetValueAsObject("TargetActor"));
		if (TargetActor)
		{
			AAIController* MyController = OwnerComp.GetAIOwner();

			APawn* AIPawn = MyController->GetPawn();
			if (ensure(AIPawn))
			{
				float DistanceTo = FVector::Distance(TargetActor->GetActorLocation(), AIPawn->GetActorLocation());

				bool bWithinRange = DistanceTo < MaxAttackRange;

				bool bHasLOS = false;
				if (bWithinRange)
				{
					bHasLOS = MyController->LineOfSightTo(TargetActor);
				}

				BlackBoardComp->SetValueAsBool(AttackRangeKey.SelectedKeyName, (bWithinRange && bHasLOS));
			}
		}
	}
}
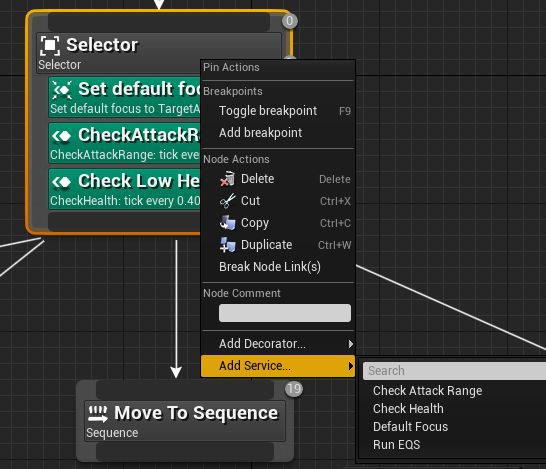
在行为树添加此Service
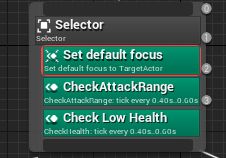
 CheckAttackRange后,会首先进入WithinAttackRange?,若条件为真,则AI执行攻击;若条件为假,则AI向玩家移动,直到到达攻击范围内;
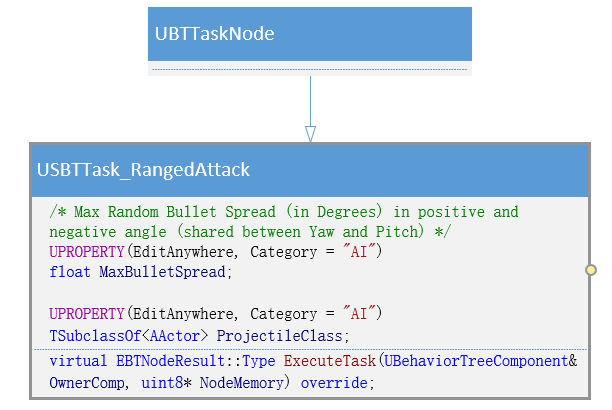
游戏AI范围内攻击任务结点:USBTTask_RangedAttack
AI朝向玩家:Set default focus
环境查询系统:
创建EQS
图中蓝色球体为未选中移动目标,绿色球体为已被选择的目标,AI会对EQS所查询的目标进行移动
随机选取一个位置让AI移动
在玩家周围半径内设置EQS生成移动目的地
AI死亡
void ASAICharacter::OnHealthChanged(AActor* InstigatorActor, USAttributeComponent* OwningComp, float NewHealth, float Delta)
{
	if (Delta < 0.0f)
	{
		if (InstigatorActor != this)
		{
			SetTargetActor(InstigatorActor);
		}

		if (ActiveHealthBar == nullptr)
		{
			ActiveHealthBar = CreateWidget(GetWorld(), HealthBarWidgetClass);
			if (ActiveHealthBar)
			{
				ActiveHealthBar->AttachedActor = this;
				ActiveHealthBar->AddToViewport();
			}
		}

		GetMesh()->SetScalarParameterValueOnMaterials(TimeToHitParamName, GetWorld()->TimeSeconds);

		if (NewHealth <= 0.0f)
		{
			// stop BT
			AAIController* AIC = Cast(GetController());
			if (AIC)
			{
				AIC->GetBrainComponent()->StopLogic("Killed");
			}

			// ragdoll
			GetMesh()->SetAllBodiesSimulatePhysics(true);
			GetMesh()->SetCollisionProfileName("Ragdoll");

			// set lifespan
			SetLifeSpan(10.0f);
		}
	}
} 