语义分割 语义分类
Hello There! This post is about a road surface semantic segmentation approach. So the focus here is on the road surface patterns, like: what kind of pavement the vehicle is driving on or if there is any damage on the road, also the road markings and speed-bumps as well and other things that can be relevant for a vehicular navigation task.
你好! 这篇文章是关于路面语义分割方法的。 因此,这里的重点是路面模式,例如:车辆行驶在哪种路面上或道路上是否有损坏,还有道路标记和减速带以及其他与路面相关的事项车辆导航任务。
Here I will show you the step-by-step approach based on the preprint paper available at ResearchGate [1]. The Ground Truth and the experiments were made using the RTK dataset [2], with images captured with a low-cost camera, containing images of roads with different types of pavement and different conditions of pavement quality.
在这里,我将向您展示基于ResearchGate [1]上预印本的分步方法。 地面真相和实验是使用RTK数据集 [2]进行的,其中使用低成本相机捕获的图像包含了具有不同类型路面和不同路面质量条件的道路图像。
It was fun to work on it and I’m excited to share it, I hope you enjoy it too.
进行这项工作很有趣,很高兴与大家分享,希望您也喜欢。
介绍 (Introduction)
The purpose of this approach is to verify the effectiveness of using passive vision (camera) to detect different patterns on the road. For example, to identify if the road surface is an asphalt or cobblestone or an unpaved (dirt) road? This may be relevant for an intelligent vehicle, whether it is an autonomous vehicle or an Advanced Driver-Assistance System (ADAS). Depending on the type of pavement it may be necessary to adapt the way the vehicle is driven, whether for the safety of users or the conservation of the vehicle or even for the comfort of people inside the vehicle.
该方法的目的是验证使用被动视觉(摄像机)检测道路上不同模式的有效性。 例如,确定路面是沥青路面还是鹅卵石路面还是未铺砌的(污垢)道路? 这可能与智能车辆有关,无论它是自动驾驶汽车还是高级驾驶员辅助系统(ADAS)。 取决于路面的类型,可能出于驾驶员的安全性或车辆的保护,甚至为了车内人员的舒适性,需要调整车辆的行驶方式。
Another relevant factor of this approach is related to the detection of potholes and water-puddles, which could generate accidents, damage the vehicles and can be quite common in developing countries. This approach can also be useful for departments or organizations responsible for maintaining highways and roads.
此方法的另一个相关因素与坑洼和水坑的检测有关,坑坑和水坑可能会导致事故,损坏车辆,并且在发展中国家非常普遍。 这种方法对于负责维护公路和公路的部门或组织也很有用。
To achieve these objectives, Convolutional Neural Networks (CNN) were used for the semantic segmentation of the road surface, I’ll talk more about that in next sections.
为了实现这些目标,将卷积神经网络(CNN)用于路面的语义分割,我将在下一节中进一步讨论。
地面真相 (Ground Truth)
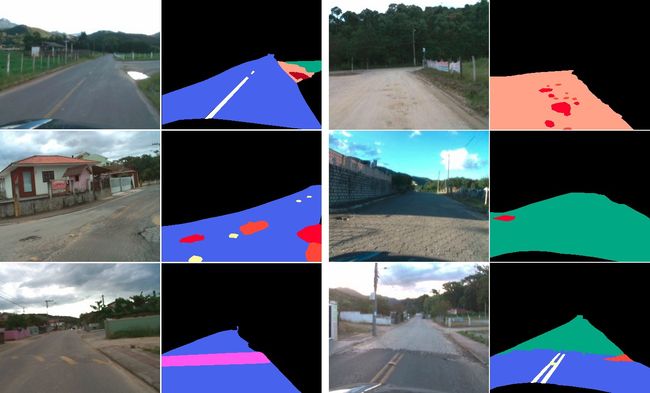
To train the neural network and to test and validate the results, a Ground Truth (GT) was created with 701 images from the RTK dataset. This GT is available on the dataset page and is composed by the following classes:
为了训练神经网络并测试和验证结果,使用来自RTK数据集中的701张图像创建了地面真实(GT)。 此GT在数据集页面上可用,并且由以下类组成:
GT classes [1] GT班[1] GT Samples [1] GT样品[1]方法和设置 (The approach and setup)
Everything done here was done using Google Colab. Which is a free Jupyter notebook environment and give us free access to GPUs and is super easy to use, also very helpful for organization and configuration. It was also used the fastai [3], the amazing deep learning library. To be more precise, the step-by-step that I will present was very much based on one of the lessons given by Jeremy Howard on one the courses about deep learning, in this case lesson3-camvid.
此处完成的所有操作均使用Google Colab完成。 这是一个免费的Jupyter笔记本环境,可让我们免费访问GPU,而且超级易用,对于组织和配置也非常有帮助。 它还使用了fastai [3],这是一个了不起的深度学习库。 更准确地说,我将逐步讲解的步骤很大程度上是基于杰里米·霍华德(Jeremy Howard)在有关深度学习的课程(在本例中为lesson3-camvid)的课程中提供的课程之一 。
The CNN architecture used was the U-NET [4], which is an architecture designed to perform the task of semantic segmentation in medical images, but successfully applied to many other approaches. In addition, ResNet [5] based encoder and a decoder are used. The experiments for this approach were done with resnet34 and resnet50.
所使用的CNN体系结构是U-NET [4],该体系结构旨在执行医学图像中的语义分割任务,但已成功应用于许多其他方法。 另外,使用基于ResNet [5]的编码器和解码器。 使用resnet34和resnet50完成了此方法的实验。
For the data augmentation step, standard options from the fastai library were used, with horizontal rotations and perspective distortion being applied. With fastai it is possible to take care to make the same variations made in the data augmentation step for both the original and mask (GT) images.
对于数据增强步骤,使用来自fastai库的标准选项,并应用了水平旋转和透视变形。 使用fastai时 ,可能要注意对原始图像和蒙版(GT)图像在数据扩充步骤中进行相同的更改。
A relevant point, which was of great importance for the definition of this approach, is that the classes of the GT are quite unbalanced, having much larger pixels of background or surface types (eg.: asphalt, paved or unpaved) than the other classes. Unlike an image classification problem, where perhaps replicating certain images from the dataset could help to balance the classes, in this case, replicating an image would imply further increasing the difference between the number of pixels from the largest to the smallest classes. Then, in the defined approach weights were used in the classes for balancing.
对于此方法的定义而言,非常重要的一点是,GT的类别非常不平衡,与其他类别相比,背景或表面类型(例如:沥青,已铺设或未铺设)的像素要大得多。 与图像分类问题不同,在图像分类问题中,也许从数据集中复制某些图像可以帮助平衡类别,在这种情况下,复制图像将意味着从最大类别到最小类别的像素数之间的差进一步增大。 然后,在定义的方法中,将权重用于类中以进行平衡。
Based on different experiments, it was realized that just applying the weights is not enough, because when improving the accuracy of the classes that contain a smaller amount of pixels, the classes that contain a larger amount of pixels (eg.: asphalt, paved and unpaved) lost quality in the accuracy results.
根据不同的实验,我们认识到仅应用权重是不够的,因为当提高包含较少像素数量的类的准确性时,包含较大像素数量的类(例如:沥青,铺砌的和未铺砌)在准确性结果中损失了质量。
The best accuracy values, considering all classes, without losing much quality for the detection of surface types, was with the following configuration: first training a model without using weights, generating a model with good accuracy for the types of surface, then, use that previously trained model as a basis for the next model that uses the proportional weights for the classes. And that’s it!
在考虑所有类别的前提下,最好的精度值在不损失检测表面类型的质量的情况下,采用以下配置:首先在不使用权重的情况下训练模型,为表面类型生成具有良好精度的模型,然后使用先前训练的模型,作为使用比例权重的下一个模型的基础。 就是这样!
You can check the complete code, that I will comment on throughout this post, on GitHub:
您可以在GitHub上查看完整的代码,以便在本文中进行评论:
一步步 (Step-by-Step)
Are you ready?
你准备好了吗?
https://giphy.com/ https://giphy.com/的 gifCool, so we start by our initial settings, importing the fastai library and the pathlib module. Let’s call this as Step 1.
太酷了,因此我们从初始设置开始,导入fastai库和pathlib模块。 我们称其为“ 步骤1” 。
第1步-初始设置 (Step 1 — Initial settings)
Road Surface Semantic Segmentation.ipynb 路面语义分割As we’ll use our dataset from google drive, we need to mount it, so in the next cell type:
由于我们将使用Google驱动器中的数据集,因此需要对其进行挂载,因此在下一个单元格类型中:
Road Surface Semantic Segmentation.ipynb 路面语义分割You’ll see something like the next image, click on the link and you’ll get an authorization code, so just copy and paste the authorization code in the expected field.
您将看到类似下图的内容,单击链接,您将获得授权码,因此只需将授权码复制并粘贴到期望的字段中即可。
From author 来自作者Now just access your Google Drive as a file system. This is the start of Step 2, loading our data.
现在,只需将您的Google云端硬盘作为文件系统访问即可。 这是第2步的开始,即加载我们的数据。
第2步-准备数据 (Step 2 — Preparing the data)
Road Surface Semantic Segmentation.ipynb 路面语义分割Where “image” is the folder containing the original images. The “labels” is the folder containing the masks that we’ll use for our training and validation, these images are 8-bit pixels after a colormap removal process. In “colorLabels” I’ve put the original colored masks, which we can use later for visual comparison. The “valid.txt” file contains a list of images names randomly selected for validation. Finally, the “codes.txt” file contains a list with classes names.
其中“ image ”是包含原始图像的文件夹。 “ labels ”是一个文件夹,其中包含我们将用于训练和验证的蒙版,这些图像是在去除色图后的8位像素。 在“ colorLabels ”中,我放置了原始的彩色蒙版,以后可以将其用于视觉比较。 “ valid.txt ”文件包含随机选择用于验证的图像名称列表。 最后,“ codes.txt ”文件包含带有类名称的列表。
From author 来自作者 Road Surface Semantic Segmentation.ipynb 路面语义分割 From author 来自作者Now, we define the paths for the original images and for the GT mask images, enabling access to all images in each folder to be used later.
现在,我们定义原始图像和GT遮罩图像的路径,从而可以访问每个文件夹中的所有图像以供以后使用。
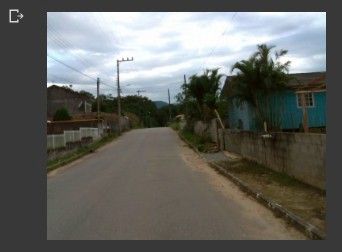
Road Surface Semantic Segmentation.ipynb 路面语义分割We can see an example, image 139 from the dataset.
我们可以看到一个示例,数据集中的图像139。
From author 来自作者Next, as shown in fastai lesson, we use a function to infer the mask filename from the original image, responsible for the color coding of each pixel.
接下来,如fastai课程中所示,我们使用一个函数来从原始图像中推断遮罩文件名,该文件名负责每个像素的颜色编码。
Road Surface Semantic Segmentation.ipynb 路面语义分割步骤3 —第一步—不加重量 (Step 3 — First Step — Without weights)
Here we are at the Step 3. Let’s create the DataBunch for training our first model using data block API. Defining where our images come from, which images will be used for validation and and the masks corresponding to each original image. For the data augmentation, the fastai library also gives options, but here we’ll use only the default options with get_transforms(), which consists of randomly horizontal rotations and the perspective warping. Remember to set tfm_y=True in the transform call to ensure that the transformations for the data augmentation in the dataset are the same for each mask and its original image. Imagine if we rotated the original image, but the mask corresponding to that image was not rotated, what a mess it would be!
现在我们进入第3步 。 让我们创建一个DataBunch来使用数据块API训练我们的第一个模型。 定义图像的来源,将用于验证的图像以及与每个原始图像相对应的蒙版。 对于数据扩充, fastai库还提供了选项,但是在这里,我们将仅将默认选项与get_transforms() ,该选项由随机的水平旋转和透视变形组成。 请记住在转换调用中设置tfm_y=True ,以确保每个蒙版及其原始图像的数据集中数据扩充的转换都相同。 想象一下,如果我们旋转了原始图像,但是与该图像相对应的蒙版没有旋转,那将是多么混乱!
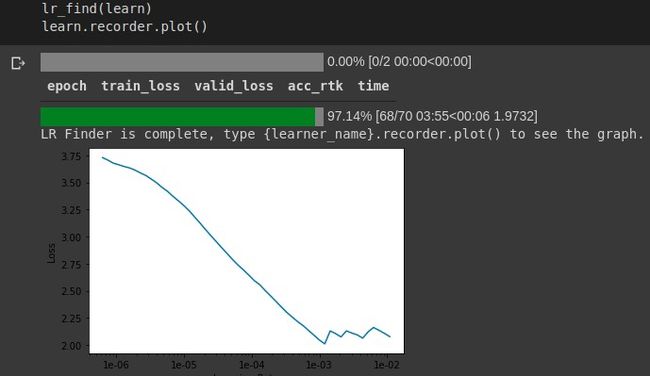
We continue using the lesson3-camvid example from the fastai course, to define the accuracy metric and the weight decay. I’ve used the resnet34 model since I didn’t have much of a difference using resnet50 in this approach with this dataset. We can find the learning rate using lr_find(learn), which in my case I’ve defined as 1e-4.
我们继续使用lesson3-camvid从fastai当然例如,要定义精度指标和权衰减。 我使用过resnet34模型,因为在此方法中使用resnet50与该数据集没有太大区别。 我们可以使用lr_find(learn)找到学习率,在我的情况下,我将其定义为1e-4 。
Next we run the fit_one_cycle() for 10 times to check how our model is doing.
接下来,我们运行fit_one_cycle() 10次以检查模型的运行情况。
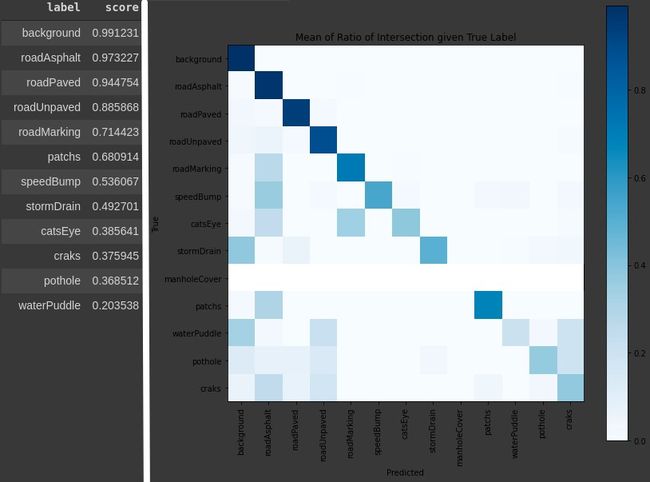
Using the confusion matrix we can see how good (or bad) the model is for each class until now…
使用混淆矩阵,我们可以看到到目前为止每个班级的模型好坏。
Road Surface Semantic Segmentation.ipynb 路面语义分割 From author 来自作者Don’t forget to save the model we’ve trained until now.
别忘了保存我们到目前为止训练的模型。
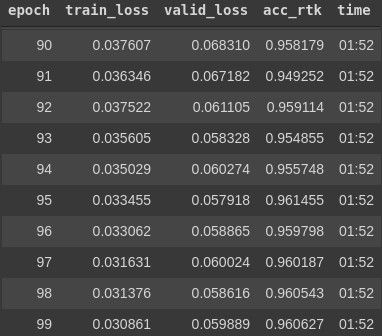
Road Surface Semantic Segmentation.ipynb 路面语义分割Now we just train the model over more epochs to improve the learning, and remember to save our final model. The slice keyword is used to take a start and a stop value, so in the first layers begin the training with the start value and this will change until the stop value when reaching the end of the training process.
现在,我们只是在更多的时期内训练模型以改善学习效果,并记住保存最终模型。 slice关键字用于获取起始值和终止值,因此在第一层中,以起始值开始训练,并且在到达训练过程结束时,它将更改直到终止值。
Road Surface Semantic Segmentation.ipynb 路面语义分割 From author 来自作者This is our first model, without weights, which works fine for road surfaces but doesn’t work for the small classes.
这是我们的第一个没有配重的模型,该模型在路面上可以正常使用,但不适用于小班级。
From author 来自作者步骤4-第二部分-配重 (Step 4 — Second Part — With weights)
We’ll use the first model in our next Step. This part is almost exactly the same as the Step 3, since the databunch, we just need to remember to load our previous model.
在下一步中,我们将使用第一个模型。 这部分与第3步几乎完全相同,因为数据绑定,我们只需要记住加载先前的模型即可。
Road Surface Semantic Segmentation.ipynb 路面语义分割And, before we start the training process, we need to put weight in the classes. I defined these weights in order to try to be proportional to how much each class appears in the dataset (number of pixels). * I ran a python code with OpenCV just to count the number of pixels in each class over the GT’s 701 images, to get a sense of the proportion of each class…
并且,在我们开始培训过程之前,我们需要在课堂上加倍权重。 我定义了这些权重,以便尝试与每个类在数据集中出现的数量(像素数)成正比。 *我用OpenCV运行了一个python代码,只是为了计算GT 701图像中每个类别的像素数,以了解每个类别的比例……
Road Surface Semantic Segmentation.ipynb 路面语义分割The remainder is exactly like step three presented before. What changes are the results obtained.
其余部分与前面介绍的第三步完全一样。 得到的结果有什么变化。
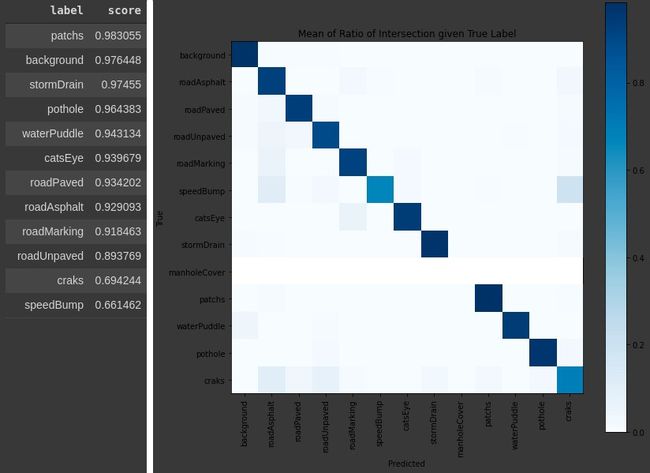
From author 来自作者Now, it looks like we have a more reasonable result for all classes. Remember to save it!
现在,对于所有类来说,我们似乎都有一个更合理的结果。 记住要保存!
Road Surface Semantic Segmentation.ipynb 路面语义分割结果 (Results)
Finally, let’s see our images, right? Before anything, it will be better to save our results, or our test images.
最后,让我们看看我们的图像,对不对? 首先,最好保存我们的结果或测试图像。
Road Surface Semantic Segmentation.ipynb 路面语义分割But, wait! The images all look completely black, where are my results??? Calm down, these are the results, just without color map, if you open one of these images on the entire screen, with high brightness, you can see the small variations, “Eleven Shades of Grey” . So let’s color our results to be more presentable? Now we’ll use OpenCV and create a new folder to save our colored results.
可是等等! 图像全部看起来都是黑色的,我的结果在哪里??? 冷静一下,这些就是结果,只是没有颜色图,如果在整个屏幕上以高亮度打开这些图像之一,则可以看到小的变化,即“十一色灰色”。 因此,让我们对结果进行上色以使其更具表现力吗? 现在,我们将使用OpenCV并创建一个新文件夹来保存彩色结果。
Road Surface Semantic Segmentation.ipynb 路面语义分割So we create a function to identify each variation and to colorize each pixel.
因此,我们创建了一个函数来识别每个变化并为每个像素着色。
Road Surface Semantic Segmentation.ipynb 路面语义分割Next, we read each image, call the function and save our final result.
接下来,我们读取每个图像,调用函数并保存最终结果。
Road Surface Semantic Segmentation.ipynb 路面语义分割But, this process could take more time than necessary, using the %timeit we achieve a performance as:
但是,使用%timeit ,此过程可能会花费不必要的时间,我们可以达到以下性能:
Imagine if we need to test with more images? We can speed up this step using Cython. So, let’s put a pinch of Cython on that!
想像一下是否需要测试更多图像? 我们可以使用Cython加快此步骤。 因此,让我们在上面放一点Cython!
https://giphy.com/ https://giphy.com/的 gifSo, we edit our function to identify each variation and to colorize each pixel, but this time, using Cython.
因此,我们编辑函数以识别每个变化并为每个像素着色,但是这次使用Cython。
Road Surface Semantic Segmentation.ipynb 路面语义分割And we just read each image and call the function and save our final result as we did before.
然后,我们只需读取每个图像并调用函数,然后像以前一样保存最终结果。
Road Surface Semantic Segmentation.ipynb 路面语义分割And voila! Now we have a performance as:
瞧! 现在我们的表现为:
From author 来自作者Much better, right?
好多了吧?
一些结果样本 (Some results samples)
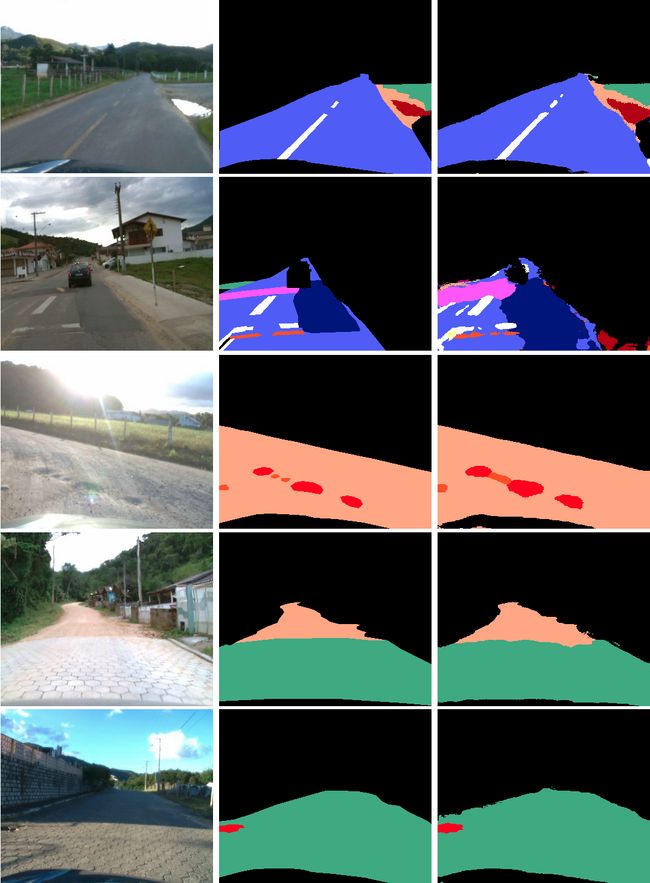
In the image below are some results. In the left column are the original images, in the middle column the GT and in the right column the result with this approach.
在下图中是一些结果。 左图是原始图像,中间栏是GT,右图是这种方法的结果。
Adapted from [1] 改编自[1]带有结果的视频 (Video with the results)
讨论(让我们谈谈) (Discussion (Let’s talk about it))
Identifying road surface conditions is important in any scenario, based on this the vehicle or driver can adapt and make a decision that can make the driving safer, more comfortable and more efficient. This is particularly relevant in developing countries that may have even more situations of road maintenance problems or a reasonable number of unpaved roads.
在任何情况下,识别路面状况都很重要,基于此,车辆或驾驶员可以做出调整,并做出可以使驾驶更加安全,舒适和高效的决定。 这在可能存在更多道路维护问题或相当数量的未铺砌道路的发展中国家中尤其重要。
This approach looks promising for dealing with environments with variations in the road surface. This can also be useful for highway analysis and maintenance departments, in order to automate part of their work in assessing road quality and identifying where maintenance is needed.
对于处理路面变化的环境,这种方法看起来很有希望。 这对于高速公路分析和养护部门也很有用,以便使他们在评估道路质量和确定需要维护的地方的工作自动化。
However, some points were identified and analyzed as subject to improvement.
但是,发现并改进了一些要点。
For the segmentation GT, it may be interesting to divide some classes into more specific classes, such as the Cracks class, used for different damages regardless of the type of road. Thus having variations of Cracks for each type of surface, because different surfaces have different types of damage. Also divide this class into different classes, categorizing different damage in each new class.
对于分段GT,将某些类别划分为更具体的类别(例如“裂缝”类别)可能会很有趣,例如,无论道路类型如何,“裂纹”类别都会用于不同的损坏。 因此,由于不同类型的表面具有不同类型的损坏,因此每种类型的表面都有不同的裂纹。 还要将此类别分为不同的类别,在每个新类别中将不同的损害分类。
That’s all for now. Feel free to reach out to me.
目前为止就这样了。 请随时与我联系。
致谢 (Acknowledgements)
This experiment is part of a project on visual perception for vehicular navigation from LAPiX (Image Processing and Computer Graphics Lab).
该实验是LAPiX (图像处理和计算机图形实验室)的车辆导航视觉感知项目的一部分。
If you are going to talk about this approach, please cite as:
如果您要谈论这种方法 ,请引用为:
@article{rateke:2020_3,author = {Thiago Rateke and Aldo von Wangenheim},title = {Road surface detection and differentiation considering surface damages},year = {2020},eprint = {2006.13377}, archivePrefix = {arXiv}, primaryClass = {cs.CV},}
@article {rateke:2020_3, 作者 = {Thiago Rateke和Aldo von Wangenheim}, 标题 = {考虑到表面损坏的路面检测和区分}, 年份 = {2020}, eprint = {2006.13377}, archivePrefix = {arXiv}, primaryClass = {cs.CV},}
也可以看看 (See Also)
翻译自: https://towardsdatascience.com/road-surface-semantic-segmentation-4d65b045245
语义分割 语义分类
