经典数据集介绍-数据集制作-YOLOv5参数释义
文章预览:
-
-
- VOC数据集介绍
- COCO数据集介绍
- 制作数据集
-
- 使用 Roboflow
-
- Collect Images
- Create Labels
- 手动准备数据集
- Create dataset.yaml
- YOLOv5-6.0
-
- **detect.py**
- **train.py**
-
此笔记根据 小土堆教学视频所作笔记,内容详细,不枯燥,推荐给想学习目标检测的同学们,以下个人笔记供大家参考,若有误,还望指正!
目标检测:位置+类别
人脸检测:人脸-目标
文字检测:文字-目标
主流的目标检测,都是以矩阵框的形式进行输出的
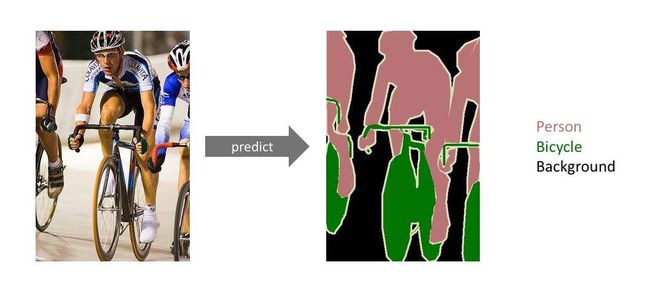
语义分割,如下图所示,可以达到更高的精度
VOC数据集介绍
有VOC 2007、VOC 2012
官网:VOC数据集
For VOC2012 the majority of the annotation effort was put into increasing the size of the segmentation and action classification datasets, and no additional annotation was performed for the classification/detection tasks. The list below summarizes the differences in the data between VOC2012 and VOC2011.
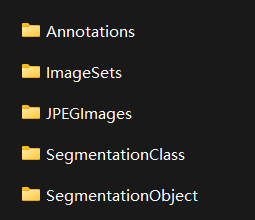
VOC2007为例:
Annotations:包括了xml文件,描述了图片的各种信息,特别是目标的位置坐标
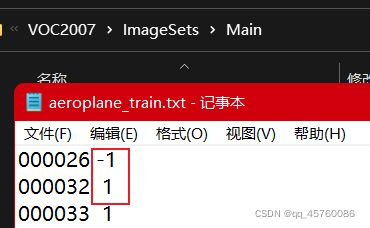
ImaggeSets:主要关注Main文件夹的内容,里面的文件包括了不同类别目标的训练/验证数据集图片名称
例如:1表示图片中有飞机,-1表示无飞机
JPEGImages:原图片
SegmentationClass/Object:用于语义分割
COCO数据集介绍
常用的数据集为COCO2017
官网:COCO2017数据集
制作数据集
数据集制作详解
- 自己获得数据集–人工标注
- 自己获取数据集–半人工标注(对标注好的数据集进行微调)
- 仿真数据集(GAN,数字图像处理的方式)(效果可能不太好)
使用 Roboflow
Collect Images
- Training on images similar to the ones it will see in the wild is of the utmost importance. collect a wide variety of images from the same configuration as you will ultimately deploy your project.
- start from a public dataset to train your initial model and then sample images from the wild during inference to improve your dataset and model iteratively.
Create Labels
-
Roboflow Annotate is a simple web-based tool for managing and labeling your images with your team and exporting them in YOLOv5’s annotation format.
Whether you label your images with Roboflow or not, you can use it to convert your dataset into YOLO format, create a YOLOv5 YAML configuration file, and host it for importing into your training script.
-
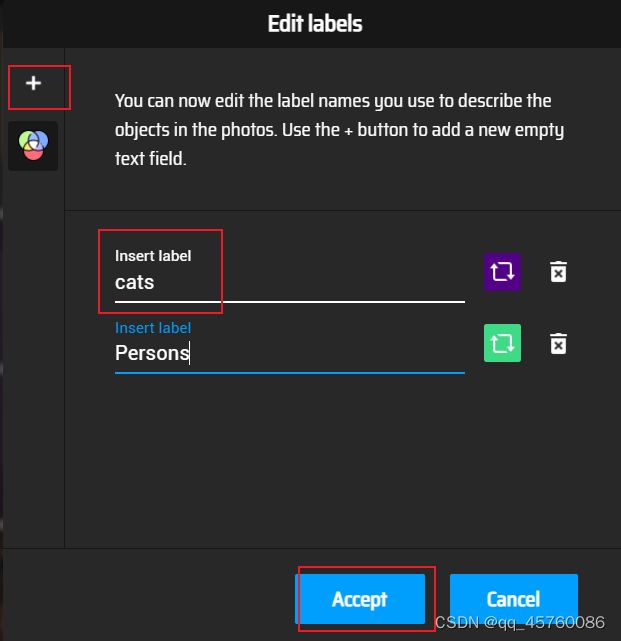
在线网站:数据集制作(makesense)
步骤:
添加标注类别
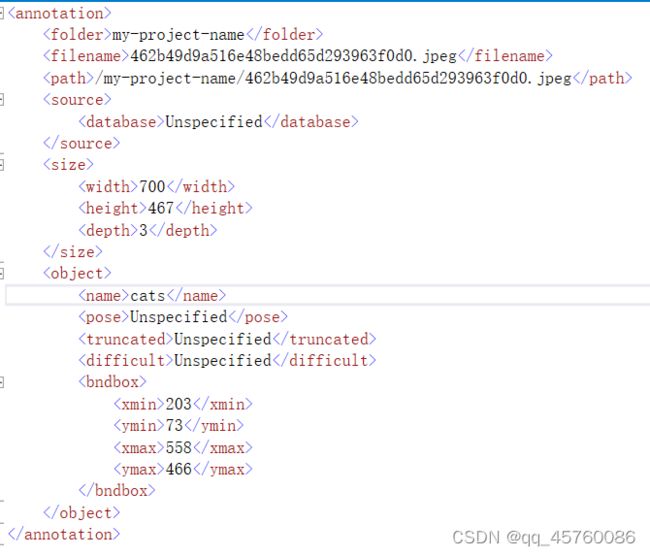
添加好类别后,在图片上选择需要识别的内容框选,然后在右边选择标签类别,当全部标记好以后,在Actions/Export Annotations导出标注,以下为xml的文件 格式内容,包含了filename、path、以及图片信息,object物体(标签,以及识别物体的坐标矩形框)等
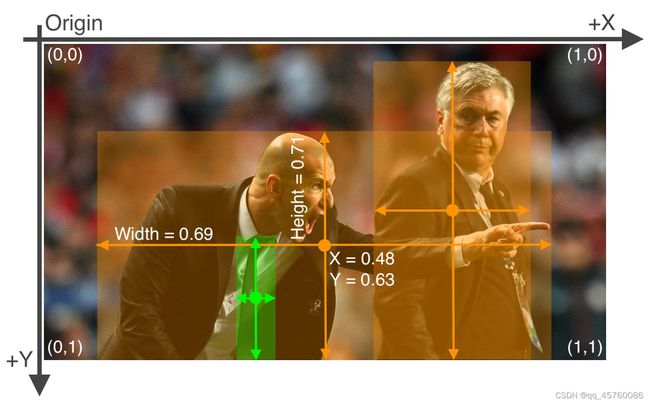
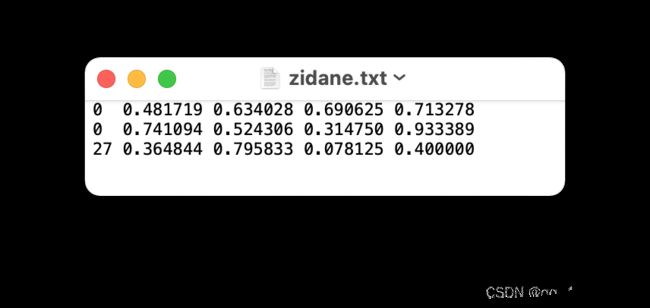
导出的YOLO则为txt格式,内容如下,第一个0/1/2等表示类目,第二第三为物体中心的坐标,第四第五为宽度高度
- One row per object
- Each row is
class x_center y_center width heightformat. - Box coordinates must be in normalized xywh format (from 0 - 1)(归一化). If your boxes are in pixels, divide
x_centerandwidthby image width, andy_centerandheightby image height. - Class numbers are zero-indexed (start from 0).
可以选择AI标注,会提示你未创建的标签创建,并在图片上自动框选物体,点击即可。
- 多人在线标注
网址:数据集制作(cvat)(需要开VPN使用)
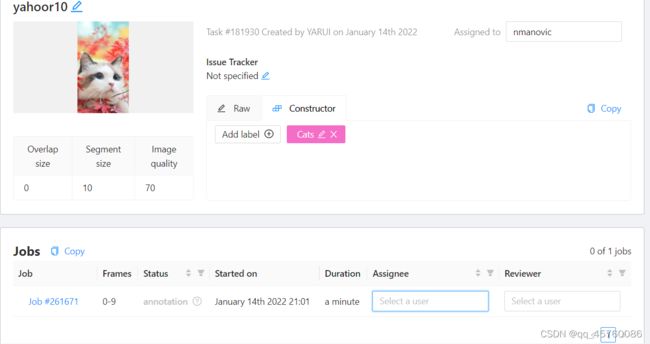
创建好task,添加标签,加载图片后提交。
可以将项目分配给某些人
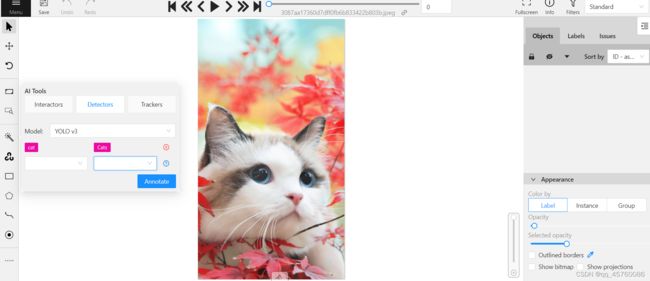
可以选择自动识别的功能
选择Detectors,模型选择YOLO v3,其中,该模型可以识别许多内容,例如选择cat(3)后将会自动识别框选,如果识别为cat,将会标注为自己的标签类别,即(4)
导出类型多,支持COCO类型
可以看到,当用Pychram打开json文件时,会只出现在一行上,我们可以按两次shift,然后选择Action(操作)输入reformat code,就会把代码调成json数据格式
手动准备数据集
-
Create dataset.yaml
根据后续需要的内容进行修改:
只需要修改数据集的yaml即可,其他不要作修改
the dataset config file that defines
1) the dataset root directory path and relative paths to train / val / test image directories (or *.txt files with image paths),
**3)**a list of class names#注意标签顺序,不可颠倒
# Train/val/test sets as 1) dir: path/to/imgs, 2) file: path/to/imgs.txt, or 3) list: [path/to/imgs1, path/to/imgs2, ..]
path: ../datasets/coco128  # dataset root dir
train: images/train2017  # train images (relative to 'path') 128 images
val: images/train2017  # val images (relative to 'path') 128 images
test:  # test images (optional)

# Classes
nc: 80  # number of classes
names: [ 'person', 'bicycle', 'car', 'motorcycle', 'airplane', 'bus', 'train', 'truck', 'boat', 'traffic light',
         'fire hydrant', 'stop sign', 'parking meter', 'bench', 'bird', 'cat', 'dog', 'horse', 'sheep', 'cow',
         'elephant', 'bear', 'zebra', 'giraffe', 'backpack', 'umbrella', 'handbag', 'tie', 'suitcase', 'frisbee',
         'skis', 'snowboard', 'sports ball', 'kite', 'baseball bat', 'baseball glove', 'skateboard', 'surfboard',
         'tennis racket', 'bottle', 'wine glass', 'cup', 'fork', 'knife', 'spoon', 'bowl', 'banana', 'apple',
         'sandwich', 'orange', 'broccoli', 'carrot', 'hot dog', 'pizza', 'donut', 'cake', 'chair', 'couch',
         'potted plant', 'bed', 'dining table', 'toilet', 'tv', 'laptop', 'mouse', 'remote', 'keyboard', 'cell phone',
         'microwave', 'oven', 'toaster', 'sink', 'refrigerator', 'book', 'clock', 'vase', 'scissors', 'teddy bear',
         'hair drier', 'toothbrush' ]  # class names
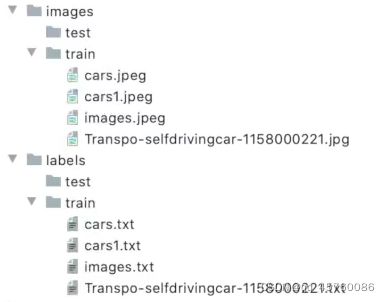
根据方式一收集图片并创建标签,然后按下列格式创建目录
../datasets/coco128/images/im0.jpg  # 主要不要改变images名字
../datasets/coco128/labels/im0.txt  # 主要不要改变labels名字
由于检索需要时间,如果项目很大,则可以将这些数据集内容放到外面,即右键Mark Directory as/Excluded,其他内容不作修改
YOLOv5-6.0
下载链接:YOLOv5-6.0
YOLOv5的官方代码是基于Pytorch框架实现的
选择对应的Canda配置环境,通过系统提示下载requirements.txt的包
如果作者没有提供requirements.txt文件,则根据报错手动添加
detect.py
inference设置可以有以下形式,本地图片视频,目录下的文件,以及实时检测的视频流
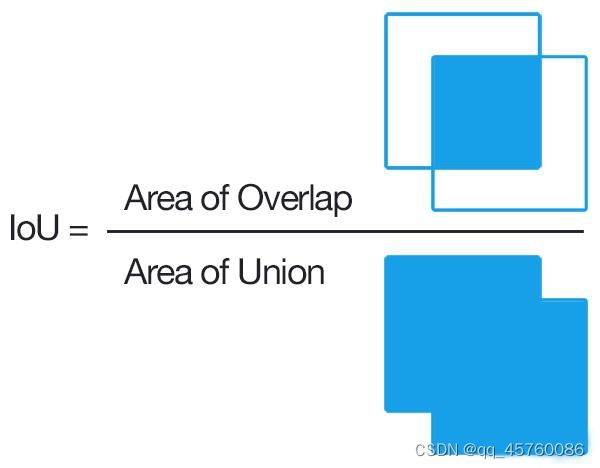
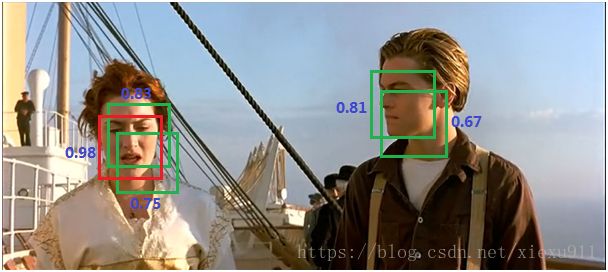
1.–iou-thres
由iou-thres控制以上图片的选区,选择最优的结果
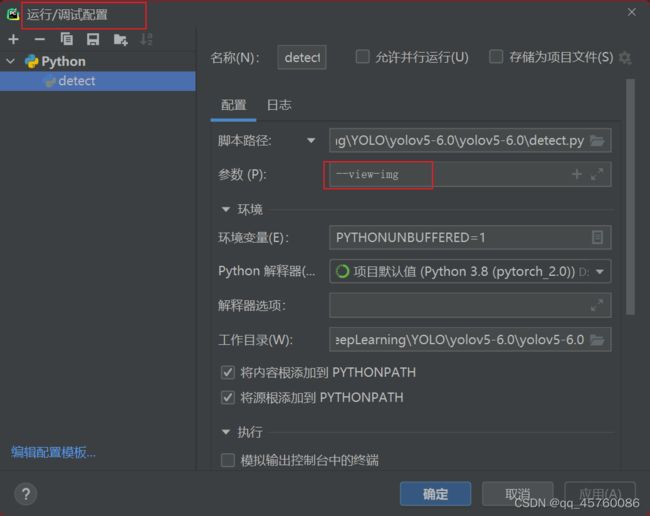
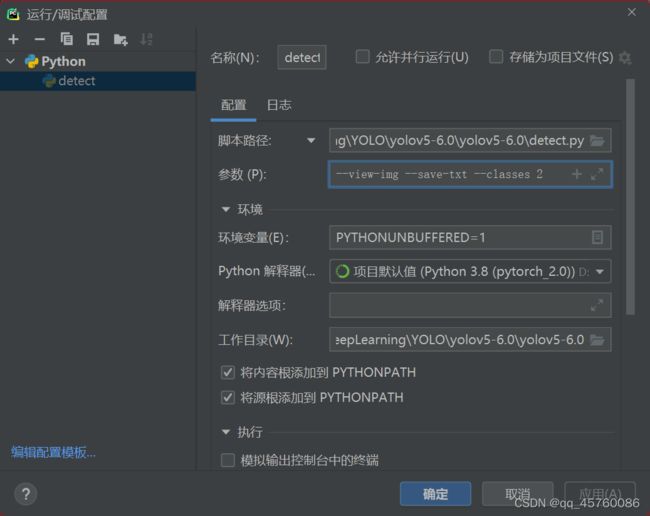
如果需要执行时带有某些参数,可以在以下图中配置
只识别汽车(classes 2),并用txt保存检测结果
通过在opt = parser.parse_args()设置断点,观察各个参数的值,没有默认的,如果未定义,则是FALSE
常用的参数解析如下:
def parse_opt():
    parser = argparse.ArgumentParser()
    parser.add_argument('--weights', nargs='+', type=str, default=ROOT / 'yolov5x6.pt', help='model path(s)')#可以根据需要更改网络模型
    parser.add_argument('--source', type=str, default=ROOT / 'data/images', help='file/dir/URL/glob, 0 for webcam')#中间的路径可以是一张图片/视频,若是文件夹,则检测全部
    parser.add_argument('--imgsz', '--img', '--img-size', nargs='+', type=int, default=[640], help='inference size h,w')#img-size在训练时会有缩放,放输入输出还是一样的
    parser.add_argument('--conf-thres', type=float, default=0.25, help='confidence threshold')#置信度,0.25表示概率大于0.25,我就认为是这个物体,按需求反复调试
    parser.add_argument('--iou-thres', type=float, default=0.45, help='NMS IoU threshold')#可以从多个方面判断物体,但是选择最优的,重叠部分比上全部框选区域达到0.45时,认为是同一个目标,则不框选,若iou为0,则没有相交的框
    parser.add_argument('--max-det', type=int, default=1000, help='maximum detections per image')
    parser.add_argument('--device', default='', help='cuda device, i.e. 0 or 0,1,2,3 or cpu')
    parser.add_argument('--view-img', action='store_true', help='show results')#只要定义了--view-img,则为TRUE,执行后面的help
    parser.add_argument('--save-txt', action='store_true', help='save results to *.txt')#可以保存一些标注
    parser.add_argument('--save-conf', action='store_true', help='save confidences in --save-txt labels')
    parser.add_argument('--save-crop', action='store_true', help='save cropped prediction boxes')
    parser.add_argument('--nosave', action='store_true', help='do not save images/videos')
    parser.add_argument('--classes', nargs='+', type=int, help='filter by class: --classes 0, or --classes 0 2 3')#‘+’表示可以赋值多个,选择需要识别的物体,
    parser.add_argument('--agnostic-nms', action='store_true', help='class-agnostic NMS')#设置后,NMS增强,增强识别概率
    parser.add_argument('--augment', action='store_true', help='augmented inference')#设置后,增强识别概率
    parser.add_argument('--visualize', action='store_true', help='visualize features')
    parser.add_argument('--update', action='store_true', help='update all models')
    parser.add_argument('--project', default=ROOT / 'runs/detect', help='save results to project/name')#设置保存路径
    parser.add_argument('--name', default='exp', help='save results to project/name')
    parser.add_argument('--exist-ok', action='store_true', help='existing project/name ok, do not increment')#是否保存在已有文件还是创建新的文件
    parser.add_argument('--line-thickness', default=3, type=int, help='bounding box thickness (pixels)')
    parser.add_argument('--hide-labels', default=False, action='store_true', help='hide labels')
    parser.add_argument('--hide-conf', default=False, action='store_true', help='hide confidences')
    parser.add_argument('--half', action='store_true', help='use FP16 half-precision inference')
    parser.add_argument('--dnn', action='store_true', help='use OpenCV DNN for ONNX inference')#Opencv接口类型
    opt = parser.parse_args()
    opt.imgsz *= 2 if len(opt.imgsz) == 1 else 1  # expand
    print_args(FILE.stem, opt)
    return opt
train.py
-
rectangular trainin
以往训练会将图片按规定的正方形补充完整(如第一张图片所示),现在则只会补充一点(如第二张图片所示),以此减少不必要的信息,加快训练速度。
通过 k-means 聚类 + 遗传算法来生成和当前数据集匹配度更高的anchors。如果要使用这个脚本要注意两点:
- train.py的parse_opt下的参数noautoanchor必须为False,即不定义,默认开启状态
- hyp.scratch.yaml下的anchors参数必须注释掉
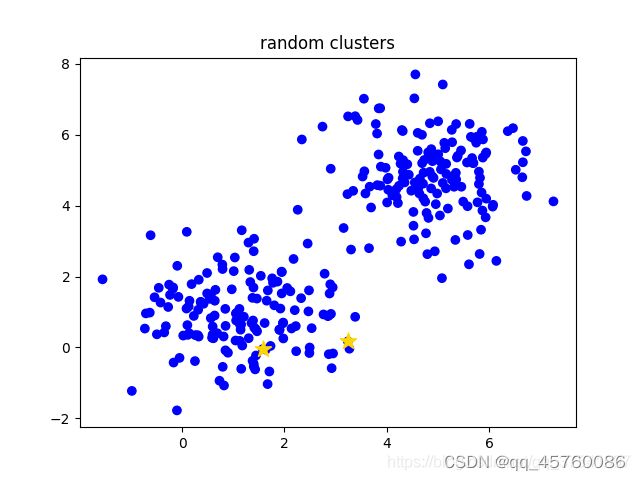
k-means是非常经典且有效的聚类方法,通过计算样本之间的距离(相似程度)将较近的样本聚为同一类别(簇)
k-means算法主要流程
- 手动设定簇的个数k,假设k=2;
- 在所有样本中随机选取k个样本作为簇的初始中心,如下图(random clusters)中两个黄色的小星星代表随机初始化的两个簇中心;
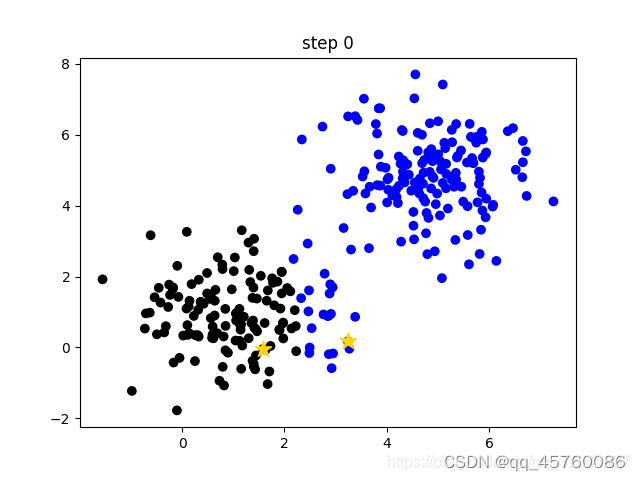
- 计算每个样本离每个簇中心的距离(这里以欧式距离为例),然后将样本划分到离它最近的簇中。如下图(step 0)用不同的颜色区分不同的簇;
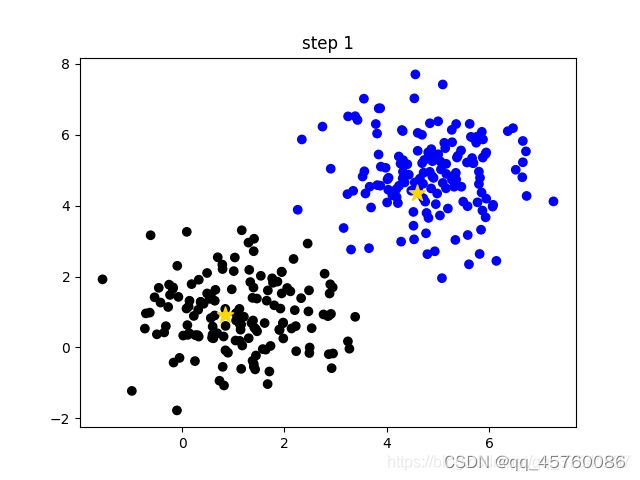
- 更新簇的中心,计算每个簇中所有样本的均值(方法不唯一)作为新的簇中心。如下图(step 1)所示,两个黄色的小星星已经移动到对应簇的中心;
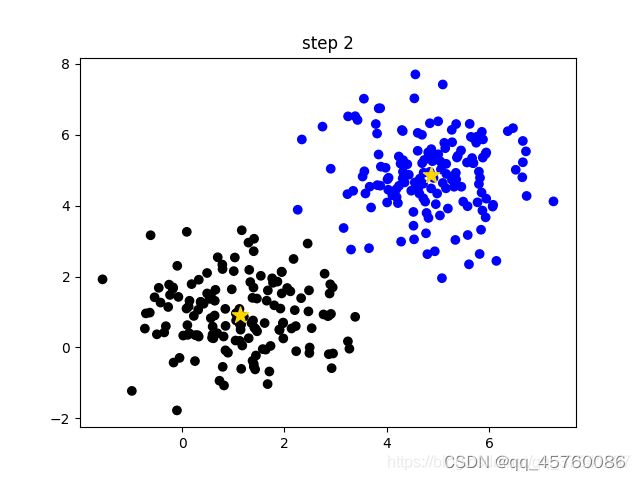
- 重复第3步到第4步直到簇中心不在变化或者簇中心变化很小满足给定终止条件。如下图(step2)所示,最终聚类结果。
- –evolve
yolov5提供了一种超参数优化的方法–Hyperparameter Evolution,即超参数进化。超参数进化是一种利用 遗传算法(GA) 进行超参数优化的方法,我们可以通过该方法选择更加合适自己的超参数。
提供的默认参数也是通过在COCO数据集上使用超参数进化得来的。由于超参数进化会耗费大量的资源和时间,如果默认参数训练出来的结果能满足你的使用,使用默认参数也是不错的选择。
- –quad
the quad dataloader is an experimental feature we thought of that may allow some benefits of higher --img size training at lower --img sizes.
–quad model predictably can run inference at --img-sizes above 640, while the normal model suffers worse performance at > 640 image sizes (both models were trained at --img 640). 用640尺寸的训练,然后在大于640的图片会有比较好的test效果
The compromise though (there’s always a compromise) is that the quad model performs slightly worse at 640但是这样会让在640尺寸的test效果变差
- –linear-lr
# Scheduler
if opt.linear_lr:
    lf = lambda x: (1 - x / (epochs - 1)) * (1.0 - hyp['lrf']) + hyp['lrf']  # linear
else:
    lf = one_cycle(1, hyp['lrf'], epochs)  # cosine 1->hyp['lrf']
如果定义了,则会按照线性的方式进行处理,未定义则按照余弦的方式处理
- –label-smoothing
神经网络会促使自身往正确标签和错误标签差值最大的方向学习,在训练数据较少,不足以表征所有的样本特征的情况下,会导致网络过拟合。
label smoothing可以解决上述问题,这是一种正则化策略,主要是通过soft one-hot来加入噪声,减少了真实样本标签的类别在计算损失函数时的权重,最终起到抑制过拟合的效果。
相关参数如下:
parser.add_argument('--weights', type=str, default=ROOT / '', help='initial weights path')#当加上yolov5s.pt或其他模型文件时,遍从该模型加载,从头开始训练可以默认为空
parser.add_argument('--cfg', type=str, default='models/yolov5x.yaml', help='model.yaml path')#加载模型配置,存在model.yaml中,则为根据models/yolov5x.yaml结构训练模型
parser.add_argument('--data', type=str, default=ROOT / 'data/coco128.yaml', help='dataset.yaml path')#数据集路径可以是coco128.yaml、coco.yaml、VOC.yaml、Argoverse.yaml
parser.add_argument('--hyp', type=str, default=ROOT / 'data/hyps/hyp.scratch.yaml', help='hyperparameters path')#超参数hyperparameters
parser.add_argument('--epochs', type=int, default=300)#训练轮数
parser.add_argument('--batch-size', type=int, default=16, help='total batch size for all GPUs')#设置batch_size,一组放多少图片
parser.add_argument('--imgsz', '--img', '--img-size', type=int, default=640, help='train, val image size (pixels)')#统一设置图片大小
parser.add_argument('--rect', action='store_true', help='rectangular training')#没有默认值,定义后执行help内容,rectangle是矩阵的训练方式
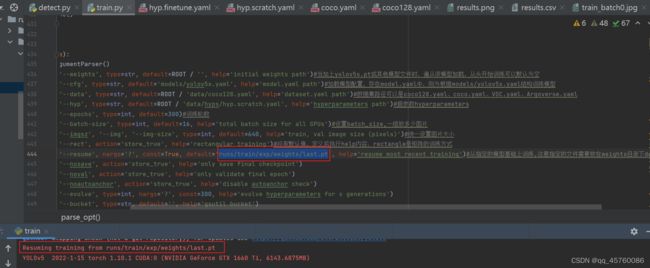
parser.add_argument('--resume', nargs='?', const=True, default='runs/train/exp/weights/last.pt', help='resume most recent training')#从指定的模型基础上训练,注意指定的文件需要放在weights目录下default=False
parser.add_argument('--nosave', action='store_true', help='only save final checkpoint')#看help
parser.add_argument('--noval', action='store_true', help='only validate final epoch')
parser.add_argument('--noautoanchor', action='store_true', help='disable autoanchor check')#一般不定义
parser.add_argument('--evolve', type=int, nargs='?', const=300, help='evolve hyperparameters for x generations')
parser.add_argument('--bucket', type=str, default='', help='gsutil bucket')#不用管
parser.add_argument('--cache', type=str, nargs='?', const='ram', help='--cache images in "ram" (default) or "disk"')#是否缓存,以便更好的训练
parser.add_argument('--image-weights', action='store_true', help='use weighted image selection for training')#对一些test表现不太好的,在下一轮训练中,增加权重,但是效果不是太好
parser.add_argument('--device', default='', help='cuda device, i.e. 0 or 0,1,2,3 or cpu')
parser.add_argument('--multi-scale', action='store_true', help='vary img-size +/- 50%%')
parser.add_argument('--single-cls', action='store_true', help='train multi-class data as single-class')#训练单类别
parser.add_argument('--adam', action='store_true', help='use torch.optim.Adam() optimizer')#定义的话使用优化器,默认则为随机梯度下降
parser.add_argument('--sync-bn', action='store_true', help='use SyncBatchNorm, only available in DDP mode')#DDP对于多个GPU的分布式适用
parser.add_argument('--workers', type=int, default=0, help='maximum number of dataloader workers')#此参数最好由小开始调整

