点云图像融合(点云着色)——基于PCL、OpenCV和kitti数据集
文章目录
- 前言
- 一、准备
- 二、点云图像融合(点云着色)
-
- 1. 数据读入
- 2. 变换矩阵准备
- 3. 坐标变换
- 4. 点云显示
- 三、总结
前言
一种图像数据与激光雷达点云数据融合的c/c++方法实现,使用图像像素值给对应的点云着色。基于PCL点云库、OpenCV库、kitti数据集。
一、准备
1)运行环境:Ubuntu16.04(18.04也可)
2)安装OpenCV库;
3)安装PCL库;
4)kitti数据集,中的1组png图像及对应的bin点云文件,及坐标变换说明txt文件;
5)bin2pcd的app,用于把kitti数据集的bin点云文件转换成pcd文件。
参考:ubuntu16.04下用pcl库将点云bin文件转成pcd文件
二、点云图像融合(点云着色)
1. 数据读入
使用OpenCV读入png图像文件;使用PCL读入对应的pcd点云文件;
//图像读入
Mat img = imread(“000005.png”);
//点云读入
pcl::PointCloud::Ptr point_cloud_ptr(new pcl::PointCloud);
pcl::io::loadPCDFile (“5.pcd”, *point_cloud_ptr);


2. 变换矩阵准备
根据kitti数据集采集时标定的坐标转换公式,来计算由点云坐标中的点x(x, y, z, 1)到图像坐标中的y(u, v, 1)的变换:

其中,T为坐标变换旋转平移矩阵;
R(0)为各摄像头到摄像头0的修正矩阵;
P为各摄像头的内参矩阵;
在工程计算时需对各矩阵进行行列扩展:

各矩阵的元素值在kitti数据集的对应的calib/文件夹下:

提前计算出P * R * T,用于下一步的坐标变换:
Mat trans = Mat(3,4,CV_32FC1);
trans = P2 * R0_rect * Tr_velo_to_cam;
3. 坐标变换
对点云中的每个点进行坐标变换,根据变换后的图像坐标,读出图像像素rgb,赋值给点云。
//遍历点云数据:
//       1)读出点云坐标:x, y, z;
//       2)矩阵乘得到图像坐标:u, v;
//       3)判断u, v是否在图像内部;
//       4)读出u, v像素值的 r, g, b;
//       5)赋值r, g, b给点云数据。
for(int nIndex = 0; nIndex < point_cloud_ptr->points.size (); nIndex++)
	{
		c_x = point_cloud_ptr->points[nIndex].x;
		c_y = point_cloud_ptr->points[nIndex].y;
		c_z = point_cloud_ptr->points[nIndex].z;

		c_tmp = (Mat_(4, 1) << c_x, c_y, c_z, 1);
		p_result = trans * c_tmp;

		p_w = p_result.at(0,2);
		p_u = (int)((p_result.at(0,0)) / p_w);
		p_v = (int)((p_result.at(0,1)) / p_w);
		if( (p_u<0) || (p_u>cols)  || (p_v<0) || (p_v>rows) || (p_w < 0)){
			point_cloud_ptr->points[nIndex].r = 128;
			point_cloud_ptr->points[nIndex].g = 2;
			point_cloud_ptr->points[nIndex].b = 64;
			continue;
		}
		point_cloud_ptr->points[nIndex].r = img.at(p_v,p_u)[2];//not (p_u,p_v)!
		point_cloud_ptr->points[nIndex].g = img.at(p_v,p_u)[1];
		point_cloud_ptr->points[nIndex].b = img.at(p_v,p_u)[0];
	}
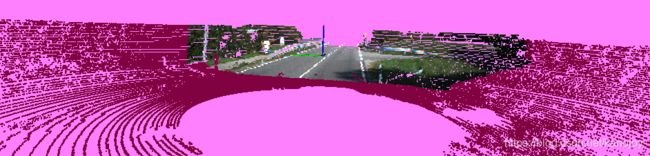
4. 点云显示
使用PCL库的Visualization进行着色后的点云显示,可参考Github上《点云库PCL从入门到精通》的配套例程:
Point-Cloud-Processing-example-master\第五章\3 pcl_visualizer_demo\source\pcl_visualizer_demo.cpp
//RGB colour visualisation example
boost::shared_ptr rgbVis(pcl::PointCloud::ConstPtr cloud)
{
    //创建3D窗口并添加点云
    boost::shared_ptr viewer(new pcl::visualization::PCLVisualizer("3D Viewer"));
    viewer->setBackgroundColor(0, 0, 0);
    pcl::visualization::PointCloudColorHandlerRGBField rgb(cloud);
    viewer->addPointCloud(cloud, rgb, "sample cloud");
    viewer->setPointCloudRenderingProperties(pcl::visualization::PCL_VISUALIZER_POINT_SIZE, 3, "sample cloud");
    viewer->addCoordinateSystem(1.0);
    viewer->initCameraParameters();
    return (viewer);
}
三、总结
基于PCL点云库、OpenCV库、kitti数据集,完成对点云数据的着色,即图像数据与激光雷达点云数据的融合。

完整代码
//./kitti-color ./kitti/1.pcd ./000001.png
#include
#include
#include
#include
#include
#include
#include
#include

#include "opencv2/highgui.hpp"
using namespace cv;
using namespace std;

//RGB colour visualisation example
boost::shared_ptr rgbVis(pcl::PointCloud::ConstPtr cloud)
{
    //创建3D窗口并添加点云
    boost::shared_ptr viewer(new pcl::visualization::PCLVisualizer("3D Viewer"));
    viewer->setBackgroundColor(0, 0, 0);
    pcl::visualization::PointCloudColorHandlerRGBField rgb(cloud);
    viewer->addPointCloud(cloud, rgb, "sample cloud");
    viewer->setPointCloudRenderingProperties(pcl::visualization::PCL_VISUALIZER_POINT_SIZE, 2, "sample cloud");
    viewer->addCoordinateSystem(1.0);
    viewer->initCameraParameters();
    return (viewer);
}

// -----Main-----
int main(int argc, char** argv)
{
    // 解析命令行参数
    if (argc != 3)
    {
        cout<<"Usage : xx yy.pcd zz.png"<::Ptr point_cloud_ptr(new pcl::PointCloud);
    pcl::io::loadPCDFile (argv[1], *point_cloud_ptr);

	Mat img = imread(argv[2]);
	if(img.channels() != 3){
		cout <<"RGB pics needed." <(3,4) << 7.215377000000e+02,0.000000000000e+00,6.095593000000e+02,4.485728000000e+01,0.000000000000e+00,7.215377000000e+02,1.728540000000e+02,2.163791000000e-01,0.000000000000e+00,0.000000000000e+00,1.000000000000e+00,2.745884000000e-03);
	Mat R0_rect = (Mat_(4,4) << 9.999239000000e-01,9.837760000000e-03,-7.445048000000e-03,0,-9.869795000000e-03,9.999421000000e-01,-4.278459000000e-03,0,7.402527000000e-03,4.351614000000e-03,9.999631000000e-01,0, 0,0,0,1);
	Mat Tr_velo_to_cam = (Mat_(4,4) << 7.533745000000e-03,-9.999714000000e-01,-6.166020000000e-04,-4.069766000000e-03,1.480249000000e-02,7.280733000000e-04,-9.998902000000e-01,-7.631618000000e-02,9.998621000000e-01,7.523790000000e-03,1.480755000000e-02,-2.717806000000e-01, 0,0,0,1);

	Mat trans = Mat(3,4,CV_32FC1);
	trans = P2 * R0_rect * Tr_velo_to_cam;
	Mat c_tmp = Mat(4,1,CV_32FC1);
	Mat p_result = Mat(1,3,CV_32FC1);

	cout << "trans = " << trans <points.size (); nIndex++)
	{
		c_x = point_cloud_ptr->points[nIndex].x;
		c_y = point_cloud_ptr->points[nIndex].y;
		c_z = point_cloud_ptr->points[nIndex].z;

		c_tmp = (Mat_(4, 1) << c_x, c_y, c_z, 1);
		p_result = trans * c_tmp;

		p_w = p_result.at(0,2);
		p_u = (int)((p_result.at(0,0)) / p_w);
		p_v = (int)((p_result.at(0,1)) / p_w);
		if( (p_u<0) || (p_u>cols)  || (p_v<0) || (p_v>rows) ||(p_w < 0)){
			point_cloud_ptr->points[nIndex].r = 128;
			point_cloud_ptr->points[nIndex].g = 2;
			point_cloud_ptr->points[nIndex].b = 64;
			continue;
		}
		point_cloud_ptr->points[nIndex].r = img.at(p_v,p_u)[2];//not (p_u,p_v)!
		point_cloud_ptr->points[nIndex].g = img.at(p_v,p_u)[1];
		point_cloud_ptr->points[nIndex].b = img.at(p_v,p_u)[0];
	}

    boost::shared_ptr viewer;
    viewer = rgbVis(point_cloud_ptr);
    // 主循环
    while (!viewer->wasStopped())
    {
        viewer->spinOnce(100);
        boost::this_thread::sleep(boost::posix_time::microseconds(100000));
    }
}
CMakeLists.txt、点云着色用到的PCD、PNG、calib.txt文件可参见:
工程zip