PaddleOCR手写体训练摸索
手写OCR识别
- 一:官方支持的数据格式?
-
- 1.官方文档
-
- 1.1 PaddleOCR 支持两种数据格式:
- 1.2 训练数据的默认存储路径
- 1.3 自定义数据集的准备
-
- 1.3.1 通用数据集
- 1.3.2 lmdb数据集
-
- 1.3.2.1 lmdb基本函数:
- 1.3.2.2 创建一个 lmdb 环境:
- 1.3.2.3 修改数据库内容:
- 1.3.2.4 查询数据库内容:
- 1.3.2.5 完整的demo如下:
- 1.3.2.6 将图片和对应的文本标签存放到lmdb数据库:
- 1.3.2.7 从lmdb数据库中读取图片数据:
- 1.3.3文字标签数字化(涉及到解码部分,训练输入的数据不用编码,按一般格式输入即可):
- 2.FAQ中的相关问题
-
- 2.1 Q:对于图片中的密集文字,有什么好的处理方法?
- 2.2 Q:文本行较紧密的情况下如何准确检测?
- 2.3 Q:文档场景中,使用DB模型会出现整行漏检的情况应该怎么解决?
- 2.4 Q: 弯曲文本(如略微形变的文档图像)漏检问题
- 2.5 Q: 如何识别文字比较长的文本?
- 2.6 Q: 使用预训练模型进行预测,对于特定字符识别识别效果较差,怎么解决?
- 2.7 Q: 在使用训练好的识别模型进行预测的时候,发现有很多重复的字,这个怎么解决呢?
- 2.8 Q: 模型独立性—— 只想要识别票据中的部分片段,重新训练它的话,只需要训练文本检测模型就可以了吗?问文本识别,方向分类还是用原来的模型这样可以吗?
- 2.9 Q: 遇到中英文识别模型不支持的字符,该如何对模型做微调?
- 2.10 Q: 特殊字符(例如一些标点符号)识别效果不好怎么办?
- 2.11 Q: 单张图上多语种并存识别(如单张图印刷体和手写文字并存),应该如何处理?
- 2.12 Q: 如何更换文本检测/识别的backbone?
- 2.13 Q: 参照文档做实际项目时,是重新训练还是在官方训练的基础上进行训练?具体如何操作?
- 2.14 Q: 为什么在checkpoints中load下载的预训练模型会报错?
- 2.15 Q: 如何对检测模型finetune,比如冻结前面的层或某些层使用小的学习率学习?
- 2.16 Q: 在识别模型中,为什么降采样残差结构的stride为(2, 1)?
- 2.17 Q: 训练识别时,如何选择合适的网络输入shape?
- 2.18 Q: 识别模型框出来的位置太紧凑,会丢失边缘的文字信息,导致识别错误
- 2.19 Q: 文本识别训练不加LSTM是否可以收敛?
- 2.20 Q: 文本识别中LSTM和GRU如何选择?
- 2.21 Q: 对于CRNN模型,backbone采用DenseNet和ResNet_vd,哪种网络结构更好?
- 2.22 Q: 如何根据不同的硬件平台选用不同的backbone?
- 2.23 Q: 文字识别模型模型的输出矩阵需要进行解码才能得到识别的文本。代码中实现为preds_idx = preds.argmax(axis=2),也就是最佳路径解码法。这是一种贪心算法,是每一个时间步只将最大概率的字符作为当前时间步的预测输出,但得到的结果不一定是最好的。为什么不使用beam search这种方式进行解码呢?
- 2.24 Q: PP-OCR检测效果不好,该如何优化?
- 2.25 Q: DB有些框太贴文本了反而去掉了一些文本的边角影响识别,这个问题有什么办法可以缓解吗?
- 2.26 Q: 训练模型和测试模型的检测结果差距较大
- 2.27 Q: 某个类别的样本比较少,通过增加训练的迭代次数或者是epoch,变相增加小样本的数目,这样能缓解这个问题么?
- 2.28 Q: 如何调试数据读取程序?
- 2.29 Q: 中文文本检测、文本识别构建训练集的话,大概需要多少数据量
- 2.30 Q: config yml文件中的ratio_list参数的作用是什么?
- 2.31 Q: 怎么加速训练过程呢?
- 2.32 一些特殊场景的数据识别效果差,但是数据量很少,不够用来finetune怎么办?
- 2.33 如何合成手写中文数据集?
- 2.34 PaddleOCR默认不是200个step保存一次模型吗?为啥文件夹下面都没有生成
- 2.35 PaddleOCR在训练的时候一直使用cosine_decay的学习率下降策略,这是为什么呢?
- 2.36 Cosine学习率的更新策略是怎样的?训练过程中为什么会在一个值上停很久?
- 2.37 之前的CosineWarmup方法为什么不见了?
- 2.38 训练识别和检测时学习率要加上warmup,目的是什么?
- 2.39 训练过程中,训练程序意外退出/挂起,应该如何解决?
- 2.40 训练程序启动后直到结束,看不到训练过程log?
- 2.41 配置文件中的参数num workers是什么意思,应该如何设置?
- 3.程序中的相关内容
-
- 4.搞清楚各种配置文件yml对应关系
- 二:CRNN网络设计
-
- 2.1 网络结构
- 2.2 输入数据大小
- 2.3 处理过程
- 三:PaddleOCR使用的骨干网
- 四:CAISA-HWDB数据格式及转换
-
- 4.1 官网描述
-
- 4.1.1 类别
-
- 4.1.1.1 Feature Data
- 4.1.1.2 Character Sample Data
- 4.1.1.3 Textline (Page) Data——使用
- 4.1.1.4 Competition Test Data
- 4.1.2 数据集的划分
- 4.2 读取 gnt 解码为 字+img
- 4.3 读取 dgrl 解码为多行手写文本的图片+ 相应的VOC格式的xml文件
- 4.4 数据量
-
- 4.4.1 训练
- 4.4.2 验证
- 4.4.2 分布
- 五:使用单字训练还是文本行训练?——文本行
-
- 5.1 提取单行文本+标签
- 六:格式转换
- 七:数据增广处理
-
- 7.1 印刷体数据集
- 7.2 场景文本数据集
- 7.3 数字+英文
- 八:环境配置
-
- 8.1 CUDA版本以及Cudnn版本
- 九: 训练
-
- 9.2 训练命令
- 9.2 模型转换——转Inference模型测试
- 十: 使用训练117epoch-best acc参数的测试
-
- 10.1 关于单行文本中文本弯曲问题
- 10.2 英文识别能力——
- 10.3 印刷体数字识别能力——
- 10.4 针对印刷字体的识别能力
-
- 10.4.1 测试1
- 10.4.2 测试2
- 10.5 针对场景文字的识别能力
- 10.6 针对手写印刷体共存
-
- 10.6.1 手写印刷体大小不一
-
- 10.6.1.1 共存,距离过近——除去识别模型本身的识别精度问题,无法识别是裁剪的问题
- 10.6.2 官方给的手写印刷共存的处理思路,关键在于分类和两个识别模型
- 10.7 针对常规难题的测试(基于117左右-best)
-
- 10.7.1 连笔
- 10.7.2 书写不水平
- 10.7.3 字迹潦草
- 10.7.4 相似字的识别
- 10.7.5 带表格线和不带表格线
- 10.7.6 多行文字的识别能力
-
- 10.7.6.1 测试1
- 10.7.6.2 测试2
- 10. 使用test数据集中的图片测试(117左右best)
-
- 10. .1 006-P18_3.jpg
- 10. .2 006-P19_3.jpg
- 10. .3 013-P16_0.jpg
- 10. .4 020-P16_0.jpg
- 十一: 问题总结
- 十一: 几点想法
-
- 1.手写体 场景文字 均衡数据及分布 一起训练???
- 2.finetune的操作,怎样固定层数???
- 3.和不同手写人的数据分布有关吗,一段时间内输入的都是同一个人的数据,并没有穿插其他人的
- 附录一 : 好的参考
- 附录二: 代码组织结构
蓦然回首,那人却在灯火阑珊处。
此文从20220421开始着手,
至20220425为初稿,
从基础理论看起,
以官方文档为根本,
经过自己的一番摸索,
也倒是大致了解了整个过程,
最后却发现最有用的却是已经被官方总结好了
放在这里让后来人少走弯路。
虽然自己摸爬滚打许多天不如一篇官方文章,
但是,
真的没有收获吗?
我觉得未必。
编辑记录
————————————————
20220421 起稿
20220425 21:49 一稿发布
20220426 编辑
20220427 已成功能够开始训练,涉及到手写体数据库格式转换和配置过程后面补齐
20220428 摸索服务器训练
20220502 尝试使用epoch31的训练数据识别(epoch: [31/500], iter: 10105, lr: 0.000993, loss: 7.327022, acc: 0.558589,)
20220503 修补训练数据集的生成与配置使用;测试训练模型的识别能力
202205__ 有使用epoch117数据识别,应该为第10节的测试
202205__ 未完待续…
20220512 搞清train与test数据的相关性——不同作者书写,不相关
一:官方支持的数据格式?
1.官方文档
1.1 PaddleOCR 支持两种数据格式:
- lmdb 用于训练以lmdb格式存储的数据集(LMDBDataSet);
- 通用数据 用于训练以文本文件存储的数据集(SimpleDataSet);
1.2 训练数据的默认存储路径
PaddleOCR/train_data/
1.3 自定义数据集的准备
1.3.1 通用数据集
1.3.2 lmdb数据集
(引用——by程序员阿德)
**什么是lmdb数据集?**
1.英文全名:Lightning Memory-Mapped Database (LMDB);
2.对应中文名:轻量级内存映射数据库。
3.因为最开始 Caffe 就是使用的这个数据库,所以网上的大多数关于 LMDB 的教程都通过 Caffe 实现的
4.LMDB属于key-value数据库,而不是关系型数据库( 比如 MySQL ),LMDB提供 key-value 存储,其中每个键值对都是我们数据集中的一个样本。
  LMDB的主要作用是提供数据管理,可以将各种各样的原始数据转换为统一的key-value存储。
5.LMDB的文件结构很简单,一个文件夹,里面是一个数据文件和一个锁文件。
  数据随意复制,随意传输。
  它的访问简单,不需要单独的数据管理进程。
  只要在访问代码里引用LMDB库,访问时给文件路径即可。
1.3.2.1 lmdb基本函数:
env = lmdb.open():创建 lmdb 环境txn = env.begin():建立事务txn.put(key, value):进行插入和修改txn.delete(key):进行删除txn.get(key):进行查询txn.cursor():进行遍历txn.commit():提交更改
1.3.2.2 创建一个 lmdb 环境:
# 安装:pip install lmdb
import lmdb

env = lmdb.open(lmdb_path, map_size=1099511627776)
# lmdb_path:指定存放生成的lmdb数据库的文件夹路径,如果没有该文件夹则自动创建。
# map_size: 指定创建的新数据库所需磁盘空间的最小值,1099511627776B=1T。

# 会在指定路径下创建 data.mdb 和 lock.mdb 两个文件,一是个数据文件,一个是锁文件。
1.3.2.3 修改数据库内容:
# 创建一个事务(transaction) 对象 txn,所有的操作都必须经过这个事务对象。
# 因为我们要对数据库进行写入操作,所以将 write 参数置为 True,默认其为 False。
txn = env.begin(write=True)

# 使用 .put(key, value) 对数据库进行插入和修改操作,传入的参数为键值对。
# 需要在键值字符串后加 .encode() 改变其编码格式,
# 将 str 转换为 bytes 格式,否则会报该错误:# TypeError: Won't implicitly convert Unicode to bytes; use .encode()。
# 在后面使用 .decode() 对其进行解码得到原数据。
# insert/modify
txn.put(str(1).encode(), "Alice".encode())
txn.put(str(2).encode(), "Bob".encode())

# 使用 .delete(key) 删除指定键值对。
# delete
txn.delete(str(1).encode())

# 对LMDB的读写操作在事务中执行,需要使用 commit 方法提交待处理的事务。
txn.commit()
1.3.2.4 查询数据库内容:
# 每次 commit() 之后都要用 env.begin() 更新 txn(得到最新的lmdb数据库)。
txn = env.begin()

# 使用 .get(key) 查询数据库中的单条记录。
print(txn.get(str(2).encode()))

# 使用 .cursor() 遍历数据库中的所有记录,
# 其返回一个可迭代对象,相当于关系数据库中的游标,每读取一次,游标下移一位。
for key, value in txn.cursor():
    print(key, value)

env.close()
1.3.2.5 完整的demo如下:
import lmdb
import os, sys

def initialize():
    env = lmdb.open("lmdb_dir")
    return env

def insert(env, sid, name):
    txn = env.begin(write=True)
    txn.put(str(sid).encode(), name.encode())
    txn.commit()

def delete(env, sid):
    txn = env.begin(write=True)
    txn.delete(str(sid).encode())
    txn.commit()

def update(env, sid, name):
    txn = env.begin(write=True)
    txn.put(str(sid).encode(), name.encode())
    txn.commit()

def search(env, sid):
    txn = env.begin()
    name = txn.get(str(sid).encode())
    return name

def display(env):
    txn = env.begin()
    cur = txn.cursor()
    for key, value in cur:
        print(key, value)


env = initialize()

print("Insert 3 records.")
insert(env, 1, "Alice")
insert(env, 2, "Bob")
insert(env, 3, "Peter")
display(env)

print("Delete the record where sid = 1.")
delete(env, 1)
display(env)

print("Update the record where sid = 3.")
update(env, 3, "Mark")
display(env)

print("Get the name of student whose sid = 3.")
name = search(env, 3)
print(name)

# 最后需要关闭关闭lmdb数据库
env.close()

# 执行系统命令
os.system("rm -r lmdb_dir")
1.3.2.6 将图片和对应的文本标签存放到lmdb数据库:
在这里插入代码片
1.3.2.7 从lmdb数据库中读取图片数据:
在这里插入代码片
做OCR,在搜索中常常碰到一个优质博主:冠军的试炼(【OCR技术系列之八】端到端不定长文本识别CRNN代码实现)
这篇文章对理解CRNN训练的数据输入有帮助
1.3.3文字标签数字化(涉及到解码部分,训练输入的数据不用编码,按一般格式输入即可):
在数据准备部分还有一个操作需要强调的,那就是文字标签数字化,即我们用数字来表示每一个文字(汉字,英文字母,标点符号)。
比如“我”字对应的id是1,
“l”对应的id是1000,
“?”对应的id是90,
如此类推,这种编解码工作使用字典数据结构存储即可,训练时先把标签编码(encode),预测时就将网络输出结果解码(decode)成文字输出。
参考代码:
# 定义str to label 类
class strLabelConverter(object):
    """Convert between str and label.
    	转换str和label

    NOTE:
        Insert `blank` to the alphabet for CTC.

    Args:
        alphabet (str): set of the possible characters.
        ignore_case (bool, default=True): whether or not to ignore all of the case.
    """

    def __init__(self, alphabet, ignore_case=False):
        self._ignore_case = ignore_case
        if self._ignore_case:
            alphabet = alphabet.lower()
        self.alphabet = alphabet + '-'  # for `-1` index

        self.dict = {}
        for i, char in enumerate(alphabet):
            # NOTE: 0 is reserved for 'blank' required by wrap_ctc
            self.dict[char] = i + 1

    def encode(self, text):
        """Support batch or single str.

        Args:
            text (str or list of str): texts to convert.

        Returns:
            torch.IntTensor [length_0 + length_1 + ... length_{n - 1}]: encoded texts.
            torch.IntTensor [n]: length of each text.
        """

        length = []
        result = []
        for item in text:
            item = item.decode('utf-8', 'strict')

            length.append(len(item))
            for char in item:

                index = self.dict[char]
                result.append(index)

        text = result
        # print(text,length)
        return (torch.IntTensor(text), torch.IntTensor(length))

    def decode(self, t, length, raw=False):
        """Decode encoded texts back into strs.

        Args:
            torch.IntTensor [length_0 + length_1 + ... length_{n - 1}]: encoded texts.
            torch.IntTensor [n]: length of each text.

        Raises:
            AssertionError: when the texts and its length does not match.

        Returns:
            text (str or list of str): texts to convert.
        """
        if length.numel() == 1:
            length = length[0]
            assert t.numel() == length, "text with length: {} does not match declared length: {}".format(t.numel(),
                                                                                                         length)
            if raw:
                return ''.join([self.alphabet[i - 1] for i in t])
            else:
                char_list = []
                for i in range(length):
                    if t[i] != 0 and (not (i > 0 and t[i - 1] == t[i])):
                        char_list.append(self.alphabet[t[i] - 1])
                return ''.join(char_list)
        else:
            # batch mode
            assert t.numel() == length.sum(), "texts with length: {} does not match declared length: {}".format(
                t.numel(), length.sum())
            texts = []
            index = 0
            for i in range(length.numel()):
                l = length[i]
                texts.append(
                    self.decode(
                        t[index:index + l], torch.IntTensor([l]), raw=raw))
                index += l
            return texts
- 所以要看PaddleOCR这一部分设置的对应关系
2.FAQ中的相关问题
2.1 Q:对于图片中的密集文字,有什么好的处理方法?
A:可以先试用预训练模型测试一下,例如DB+CRNN,判断下密集文字图片中是检测还是识别的问题,然后针对性的改善。还有一种是如果图象中密集文字较小,可以尝试增大图像分辨率,对图像进行一定范围内的拉伸,将文字稀疏化,提高识别效果。
2.2 Q:文本行较紧密的情况下如何准确检测?
A:使用基于分割的方法,如DB,检测密集文本行时,最好收集一批数据进行训练,并且在训练时,并将生成二值图像的shrink_ratio参数调小一些。
2.3 Q:文档场景中,使用DB模型会出现整行漏检的情况应该怎么解决?
A:可以在预测时调小 det_db_box_thresh 阈值,默认为0.5, 可调小至0.3观察效果。
2.4 Q: 弯曲文本(如略微形变的文档图像)漏检问题
A: db后处理中计算文本框平均得分时,是求rectangle区域的平均分数,容易造成弯曲文本漏检,已新增求polygon区域的平均分数,会更准确,但速度有所降低,可按需选择,在相关pr中可查看可视化对比效果。该功能通过参数 det_db_score_mode进行选择,参数值可选[fast(默认)、slow],fast对应原始的rectangle方式,slow对应polygon方式。感谢用户buptlihang提pr帮助解决该问题。
2.5 Q: 如何识别文字比较长的文本?
A:在中文识别模型训练时,并不是采用直接将训练样本缩放到[3,32,320]进行训练,而是先等比例缩放图像,保证图像高度为32,宽度不足320的部分补0,宽高比大于10的样本直接丢弃。预测时,如果是单张图像预测,则按上述操作直接对图像缩放,不做宽度320的限制。如果是多张图预测,则采用batch方式预测,每个batch的宽度动态变换,采用这个batch中最长宽度。
2.6 Q: 使用预训练模型进行预测,对于特定字符识别识别效果较差,怎么解决?
A: 由于我们所提供的识别模型是基于通用大规模数据集进行训练的,部分字符可能在训练集中包含较少,因此您可以构建特定场景的数据集,基于我们提供的预训练模型进行微调。建议用于微调的数据集中,每个字符出现的样本数量不低于300,但同时需要注意不同字符的数量均衡。具体可以参考:微调。
2.7 Q: 在使用训练好的识别模型进行预测的时候,发现有很多重复的字,这个怎么解决呢?
A:可以看下训练的尺度和预测的尺度是否相同,如果训练的尺度为[3, 32, 320],预测的尺度为[3, 64, 640],则会有比较多的重复识别现象。
2.8 Q: 模型独立性—— 只想要识别票据中的部分片段,重新训练它的话,只需要训练文本检测模型就可以了吗?问文本识别,方向分类还是用原来的模型这样可以吗?
A:可以的。PaddleOCR的检测、识别、方向分类器三个模型是独立的,在实际使用中可以优化和替换其中任何一个模型。
2.9 Q: 遇到中英文识别模型不支持的字符,该如何对模型做微调?
A:如果希望识别中英文识别模型中不支持的字符,需要更新识别的字典,并完成微调过程。比如说如果希望模型能够进一步识别罗马数字,可以按照以下步骤完成模型微调过程。
- 准备数据集:中英文识别数据、罗马数字的识别数据,用于训练,同时保证罗马数字和中英文识别数字的效果;
- 修改默认的字典文件,在后面添加罗马数字的字符;
- 下载PaddleOCR提供的预训练模型,配置预训练模型和数据的路径,开始训练。
2.10 Q: 特殊字符(例如一些标点符号)识别效果不好怎么办?
A:首先请您确认要识别的特殊字符是否在字典中。 如果字符在已经字典中但效果依然不好,可能是由于识别数据较少导致的,您可以增加相应数据finetune模型。
2.11 Q: 单张图上多语种并存识别(如单张图印刷体和手写文字并存),应该如何处理?
A:单张图像中存在多种类型文本的情况很常见,典型的以学生的试卷为代表,一张图像同时存在手写体和印刷体两种文本,这类情况下,可以尝试”1个检测模型+1个N分类模型+N个识别模型”的解决方案。 其中不同类型文本共用同一个检测模型,N分类模型指额外训练一个分类器,将检测到的文本进行分类,如手写+印刷的情况就是二分类,N种语言就是N分类,在识别的部分,针对每个类型的文本单独训练一个识别模型,如手写+印刷的场景,就需要训练一个手写体识别模型,一个印刷体识别模型,如果一个文本框的分类结果是手写体,那么就传给手写体识别模型进行识别,其他情况同理。
2.12 Q: 如何更换文本检测/识别的backbone?
A:无论是文字检测,还是文字识别,骨干网络的选择是预测效果和预测效率的权衡。一般,选择更大规模的骨干网络,例如ResNet101_vd,则检测或识别更准确,但预测耗时相应也会增加。而选择更小规模的骨干网络,例如MobileNetV3_small_x0_35,则预测更快,但检测或识别的准确率会大打折扣。幸运的是不同骨干网络的检测或识别效果与在ImageNet数据集图像1000分类任务效果正相关。飞桨图像分类套件PaddleClas汇总了ResNet_vd、Res2Net、HRNet、MobileNetV3、GhostNet等23种系列的分类网络结构,在上述图像分类任务的top1识别准确率,GPU(V100和T4)和CPU(骁龙855)的预测耗时以及相应的117个预训练模型下载地址。
(1)文字检测骨干网络的替换,主要是确定类似与ResNet的4个stages,以方便集成后续的类似FPN的检测头。此外,对于文字检测问题,使用ImageNet训练的分类预训练模型,可以加速收敛和效果提升。
(2)文字识别的骨干网络的替换,需要注意网络宽高stride的下降位置。由于文本识别一般宽高比例很大,因此高度下降频率少一些,宽度下降频率多一些。可以参考PaddleOCR中MobileNetV3骨干网络的改动。
2.13 Q: 参照文档做实际项目时,是重新训练还是在官方训练的基础上进行训练?具体如何操作?
A: 基于官方提供的模型,进行finetune的话,收敛会更快一些。 具体操作上,以识别模型训练为例:如果修改了字符文件,可以设置pretraind_model为官方提供的预训练模型
2.14 Q: 为什么在checkpoints中load下载的预训练模型会报错?
A: 这里有两个不同的概念:
pretrained_model:指预训练模型,是已经训练完成的模型。这时会load预训练模型的参数,但并不会load学习率、优化器以及训练状态等。
如果需要finetune,应该使用pretrained。
checkpoints:指之前训练的中间结果,例如前一次训练到了100个epoch,想接着训练。这时会load尝试所有信息,包括模型的参数,之前的状态等。
2.15 Q: 如何对检测模型finetune,比如冻结前面的层或某些层使用小的学习率学习?
A:如果是冻结某些层,可以将变量的stop_gradient属性设置为True,这样计算这个变量之前的所有参数都不会更新了,参考:
如果对某些层使用更小的学习率学习,静态图里还不是很方便,一个方法是在参数初始化的时候,给权重的属性设置固定的学习率,参考:
实际上我们实验发现,直接加载模型去fine-tune,不设置某些层不同学习率,效果也都不错
2.16 Q: 在识别模型中,为什么降采样残差结构的stride为(2, 1)?
A: stride为(2, 1),表示在图像y方向(高度方向)上stride为2,x方向(宽度方向)上为1。由于待识别的文本图像通常为长方形,这样只在高度方向做下采样,尽量保留宽度方向的序列信息,避免宽度方向下采样后丢失过多的文字信息。
2.17 Q: 训练识别时,如何选择合适的网络输入shape?
A:一般高度采用32,最长宽度的选择,有两种方法:
(1)统计训练样本图像的宽高比分布。最大宽高比的选取考虑满足80%的训练样本。
(2)统计训练样本文字数目。最长字符数目的选取考虑满足80%的训练样本。然后中文字符长宽比近似认为是1,英文认为3:1,预估一个最长宽度。
2.18 Q: 识别模型框出来的位置太紧凑,会丢失边缘的文字信息,导致识别错误
A:可以在命令中加入 --det_db_unclip_ratio ,参数定义位置,这个参数是检测后处理时控制文本框大小的,默认1.6,可以尝试改成2.5或者更大,反之,如果觉得文本框不够紧凑,也可以把该参数调小。
2.19 Q: 文本识别训练不加LSTM是否可以收敛?
2.20 Q: 文本识别中LSTM和GRU如何选择?
2.21 Q: 对于CRNN模型,backbone采用DenseNet和ResNet_vd,哪种网络结构更好?
A:Backbone的识别效果在CRNN模型上的效果,与Imagenet 1000 图像分类任务上识别效果和效率一致。在图像分类任务上ResnNet_vd(79%+)的识别精度明显优于DenseNet(77%+),此外对于GPU,Nvidia针对ResNet系列模型做了优化,预测效率更高,所以相对而言,resnet_vd是较好选择。如果是移动端,可以优先考虑MobileNetV3系列。
2.22 Q: 如何根据不同的硬件平台选用不同的backbone?
A:在不同的硬件上,不同的backbone的速度优势不同,可以根据不同平台的速度-精度图来确定backbone,这里可以参考PaddleClas模型速度-精度图。
2.23 Q: 文字识别模型模型的输出矩阵需要进行解码才能得到识别的文本。代码中实现为preds_idx = preds.argmax(axis=2),也就是最佳路径解码法。这是一种贪心算法,是每一个时间步只将最大概率的字符作为当前时间步的预测输出,但得到的结果不一定是最好的。为什么不使用beam search这种方式进行解码呢?
A:实验发现,使用贪心的方法去做解码,识别精度影响不大,但是速度方面的优势比较明显,因此PaddleOCR中使用贪心算法去做识别的解码。
2.24 Q: PP-OCR检测效果不好,该如何优化?
A: 具体问题具体分析: 如果在你的场景上检测效果不可用,首选是在你的数据上做finetune训练; 如果图像过大,文字过于密集,建议不要过度压缩图像,可以尝试修改检测预处理的resize逻辑,防止图像被过度压缩; 检测框大小过于紧贴文字或检测框过大,可以调整db_unclip_ratio这个参数,加大参数可以扩大检测框,减小参数可以减小检测框大小; 检测框存在很多漏检问题,可以减小DB检测后处理的阈值参数det_db_box_thresh,防止一些检测框被过滤掉,也可以尝试设置det_db_score_mode为’slow’; 其他方法可以选择use_dilation为True,对检测输出的feature map做膨胀处理,一般情况下,会有效果改善;
2.25 Q: DB有些框太贴文本了反而去掉了一些文本的边角影响识别,这个问题有什么办法可以缓解吗?
A:可以把后处理的参数unclip_ratio适当调大一点。
2.26 Q: 训练模型和测试模型的检测结果差距较大
A:1. 检查两个模型使用的后处理参数是否是一样的,训练的后处理参数在配置文件中的PostProcess部分,测试模型的后处理参数在tools/infer/utility.py中,最新代码中两个后处理参数已保持一致。
2.27 Q: 某个类别的样本比较少,通过增加训练的迭代次数或者是epoch,变相增加小样本的数目,这样能缓解这个问题么?
2.28 Q: 如何调试数据读取程序?
A:tools/train.py中有一个test_reader()函数用于调试数据读取。
2.29 Q: 中文文本检测、文本识别构建训练集的话,大概需要多少数据量
A:检测需要的数据相对较少,在PaddleOCR模型的基础上进行Fine-tune,一般需要500张可达到不错的效果。 识别分英文和中文,一般英文场景需要几十万数据可达到不错的效果,中文则需要几百万甚至更多。
2.30 Q: config yml文件中的ratio_list参数的作用是什么?
A: 在动态图中,ratio_list在有多个数据源的情况下使用,ratio_list中的每个值是每个epoch从对应数据源采样数据的比例。如ratio_list=[0.3,0.2],label_file_list=[‘data1’,‘data2’],代表每个epoch的训练数据包含data1 30%的数据,和data2里 20%的数据,ratio_list中数值的和不需要等于1。ratio_list和label_file_list的长度必须一致。
静态图检测数据采样的逻辑与动态图不同,但基本不影响训练精度。
在静态图中,使用 检测 dataloader读取数据时,会先设置每个epoch的数据量,比如这里设置为1000,ratio_list中的值表示在1000中的占比,比如ratio_list是[0.3, 0.7],则表示使用两个数据源,每个epoch从第一个数据源采样1000*0.3=300张图,从第二个数据源采样700张图。ratio_list的值的和也不需要等于1。
2.31 Q: 怎么加速训练过程呢?
A:OCR模型训练过程中一般包含大量的数据增广,这些数据增广是比较耗时的,因此可以离线生成大量增广后的图像,直接送入网络进行训练,机器资源充足的情况下,也可以使用分布式训练的方法,可以参考分布式训练教程文档。
2.32 一些特殊场景的数据识别效果差,但是数据量很少,不够用来finetune怎么办?
A:您可以合成一些接近使用场景的数据用于训练。 我们计划推出基于特定场景的文本数据合成工具,请您持续关注PaddleOCR的近期更新。
2.33 如何合成手写中文数据集?
A: 手写数据集可以通过手写单字数据集合成得到。随机选取一定数量的单字图片和对应的label,将图片高度resize为随机的统一高度后拼接在一起,即可得到合成数据集。对于需要添加文字背景的情况,建议使用阈值化将单字图片的白色背景处理为透明背景,再与真实背景图进行合成。具体可以参考文档手写数据集。
2.34 PaddleOCR默认不是200个step保存一次模型吗?为啥文件夹下面都没有生成
A:因为默认保存的起始点不是0,而是4000,将eval_batch_step [4000, 5000]改为[0, 2000] 就是从第0次迭代开始,每2000迭代保存一次模型
2.35 PaddleOCR在训练的时候一直使用cosine_decay的学习率下降策略,这是为什么呢?
A:cosine_decay表示在训练的过程中,学习率按照cosine的变化趋势逐渐下降至0,在迭代轮数更长的情况下,比常量的学习率变化策略会有更好的收敛效果,因此在实际训练的时候,均采用了cosine_decay,来获得精度更高的模型。
2.36 Cosine学习率的更新策略是怎样的?训练过程中为什么会在一个值上停很久?
A: Cosine学习率的说明可以参考这里
在PaddleOCR中,为了让学习率更加平缓,我们将其中的epoch调整成了iter。 学习率的更新会和总的iter数量有关。当iter比较大时,会经过较多iter才能看出学习率的值有变化。
2.37 之前的CosineWarmup方法为什么不见了?
A: 我们对代码结构进行了调整,目前的Cosine可以覆盖原有的CosineWarmup的功能,只需要在配置文件中增加相应配置即可。 例如下面的代码,可以设置warmup为2个epoch:
lr:
  name: Cosine
  learning_rate: 0.001
  warmup_epoch: 2
2.38 训练识别和检测时学习率要加上warmup,目的是什么?
2.39 训练过程中,训练程序意外退出/挂起,应该如何解决?
A: 考虑内存,显存(使用GPU训练的话)是否不足,可在配置文件中,将训练和评估的batch size调小一些。需要注意,训练batch size调小时,学习率learning rate也要调小,一般可按等比例调整。
2.40 训练程序启动后直到结束,看不到训练过程log?
A: 可以从以下三方面考虑:
1. 检查训练进程是否正常退出、显存占用是否释放、是否有残留进程,如果确定是训练程序卡死,可以检查环境配置,遇到环境问题建议使用docker,可以参考说明文档[安装](https://github.com/PaddlePaddle/PaddleOCR/blob/release/2.1/doc/doc_ch/installation.md)。
2. 检查数据集的数据量是否太小,可调小batch size从而增加一个epoch中的训练step数量,或在训练config文件中,将参数print_batch_step改为1,即每一个step打印一次log信息。
3. 如果使用私有数据集训练,可先用PaddleOCR提供/推荐的数据集进行训练,排查私有数据集是否存在问题。
2.41 配置文件中的参数num workers是什么意思,应该如何设置?
A: 训练数据的读取需要硬盘IO,而硬盘IO速度远小于GPU运算速度,为了避免数据读取成为训练速度瓶颈,可以使用多进程读取数据,
num workers表示数据读取的进程数量,
0表示不使用多进程读取。
在Linux系统下,多进程读取数据时,进程间通信需要基于共享内存,因此使用多进程读取数据时,建议设置共享内存不低于2GB,最好可以达到8GB,此时,num workers可以设置为CPU核心数。
如果机器硬件配置较低,或训练进程卡死、dataloader报错,可以将num workers设置为0,即不使用多进程读取数据。
3.程序中的相关内容
4.搞清楚各种配置文件yml对应关系
Global:
  use_gpu: True
  epoch_num: 2
  log_smooth_window: 20
  # 每( 1000 )iter打印一次当前 iter: lr: loss: acc:  norm_edit_dis:  reader_cost:  batch_cost: samples:  ips:
  print_batch_step: 1000
  save_model_dir: ./output/rec_chinese_common_v2.0
  # 每()epoc保存一次模型参数
  save_epoch_step: 1
  # evaluation is run every 5000 iterations after the 4000th iteration
  # 每()iter保存一次模型参数
  eval_batch_step: [0, 100]
  cal_metric_during_train: True
  pretrained_model: F:/OCR/PaddleOCR-release-2.4/inference/server model/pre-train model/rec/ch_ppocr_server_v2.0_rec_pre/ch_ppocr_server_v2.0_rec_pre/best_accuracy
  checkpoints:
  save_inference_dir: F:/OCR/PaddleOCR-release-2.4/inference/self_train
  use_visualdl: True
  infer_img: doc/imgs_words/hand_write/1241-P16_0.jpg
  # for data or label process
  character_dict_path: ppocr/utils/ppocr_keys_v1.txt
  max_text_length: 35
  infer_mode: False
  use_space_char: True
  save_res_path: ./output/rec/predicts_chinese_common_v2.0.txt


Optimizer:
  name: Adam
  beta1: 0.9
  beta2: 0.999
  lr:
    name: Cosine
    learning_rate: 0.001
    warmup_epoch: 1
  regularizer:
    name: 'L2'
    factor: 0.00004

Architecture:
  model_type: rec
  algorithm: CRNN
  Transform:
  Backbone:
    name: ResNet
    layers: 34
  Neck:
    name: SequenceEncoder
    encoder_type: rnn
    hidden_size: 256
  Head:
    name: CTCHead
    fc_decay: 0.00004

Loss:
  name: CTCLoss

PostProcess:
  name: CTCLabelDecode

Metric:
  name: RecMetric
  main_indicator: acc

Train:
  dataset:
    name: SimpleDataSet
    data_dir: ./train_data/
    label_file_list: ["./train_data/rec_gt_train.txt"]
    transforms:
      - DecodeImage: # load image
          img_mode: BGR
          channel_first: False
      - RecAug:
      - CTCLabelEncode: # Class handling label
      - RecResizeImg:
          image_shape: [3, 32, 320]
      - KeepKeys:
          keep_keys: ['image', 'label', 'length'] # dataloader will return list in this order
  loader:
    shuffle: True
    batch_size_per_card: 8
    drop_last: True
    num_workers: 4

Eval:
  dataset:
    name: SimpleDataSet
    data_dir: ./train_data/
    label_file_list: ["./train_data/rec_gt_test.txt"]
    transforms:
      - DecodeImage: # load image
          img_mode: BGR
          channel_first: False
      - CTCLabelEncode: # Class handling label
      - RecResizeImg:
          image_shape: [3, 32, 320]
      - KeepKeys:
          keep_keys: ['image', 'label', 'length'] # dataloader will return list in this order
  loader:
    shuffle: False
    drop_last: False
    batch_size_per_card: 8
    num_workers: 4
二:CRNN网络设计
什么是CRNN?
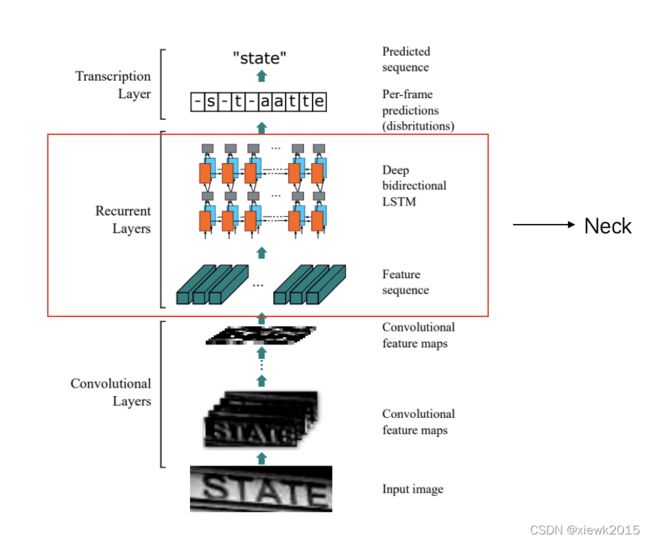
CRNN是由CNN-RNN-CTC三大部分架构而成
分别对应 卷积层、循环层和转录层
(1)CNN提取图像卷积特征
(2)深层双向LSTM网络,在卷积特征的基础上继续提取文字序列特征,用于学习关联序列信息并预测标签分布
(3)CTC,解决训练时字符无法对齐的问题用于序列对齐,输出预测结果。
- 什么是CNN?
- 定义
- 结构
- 什么是RNN?
- 定义
- 网络结构
- 泛化性能?
- 计算图?
- 有向无环
- 循环图
- 展开图
- 通过时间反向传播(BPTT)
- 什么是CTC?
- 定义
- 网络结构
什么是CNN——卷积神经网络(by深度学习花书)?
- 是一种用来处理具有类似网络结构的数据的神经网络?
- 时间序列数据——可以认为在时间轴上有规律的采样形成的一维网格
- 图像数据——可以看作二维的像素网格
- 使用“卷积”这种数学运算,特殊的的线性运算
- 卷积网络是指至少在网络的一层中使用卷积运算来替代一般的矩阵乘法运算的神经网络
- 卷积网络可以很容易扩展到具有很大宽度和高度的图像,以及处理大小可变的图像
什么是RNN?——循环神经网络
-
是一种用来处理序列数据的神经网络
-
循环网络可以扩展到更长的序列,大多数循环网络也能处理可变长度序列
-
虽然卷积操作允许网络跨时间共享参数,但只是浅层的
-
RNN以不同的形式共享参数:输出的每一项是前一项的函数
RNN的设计模式
什么是CTC(Connectionist temporal classification)?
参考网页:超详细讲解CTC理论和实战
- 是一种常用在语音识别、文本识别等领域的算法,用来解决输入和输出序列长度不一、无法对齐的问题
- 不管是在语音识别还是文本识别领域,CTC通常接在RNN的后面
- 自己理解:训练出最合适的对齐方式
文本行是如何被检测的?
只调用识别可以识别多行文本吗?
2.1 网络结构
-
特征提取部分使用主流卷积结构,常用的有
- ResNet
- MobileNet
- VGG
-
因为文本识别任务的特殊性,数据中存在大量上下文信息,卷积神经网络很难挖掘到文本之间的上下文联系。为解决这一问题,CRNN引入双向LSTM来增强上下文建模
-
最终将输出的特征序列输入到CTC中,直接解码序列结果。
详解: -
- 卷积网络作为底层的骨干网络,用于从输入图像中提取特征序列。
- 由于 conv、max-pooling、elementwise 和激活函数都作用在局部区域上,所以它们是平移不变的。
- 因此,特征映射的每一列对应于原始图像的一个矩形区域(称为感受野),并且这些矩形区域与它们在特征映射上对应的列从左到右的顺序相同。
- 由于CNN需要将输入的图像缩放到固定的尺寸以满足其固定的输入维数,因此它不适合长度变化很大的序列对象。
- 为了更好的支持变长序列,CRNN将backbone最后一层输出的特征向量送到了RNN层,转换为序列特征。
-
- 递归层,在卷积网络的基础上,构建递归网络,将图像特征转换为序列特征,预测每个帧的标签分布。
- RNN具有很强的捕获序列上下文信息的能力。
- 使用上下文线索进行基于图像的序列识别比单独处理每个像素更有效。
- 以场景文本识别为例,宽字符可能需要几个连续的帧来充分描述。
- 此外,有些歧义字符在观察其上下文时更容易区分。
- 其次,RNN可以将误差差分反向传播回卷积层,使网络可以统一训练。
- 第三,RNN能够对任意长度的序列进行操作,解决了文本图片变长的问题。
- CRNN使用双层LSTM作为递归层,解决了长序列训练过程中的梯度消失和梯度爆炸问题。
-
head:
-
- 转录层,通过全连接网络和softmax激活函数,将每帧的预测转换为最终的标签序列。
- 最后使用 CTC Loss 在无需序列对齐的情况下,完成CNN和RNN的联合训练。
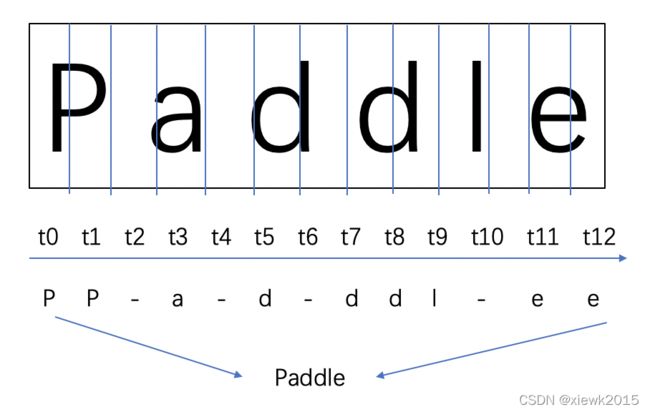
- CTC 有一套特别的合并序列机制,LSTM输出序列后,需要在时序上分类得到预测结果。
- 可能存在多个时间步对应同一个类别,因此需要对相同结果进行合并。
- 为避免合并本身存在的重复字符,CTC 引入了一个 blank 字符插入在重复字符之间。
2.2 输入数据大小
数据送入网络前需要缩放到统一尺寸(3,32,320),并完成归一化处理。
2.3 处理过程
- 【数据输入】
数据送入网络前需要缩放到统一尺寸(3,32,320),并完成归一化处理。这里省略掉训练时需要的数据增强部分,以单张图为例展示预处理的必须步骤(源码位置)
import cv2
import math
import numpy as np


def resize_norm_img(img):
    """
    数据缩放和归一化
    :param img: 输入图片
    """

    # 默认输入尺寸
    imgC = 3
    imgH = 32
    imgW = 320

    # 图片的真实高宽
    h, w = img.shape[:2]
    # 图片真实长宽比
    ratio = w / float(h)

    # 按比例缩放
    # math.ceil( )函数————向上取整,四舍五入
    # math.floor()函数————向下取整
    if math.ceil(imgH * ratio) > imgW:
        # 如大于默认宽度,则宽度为imgW
        resized_w = imgW
    else:
        # 如小于默认宽度则以图片真实宽为准
        resized_w = int(math.ceil(imgH * ratio))
    # 缩放
    resized_image = cv2.resize(img, (resized_w, imgH))
    	# astype()    对数据类型进行转换
    resized_image = resized_image.astype('float32')
    # 归一化
    # 此处导致颜色变化是因为/255再减均值除方差
    resized_image = resized_image.transpose((2, 0, 1)) / 255
    resized_image -= 0.5
    resized_image /= 0.5
    # 对宽度不足的位置,补0
    padding_im = np.zeros((imgC, imgH, imgW), dtype=np.float32)
    padding_im[:, :, 0:resized_w] = resized_image
    # 转置 padding 后的图片用于可视化
    draw_img = padding_im.transpose((1,2,0))
    return padding_im, draw_img
import matplotlib.pyplot as plt
# 读图
raw_img = cv2.imread("/home/aistudio/work/word_1.png")
plt.figure()
plt.subplot(2,1,1)
# 可视化原图
plt.imshow(raw_img)
# 缩放并归一化
padding_im, draw_img = resize_norm_img(raw_img)
plt.subplot(2,1,2)
# 可视化网络输入图
plt.imshow(draw_img)
plt.show()
- 【网络结构】
- backbone
import paddle
import paddle.nn as nn
import paddle.nn.functional as F

class ConvBNLayer(nn.Layer):
    def __init__(self,
                 in_channels,
                 out_channels,
                 kernel_size,
                 stride,
                 padding,
                 groups=1,
                 if_act=True,
                 act=None):
        """
        卷积BN层
        :param in_channels: 输入通道数
        :param out_channels: 输出通道数
        :param kernel_size: 卷积核尺寸
        :parma stride: 步长大小
        :param padding: 填充大小
        :param groups: 二维卷积层的组数
        :param if_act: 是否添加激活函数
        :param act: 激活函数
        """
        super(ConvBNLayer, self).__init__()
        self.if_act = if_act
        self.act = act
        # nn.Conv2d()详解 [网址](https://blog.csdn.net/qq_42079689/article/details/102642610)
        #
        self.conv = nn.Conv2D(
            in_channels=in_channels,
            out_channels=out_channels,
            kernel_size=kernel_size,
            stride=stride,
            padding=padding,
            groups=groups,
            bias_attr=False)
		# 批规范化,为了解决每一个batch输入的数据分布变化问题。
        self.bn = nn.BatchNorm(num_channels=out_channels, act=None)

    def forward(self, x):
        # conv层
        x = self.conv(x)
        # batchnorm层
        x = self.bn(x)
        # 是否使用激活函数
        if self.if_act:
            if self.act == "relu":
                x = F.relu(x)
            elif self.act == "hardswish":
                x = F.hardswish(x)
            else:
                print("The activation function({}) is selected incorrectly.".
                      format(self.act))
                exit()
        return x

# mobilenetv3中调用
class SEModule(nn.Layer):
    def __init__(self, in_channels, reduction=4):
        """
        SE模块
        :param in_channels: 输入通道数
        :param reduction: 通道缩放率
        """
        super(SEModule, self).__init__()
        self.avg_pool = nn.AdaptiveAvgPool2D(1)
        self.conv1 = nn.Conv2D(
            in_channels=in_channels,
            out_channels=in_channels // reduction,
            kernel_size=1,
            stride=1,
            padding=0)
        self.conv2 = nn.Conv2D(
            in_channels=in_channels // reduction,
            out_channels=in_channels,
            kernel_size=1,
            stride=1,
            padding=0)

    def forward(self, inputs):
        # 平均池化
        outputs = self.avg_pool(inputs)
        # 第一个卷积层
        outputs = self.conv1(outputs)
        # relu激活函数
        outputs = F.relu(outputs)
        # 第二个卷积层
        outputs = self.conv2(outputs)
        # hardsigmoid 激活函数
        outputs = F.hardsigmoid(outputs, slope=0.2, offset=0.5)
        return inputs * outputs


class ResidualUnit(nn.Layer):
    def __init__(self,
                 in_channels,
                 mid_channels,
                 out_channels,
                 kernel_size,
                 stride,
                 use_se,
                 act=None):
        """
        残差层
        :param in_channels: 输入通道数
        :param mid_channels: 中间通道数
        :param out_channels: 输出通道数
        :param kernel_size: 卷积核尺寸
        :parma stride: 步长大小
        :param use_se: 是否使用se模块
        :param act: 激活函数
        """
        super(ResidualUnit, self).__init__()
        self.if_shortcut = stride == 1 and in_channels == out_channels
        self.if_se = use_se

        self.expand_conv = ConvBNLayer(
            in_channels=in_channels,
            out_channels=mid_channels,
            kernel_size=1,
            stride=1,
            padding=0,
            if_act=True,
            act=act)
        self.bottleneck_conv = ConvBNLayer(
            in_channels=mid_channels,
            out_channels=mid_channels,
            kernel_size=kernel_size,
            stride=stride,
            padding=int((kernel_size - 1) // 2),
            groups=mid_channels,
            if_act=True,
            act=act)
        if self.if_se:
            self.mid_se = SEModule(mid_channels)
        self.linear_conv = ConvBNLayer(
            in_channels=mid_channels,
            out_channels=out_channels,
            kernel_size=1,
            stride=1,
            padding=0,
            if_act=False,
            act=None)

    def forward(self, inputs):
        x = self.expand_conv(inputs)
        x = self.bottleneck_conv(x)
        if self.if_se:
            x = self.mid_se(x)
        x = self.linear_conv(x)
        if self.if_shortcut:
            x = paddle.add(inputs, x)
        return x


def make_divisible(v, divisor=8, min_value=None):
    """
    确保被8整除
    """
    if min_value is None:
        min_value = divisor
    new_v = max(min_value, int(v + divisor / 2) // divisor * divisor)
    if new_v < 0.9 * v:
        new_v += divisor
    return new_v
利用公共模块搭建骨干网络
class MobileNetV3(nn.Layer):
    def __init__(self,
                 in_channels=3,
                 model_name='small',
                 # 代表网络的宽度,1是标准宽度,最大
                 scale=0.5,
                 small_stride=None,
                 disable_se=False,
                 **kwargs):
        super(MobileNetV3, self).__init__()
        self.disable_se = disable_se

        small_stride = [1, 2, 2, 2]

        if model_name == "small":
            cfg = [
                # k, exp, c,  se,     nl,  s,
                [3, 16, 16, True, 'relu', (small_stride[0], 1)],
                [3, 72, 24, False, 'relu', (small_stride[1], 1)],
                [3, 88, 24, False, 'relu', 1],
                [5, 96, 40, True, 'hardswish', (small_stride[2], 1)],
                [5, 240, 40, True, 'hardswish', 1],
                [5, 240, 40, True, 'hardswish', 1],
                [5, 120, 48, True, 'hardswish', 1],
                [5, 144, 48, True, 'hardswish', 1],
                [5, 288, 96, True, 'hardswish', (small_stride[3], 1)],
                [5, 576, 96, True, 'hardswish', 1],
                [5, 576, 96, True, 'hardswish', 1],
            ]
            cls_ch_squeeze = 576
        else:
            raise NotImplementedError("mode[" + model_name +
                                      "_model] is not implemented!")

        supported_scale = [0.35, 0.5, 0.75, 1.0, 1.25]
        assert scale in supported_scale, \
            "supported scales are {} but input scale is {}".format(supported_scale, scale)

        inplanes = 16
        # conv1
        self.conv1 = ConvBNLayer(
            in_channels=in_channels,
            out_channels=make_divisible(inplanes * scale),
            kernel_size=3,
            stride=2,
            padding=1,
            groups=1,
            if_act=True,
            act='hardswish')
        i = 0
        block_list = []
        inplanes = make_divisible(inplanes * scale)
        for (k, exp, c, se, nl, s) in cfg:
            se = se and not self.disable_se
            block_list.append(
                ResidualUnit(
                    in_channels=inplanes,
                    mid_channels=make_divisible(scale * exp),
                    out_channels=make_divisible(scale * c),
                    kernel_size=k,
                    stride=s,
                    use_se=se,
                    act=nl))
            inplanes = make_divisible(scale * c)
            i += 1
        self.blocks = nn.Sequential(*block_list)

        self.conv2 = ConvBNLayer(
            in_channels=inplanes,
            out_channels=make_divisible(scale * cls_ch_squeeze),
            kernel_size=1,
            stride=1,
            padding=0,
            groups=1,
            if_act=True,
            act='hardswish')

        self.pool = nn.MaxPool2D(kernel_size=2, stride=2, padding=0)
        self.out_channels = make_divisible(scale * cls_ch_squeeze)

    def forward(self, x):
        x = self.conv1(x)
        x = self.blocks(x)
        x = self.conv2(x)
        x = self.pool(x)
        return x
# 图片输入骨干网络
backbone = MobileNetV3()
# 将numpy数据转换为Tensor
input_data = paddle.to_tensor([padding_im])
# 骨干网络输出
feature = backbone(input_data)
# 查看feature map的纬度
print("backbone output:", feature.shape)
- neck
neck 部分将backbone输出的视觉特征图转换为1维向量输入送到 LSTM 网络中,输出序列特征( 源码位置 )
class Im2Seq(nn.Layer):
    def __init__(self, in_channels, **kwargs):
        """
        图像特征转换为序列特征
        :param in_channels: 输入通道数
        """
        super().__init__()
        self.out_channels = in_channels

    def forward(self, x):
    	# 4维压缩到3维
        B, C, H, W = x.shape
        assert H == 1
        x = x.squeeze(axis=2)
        x = x.transpose([0, 2, 1])  # (NWC)(batch, width, channels)
        return x

class EncoderWithRNN(nn.Layer):
    def __init__(self, in_channels, hidden_size):
        super(EncoderWithRNN, self).__init__()
        self.out_channels = hidden_size * 2
        self.lstm = nn.LSTM(
            in_channels, hidden_size, direction='bidirectional', num_layers=2)

    def forward(self, x):
        x, _ = self.lstm(x)
        return x


class SequenceEncoder(nn.Layer):
    def __init__(self, in_channels, hidden_size=48, **kwargs):
        """
        序列编码
        :param in_channels: 输入通道数
        :param hidden_size: 隐藏层size
        """
        super(SequenceEncoder, self).__init__()
        self.encoder_reshape = Im2Seq(in_channels)

        self.encoder = EncoderWithRNN(self.encoder_reshape.out_channels, hidden_size)
        self.out_channels = self.encoder.out_channels

    def forward(self, x):
        x = self.encoder_reshape(x)
        x = self.encoder(x)
        return x
neck = SequenceEncoder(in_channels=288)
sequence = neck(feature)
print("sequence shape:", sequence.shape)
- head
预测头部分由全连接层和softmax组成,用于计算序列特征时间步上的标签概率分布,本示例仅支持模型识别小写英文字母和数字(26+10)36个类别(源码位置)
class CTCHead(nn.Layer):
    def __init__(self,
                 in_channels,
                 out_channels,
                 **kwargs):
        """
        CTC 预测层
        :param in_channels: 输入通道数
        :param out_channels: 输出通道数
        """
        super(CTCHead, self).__init__()
        self.fc = nn.Linear(
            in_channels,
            out_channels)

        # 思考:out_channels 应该等于多少?
        self.out_channels = out_channels

    def forward(self, x):
    	#
        predicts = self.fc(x)
        result = predicts

        if not self.training:
            predicts = F.softmax(predicts, axis=2)
            result = predicts

        return result
在网络随机初始化的情况下,输出结果是无序的,
经过SoftMax之后,可以得到各时间步上的概率最大的预测结果,
其中:
pred_id 代表预测的标签ID,
pre_scores 代表预测结果的置信度
ctc_head = CTCHead(in_channels=96, out_channels=37)
predict = ctc_head(sequence)
print("predict shape:", predict.shape)
result = F.softmax(predict, axis=2)
pred_id = paddle.argmax(result, axis=2)
pred_socres = paddle.max(result, axis=2)
print("pred_id:", pred_id)
print("pred_scores:", pred_socres)
- 后处理-postprocess
识别网络最终返回的结果是各个时间步上的最大索引值,最终期望的输出是对应的文字结果,因此CRNN的后处理是一个解码过程,主要逻辑如下:
def decode(text_index, text_prob=None, is_remove_duplicate=False):
    """ convert text-index into text-label. """
    character = "-0123456789abcdefghijklmnopqrstuvwxyz"
    result_list = []
    # 忽略tokens [0] 代表ctc中的blank位
    ignored_tokens = [0]
    batch_size = len(text_index)
    for batch_idx in range(batch_size):
        char_list = []
        conf_list = []
        for idx in range(len(text_index[batch_idx])):
            if text_index[batch_idx][idx] in ignored_tokens:
                continue
            # 合并blank之间相同的字符
            if is_remove_duplicate:
                # only for predict
                if idx > 0 and text_index[batch_idx][idx - 1] == text_index[
                        batch_idx][idx]:
                    continue
            # 将解码结果存在char_list内
            char_list.append(character[int(text_index[batch_idx][
                idx])])
            # 记录置信度
            if text_prob is not None:
                conf_list.append(text_prob[batch_idx][idx])
            else:
                conf_list.append(1)
        text = ''.join(char_list)
        # 输出结果
        result_list.append((text, np.mean(conf_list)))
    return result_list
以 head 部分随机初始化预测出的结果为例,进行解码得到:
pred_id = paddle.argmax(result, axis=2)
pred_socres = paddle.max(result, axis=2)
print(pred_id)
decode_out = decode(pred_id, pred_socres)
print("decode out:", decode_out)
- 位置:ppocr/postprocess(后处理)/rec_postprocess
三:PaddleOCR使用的骨干网
- 考虑Mobilenet换为Resnet?
- 什么是Mobilenet
- 什么是Resnet
四:CAISA-HWDB数据格式及转换
- 使用单字还是文本行?
- 应该要使用文本行,要看文本行的编码格式进行解码
- 是否字典中包含所有字?
4.1 官网描述
4.1.1 类别
4.1.1.1 Feature Data
- offline handwriting datasets HWDB1.0 and HWDB1.1
- HWDB1.0
- 420个writer
- HWDB1.1
- 300个writer
- GB2312-80中的3755种汉字
- HWDB1.0
- online handwriting datasets OLHWDB1.0 and OLHWDB1.1
- fileFormat-mpf
4.1.1.2 Character Sample Data
# codecs用法
codecs.open(filepath,method,encoding)
filepath--文件路径
method--打开方式,r为读,w为写,rw为读写
encoding--文件的编码,中文文件使用utf-8
# Python使用struct处理二进制(pack和unpack用法)

# 按照给定的格式(fmt),把数据封装成字符串(实际上是类似于c结构体的字节流)
struct.pack(fmt, v1, v2, ...)

# 按照给定的格式(fmt)解析字节流string,返回解析出来的tuple
struct.unpack(fmt, string)

# 计算给定的格式(fmt)占用多少字节的内存
calcsize(fmt)
# .read用法
# read() 函数:逐个字节或者字符读取文件中的内容
# readline() 函数:逐行读取文件中的内容;
# readlines() 函数:一次性读取文件中多行内容。
# 如果文件是以文本模式(非二进制模式)打开的,
# 则 read() 函数会逐个字符进行读取;
# 如果文件以二进制模式打开,
# 则 read() 函数会逐个字节进行读取。

file.read([size])
# file 表示已打开的文件对象;
# size 作为一个可选参数,用于指定一次最多可读取的字符(字节)个数,如果省略,则默认一次性读取所有内容。

# 注意,当操作文件结束后,必须调用 close() 函数手动将打开的文件进行关闭,这样可以避免程序发生不必要的错误。
4.1.1.3 Textline (Page) Data——使用
4.1.1.4 Competition Test Data
4.1.2 数据集的划分
4.2 读取 gnt 解码为 字+img
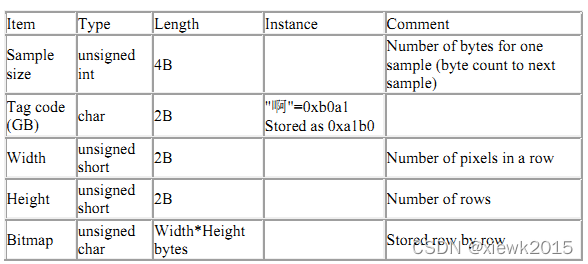
def decode_GNT_to_imgs(gnt):
'''
:param gnt: a writer's enco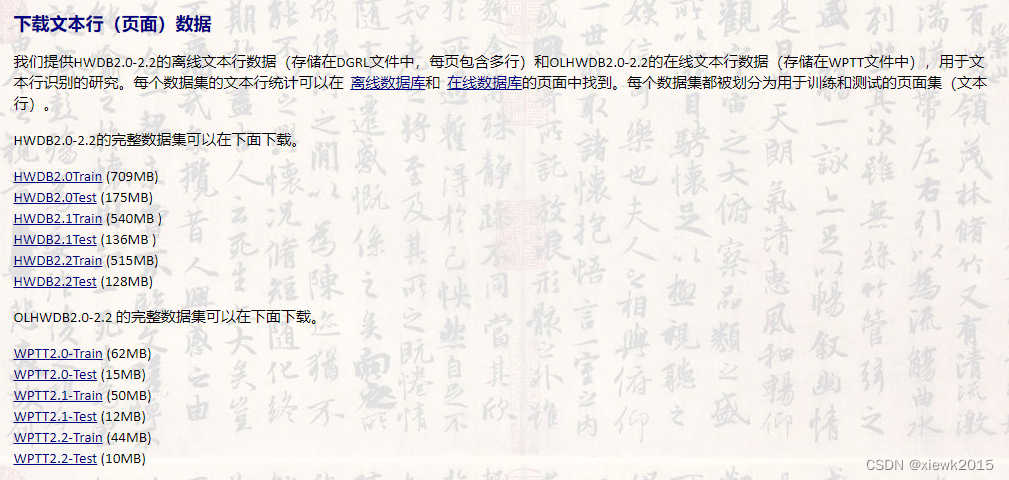
ded ground truth file.(gnt文件路径)
:return: samples list, each sample with format (charname, img)
'''
samples = []
with codecs.open(gnt, mode='rb') as fin:
while (True):
# 读取4B的长度到缓存中,4B是从文件格式中得到的
left_cache = fin.read(4)
# 如果读到的<4B说明读取错误,跳出
if len(left_cache) < 4:
break
# left_cache:
# Sample size:4B unsigned int;
# Tag code :2B char;
# Width :2B unsigned short;
# Hight :2B unsigned short;
# Bitmap :矩阵 前两个相乘的长度bytes unsigned char
sample_size = struct.unpack("I", left_cache)[0]# I: unsigned int struct.unpack返回的是tuple,那么[0]则是指tuple里的第一个元素
print(sample_size)
tag_code = str(fin.read(2), 'gbk')
print(tag_code[0])
width = struct.unpack("H", fin.read(2))[0] # H:unsigned short
print(width)
height = struct.unpack("H", fin.read(2))[0] # H:unsigned short
print(height)
# 创建img数组,将数据写入
img = np.zeros(shape=[height, width], dtype=np.uint8)
for r in range(height):
for c in range(width):
img[r, c] = struct.unpack("B", fin.read(1))[0]
# 校验,10是前面字节的总长度,sample_size为存储的一个字的所有总长度
if width * height + 10 != sample_size:
break
samples.append((tag_code[0], img))
# print(samples)
return samples
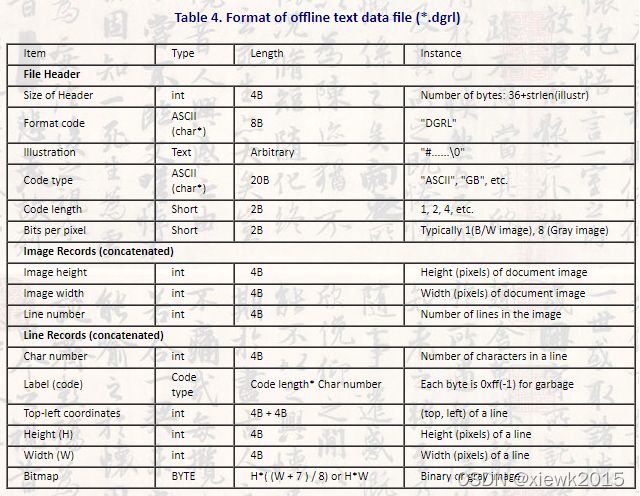
4.3 读取 dgrl 解码为多行手写文本的图片+ 相应的VOC格式的xml文件
VOC标签格式说明:链接
此处我们不使用这种格式,下一节会对其进行转换
def decode_DGR_to_imgs_and_vocxml(dgr):
    '''
    :param dgr: a writer's encoded ground truth file.
    :return:    samples list, each sample with format (charname, img)
    '''
    doc_img, voc_xml = None, None
    with codecs.open(dgr, mode='rb') as fin:
        while(True):
            left_cache = fin.read(4)
            if len(left_cache) < 4:
                break

            #FILE HEAFER
            size_of_header = struct.unpack("I", left_cache)[0]
            format_code = fin.read(8)
            illus_len = size_of_header - 36
            illus = fin.read(illus_len)
            if sys.version_info < (3, 0, 0):
                code_type = fin.read(20).decode('ASCII')
            else:
                code_type = str(fin.read(20), 'ASCII')

            code_len = struct.unpack("h", fin.read(2))[0]
            bits_per_pix = struct.unpack("h", fin.read(2))[0]

            if bits_per_pix == 1:
                break

            #Image Records (concatenated)
            height = struct.unpack("I", fin.read(4))[0]
            width = struct.unpack("I", fin.read(4))[0]
            doc_img = np.zeros(shape=[height, width], dtype=np.uint8) + 255

            voc_xml = PascalVocWriter(os.path.dirname(dgr), os.path.split(dgr)[-1][:-4] + '.jpg', doc_img.shape)

            # Line Records (concatenated)
            line_num = struct.unpack("I", fin.read(4))[0]
            for i in range(line_num):
                # Character Records (concatenated)
                word_num = struct.unpack("I", fin.read(4))[0]
                for j in range(word_num):
                    tmp_code = fin.read(code_len)
                    try:
                        if sys.version_info < (3, 0, 0):
                            label = tmp_code.decode('gbk')[0]
                        else:
                            label = str(tmp_code, ('gbk'))[0]
                    except:
                        label = u'Unknown'

                top = struct.unpack("H", fin.read(2))[0]
                left = struct.unpack("H", fin.read(2))[0]
                char_height = struct.unpack("H", fin.read(2))[0]
                char_width = struct.unpack("H", fin.read(2))[0]
                tmp_img = np.zeros(shape=[char_height, char_width], dtype=np.uint8)

                #Image data
                for r in range(char_height):
                    for c in range(char_width):
                        tmp_img[r, c] = struct.unpack("B", fin.read(1))[0]
                # 务必注意此处缩进,怎样实现单行图片对应单行文字输出有待编写
                doc_img[top:top+char_height, left:left+char_width] = tmp_img
                voc_xml.addBndBox(left, top, left + char_width, top+char_height, label)

    return doc_img, voc_xml
4.4 数据量
4.4.1 训练
4.4.2 验证
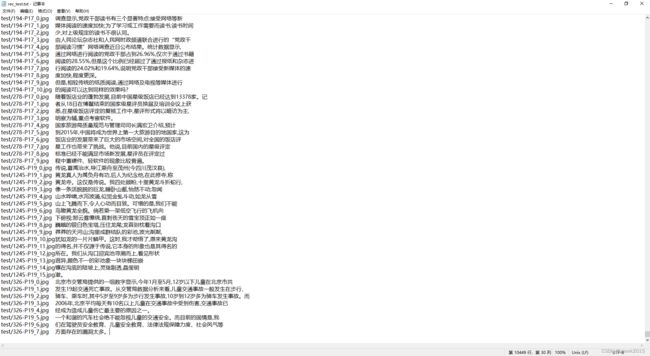
测试数据共10449行
4.4.2 分布

共 7356+1859 = 9215 类。即中文+符号+部分英文等,共9215种不同的字符
- train和test是什么数据关系?
每个writer写5页
文件以writer+页面 命名
371号writer的数据丢失
所以train和test是不同作者书写的字,
使用train训练与使用test评估是不相关的
五:使用单字训练还是文本行训练?——文本行
按照文本行生成数据集怎样切分标注与编号???
paddlepaddle下载地址
5.1 提取单行文本+标签
def decode_DGR_to_imgs_and_vocxml(dgr):
    '''
    :param dgr: a writer's encoded ground truth file.
    :return:    samples list, each sample with format (charname, img)
    '''
    doc_img, voc_xml = None, None
    label_all = ''
    lable_every_line = {}
    doc_img_every_line = {}
    with codecs.open(dgr, mode='rb') as fin:
        while(True):
            # Size of Header int 4B
            left_cache = fin.read(4)
            if len(left_cache) < 4:
                break

            # FILE HEAFER
            size_of_header = struct.unpack("I", left_cache)[0]
            format_code = fin.read(8)
            # 36 = 4+8+20+2+2
            # Illustration 类型:Text 长度:Arbitrary(任意长度)
            illus_len = size_of_header - 36
            # 此处读入数据
            illus = fin.read(illus_len)
            # 用于返回你使用的python版本号
            # 此处应该是版本不同对字节的处理方式不同
            # Code_type 类型:ASCII (char*) 长度:20B 举例:"ASCII", "GB", etc.
            # by xie
            if sys.version_info < (3, 0, 0):
                code_type = fin.read(20).decode('ASCII')
            else:
                code_type = str(fin.read(20), 'ASCII')
            # Code length 类型:Short 长度:2B 举例: 1, 2, 4, etc.
            code_len = struct.unpack("h", fin.read(2))[0]
            # print(code_len)
            # Bits per pixel 类型:Short 长度:2B 举例:Typically1(B / Wimage), 8(Grayimage)
            bits_per_pix = struct.unpack("h", fin.read(2))[0]
            #
            if bits_per_pix == 1:
                break

            # Image Records (concatenated)
            height = struct.unpack("I", fin.read(4))[0]
            # print(height)
            width = struct.unpack("I", fin.read(4))[0]
            # print(width)
            doc_img = np.zeros(shape=[height, width], dtype=np.uint8) + 255
            # print(doc_img)

            voc_xml = PascalVocWriter(os.path.dirname(dgr), os.path.split(dgr)[-1][:-4] + '.jpg', doc_img.shape)

            # Line Records (concatenated连接)
            # 行数
            line_num = struct.unpack("I", fin.read(4))[0]
            # print(line_num)
            # 循环遍历所有行
            for i in range(line_num):
                # Character Records (concatenated)每行字符个数
                word_num = struct.unpack("I", fin.read(4))[0]
                # print(word_num)
                for j in range(word_num):
                    tmp_code = fin.read(code_len)
                    try:
                        if sys.version_info < (3, 0, 0):
                            label = tmp_code.decode('gbk')[0]
                        else:
                            label = str(tmp_code, ('gbk'))[0]
                            # print(label)
                            label_all = label_all + label
                            # print(label_all)
                    except:
                        label = u'Unknown'
                lable_every_line[int(f'{i}')] = label_all
                # if i+1 == line_num:
                #     print(lable_every_line)
                label_all = ''
                top = struct.unpack("I", fin.read(4))[0]
                # print(top)
                left = struct.unpack("I", fin.read(4))[0]
                # print(left)
                # 一行字符的高度
                char_height = struct.unpack("I", fin.read(4))[0]
                # print(char_height)
                # 一行字符的宽度
                char_width = struct.unpack("I", fin.read(4))[0]
                # print(char_width)
                tmp_img = np.zeros(shape=[char_height, char_width], dtype=np.uint8)
                # print(tmp_img)
                # Image data
                for r in range(char_height):
                    for c in range(char_width):
                        tmp_img[r, c] = struct.unpack("B", fin.read(1))[0]
                doc_img[top:top + char_height, left:left + char_width] = tmp_img
                voc_xml.addBndBox(left, top, left + char_width, top+char_height, label)
                doc_img_every_line[int(f'{i}')] = tmp_img
                # print(doc_img_every_line)
                # cv2.imwrite(os.path.join('F:/OCR/PaddleOCR-release-2.4/train_data/img', str(i) + '.jpg'), doc_img_every_line[int(f'{i}')])
    return doc_img, voc_xml, line_num, doc_img_every_line, lable_every_line
def decode_HWDB_subset_v2(dgr_data_dir, img_save_dir, xml_writing_dir):
    '''
    解析并保存HWDB-v2的dgr格式数据到图像和相应的VOC格式的xml文件
    :param dgr_data_dir:
    :param img_save_dir:
    :param xml_writing_dir:
    :return:
    '''
    dgrs = os.listdir(dgr_data_dir)
    for dgr in dgrs:
        doc_img, voc_xml, line_num, doc_img_every_line, lable_every_line = decode_DGR_to_imgs_and_vocxml(os.path.join(dgr_data_dir, dgr))
        for i in range(line_num):
            cv2.imwrite(os.path.join('F:/OCR/PaddleOCR-release-2.4/train_data/img', str(i) + '.jpg'), doc_img_every_line[i])
            print(lable_every_line[i])
        # cv2.imwrite(os.path.join(img_save_dir, dgr[:-4] + '.jpg'), doc_img)
        # voc_xml.save(xml_writing_dir + "/" + dgr[:-4] + XML_EXT)
        print('Processed file %s.' % dgr)
if __name__ == '__main__':
    # transform_labelmap_to_utf8('F:/OCR/PaddleOCR-release-2.4/train_data/labelmap/2.txt',
    #                            'utf-8',
    #                            'F:/OCR/PaddleOCR-release-2.4/train_data/labelmap/2.txt')
    # decode_HWDB_subset_v1('F:/OCR/PaddleOCR-release-2.4/train_data/HWDB1.0-1.2/Gnt1.0Test/',
    #                       'F:/OCR/PaddleOCR-release-2.4/train_data/img',
    #                       'F:/OCR/PaddleOCR-release-2.4/train_data/labelmap/2.txt')

    decode_HWDB_subset_v2('F:/OCR/PaddleOCR-release-2.4/train_data/HWDB2.0Test',
                          'F:/OCR/PaddleOCR-release-2.4/train_data/img',
                          'F:/OCR/PaddleOCR-release-2.4/train_data/img')
- 20220426 16:38 基本功能可以实现,怎样组织文件夹以及怎样存储路径和label是下一步工作
# 创建txt并写入
-
转换了一个训练集 HWDB2.0Train
-
转换一个测试集 HWDB2.0Test
-
行最大字符长度设置,现在看到的最长在46左右
-
KeyError: ‘LinearWarmup_LR’
六:格式转换
见 第四节
七:数据增广处理
7.1 印刷体数据集
7.2 场景文本数据集
7.3 数字+英文
八:环境配置
8.1 CUDA版本以及Cudnn版本
cuda :10.2
conda install cudatoolkit=10.2
cudnn : 适配cuda10.2的 cudnn7.6.5
conda install cudnn=7.6.5
参考:https://zhuanlan.zhihu.com/p/367740437
九: 训练
9.2 训练命令
- ubuntu后台运行程序
nohup python tools/train.py -c ./configs/rec/ch_ppocr_v2.0/rec_chinese_common_train_v2.0.yml &
9.2 模型转换——转Inference模型测试
python tools/export_model.py -c configs/rec/ch_ppocr_v2.0/rec_chinese_common_train_v2.0.yml -o Global.pretrained_model=./inference/self_train/epoch31/best_accuracy Global.save_inference_dir=./inference/self_train/epoch31/
十: 使用训练117epoch-best acc参数的测试
10.1 关于单行文本中文本弯曲问题
- 整行弯曲文本
- 截取前半段
- 截取后半段
- 现象:
- 单行文本若是弯曲程度较大无法全部识别 - 单样本结论:
- 弯曲文本会很大程度上影响识别结果
- 只在图片类输出中弯曲文本检测能力较强
10.2 英文识别能力——
基本不可用
————原因在于新的训练集中并无大量的英文
10.3 印刷体数字识别能力——
10.4 针对印刷字体的识别能力
10.4.1 测试1
10.4.2 测试2
10.5 针对场景文字的识别能力
10.6 针对手写印刷体共存
10.6.1 手写印刷体大小不一
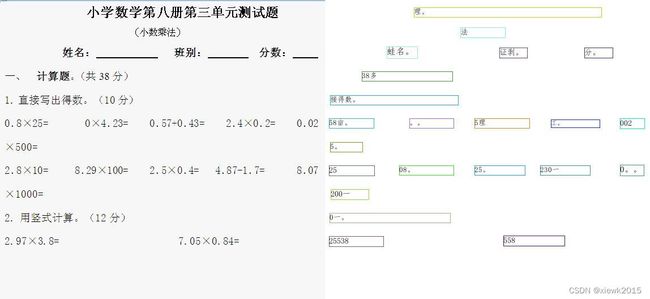
10.6.1.1 共存,距离过近——除去识别模型本身的识别精度问题,无法识别是裁剪的问题
- 训练后
- 分割结果
10.6.2 官方给的手写印刷共存的处理思路,关键在于分类和两个识别模型
10.7 针对常规难题的测试(基于117左右-best)
10.7.1 连笔
10.7.2 书写不水平
使用 det_db_score_mode=‘slow’ 后对文本行弯曲有缓解
10.7.3 字迹潦草
10.7.4 相似字的识别
10.7.5 带表格线和不带表格线
10.7.6 多行文字的识别能力
主要在于DB分割,若分割无问题就转换为单行文本识别的问题
10.7.6.1 测试1
.
- 训练前
10.7.6.2 测试2
#### 10.7.6.2
## 10.8 compare_results.py的使用 ——功能理解错误
python test_tipc/compare_results.py --gt_file=./test_tipc/configs/ch_ppocr_server_v2.0_rec/model_linux_gpu_normal_normal_serving_python_linux_gpu_cpu.txt --log_file=./output/compare_results/train.log
10. 使用test数据集中的图片测试(117左右best)
10. .1 006-P18_3.jpg
- 原图(006-P18_3.jpg)
- 训练前
- 训练后
- 剪切3——英文
10. .2 006-P19_3.jpg
- 百度手写识别API
- 自己的识别有弯曲文本的处理问题,只在图片类中弯曲文本被检测到的能力较强
- 结论:
- 切分可识别
- 怀疑也是单行文本不对齐的原因
10. .3 013-P16_0.jpg
-
- 训练前 ——无法识别

- 训练后 ——无法识别

- 训练前 ——无法识别
-
- 训练前

- 训练后

- 训练前
10. .4 020-P16_0.jpg
- 原图(020-P16_0.jpg)

十一: 问题总结
第一次测试时很多是无法识别的,修改了检测边框的裁切ratio后可识别了
现阶段不具备可使用的能力
原因:
- 样本不均衡:只有中文手写数据,无均衡的英文、数字、符合训练数据,可能需要使用手写单字样本合成大量数据
- 微弯曲文本的检测识别问题还有困难
- 若是均匀混合印刷体和手写体两种数据集,能在一个模型中训练出来吗?
十一: 几点想法
1.手写体 场景文字 均衡数据及分布 一起训练???
2.finetune的操作,怎样固定层数???
3.和不同手写人的数据分布有关吗,一段时间内输入的都是同一个人的数据,并没有穿插其他人的
附录一 : 好的参考
【Paddle打比赛】基于PaddleOCR的AIWIN手写体识别:关于测试评估方面
PaddleOCR 使用以及用自己的数据训练
附录二: 代码组织结构
PaddleOCR
├── configs                                 ├── 配置文件,可通过 yml 文件选择模型结构并修改超参
│   ├── cls                                 │   ├──  方向分类器相关配置文件
│   │   ├── cls_mv3.yml                     │   │   ├── 训练配置相关,包括骨干网络、head、loss、优化器和数据
│   ├── det                                 │   ├── 检测相关配置文件
│   │   ├── det_mv3_db.yml                  │   │   ├── 训练配置
│   │   ...
│   └── rec                                 │   └── 识别相关配置文件
│       ├── rec_mv3_none_bilstm_ctc.yml     │       ├── crnn 训练配置
│       ...
├── deploy                                  ├── 部署相关
│   ├── android_demo                        │   ├── android_demo
│   │   ...
│   ├── cpp_infer                           │   ├── C++ infer
│   │   ├── CMakeLists.txt                  │   │   ├── Cmake 文件
│   │   ├── docs                            │   │   ├── 说明文档
│   │   │   └── windows_vs2019_build.md
│   │   ├── include                         │   │   ├── 头文件
│   │   │   ├── clipper.h                   │   │   │   ├── clipper 库
│   │   │   ├── config.h                    │   │   │   ├── 预测配置
│   │   │   ├── ocr_cls.h                   │   │   │   ├── 方向分类器
│   │   │   ├── ocr_det.h                   │   │   │   ├── 文字检测
│   │   │   ├── ocr_rec.h                   │   │   │   ├── 文字识别
│   │   │   ├── postprocess_op.h            │   │   │   ├── 检测后处理
│   │   │   ├── preprocess_op.h             │   │   │   ├── 检测预处理
│   │   │   └── utility.h                   │   │   │   └── 工具
│   │   ├── readme.md                       │   │   ├── 说明文档
│   │   ├── ...
│   │   ├── src                             │   │   ├── 源文件
│   │   │   ├── clipper.cpp
│   │   │   ├── config.cpp
│   │   │   ├── main.cpp
│   │   │   ├── ocr_cls.cpp
│   │   │   ├── ocr_det.cpp
│   │   │   ├── ocr_rec.cpp
│   │   │   ├── postprocess_op.cpp
│   │   │   ├── preprocess_op.cpp
│   │   │   └── utility.cpp
│   │   └── tools                           │   │   └── 编译、执行脚本
│   │       ├── build.sh                    │   │       ├── 编译脚本
│   │       ├── config.txt                  │   │       ├── 配置文件
│   │       └── run.sh                      │   │       └── 测试启动脚本
│   ├── docker
│   │   └── hubserving
│   │       ├── cpu
│   │       │   └── Dockerfile
│   │       ├── gpu
│   │       │   └── Dockerfile
│   │       ├── README_cn.md
│   │       ├── README.md
│   │       └── sample_request.txt
│   ├── hubserving                          │   ├── hubserving
│   │   ├── ocr_cls                         │   │   ├── 方向分类器
│   │   │   ├── config.json                 │   │   │   ├── serving 配置
│   │   │   ├── __init__.py
│   │   │   ├── module.py                   │   │   │   ├── 预测模型
│   │   │   └── params.py                   │   │   │   └── 预测参数
│   │   ├── ocr_det                         │   │   ├── 文字检测
│   │   │   ├── config.json                 │   │   │   ├── serving 配置
│   │   │   ├── __init__.py
│   │   │   ├── module.py                   │   │   │   ├── 预测模型
│   │   │   └── params.py                   │   │   │   └── 预测参数
│   │   ├── ocr_rec                         │   │   ├── 文字识别
│   │   │   ├── config.json
│   │   │   ├── __init__.py
│   │   │   ├── module.py
│   │   │   └── params.py
│   │   └── ocr_system                      │   │   └── 系统预测
│   │       ├── config.json
│   │       ├── __init__.py
│   │       ├── module.py
│   │       └── params.py
│   ├── imgs                                │   ├── 预测图片
│   │   ├── cpp_infer_pred_12.png
│   │   └── demo.png
│   ├── ios_demo                            │   ├── ios demo
│   │   ...
│   ├── lite                                │   ├── lite 部署
│   │   ├── cls_process.cc                  │   │   ├── 方向分类器数据处理
│   │   ├── cls_process.h
│   │   ├── config.txt                      │   │   ├── 检测配置参数
│   │   ├── crnn_process.cc                 │   │   ├── crnn 数据处理
│   │   ├── crnn_process.h
│   │   ├── db_post_process.cc              │   │   ├── db 数据处理
│   │   ├── db_post_process.h
│   │   ├── Makefile                        │   │   ├── 编译文件
│   │   ├── ocr_db_crnn.cc                  │   │   ├── 串联预测
│   │   ├── prepare.sh                      │   │   ├── 数据准备
│   │   ├── readme.md                       │   │   ├── 说明文档
│   │   ...
│   ├── pdserving                           │   ├── pdserving 部署
│   │   ├── det_local_server.py             │   │   ├── 检测 快速版,部署方便预测速度快
│   │   ├── det_web_server.py               │   │   ├── 检测 完整版,稳定性高分布式部署
│   │   ├── ocr_local_server.py             │   │   ├── 检测+识别 快速版
│   │   ├── ocr_web_client.py               │   │   ├── 客户端
│   │   ├── ocr_web_server.py               │   │   ├── 检测+识别 完整版
│   │   ├── readme.md                       │   │   ├── 说明文档
│   │   ├── rec_local_server.py             │   │   ├── 识别 快速版
│   │   └── rec_web_server.py               │   │   └── 识别 完整版
│   └── slim
│       └── quantization                    │       └── 量化相关
│           ├── export_model.py             │           ├── 导出模型
│           ├── quant.py                    │           ├── 量化
│           └── README.md                   │           └── 说明文档
├── doc                                     ├── 文档教程
│   ...
├── ppocr                                   ├── 网络核心代码
│   ├── data                                │   ├── 数据处理
│   │   ├── imaug                           │   │       ├── 图片和 label 处理代码
│   │   │   ├── text_image_aug              │   │   │   ├── 文本识别的 tia 数据扩充
│   │   │   │   ├── __init__.py
│   │   │   │   ├── augment.py              │   │   │   │   ├── tia_distort,tia_stretch 和 tia_perspective 的代码
│   │   │   │   ├── warp_mls.py
│   │   │   ├── __init__.py
│   │   │   ├── east_process.py             │   │   │   ├── EAST 算法的数据处理步骤
│   │   │   ├── make_border_map.py          │   │   │   ├── 生成边界图
│   │   │   ├── make_shrink_map.py          │   │   │   ├── 生成收缩图
│   │   │   ├── operators.py                │   │   │   ├── 图像基本操作,如读取和归一化
│   │   │   ├── randaugment.py              │   │   │   ├── 随机数据增广操作
│   │   │   ├── random_crop_data.py         │   │   │   ├── 随机裁剪
│   │   │   ├── rec_img_aug.py              │   │   │   ├── 文本识别的数据扩充
│   │   │   └── sast_process.py             │   │   │   └── SAST 算法的数据处理步骤
│   │   ├── __init__.py                     │   │   ├── 构造 dataloader 相关代码
│   │   ├── lmdb_dataset.py                 │   │   ├── 读取lmdb数据集的 dataset
│   │   ├── simple_dataset.py               │   │   ├── 读取文本格式存储数据集的 dataset
│   ├── losses                              │   ├── 损失函数
│   │   ├── __init__.py                     │   │   ├── 构造 loss 相关代码
│   │   ├── cls_loss.py                     │   │   ├── 方向分类器 loss
│   │   ├── det_basic_loss.py               │   │   ├── 检测基础 loss
│   │   ├── det_db_loss.py                  │   │   ├── DB loss
│   │   ├── det_east_loss.py                │   │   ├── EAST loss
│   │   ├── det_sast_loss.py                │   │   ├── SAST loss
│   │   ├── rec_ctc_loss.py                 │   │   ├── CTC loss
│   │   ├── rec_att_loss.py                 │   │   ├── Attention loss
│   ├── metrics                             │   ├── 评估指标
│   │   ├── __init__.py                     │   │   ├── 构造 metric 相关代码
│   │   ├── cls_metric.py                   │   │   ├── 方向分类器 metric
│   │   ├── det_metric.py                   │   │   ├── 检测 metric
│   │   ├── eval_det_iou.py                 │   │   ├── 检测 iou 相关
│   │   ├── rec_metric.py                   │   │   ├── 识别 metric
│   ├── modeling                            │   ├── 组网相关
│   │   ├── architectures                   │   │   ├── 网络
│   │   │   ├── __init__.py                 │   │   │   ├── 构造 model 相关代码
│   │   │   ├── base_model.py               │   │   │   ├──/ 组网代码
│   │   ├── backbones                       │   │   ├── 骨干网络
│   │   │   ├── __init__.py                 │   │   │   ├── 构造 backbone 相关代码
│   │   │   ├── det_mobilenet_v3.py         │   │   │   ├── 检测 mobilenet_v3
│   │   │   ├── det_resnet_vd.py            │   │   │   ├── 检测 resnet
│   │   │   ├── det_resnet_vd_sast.py       │   │   │   ├── 检测 SAST算法的resnet backbone
│   │   │   ├── rec_mobilenet_v3.py         │   │   │   ├── 识别 mobilenet_v3
│   │   │   └── rec_resnet_vd.py            │   │   │   ├── 识别 resnet
│   │   ├── necks                           │   │   ├── 颈函数
│   │   │   ├── __init__.py                 │   │   │   ├── 构造 neck 相关代码
│   │   │   ├── db_fpn.py                   │   │   │   ├── 标准 fpn 网络
│   │   │   ├── east_fpn.py                 │   │   │   ├── EAST 算法的 fpn 网络
│   │   │   ├── sast_fpn.py                 │   │   │   ├── SAST 算法的 fpn 网络
│   │   │   ├── rnn.py                      │   │   │   ├── 识别 序列编码
│   │   ├── heads                           │   │   ├── 头函数
│   │   │   ├── __init__.py                 │   │   │   ├── 构造 head 相关代码
│   │   │   ├── cls_head.py                 │   │   │   ├── 方向分类器 分类头
│   │   │   ├── det_db_head.py              │   │   │   ├── DB 检测头
│   │   │   ├── det_east_head.py            │   │   │   ├── EAST 检测头
│   │   │   ├── det_sast_head.py            │   │   │   ├── SAST 检测头
│   │   │   ├── rec_ctc_head.py             │   │   │   ├── 识别 ctc
│   │   │   ├── rec_att_head.py             │   │   │   ├── 识别 attention
│   │   ├── transforms                      │   │   ├── 图像变换
│   │   │   ├── __init__.py                 │   │   │   ├── 构造 transform 相关代码
│   │   │   └── tps.py                      │   │   │   └── TPS 变换
│   ├── optimizer                           │   ├── 优化器
│   │   ├── __init__.py                     │   │   ├── 构造 optimizer 相关代码
│   │   └── learning_rate.py                │   │   └── 学习率衰减
│   │   └── optimizer.py                    │   │   └── 优化器
│   │   └── regularizer.py                  │   │   └── 网络正则化
│   ├── postprocess                         │   ├── 后处理
│   │   ├── cls_postprocess.py              │   │   ├── 方向分类器 后处理
│   │   ├── db_postprocess.py               │   │   ├── DB 后处理
│   │   ├── east_postprocess.py             │   │   ├── EAST 后处理
│   │   ├── locality_aware_nms.py           │   │   ├── NMS
│   │   ├── rec_postprocess.py              │   │   ├── 识别网络 后处理
│   │   └── sast_postprocess.py             │   │   └── SAST 后处理
│   └── utils                               │   └── 工具
│       ├── dict                            │       ├── 小语种字典
│            ....
│       ├── ic15_dict.txt                   │       ├── 英文数字字典,区分大小写
│       ├── ppocr_keys_v1.txt               │       ├── 中文字典,用于训练中文模型
│       ├── logging.py                      │       ├── logger
│       ├── save_load.py                    │       ├── 模型保存和加载函数
│       ├── stats.py                        │       ├── 统计
│       └── utility.py                      │       └── 工具函数
├── tools
│   ├── eval.py                             │   ├── 评估函数
│   ├── export_model.py                     │   ├── 导出 inference 模型
│   ├── infer                               │   ├── 基于预测引擎预测
│   │   ├── predict_cls.py
│   │   ├── predict_det.py
│   │   ├── predict_rec.py
│   │   ├── predict_system.py
│   │   └── utility.py
│   ├── infer_cls.py                        │   ├── 基于训练引擎 预测分类
│   ├── infer_det.py                        │   ├── 基于训练引擎 预测检测
│   ├── infer_rec.py                        │   ├── 基于训练引擎 预测识别
│   ├── program.py                          │   ├── 整体流程
│   ├── test_hubserving.py
│   └── train.py                            │   └── 启动训练
├── paddleocr.py
├── README_ch.md                            ├── 中文说明文档
├── README_en.md                            ├── 英文说明文档
├── README.md                               ├── 主页说明文档
├── requirements.txt                        ├── 安装依赖
├── setup.py                                ├── whl包打包脚本
├── train.sh                                ├── 启动训练脚本


