LeetCode刷题2:链表篇
提示:本篇共7道力扣题目供大家食用,时间自行把控~
算法刷题系列笔记
- LeetCode刷题1:数组篇
文章目录
- 算法刷题系列笔记
- 作者有话说
- 一、链表知识
-
- 1.1 什么是链表?
- 1.2 链表的类型
- 1.3 链表操作
- 二、经典题目
-
- 2.1 Leetcode203.移除链表元素
- 2.2 LeetCode707 设计链表
- 2.3 LeetCode206 反转链表
- 2.4 LeetCode24 两两交换链表中的节点
- 2.5 LeetCode19 删除链表的倒数第N个节点
- 2.6 LeetCode160 链表相交
- 2.7 LeetCode142 环形链表II
- 三、推荐题目
- 总结
作者有话说
1、本篇是算法刷题系列文章的第 2 篇,写此系列的目的是为了让自己对题目的理解更加深刻。
2、本系列博客主要参考了卡哥的 代码随想录博客 以及 卡哥本人B站讲解的视频 代码随想录B站视频 ,强烈推荐给大家,因为本人学习中 Python为主,因此博客主要由 Python 代码呈现给大家,需要其他语言的版本,卡哥博客链接自取。
一、链表知识
1.1 什么是链表?
链表是一种通过指针串联在一起的线性结构,每一个节点由两部分组成,一个是 数据域 一个是 指针域(存放指向下一个节点的指针),最后一个节点的指针域指向null(空指针的意思)。
链表在内存中不是连续分布的。
1.2 链表的类型
- 单链表: 只能从前往后进行遍历链表,结构如下图所示:

- 双链表: 每一个节点有两个指针域,一个指向下一个节点,一个指向上一个节点;既可以向前查询也可以向后查询。结构如下图所示:

- 循环链表: 链表首尾相连,结构如下图所示:

1.3 链表操作
- 删除节点: 删除节点C的操作如下图所示:

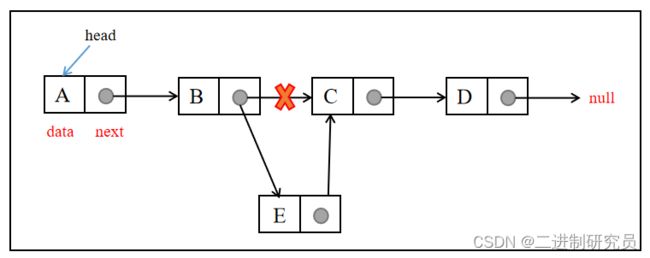
- 添加节点: 添加节点E;这里有三种插入方法:头插(设置虚拟头节点);尾插(先遍历链表找到链表的尾部,然后插入);在某个位置插入(遍历链表找到此位置,然后插入新节点)。添加节点操作如下图所示:
二、经典题目
2.1 Leetcode203.移除链表元素
- 原题地址: 203.移除链表元素
- 题目描述: 给你一个链表的头节点
head和一个整数val,请你删除链表中所有满足Node.val == val的节点,并返回 新的头节点 。 - 解题思路: 解决此题主要有两步:1、遍历链表找到满足题意的节点;2、删除对应的节点(只需让当前节点的前一个结点指向此节点后面的一个节点,即可达到删除节点的目的)。注意:添加一个虚拟头节点
dummy_head,使得删除头节点和其他节点的规则一致。 - 代码如下:
class Solution:
    def removeElements(self, head: Optional[ListNode], val: int) -> Optional[ListNode]:
        # 设置虚拟头节点
        dummy_head = ListNode(next=head)
        curNode = dummy_head
        while(curNode.next!=None):
            if(curNode.next.val == val):
                # 找到后,删除cur.next节点
                curNode.next = curNode.next.next
            else:
            	# 没找到,更新curNode
                curNode = curNode.next
        return dummy_head.next
2.2 LeetCode707 设计链表
- 原题地址: 707.设计链表
- 题目描述: 自己设计一个链表,具有以下功能:
get(index)获取链表中第index个节点的值;addAtHead(val)在链表的第一个元素之前添加一个值为val的节点;addAtTail(val)将值为val的节点追加到链表的最后一个元素;addAtIndex(index,val)在链表中的第index个节点之前添加值为val的节点;deleteAtIndex(index)如果索引index有效,则删除链表中的第index个节点。
- 解题思路: 无
- 代码如下: 单链表 + 双链表
单链表:
class Node:
    def __init__(self, val):
        self.val = val
        self.next = None
class MyLinkedList:

    def __init__(self):
        self._head = Node(0)
        self._count = 0

    def get(self, index: int) -> int:
        if 0 <= index <self._count:
            temp = self._head
            for i in range(index + 1):
                temp = temp.next
            return  temp.val
        else:
            return -1

    def addAtHead(self, val: int) -> None:
        self.addAtIndex(0, val)

    def addAtTail(self, val: int) -> None:
        self.addAtIndex(self._count, val)

    def addAtIndex(self, index: int, val: int) -> None:
        if index < 0:
            index =0
        elif index > self._count:
            return
        add_node = Node(val)
        curNode = self._head
        while index:
            curNode =  curNode.next
            index -= 1
        else:
            add_node.next, curNode.next = curNode.next, add_node
            # 计数累加
            self._count += 1

    def deleteAtIndex(self, index: int) -> None:

        if 0 <= index < self._count:
            curNode = self._head
            while index:
                curNode = curNode.next
                index -= 1
            curNode.next = curNode.next.next
            self._count -= 1
双链表: 相对于单链表,Node新增了prev属性
class Node:

    def __init__(self, val):
        self.val = val
        self.prev = None
        self.next = None

class MyLinkedList:

    def __init__(self):
    	# 虚拟节点
        self._head, self._tail = Node(0), Node(0)
        self._head.next, self._tail.prev = self._tail, self._head
        # 添加的节点数
        self._count = 0

    def _get_node(self, index: int) -> Node:
        # 当index小于_count//2时, 使用_head查找更快, 反之_tail更快
        if index >= self._count // 2:
            # 使用prev往前找
            node = self._tail
            for _ in range(self._count - index):
                node = node.prev
        else:
            # 使用next往后找
            node = self._head
            for _ in range(index + 1):
                node = node.next
        return node

    def get(self, index: int) -> int:

        if 0 <= index < self._count:
            node = self._get_node(index)
            return node.val
        else:
            return -1

    def addAtHead(self, val: int) -> None:

        self._update(self._head, self._head.next, val)

    def addAtTail(self, val: int) -> None:

        self._update(self._tail.prev, self._tail, val)

    def addAtIndex(self, index: int, val: int) -> None:

        if index < 0:
            index = 0
        elif index > self._count:
            return
        node = self._get_node(index)
        self._update(node.prev, node, val)

    def _update(self, prev: Node, next: Node, val: int) -> None:

        # 计数累加
        self._count += 1
        node = Node(val)
        prev.next, next.prev = node, node
        node.prev, node.next = prev, next

    def deleteAtIndex(self, index: int) -> None:

        if 0 <= index < self._count:
            node = self._get_node(index)
            # 计数-1
            self._count -= 1
            node.prev.next, node.next.prev = node.next, node.prev
2.3 LeetCode206 反转链表
- 原题地址: 206. 反转链表
- 题目描述: 给你单链表的头节点
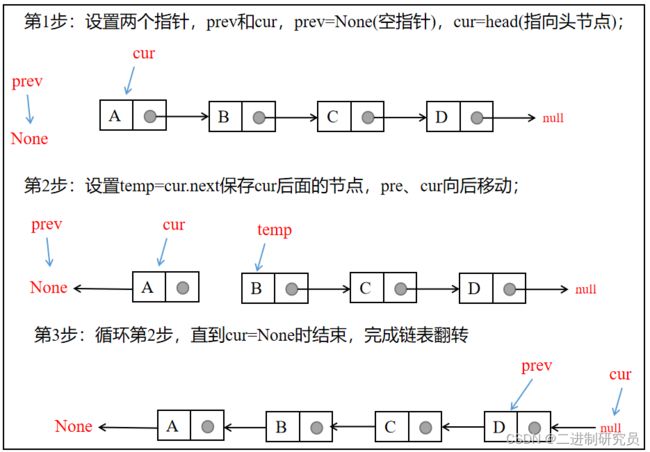
head,请你反转链表,并返回反转后的链表。 - 解题思路: 双指针法:看图解理解过程
第1步: 设置两个指针,prev和cur,prev=None(空指针),cur=head(指向头节点);
第2步: 设置temp=cur.next保存cur后面的节点,pre、cur向后移动;
第3步: 循环第2步,直到cur=None时结束,完成链表翻转;
第4步: 返回prev,即新链表的头节点。
- 代码如下:
法一:双指针
class Solution:
    def reverseList(self, head: Optional[ListNode]) -> Optional[ListNode]:
        cur = head
        pre = None
        while(cur!=None):
            # 保存一下 cur 的下一个节点
            temp = cur.next
            cur.next = pre #反转
            #更新pre、cur指针
            pre = cur
            cur = temp
        return pre
法二:递归
class Solution:
    def reverseList(self, head: Optional[ListNode]) -> Optional[ListNode]:

        def reverse(prev, cur):
            if not cur:
                return prev;
            temp = cur.next
            # 翻转操作
            cur.next = prev
            # 下一轮反转操作
            return reverse(cur, temp)
        return reverse(None, head)
2.4 LeetCode24 两两交换链表中的节点
- 原题地址: 24. 两两交换链表中的节点
- 题目描述: 给你一个链表,两两交换其中相邻的节点,并返回交换后链表的头节点。你必须在不修改节点内部的值的情况下完成本题(即,只能进行节点交换)。
- 解题思路: 题目要求不修改节点内部值完成,也就是让我们拿
整个节点去做交换操作。具体交换见图解。
第1步: 设置4个指针,dummy_head = ListNode(next=head)、prev、cur、post,prev=dummy_head(指向A节点),cur=prev.next(指向B节点),post=prev.next.next(指向C节点);
第2步: 根据 cur.next = post.next post.next = cur prev.next = post 更新各个指针;
第3步: 循环第2步,直到 prev.next == None(偶数节点) and prev.next.next = None(奇数节点)时结束.
- 代码如下:
class Solution:
    def swapPairs(self, head: Optional[ListNode]) -> Optional[ListNode]:
        dummy_head = ListNode(next=head)
        prev = dummy_head

        # 交换
        while prev.next and prev.next.next:
            cur = prev.next
            post = prev.next.next

            # prev,cur,post对应最左,中间的,最右边的节点
            cur.next = post.next
            post.next = cur
            prev.next = post

            prev = prev.next.next
        return dummy_head.next
2.5 LeetCode19 删除链表的倒数第N个节点
- 原题地址: 19.删除链表的倒数第N个节点
- 题目描述: 给你一个链表,删除链表的 倒数 第
n个结点,并且返回链表的头结点。 - 解题思路: 快慢指针法:
第1步: 定义fast指针和slow指针,初始值为虚拟头结点;
第2步:fast首先走n + 1步 ,为什么是n+1呢,因为只有这样同时移动的时候slow才能指向删除节点的上一个节点(方便做删除操作);
第3步:fast和slow同时移动,直到fast指向末尾,删除slow指向的下一个节点。 - 代码如下:
class Solution:
    def removeNthFromEnd(self, head: Optional[ListNode], n: int) -> Optional[ListNode]:

        dummy_head = ListNode()
        dummy_head.next = head

        # 第 1 步:初始化
        slow, fast = dummy_head, dummy_head
        # 第 2 步: fast先往前走n步
        while(n!=0):
            fast = fast.next
            n -= 1
        # 第 3 步: fast 走到结尾后,slow 的下一个节点为倒数第N个节点
        while(fast.next!=None):
            slow = slow.next
            fast = fast.next
        # 删除节点
        slow.next = slow.next.next
        return dummy_head.next
2.6 LeetCode160 链表相交
- 原题地址: 160. 链表相交
- 题目描述: 给你两个单链表的头节点
headA和headB,请你找出并返回两个单链表相交的起始节点。如果两个链表不存在相交节点,返回null。 - 解题思路: 根据
快慢法则,走的快的一定会追上走得慢的。在这道题里,有的链表短,他走完了就去走另一条链表,我们可以理解为走的快的指针。那么,只要其中一个链表走完了,就去走另一条链表的路。如果有交点,他们最终一定会在同一个位置相遇。 - 代码如下:
class Solution:
    def getIntersectionNode(self, headA: ListNode, headB: ListNode) -> ListNode:

        if headA is None or headB is None:
            return None
        cur_a, cur_b = headA, headB     # 用两个指针代替a和b


        while cur_a != cur_b:
        	# 如果a走完了,那么就切换到b走
            cur_a = cur_a.next if cur_a else headB
            # 同理,b走完了就切换到a
            cur_b = cur_b.next if cur_b else headA

        return cur_a
2.7 LeetCode142 环形链表II
- 原题地址: 142.环形链表II
- 题目描述: 给定一个链表的头节点
head,返回链表开始入环的第一个节点。 如果链表无环,则返回null。如果链表中有某个节点,可以通过连续跟踪next指针再次到达,则链表中存在环。 为了表示给定链表中的环,评测系统内部使用整数pos来表示链表尾连接到链表中的位置(索引从0开始)。如果pos是-1,则在该链表中没有环。注意:pos不作为参数进行传递,仅仅是为了标识链表的实际情况。 不允许修改链表。 - 解题思路: 分两步解决:1、判断链表是否环(快慢指针法);2、如果有环,如何找到这个环的入口(两个指针相遇的时候就是 环形入口的节点)。
- 代码如下:
class Solution:
    def detectCycle(self, head: ListNode) -> ListNode:
        slow, fast = head, head
        while fast and fast.next:
            slow = slow.next
            fast = fast.next.next
            # 如果相遇
            if slow == fast:
                p = head
                q = slow
                while p!=q:
                    p = p.next
                    q = q.next
                return p

        return None
三、推荐题目
- 92. 反转链表 II
- 234. 回文链表
- 83. 删除排序链表中的重复元素
- 82. 删除排序链表中的重复元素 II
- 141. 环形链表
- 1669. 合并两个链表
总结
链表篇到这里就结束了,若文章中有表述不当的地方还望大家多多指出,哈希表篇见吧。


