PyTorch学习笔记一:Tensors张量
PyTorch学习笔记一:Tensors张量
- 一、张量是什么?
- 二、张量的简单使用
-
- 1. 生成特定形状的随机张量
-
- 函数:torch.rand()
- 实例:
- 2. 生成某特定张量
-
- 函数:torch.tensor()
- 实例:
- 3. 修改张量中某一元素的值
-
- 张量名[第一维序号][第二维序号]...
- 实例:
- 4. 生成元素全为0的张量
-
- 函数:torch.zeros()
- 实例:
- 5. 生成元素全为1的张量
-
- 函数:torch.ones()
- 实例:
- 6. 相同形状张量的加减乘除
-
- 实例:
- 7. 从只有一个元素的张量中取出元素的值
-
- 函数:张量名.item()
- 实例:
- 8. 查看张量所在设备(CPU/CUDA)
-
- 对象:张量名.device
- 实例:
- 9. 将一个张量复制到另一个设备
-
- 函数:张量名.to(设备名)
- 实例:
- 10. 取张量中最大/最小的一个元素做一个新的张量
-
- 函数:张量名.max()/min()
- 实例:
- 11. 查看张量类型
-
- 函数:张量名.type()
- 实例:
- 12. 张量类型转换
-
- 函数:张量名.to(dtype)
- 实例:
- 15. 查看张量形状
-
- 对象:张量名.shape
- 实例:
- 14. 张量的形状改变
-
- 函数:张量名.reshape()
- 实例:
- 15. 改变张量维度顺序
-
- 函数:张量名.permute()
- 实例:
- 16. 张量的广播
-
- 实例:
- 三、参考
一、张量是什么?
A tensor is both a container for numbers as well as a set of rules that define transformations between tensors that produce new tensors[1].
张量既是数字的容器,也是一组规则,这些规则定义了产生新张量的张量之间的转换。
其实张量可以相似地理解为多维数组。
二、张量的简单使用
1. 生成特定形状的随机张量
函数:torch.rand()
实例:
import torch
print(torch.rand(2, 3))
2. 生成某特定张量
函数:torch.tensor()
实例:
import torch
x = torch.tensor([[0,0,1],[1,1,1],[0,0,0]])
print(x)
3. 修改张量中某一元素的值
张量名[第一维序号][第二维序号]…
实例:
import torch
x = torch.tensor([[0,0,1],[1,1,1],[0,0,0]])
x[0][0] = 5
print(x)
4. 生成元素全为0的张量
函数:torch.zeros()
实例:
import torch
print(torch.zeros(3, 4))
5. 生成元素全为1的张量
函数:torch.ones()
实例:
import torch
print(torch.ones(2, 2))
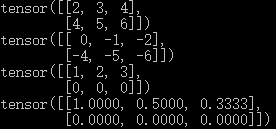
6. 相同形状张量的加减乘除
实例:
import torch
a = torch.tensor([[1,1,1],[0,0,0]])
b = torch.tensor([[1,2,3],[4,5,6]])
print(a + b)
print(a - b)
print(a * b)
print(a / b)
7. 从只有一个元素的张量中取出元素的值
函数:张量名.item()
实例:
import torch
x = torch.rand(1)
y = torch.rand(1,1,1)
print(x)
print(x.item())
print(y)
print(y.item())
8. 查看张量所在设备(CPU/CUDA)
对象:张量名.device
实例:
import torch
x = torch.rand(2)
print(x.device)
输出:
![]()
9. 将一个张量复制到另一个设备
函数:张量名.to(设备名)
实例:
import torch
x = torch.rand(2)
y = x.to('cuda')
print(y.device)
输出:
![]()
10. 取张量中最大/最小的一个元素做一个新的张量
函数:张量名.max()/min()
实例:
import torch
x = torch.rand(2,3)
print(x)
print(x.max())
print(x.max().item())

print()
print(x.min())
11. 查看张量类型
函数:张量名.type()
实例:
import torch
x = torch.rand(2,3)
print(x.type())
输出:
![]()
12. 张量类型转换
函数:张量名.to(dtype)
实例:
import torch
x = torch.tensor([[1,2.2,3],[4,5,0.3]])
y = x.to(dtype=torch.int)
print(y)
print(y.type())
15. 查看张量形状
对象:张量名.shape
实例:
import torch
x = torch.tensor([[1,2,3],[4,5,6]])
print(x.shape)
输出:
![]()
14. 张量的形状改变
函数:张量名.reshape()
实例:
import torch
x = torch.tensor([[1,2,3],[4,5,6]])
y = x.reshape(6)
print(y)
print(y.shape)
15. 改变张量维度顺序
函数:张量名.permute()
实例:
import torch
x = torch.tensor([[1,2,3],[4,5,6]])
y = x.permute(1,0)
print(y)
print(y.shape)
16. 张量的广播
实例:
import torch
x = torch.tensor([[1,2,3],[4,5,6]])
print(x * 2)
三、参考
《Programming PyTorch for Deep Learning》


