深度学习部署
ONNX
- ONNX官网:https://onnx.ai/
- AutoDeployAI官网:https://www.autodeploy.ai/
- 深度学习模型转换与部署那些事(含ONNX格式详细分析)
- 使用ONNX部署深度学习和传统机器学习模型 - 知乎
- ONNX Runtime:https://github.com/microsoft/onnxruntime
- ONNX Github:https://github.com/onnx/onnx
- README/introduce.md at main · FelixFu520/README · GitHub
什么是ONNX?
现如今,各大主流深度学习框架都有着自己独有的特点与魅力,吸引着广大科研与开发人员,例如:
- Caffe2:方便机器学习算法和模型大规模部署在移动设备
- PyTorch:PyTorch是一个快速便于实验深度学习框架。但是由于其高度封装,导致部分function不够灵活
- TensorFlow:TensorFlow 是一个开放源代码软件库,是很多主流框架的基础或者依赖。几乎能满足所有机器学习开发的功能,但是也有由于其功能代码过于底层,学习成本高,代码冗繁,编程逻辑与常规不同等缺点。
此外还有:Cognitive Toolkit (CNTK),Apache MXNet,Chainer,Apple CoreML,SciKit-Learn,ML.NET
深度学习算法大多通过计算数据流图来完成神经网络的深度学习过程。 一些框架(例如CNTK,Caffe2,Theano和TensorFlow)使用静态图形,而其他框架(例如PyTorch和Chainer)使用动态图形。 但是这些框架都提供了接口,使开发人员可以轻松构建计算图和运行时,以优化的方式处理图。 这些图用作中间表示(IR),捕获开发人员源代码的特定意图,有助于优化和转换在特定设备(CPU,GPU,FPGA等)上运行
此时,ONNX便应运而生,Caffe2,PyTorch,Microsoft Cognitive Toolkit,Apache MXNet等主流框架都对ONNX有着不同程度的支持。这就便于了我们的算法及模型在不同的框架之间的迁移。
典型的几个线路:
- Pytorch -> ONNX -> TensorRT
- Pytorch -> ONNX -> TVM
- TF – ONNX – ncnn
ONNX是一套表示深度神经网络模型的开放格式,可以支持传统非神经网络机器学习模型。
ONNX规范由以下几个部分组成:
- 一个可扩展的计算图模型:定义了通用的计算图中间表示法(Intermediate Representation)。
- 内置操作符集:
ai.onnx和ai.onnx.ml,ai.onnx是默认的操作符集,主要针对神经网络模型,ai.onnx.ml主要适用于传统非神经网络机器学习模型。 - 标准数据类型。包括张量(tensors)、序列(sequences)和映射(maps)
ONNX神经网络变体只使用张量作为输入和输出;而作为支持传统机器学习模型的ONNX-ML,还可以识别序列和映射,ONNX-ML为支持非神经网络算法扩展了ONNX操作符集。
言简意赅:利用PyTorch训练好了一个模型,将其保存为pt文件,读取这个文件相当于预加载了权重信息。我们可以将pt文件转换为onnx文件,这其中不仅包含了权重值,也包含了神经网络的网络流动信息以及每一层网络的输入输出信息和一些其他的辅助信息。
例子:
from sklearn.datasets import load_iris
from sklearn.model_selection import train_test_split
from sklearn.linear_model import LogisticRegression

iris = load_iris()
X, y = iris.data, iris.target
X_train, X_test, y_train, y_test = train_test_split(X, y)

clr = LogisticRegression()
clr.fit(X_train, y_train)
将模型序列化为ONNX格式
from skl2onnx import convert_sklearn
from skl2onnx.common.data_types import FloatTensorType

initial_type = [('float_input', FloatTensorType([1, 4]))]
onx = convert_sklearn(clr, initial_types=initial_type)
with open("logreg_iris.onnx", "wb") as f:
    f.write(onx.SerializeToString())
查看验证模型
import onnx

model = onnx.load('logreg_iris.onnx')
print(model)
输出信息:
ir_version: 5
producer_name: "skl2onnx"
producer_version: "1.5.1"
domain: "ai.onnx"
model_version: 0
doc_string: ""
graph {
  node {
    input: "float_input"
    output: "label"
    output: "probability_tensor"
    name: "LinearClassifier"
    op_type: "LinearClassifier"
    attribute {
      name: "classlabels_ints"
      ints: 0
      ints: 1
      ints: 2
      type: INTS
    }
    attribute {
      name: "coefficients"
      floats: 0.375753253698349
      floats: 1.3907358646392822
      floats: -2.127762794494629
      floats: -0.9207873344421387
      floats: 0.47902926802635193
      floats: -1.5524250268936157
      floats: 0.46959221363067627
      floats: -1.2708674669265747
      floats: -1.5656673908233643
      floats: -1.256540060043335
      floats: 2.18996000289917
      floats: 2.2694246768951416
      type: FLOATS
    }
    attribute {
      name: "intercepts"
      floats: 0.24828049540519714
      floats: 0.8415762782096863
      floats: -1.0461325645446777
      type: FLOATS
    }
    attribute {
      name: "multi_class"
      i: 1
      type: INT
    }
    attribute {
      name: "post_transform"
      s: "LOGISTIC"
      type: STRING
    }
    domain: "ai.onnx.ml"
  }
  node {
    input: "probability_tensor"
    output: "probabilities"
    name: "Normalizer"
    op_type: "Normalizer"
    attribute {
      name: "norm"
      s: "L1"
      type: STRING
    }
    domain: "ai.onnx.ml"
  }
  node {
    input: "label"
    output: "output_label"
    name: "Cast"
    op_type: "Cast"
    attribute {
      name: "to"
      i: 7
      type: INT
    }
    domain: ""
  }
  node {
    input: "probabilities"
    output: "output_probability"
    name: "ZipMap"
    op_type: "ZipMap"
    attribute {
      name: "classlabels_int64s"
      ints: 0
      ints: 1
      ints: 2
      type: INTS
    }
    domain: "ai.onnx.ml"
  }
  name: "deedadd605a34d41ac95746c4feeec1f"
  input {
    name: "float_input"
    type {
      tensor_type {
        elem_type: 1
        shape {
          dim {
            dim_value: 1
          }
          dim {
            dim_value: 4
          }
        }
      }
    }
  }
  output {
    name: "output_label"
    type {
      tensor_type {
        elem_type: 7
        shape {
          dim {
            dim_value: 1
          }
        }
      }
    }
  }
  output {
    name: "output_probability"
    type {
      sequence_type {
        elem_type {
          map_type {
            key_type: 7
            value_type {
              tensor_type {
                elem_type: 1
              }
            }
          }
        }
      }
    }
  }
}
opset_import {
  domain: ""
  version: 9
}
opset_import {
  domain: "ai.onnx.ml"
  version: 1
}
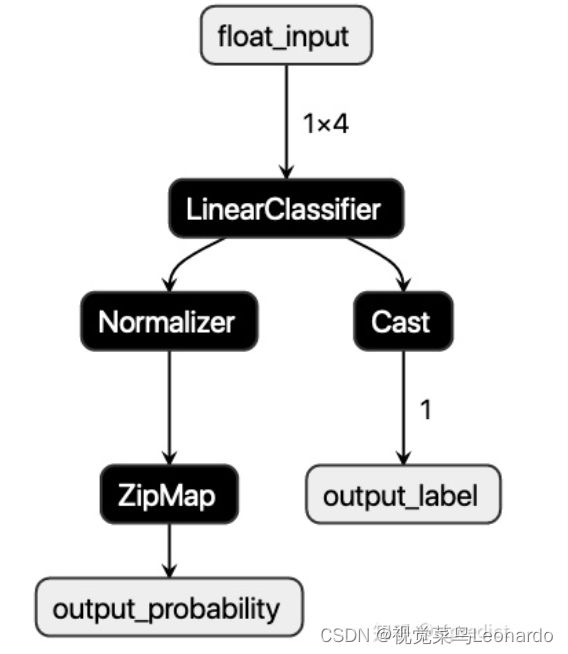
使用netron,可以图像化显示ONNX模型的计算拓扑图;
导入模型后,需要使用ONNX Runtime来预测:
import onnxruntime as rt
import numpy
sess = rt.InferenceSession("logreg_iris.onnx")
input_name = sess.get_inputs()[0].name
label_name = sess.get_outputs()[0].name
probability_name = sess.get_outputs()[1].name
pred_onx = sess.run([label_name, probability_name], {input_name: X_test[0].astype(numpy.float32)})

# print info
print('input_name: ' + input_name)
print('label_name: ' + label_name)
print('probability_name: ' + probability_name)
print(X_test[0])
print(pred_onx)
打印的模型信息和预测值:
input_name: float_input
label_name: output_label
probability_name: output_probability
[5.5 2.6 4.4 1.2]
[array([1], dtype=int64), [{0: 0.012208569794893265, 1: 0.5704444646835327, 2: 0.4173469841480255}]]
完整程序:onnx.ipynb
ONNX结构分析
对于ONNX的了解,很多人可能仅仅停留在它是一个开源的深度学习模型标准,能够用于模型转换及部署但是对于其内部是如何定义这个标准,如何实现和组织的,却并不十分了解,所以在转换模型到ONNX的过程中,对于出现的不兼容不支持的问题有些茫然。
ONNX结构的定义基本都在这一个onnx.proto文件里面了,如何你对protobuf不太熟悉的话,可以先简单了解一下再回来看这个文件。当然我们也不必把这个文件每一行都看明白,只需要了解其大概组成即可,有一些部分几乎不会使用到可以忽略。
这里我把需要重点了解的对象列出来
- ModelProto
- GraphProto
- NodeProto
- AttributeProto
- ValueInfoProto
- TensorProto
我用尽可能简短的语言描述清楚上述几个Proto之间的关系:当我们将ONNX模型load进来之后,得到的是一个ModelProto,它包含了一些版本信息,生产者信息和一个非常重要的GraphProto;在GraphProto中包含了四个关键的repeated数组,分别是node(NodeProto类型),input(ValueInfoProto类型),output(ValueInfoProto类型)和initializer(TensorProto类型),其中node中存放着模型中的所有计算节点,input中存放着模型所有的输入节点,output存放着模型所有的输出节点,initializer存放着模型所有的权重;那么节点与节点之间的拓扑是如何定义的呢?非常简单,每个计算节点都同样会有input和output这样的两个数组(不过都是普通的string类型),通过input和output的指向关系,我们就能够利用上述信息快速构建出一个深度学习模型的拓扑图。最后每个计算节点当中还包含了一个AttributeProto数组,用于描述该节点的属性,例如Conv层的属性包含group,pads和strides等等,具体每个计算节点的属性、输入和输出可以参考这个Operators.md文档。
需要注意的是,刚才我们所说的GraphProto中的input输入数组不仅仅包含我们一般理解中的图片输入的那个节点,还包含了模型当中所有权重。举个例子,Conv层中的W权重实体是保存在initializer当中的,那么相应的会有一个同名的输入在input当中,其背后的逻辑应该是把权重也看作是模型的输入,并通过initializer中的权重实体来对这个输入做初始化(也就是把值填充进来)
PyTorch模型转ONNX
在PyTorch推出jit之后,很多情况下我们直接用torch scirpt来做inference会更加方便快捷,并不需要转换成ONNX格式了,当然如果你追求的是极致的效率,想使用TensorRT的话,那么还是建议先转换成ONNX的。
import torch
import torchvision

dummy_input = torch.randn(10, 3, 224, 224, device='cuda')
model = torchvision.models.alexnet(pretrained=True).cuda()

# Providing input and output names sets the display names for values
# within the model's graph. Setting these does not change the semantics
# of the graph; it is only for readability.
#
# The inputs to the network consist of the flat list of inputs (i.e.
# the values you would pass to the forward() method) followed by the
# flat list of parameters. You can partially specify names, i.e. provide
# a list here shorter than the number of inputs to the model, and we will
# only set that subset of names, starting from the beginning.
input_names = [ "actual_input_1" ] + [ "learned_%d" % i for i in range(16) ]
output_names = [ "output1" ]

torch.onnx.export(model, dummy_input, "alexnet.onnx", verbose=True, input_names=input_names, output_names=output_names)
目标平台是CUDA或者X86的话,又怕环境配置麻烦采坑,比较推荐使用的是微软的;onnxruntime如果想直接使用ONNX模型来做部署的话,可以考虑转换成TensorRT(目标平台是CUDA又追求极致的效率);如果目标平台是ARM或者其他IoT设备,那么就要考虑使用端侧推理框架了,例如NCNN、MNN和MACE等等
转为TensorRT:
需要先搭建好TensorRT的环境,然后可以直接使用TensorRT对ONNX模型进行推理;然后更为推荐的做法是将ONNX模型转换为TensorRT的engine文件,这样可以获得最优的性能
第三种情况的话一般问题也不大,由于是在端上执行,计算力有限,所以确保你的模型是经过精简和剪枝过的能够适配移动端的。几个端侧推理框架的性能到底如何并没有定论,由于大家都是手写汇编优化,以卷积为例,有的框架针对不同尺寸的卷积都各写了一种汇编实现,因此不同的模型、不同的端侧推理框架,不同的ARM芯片都有可能导致推理的性能有好有坏,这都是正常情况。
TensorRT
- TensorRT_Document
- TensorRT学习
- INT8校准原理
- TensorRT官方Github,里面有samples
- ONNX2TensorRT工具
- IOT,torch2TensorRT工具
- TensorRT官方手册 | 用户手册
- TensorRT官网
- TensorRT C++ API
- 官方案例学习
- NVIDIA官网| TensorRT 支持矩阵 | TensorRT SDK|Get Started With TensorRT
- 俊宇的博客|ONNX-TensorRT GitHub|tensorrt-yolov3|
