ubuntu显卡驱动下载安装
目录
1、ubuntu18.04使用默认专有驱动
2、手动安装显卡驱动
3、手动安装错误处理
4、显卡相关指令
验证环境:ubuntu18.04、ubuntu16.04
1、ubuntu18.04使用默认专有驱动
软件和更新->ubuntu软件->选择设备的专有驱动。
软件和更新->附加驱动。选择专有驱动。这里我选择450。
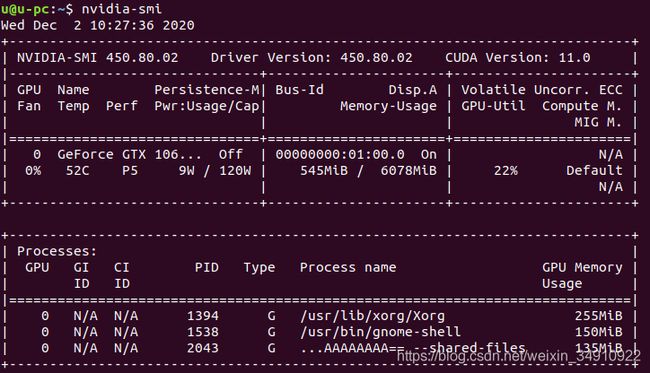
应用后,终端输入:nvidia-smi,可看到显卡相关信息。
2、手动安装显卡驱动
下载地址:https://www.nvidia.com/Download/index.aspx?lang=cn
这里我使用450驱动,文件地址:
https://cn.download.nvidia.cn/XFree86/Linux-x86_64/450.51/NVIDIA-Linux-x86_64-450.51.run
step1、屏蔽nouveau驱动
未添加报错:"The Nouveau kernel driver is currently in use by your sys."
Ubuntu系统集成的显卡驱动程序是nouveau,它是第三方为NVIDIA开发的开源驱动,我们需要先将其屏蔽才能安装NVIDIA官方驱动。 所以我们要先把驱动加到黑名单blacklist.conf里,我们要先修改该文件的属性才能编辑。
查看是否成功禁用:
只要是安装过NVIDIA显卡驱动的,nouveau一般都被禁止了。可以通过命令:
lsmod | grep nouveau
查看。如果没有任何输出就是禁用成功了。否则,请参考禁用步骤。
禁用步骤:
1)创建/etc/modprobe.d/blacklist-nouveau.conf文件,你可以通过如下命令:
sudo gedit /etc/modprobe.d/blacklist.conf2)填入以下内容:
blacklist nouveau options nouveau modeset=03)重新生成kernel initramfs
sudo update-initramfs -u4)重启电脑
sudo rebootstep2、安装驱动
1、首先在官网下载对应驱动NVIDIA-Linux-x86_64-xxxx.run,拷贝到Linux某个目录后先改权限。
自动下载地址: https://www.nvidia.com/Download/index.aspx?lang=cn(自动地址最近刷新很慢)
手动下载地址: https://www.nvidia.cn/geforce/drivers/
这里我使用450驱动,文件地址:
https://cn.download.nvidia.cn/XFree86/Linux-x86_64/450.51/NVIDIA-Linux-x86_64-450.51.run
2、卸载原驱动
sudo apt-get remove --purge nvidia* # 提示有残留可以接 sudo apt autoremove3、关闭显示服务(ubuntu18.04本机安装此步骤可略过)
Ctrl+Alt+F1
或:
sudo service lightdm stop
4、安装一些必要的依赖
sudo apt install dkms build-essential linux-headers-generic
sudo apt install gcc g++ make
5、运行安装程序
chmod 777 NVIDIA-Linux-x86_64-450.51.run
sudo ./NVIDIA-Linux-x86_64-450.51.run
驱动安装选择选项如下:
The distribution-provided pre-install script failed! Are you sure you want to continue? 选择 yes 继续。
Would you like to register the kernel module souces with DKMS? This will allow DKMS to automatically build a new module, if you install a different kernel later? 选择 No 继续。
Nvidia’s 32-bit compatibility libraries? 选择 No 继续。
Would you like to run the nvidia-xconfig utility to automatically update your x configuration so that the NVIDIA x driver will be used when you restart x? Any pre- existing x confile will be backed up. 选择 No 继续
6、安装后再重启显示(ubuntu18.04本机安装此步骤可略过)
Ctrl+Alt+F7
或:
sudo service lightdm start
7、验证驱动安装完成
nvidia-smi3、手动安装错误处理
1)已经禁用nouveau还是提示:You appear to be running an X server
一般会提示:
ERROR: Installation has failed. Please see the file '/var/log/nvidia-installer.log' for details. You may find suggestions on fixing installation problems in the README available on t
打开这个文件之后,会告诉你在/tmp下有文件冲突,比如我这里提示是.X0-lock,所以我们直接删掉这个文件就好了。
sudo rm -rf /tmp/log/.X0-lock2)打开或关闭图形界面(ubuntu18.04本机安装此步骤可略过)
关闭图形界面:ubuntu16.04下为Ctrl+Alt+F1,ubuntu18.04为Ctrl+Alt+F5为,(过程中出现星号则证明需要输入密码)
打开图形界面:再按ubuntu16.04为Ctrl+Alt+F7(ubuntu18.04为Ctrl+Alt+F1),回到图形界面即可。
也可通过lightdm工具进行设置,但不推荐,没有lightdm时,还需要安装包。
关闭图形界面:
sudo service lightdm stop如果提示unit lightdm.service not loaded,则先安装LightDm: sudo apt install lightdm。
开启图形界面:
sudo service lightdm start //启动图形界面3)纯净版ubuntu16.04下安装error处理
1、unable to find module utility 'modprobe'
执行:
apt-get install -y module-init-tools kmod2、报错:WARNING: Unable to find suitable destination to install 32-bit compatibility libraries
解决办法:
sudo dpkg --add-architecture i386
sudo apt update
sudo apt install libc6:i386
4、显卡相关指令
1)在终端输入命令,实时查看GPU的使用情况:
watch -n 1 nvidia-smi2)其它
ubuntu-drivers devices # 查看显卡型号
lshw -numeric -C display # 查看电脑显卡的型号


