NNDL 作业5:卷积
作业1
编程实现

卷积神经网络工作原理的直观理解_superdont的博客-CSDN博客
![]()
import torch
import matplotlib.pyplot as plt
import torch.nn.functional as F
import numpy as np
#生成图片
def create_pic():
picture = torch.Tensor([[0,0,0,255,255,255],
[0,0,0,255,255,255],
[0,0,0,255,255,255],
[0,0,0,255,255,255],
[0,0,0,255,255,255]])
return picture
#确定卷积网络
class MyNet(torch.nn.Module):
def __init__(self,kernel,kshape):
super(MyNet, self).__init__()
kernel = torch.reshape(kernel,kshape)
self.weight = torch.nn.Parameter(data=kernel, requires_grad=False)
def forward(self, picture):
picture = F.conv2d(picture,self.weight,stride=1,padding=0)
return picture
#确定卷积层
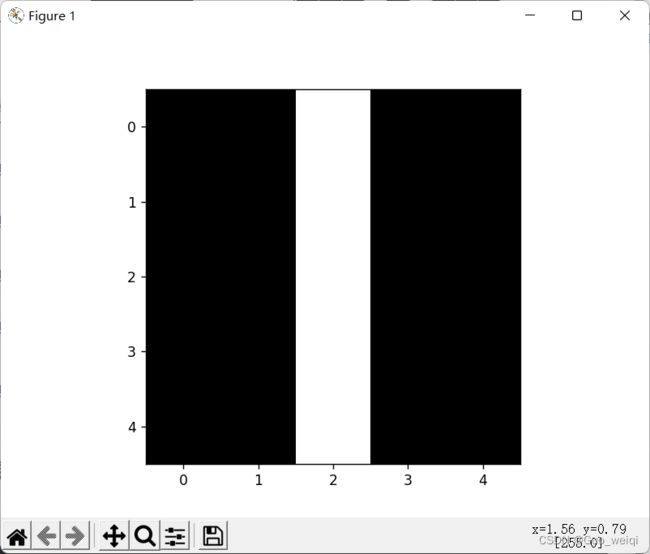
kernel = torch.tensor([-1.0,1.0])
#更改卷积层的形状适应卷积函数
kshape = (1,1,1,2)
#生成模型
model = MyNet(kernel=kernel,kshape=kshape)
#生成图片
picture = create_pic()
#更改图片的形状适应卷积层
picture = torch.reshape(picture,(1,1,5,6))
output = model(picture)
output = torch.reshape(output,(5,5))
plt.imshow(output,cmap='gray')
plt.show()

import torch
import matplotlib.pyplot as plt
import torch.nn.functional as F
import numpy as np
#生成图片
def create_pic():
    picture = torch.Tensor([[0,0,0,255,255,255],
                      [0,0,0,255,255,255],
                      [0,0,0,255,255,255],
                      [0,0,0,255,255,255],
                      [0,0,0,255,255,255]])
    return picture
#确定卷积网络
class MyNet(torch.nn.Module):
    def __init__(self,kernel,kshape):
        super(MyNet, self).__init__()
        kernel = torch.reshape(kernel,kshape)
        self.weight = torch.nn.Parameter(data=kernel, requires_grad=False)
    def forward(self, picture):
        picture = F.conv2d(picture,self.weight,stride=1,padding=0)
        return  picture
kernel = torch.tensor([-1.0,1.0])
#更改卷积和的形状为转置
kshape = (1,1,2,1)
model = MyNet(kernel=kernel,kshape=kshape)
picture = create_pic()
picture = torch.reshape(picture,(1,1,5,6))
output = model(picture)
output = torch.reshape(output,(6,4))
plt.imshow(output,cmap='gray')
plt.show()

![]()
import torch
import matplotlib.pyplot as plt
import torch.nn.functional as F
import numpy as np
#生成图片
def create_pic():
picture = torch.Tensor([[0,0,0,255,255,255],
[0,0,0,255,255,255],
[0,0,0,255,255,255],
[0,0,0,255,255,255],
[0,0,0,255,255,255]])
return picture
#确定卷积网络
class MyNet(torch.nn.Module):
def __init__(self,kernel,kshape):
super(MyNet, self).__init__()
kernel = torch.reshape(kernel,kshape)
self.weight = torch.nn.Parameter(data=kernel, requires_grad=False)
def forward(self, picture):
picture = F.conv2d(picture,self.weight,stride=1,padding=0)
return picture
#生成图像
def create_pic():
picture = torch.Tensor([[0,0,0,255,255,255],
[0,0,0,255,255,255],
[0,0,0,255,255,255],
[255,255,255,0,0,0],
[255,255,255,0,0,0],
[255,255,255,0,0,0]])
return picture
#确定卷积核
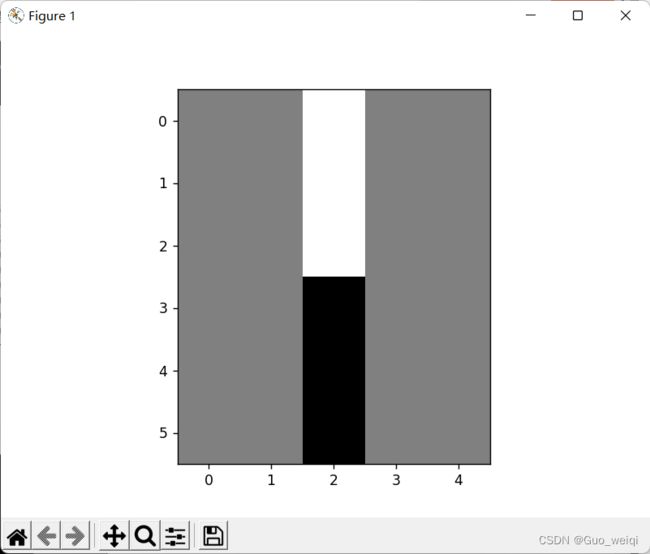
kernel = torch.tensor([-1.0,1.0])
kshape = (1,1,1,2)
#生成模型
model = MyNet(kernel=kernel,kshape=kshape)
picture = create_pic()
picture = torch.reshape(picture,(1,1,6,6))
print(picture)
output = model(picture)
output = torch.reshape(output,(6,5))
print(output)
plt.imshow(output,cmap='gray')
plt.show()

import torch
import matplotlib.pyplot as plt
import torch.nn.functional as F
import numpy as np
#生成图片
def create_pic():
picture = torch.Tensor([[0,0,0,255,255,255],
[0,0,0,255,255,255],
[0,0,0,255,255,255],
[0,0,0,255,255,255],
[0,0,0,255,255,255]])
return picture
#确定卷积网络
class MyNet(torch.nn.Module):
def __init__(self,kernel,kshape):
super(MyNet, self).__init__()
kernel = torch.reshape(kernel,kshape)
self.weight = torch.nn.Parameter(data=kernel, requires_grad=False)
def forward(self, picture):
picture = F.conv2d(picture,self.weight,stride=1,padding=0)
return picture
#生成图像
def create_pic():
picture = torch.Tensor([[0,0,0,255,255,255],
[0,0,0,255,255,255],
[0,0,0,255,255,255],
[255,255,255,0,0,0],
[255,255,255,0,0,0],
[255,255,255,0,0,0]])
return picture
#生成图像
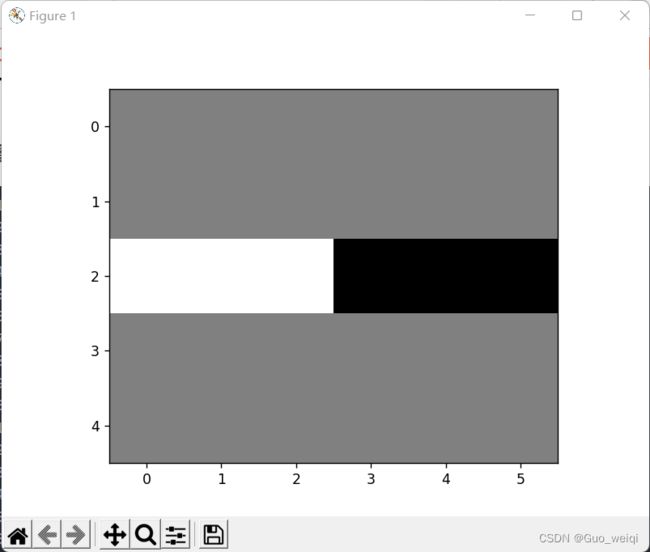
kernel = torch.tensor([-1.0,1.0])
kshape = (1,1,2,1)
model = MyNet(kernel=kernel,kshape=kshape)
picture = create_pic()
picture = torch.reshape(picture,(1,1,6,6))
print(picture)
output = model(picture)
output = torch.reshape(output,(5,6))
print(output)
plt.imshow(output,cmap='gray')
plt.show()

import torch
import matplotlib.pyplot as plt
import torch.nn.functional as F
import numpy as np
#生成图片
def create_pic():
picture = torch.Tensor([[0,0,0,255,255,255],
[0,0,0,255,255,255],
[0,0,0,255,255,255],
[0,0,0,255,255,255],
[0,0,0,255,255,255]])
return picture
#确定卷积网络
class MyNet(torch.nn.Module):
def __init__(self,kernel,kshape):
super(MyNet, self).__init__()
kernel = torch.reshape(kernel,kshape)
self.weight = torch.nn.Parameter(data=kernel, requires_grad=False)
def forward(self, picture):
picture = F.conv2d(picture,self.weight,stride=1,padding=0)
return picture
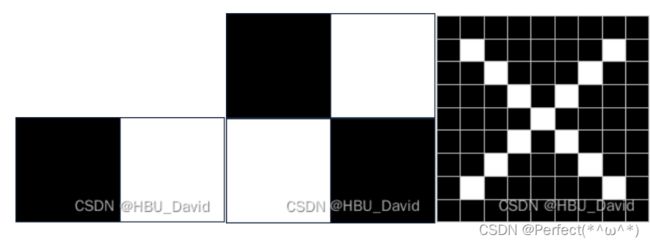
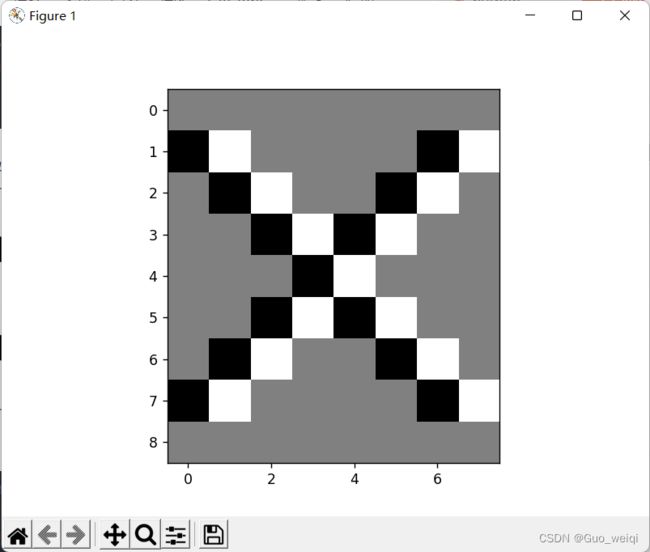
def create_pic():
picture = torch.Tensor(
[[255,255,255,255,255,255,255,255,255],
[255,0 ,255,255,255,255,255,0 ,255],
[255,255,0 ,255,255,255,0 ,255,255],
[255,255,255,0 ,255,0 ,255,255,255],
[255,255,255,255,0 ,255,255,255,255],
[255,255,255,0 ,255,0 ,255,255,255],
[255,255,0 ,255,255,255,0 ,255,255],
[255,0 ,255,255,255,255,255,0 ,255],
[255,255,255,255,255,255,255,255,255],])
return picture
#生成卷积核
kernel = torch.tensor([-1.0,1.0])
#更改卷积核的形状适应卷积函数
kshape = (1,1,1,2)
model = MyNet(kernel=kernel,kshape=kshape)
picture = create_pic()
picture = torch.reshape(picture,(1,1,9,9))
print(picture)
output = model(picture)
output = torch.reshape(output,(9,8))
print(output)
plt.imshow(output,cmap='gray')
plt.show()
import torch
import matplotlib.pyplot as plt
import torch.nn.functional as F
import numpy as np
#生成图片
def create_pic():
    picture = torch.Tensor([[0,0,0,255,255,255],
                      [0,0,0,255,255,255],
                      [0,0,0,255,255,255],
                      [0,0,0,255,255,255],
                      [0,0,0,255,255,255]])
    return picture
#确定卷积网络
class MyNet(torch.nn.Module):
    def __init__(self,kernel,kshape):
        super(MyNet, self).__init__()
        kernel = torch.reshape(kernel,kshape)
        self.weight = torch.nn.Parameter(data=kernel, requires_grad=False)
    def forward(self, picture):
        picture = F.conv2d(picture,self.weight,stride=1,padding=0)
        return  picture
def create_pic():
    picture = torch.Tensor(
                     [[255,255,255,255,255,255,255,255,255],
                      [255,0  ,255,255,255,255,255,0  ,255],
                      [255,255,0  ,255,255,255,0  ,255,255],
                      [255,255,255,0  ,255,0  ,255,255,255],
                      [255,255,255,255,0  ,255,255,255,255],
                      [255,255,255,0  ,255,0  ,255,255,255],
                      [255,255,0  ,255,255,255,0  ,255,255],
                      [255,0  ,255,255,255,255,255,0  ,255],
                      [255,255,255,255,255,255,255,255,255],])
    return picture
kernel = torch.tensor([-1.0,1.0])
kshape = (1,1,2,1)
model = MyNet(kernel=kernel,kshape=kshape)
picture = create_pic()
picture = torch.reshape(picture,(1,1,9,9))
print(picture)
output = model(picture)
output = torch.reshape(output,(8,9))
print(output)
plt.imshow(output,cmap='gray')
plt.show()

import torch
import matplotlib.pyplot as plt
import torch.nn.functional as F
import numpy as np
#生成图片
def create_pic():
picture = torch.Tensor([[0,0,0,255,255,255],
[0,0,0,255,255,255],
[0,0,0,255,255,255],
[0,0,0,255,255,255],
[0,0,0,255,255,255]])
return picture
#确定卷积网络
class MyNet(torch.nn.Module):
def __init__(self,kernel,kshape):
super(MyNet, self).__init__()
kernel = torch.reshape(kernel,kshape)
self.weight = torch.nn.Parameter(data=kernel, requires_grad=False)
def forward(self, picture):
picture = F.conv2d(picture,self.weight,stride=1,padding=0)
return picture
def create_pic():
picture = torch.Tensor(
[[255,255,255,255,255,255,255,255,255],
[255,0 ,255,255,255,255,255,0 ,255],
[255,255,0 ,255,255,255,0 ,255,255],
[255,255,255,0 ,255,0 ,255,255,255],
[255,255,255,255,0 ,255,255,255,255],
[255,255,255,0 ,255,0 ,255,255,255],
[255,255,0 ,255,255,255,0 ,255,255],
[255,0 ,255,255,255,255,255,0 ,255],
[255,255,255,255,255,255,255,255,255],])
return picture
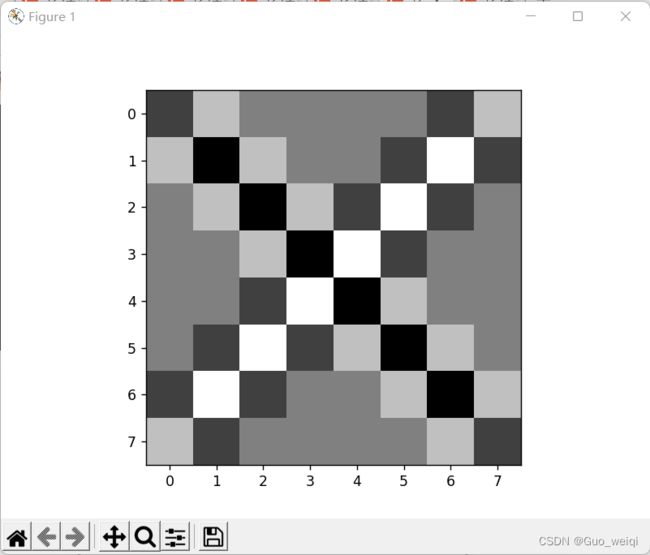
#确定卷积核
kernel = torch.tensor([[1.0,-1.0],
[-1.0,1.0]])
#更改卷积核的大小适配卷积函数
kshape = (1,1,2,2)
#生成网络模型
model = MyNet(kernel=kernel,kshape=kshape)
picture = create_pic()
picture = torch.reshape(picture,(1,1,9,9))
print(picture)
output = model(picture)
output = torch.reshape(output,(8,8))
print(output)
plt.imshow(output,cmap='gray')
plt.show()
作业2
一、概念
用自己的语言描述“卷积、卷积核、特征图、特征选择、步长、填充、感受野”。
卷积:所谓两个函数的卷积,本质上就是先将一个函数翻转,然后进行滑动叠加。
卷积核:卷积核就是图像处理时,给定输入图像,输入图像中一个小区域中像素加权平均后成为输出图像中的每个对应像素,其中权值由一个函数定义,这个函数称为卷积核。
特征图:在每个卷积层,数据都是以三维形式存在的。你可以把它看成许多个二维图片叠在一起,其中每一个称为一个feature map。
特征选择:是指从已有的M个特征(Feature)中选择N个特征使得系统的特定指标最优化,是从原始特征中选择出一些最有效特征以降低数据集维度的过程,是提高学习算法性能的一个重要手段,也是模式识别中关键的数据预处理步骤。
步长:让一个数值在每次运算中加上某个数重复执行此项运算。
填充:填充卷积过程中所缺失的部分。
感受野:卷积神经网络每一层输出的特征图上的像素点在输入图片上映射的区域大小。
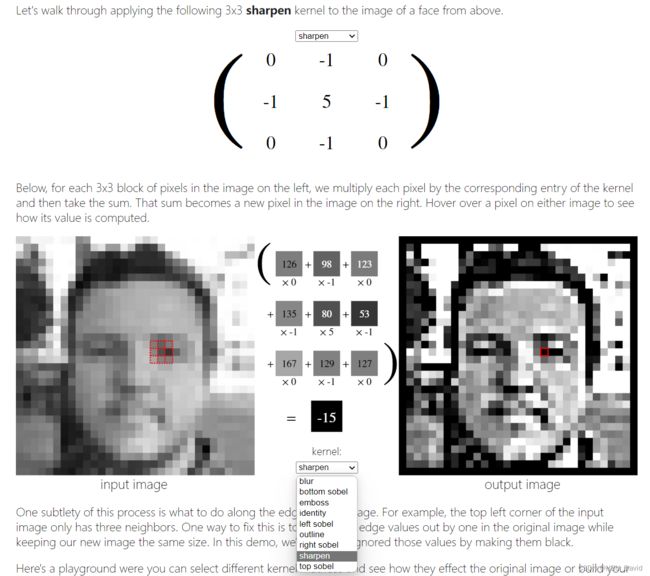
二、探究不同卷积核的作用
参考:Image Kernels explained visually (setosa.io)
1*1卷积核的作用 升维降维增加激活函数提升模型语义能力减少参数量通道间数据整合(也是降维升维过程中带来的好处,输入层和1*1卷积核连接类似全连接)大卷积核和小卷积核比较
首先只有在1*1卷积核之上大小的卷积核才有感受野的作用。
卷积核大了感受野大,可以审视更为宽广区域的feature Map,所获得的全局特征越好。虽然很多情况下可以由几个小的卷积核代替(例如一个7*7的卷积核可以由3个3*3的卷积核代替),但是虽说网络增加了深度有很多优点,但是也会增加梯度消失的风险。
反过来说连续的小卷积核代替大卷积核是现在比较常用的做法,优点很多,比如深度增加带来的非线性激活函数多了,语义表达强了,计算量也会变少,参数量也同样变少,梯度消失的问题因为BN等技术出现得到了很好的优化。另外深度增加语义表达能力增加了,在一些情况下还容易出现过拟合,有时候还不如浅层模型效果好,防止过拟合的方法也出现了很多,也很好解决了这些问题,
三、编程实现
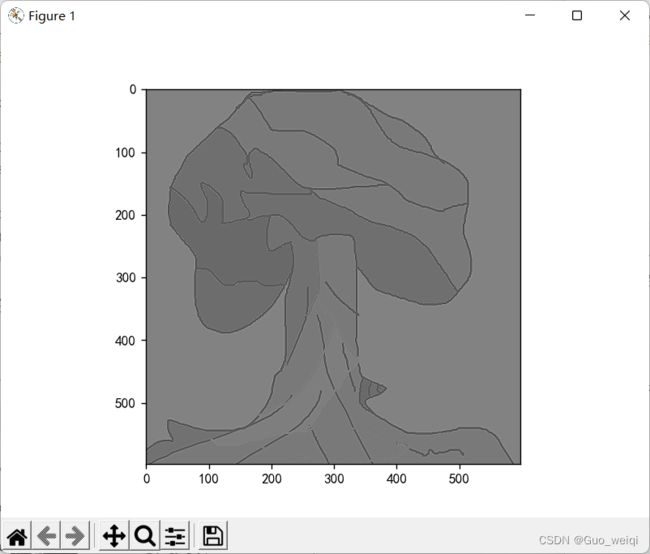
实现灰度图的边缘检测、锐化、模糊。(必做)
import numpy as np
import torch
from torch import nn
from torch.autograd import Variable
from PIL import Image
import matplotlib.pyplot as plt
import os

os.environ["KMP_DUPLICATE_LIB_OK"] = "TRUE"

plt.rcParams['font.sans-serif'] = ['SimHei']  # 用来正常显示中文标签
plt.rcParams['axes.unicode_minus'] = False  # 用来正常显示负号 #有中文出现的情况,需要u'内容
file_path = 'tRee.png'
im = Image.open(file_path).convert('L')  # 读入一张灰度图的图片
im = np.array(im, dtype='float32')  # 将其转换为一个矩阵
print(im.shape[0], im.shape[1])
plt.imshow(im.astype('uint8'), cmap='gray')  # 可视化图片
plt.title('原图')
plt.show()

im = torch.from_numpy(im.reshape((1, 1, im.shape[0], im.shape[1])))
conv1 = nn.Conv2d(1, 1, 3, bias=False)  # 定义卷积
'''
# 边缘检测
sobel_kernel = np.array([[-1, -1, -1],
                         [-1, 8, -1],
                         [-1, -1, -1]], dtype='float32')  # 定义轮廓检测算子
                         '''

# 锐化
sobel_kernel = np.array([[0, -1, 0],
                         [-1, 5, -1],
                         [0, -1, 0]], dtype='float32')  # 定义轮廓检测算子

'''
# 模糊
sobel_kernel = np.array([[0.0625, 0.125, 0.0625],
                         [0.125, 0.25, 0.125],
                         [0.0625, 0.125, 0.0625]], dtype='float32')  # 定义轮廓检测算子
                         '''
sobel_kernel = sobel_kernel.reshape((1, 1, 3, 3))  # 适配卷积的输入输出
conv1.weight.data = torch.from_numpy(sobel_kernel)  # 给卷积的 kernel 赋值

edge1 = conv1(Variable(im))  # 作用在图片上

x = edge1.data.squeeze().numpy()
print(x.shape)  # 输出大小

plt.imshow(x, cmap='gray')
plt.show()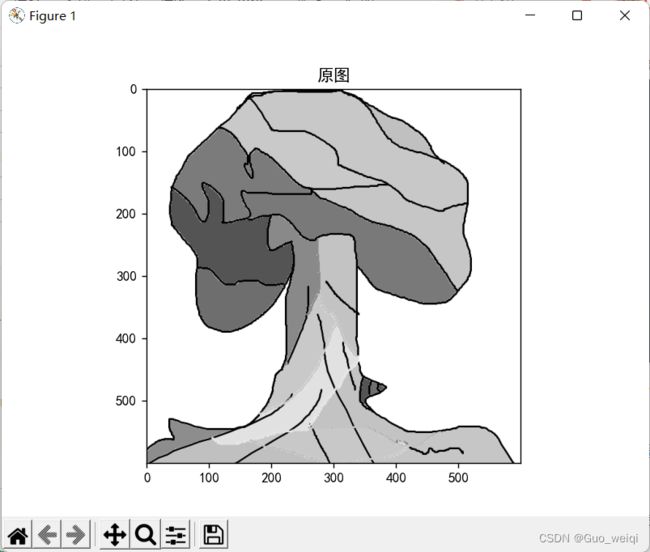

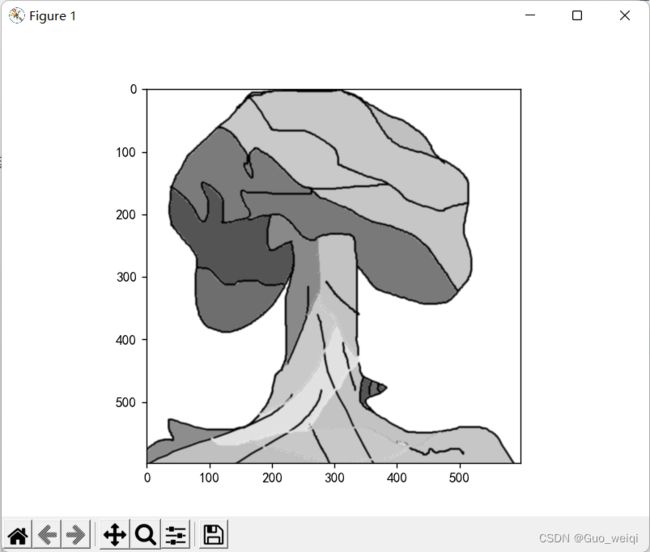
调整卷积核参数,测试并总结。(必做)
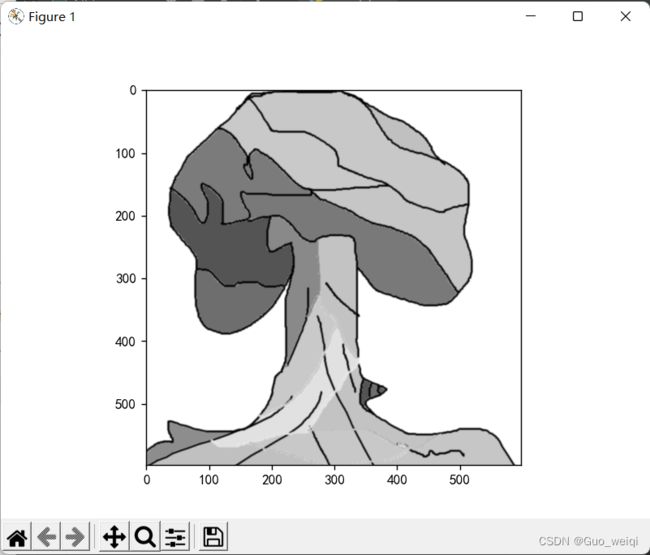
使用不同尺寸图片,测试并总结。(必做)

