在Windows环境下Webots与Ros的联合仿真
系统环境:Win11专业版 21H2 WSL2+Ubuntu18.04+ROS melodic
软件版本:WebotsR2020a rev1
前言
工作原因需要在Windows环境下进行开发,而代码开发需要在Linux环境下。在Windows环境下运行WSL中能够流畅进行Linux相关的开发、ROS的开发等。WSL和ROS的详细安装与配置可参照网上其他教程。
WSL是Windows推出的可让开发人员不需要安装虚拟机(vmware,virtbox)或者设置双系统启动就可以原生支持运行GNU/Linux的系统环境,简称WSL子系统。 目前最新的版本是WSL2,在原先的基础上提高了文件系统的性能并添加了完全的的系统调用支持。WSL2使用全新体系架构使其能真正的运行一个Linux内核。
但Webots 仿真软件在Windows环境下能够流畅仿真,但在Wsl环境下则存在不少兼容性问题,仿真流畅度较低。
因此最终采用在Windows环境下运行webots,建立ros_python控制器节点,通过虚拟网络适配器与Wsl的Linux环境下搭建Rosmaster通信,从而实现联合仿真的方案。
Webots(Windows端)
Webots的Windows安装路径下有大量官方文档和示例文件,其中ros_python.wbt 是webots与ros联合仿真的示例世界文件,ros_python为控制器源码。
世界文件目录:(Webots安装路径)\Webots\projects\languages\ros\worlds\ros_python.wbt
控制器源码目录:(Webots安装路径)\Webots\projects\languages\ros\controllers\ros_python
运行Webots,打开ros_python.wbt后,在Thymio2机器人节点下配置控制器为ros_python。
加载ros_python控制并开始仿真后,可能存在以下报错,需要到python官网安装3.7版本的python,并加载至系统环境变量。(只能是Python3.7或Python2.7)
以下摘自Ros_python控制器源码的Readme文档
`ros_python` is a simple example demonstrating how you can write a Webots controller that implements a ROS node in Python.
It is a pure Python implementation, including all the necessary Python libraries, so that no ROS installation is needed on the machine running the Webots simulation.
Therefore, it runs on Windows, Linux and macOS, straight out of the box.
`ros_python.py` is the Webots controller that is running a ROS node using the `rospy` ROS client library.
This controller actually publishes the value of its front distance sensor in a ROS topic named "sensor".
It also listens to the "motor" ROS topic.
Whenever it receives a value on this "motor" topic, it will apply it to the motors of the Thymio II robot.
`ros_controller.py` is a standalone ROS node that listens to the "sensor" topic published by `ros_python.py`.
It publishes a ROS topic named "motor" on which it publishes the value of 9 (motor velocity).
When it reads a sensor value greater than 100 on the "sensor" topic, it will publish a value of 0 on the "motor" topic.
Thus, the robot will move forward until it faces an obstacle.
The `kinetic` folder contains a minimal subset of the ROS kinetic distribution allowing to run the `rospy` package on Windows.
Similarly, the `python` folder contains a couple of Python modules needed to run `rospy`.
Both folders were copied and adapted from [here](https://github.com/Wei1234c/ROS_node_on_Windows).
Once you understood the principles behind this very simple example, you will be able to extend it to a more complex setup that will fit the requirements of your ROS project.
ros_python是在Webots控制器中建立ros节点的纯python实现,只要包含相应的python库,便可以在不同平台运行。而在Windows环境下安装的Webots目录下提供ros_python示例工程则包含了ros kinetic发行版的最小子集库,使得Webots可以在Windows环境下可以调用“rospy”包,创建ros节点,而不用安装ROS环境。
以下是ros_python.py 的源码,在该源码中创建了Webots控制器的ros节点,通过/sensor话题发送传感器数据并监听/motor话题数据,并调用api设定电机速度。
import rospy
from std_msgs.msg import Float64
from controller import Robot
import os


def callback(data):
    global velocity
    global message
    message = 'Received velocity value: ' + str(data.data) #打印消息赋值
    velocity = data.data  #电机速度赋值


robot = Robot()
timeStep = int(robot.getBasicTimeStep())
left = robot.getMotor('motor.left')
right = robot.getMotor('motor.right')
sensor = robot.getDistanceSensor('prox.horizontal.0')  # front central proximity sensor
sensor.enable(timeStep)
left.setPosition(float('inf'))  # turn on velocity control for both motors
right.setPosition(float('inf'))
velocity = 0
left.setVelocity(velocity)
right.setVelocity(velocity)
message = ''
print('Initializing ROS: connecting to ' + os.environ['ROS_MASTER_URI'])
robot.step(timeStep)
rospy.init_node('listener', anonymous=True)  #创建Webots控制器的ROS 监听节点
print('Subscribing to "motor" topic')
robot.step(timeStep)
rospy.Subscriber('motor', Float64, callback) #监听 motor话题
pub = rospy.Publisher('sensor', Float64, queue_size=10) #发送 sensor 话题
print('Running the control loop')
while robot.step(timeStep) != -1 and not rospy.is_shutdown():
    pub.publish(sensor.getValue())
    # print('Published sensor value: ', sensor.getValue())
    if message:
        print(message)  #打印收到的数据
        message = ''
    left.setVelocity(velocity) #调用webots api 设定电机转速
    right.setVelocity(velocity) #调用webots api 设定电机转速
ros_controller.py,该示例源码能够控制机器人在碰到障碍物之前停下来。代码中创建了控制器节点,并实现了对 /sensor 话题的监听以及 /motor 话题的发布。
import rospy
from std_msgs.msg import Float64


def callback(data):
    global pub
    rospy.loginfo(rospy.get_caller_id() + 'Received sensor value: %s', data.data)
    if data.data > 100:
        pub.publish(0)
    else:
        pub.publish(9)


rospy.init_node('controller', anonymous=True)
pub = rospy.Publisher('motor', Float64, queue_size=10)
rospy.Subscriber("sensor", Float64, callback)
rospy.spin()
在runtime.ini文件中配置(Windows端)ROS多机通信的环境变量,主要是ROS_MASTER_URI与ROS_HOSTNAME或者ROS_IP
一旦理解了这个非常简单的示例背后的原理,就能够将其扩展到更复杂的设置,以满足各种ROS项目的要求。
WSL与Windows之间的互相网络访问
安装WSL后,在powershell中输入ipconfig,可以查询到Windows通过虚拟网卡 vEthernet (WSL) 进行通信,且Windows端访问WSL的ip为上述查询到的IPv4 地址。
在wsl终端输入ifconfig,可以查询到wsl 通过虚拟出 eth0 网卡与Windows进行通信,且Wsl端访问Windows的ip为上述查询到的IPv4 地址。
接下来需要检查两端是否都能ping通访问对方的ip地址,如果不能ping通,则一般需要检查windows防火墙设置或者关闭防火墙。
需要注意的是,这两个ip地址并不是固定不变的,在每次wsl重启动之后,虚拟网关会为双方重新分配新ip地址。
固定Hostname 绑定动态IP
由于两端访问的ip动态改变,且网上大多数将虚拟网卡设定成固定ip的方式较为繁琐复杂,因此这里采用固定Hostname,绑定动态ip地址的方式进行通信。
设置两端的hostname,在WSL端的 /etc/profile 文件末尾中加入如下代码。
$ sudo vi /etc/profile
ipaddr=$(ifconfig eth0 | grep 'inet ' | awk '{print $2}')
sed -i '/wslhost/d' /mnt/c/Windows/System32/drivers/etc/hosts
echo "$ipaddr wslhost" >> /mnt/c/Windows/System32/drivers/etc/hosts

winip=$(cat /etc/resolv.conf | grep 'nameserver' | cut -f 2 -d ' ')
sed -i '/webotshost/d ' /etc/hosts
echo "$winip webotshost" >> /etc/hosts
前三行代码,用正则表达式截取网卡IP地址,并设置Wsl端 hostname为 wslhost 绑定该ip地址,修改windows端的host文件,以便Windows端能够解析 wsl端的hostname,访问到wsl端。此处需要修改Windows端的/Windows/System32/drivers/etc/hosts文件权限。具体修改方法可参考在Windows中动态获取WSL2中的IP地址_codezrh的博客-CSDN博客_wsl查看ip
后三行代码,获取/etc/resolv.conf 中的 nameserver对应的ip地址。该ip地址就是 Windows端访问wsl端的ip地址 ,绑定hostname webotshost,设置到wsl端的/etc/hosts 文件中。以便Wsl端能够解析Windows端的hostname,连接至ros节点。
至此hostname 与 ip 的绑定与设置完成,接下来对Ros多机通信两端进行配置。
Ros多机通信配置
在wsl端 ~/.bashrc 文件末尾加入如下代码 ,设置Wsl端ros主机的地址以及IP。
$ sudo vi ~/.bashrc
IP=$(ip addr show eth0 | grep -w inet | awk '{print $2}' | awk -F / '{print $1}')
export ROS_MASTER_URI=http://${IP}:11311
export ROS_IP=${IP}
$ source ~/.bashrc
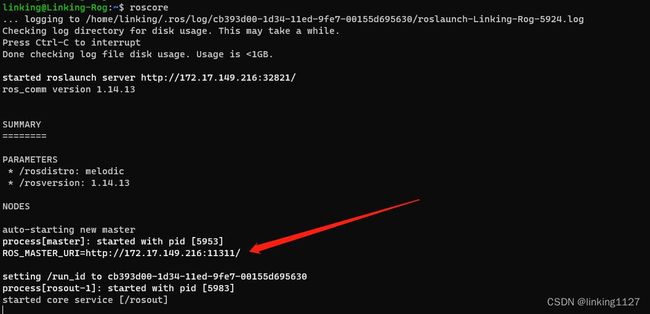
$ roscore
启动roscore之后可以观测输出信息ROS_MASTER_URI 与上述eth0 适配器ip地址能够对应。
在Windows端,在上面提到的ros_python工程中的runtime.ini文件中,修改ROS_MASTER_URI与ROS_HOSTNAME
[environment variables with relative paths]
PYTHONPATH=python/site-packages:kinetic/dist-packages

[environment variables]
ROS_LOG_DIR=ros_python_log
ROS_PACKAGE_PATH=kinetic/share
ROS_MASTER_URI=http://wslhost:11311/
ROS_HOSTNAME=webotshost
ROS_MASTER_URI 设置为 Wsl端的主机地址,由于配置了hosts文件,能够自动解析到Windows端访问wsl的ip
ROS_HOSTNAME 设置为Windows端的hostname,由于配置了wsl端的hosts文件,Wsl端能够解析该hostname 至 Wsl端访问Windows端的ip。
至此所有相关配置完成。
联合仿真
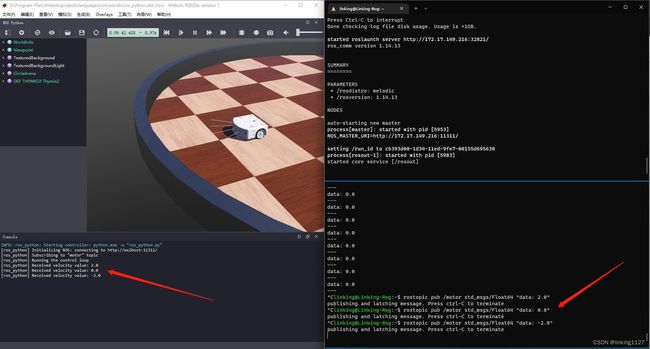
在Wsl端启动roscore,在Webots端选择配置好的ros_python控制器文件后开启仿真。在webots的控制台可以观测到相关输出信息,在wsl端可以通过rosnode info ,rostopic list 等观察节点是否成功连接,以及话题数据是否正常传输。
查看Webots传感器回传的/sensor话题数据
发布/motor话题数据 控制Webots电机运动
总结
Webots与Ros的联合仿真可以实现更多的自定义控制器,本文仅针对需要在Windows环境下进行大量开发的读者,在Ubuntu环境下也可以实现联合仿真。
在Windows环境下,借助ros_python工程建立ros节点,接收话题数据,调用webots的相关接口,实现对控制数据的转发以及传感器数据的回传。
如有更多疑问,可以联系[email protected]


