原始NeRF代码学习记录
本文记录学习 ECCV 2020 的论文 NeRF: Representing Scenes as Neural Radiance Fields for View Synthesis 对应的开源 tensorflow 代码。
对NeRF的原始论文的解读请见博文 原始 NeRF 论文主要点细致介绍。
2022-09-14 疑惑
- 为啥丢进 sample_pdf 函数的 bins 是 第一阶段采样点的中点?
 if N_importance > 0: # sample points for fine model
        z_vals_mid = 0.5 * (z_vals[: ,:-1] + z_vals[: ,1:]) # (N_rays, N_samples-1) interval mid points
        z_vals_ = sample_pdf(z_vals_mid, weights_coarse[:, 1:-1],
                             N_importance, det=(perturb==0)).detach()
- z 应该是depth(先不考虑 inverse depth)?,depth是在 z 轴的投影,下面代码却用它乘上 rays_d,这合理吗?
    xyz_coarse_sampled = rays_o.unsqueeze(1) + \
                         rays_d.unsqueeze(1) * z_vals.unsqueeze(2)
在这里插入代码片
run_nerf.py
NeRF 方法的数据集是同一场景下不同视角的若干张图像。
设一共有 N 张图像,每张图像的大小是 H × W H \times W H×W。相当于有 N × H × W N\times H\times W N×H×W个像素作为数据集。
- hwf 变量的含义是:图像的 height,width 和 focal length。
- 下面的代码暗示我们,如果想要了解 函数 load_blender_data 的细节,那么就要去 load_blender.py
from load_blender import load_blender_data

images, poses, render_poses, hwf, i_split = load_blender_data(
            args.datadir, args.half_res, args.testskip)
-
use_batching,它是一个 flag 参数。
假如 use_batching == true,则一次从 N × H × W N\times H\times W N×H×W个像素中随机选取 B 个像素来训练。这暗示了它们可能来自不同的图像。
假如use_batching == false,则一次先随机取1张图像出来,进而在 此张图像的 H × W H\times W H×W 个像素中选 B 个作为数据。 -
下面代码中 i_split 的含义是 每个 split 中各自有多少张图像,因为要把所有的数据集划分为 train / val / test。
    elif args.dataset_type == 'blender':
        images, poses, render_poses, hwf, i_split = load_blender_data(
            args.datadir, args.half_res, args.testskip)
        print('Loaded blender', images.shape,
              render_poses.shape, hwf, args.datadir)
        i_train, i_val, i_test = i_split
- 合成数据集知道 near,far 变量的值。
near far的值是指 near,far 平面与相机(光心)的距离
        near = 2.
        far = 6.

- args.white_bkgd,是一个 flag 变量,如果它为 true,则会做如下处理。
首先 images 代表图像,图像有 4 个通道 RGB α \alpha α, α \alpha α代表透明度。
假如某个像素点的透明度为1,即
i m a g e s [ … , − 1 ] = 1 ( o p a q u e ) images[…,-1] = 1 (opaque) images[…,−1]=1(opaque)
则该像素点的 RGB 值不改变。
假如某个像素点的透明度为0,即
i m a g e s [ … , − 1 ] = 0 ( t r a n s p a r e n t ) images[…,-1] = 0 (transparent) images[…,−1]=0(transparent)
则该像素点的被纠正为白色。
注意,images[…,-1] = 0 或者1。
        if args.white_bkgd:
            images = images[..., :3]*images[..., -1:] + (1.-images[..., -1:])
        else:
            images = images[..., :3]
如果 images[…,-1] = 0,则
i m a g e s [ . . . , : 3 ] ∗ i m a g e s [ . . . , − 1 : ] : = i m a g e s [ . . . , : 3 ] ∗ 0 images[..., :3]*images[..., -1:]:= images[..., :3]*0 images[...,:3]∗images[...,−1:]:=images[...,:3]∗0又
1. − i m a g e s [ . . . , − 1 : ] : = 1 − 0 : = 1 1.-images[..., -1:] := 1-0:=1 1.−images[...,−1:]:=1−0:=1
则 i m a g e s [ . . . , : 3 ] : = 1 images[..., :3] :=1 images[...,:3]:=1因为像素强度经过归一化,所以 1 即 255,此时为白色。
如果 images[…,-1] = 1,则 images[…, :3] 的值无变化。
- Kwargs变量:key word arguments
- grad_vars 变量,含义是:可以训练的变量。
- images[:, None, …] 代码的效果:(N,H,W,3) -> (N,1,H,W,3),即增加了一个维度
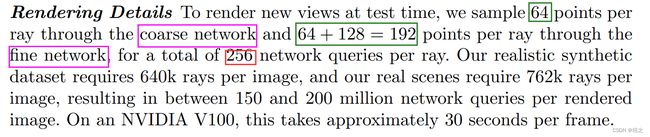
等价于代码:np.expand_dims(images, 1) - batchify_rays 函数的功能如下:因为 NeRF 用两个网络进行训练,分别是:coarse model 和 fine model。
在 coarse 模型中,每条相机光线采样 64 个空间点,在fine 模型中,每条相机光线采样 192 个空间点。
所以一条相机光线一次要采样 256 个空间点。
训练网络一次 forward pass 要 1024个像素,对应 1024 条相机光线。
所以一次 forward pass 要有 1024*256 := 2^18 个空间点丢给网络
光看这些点的数据量不大,但是相应的神经网络的参数的量会很大~
一次的计算量比较大,GPU恐怕吃不消
所以就把它切成 chunk
每个 chunk 对应 1024*32 个空间点的计算量
先切分开,然后再组装
这就是 batchify_rays 函数的功能。
def batchify_rays(rays_flat, chunk=1024*32, **kwargs):
    """Render rays in smaller minibatches to avoid OOM."""
    all_ret = {}
    for i in range(0, rays_flat.shape[0], chunk):
        ret = render_rays(rays_flat[i:i+chunk], **kwargs)
        for k in ret:
            if k not in all_ret:
                all_ret[k] = []
            all_ret[k].append(ret[k])

    all_ret = {k: tf.concat(all_ret[k], 0) for k in all_ret}
    return all_ret
- Python里面 命名空间和字典数据结构取值的区别:
字典数据结构:
D = {‘a’:1 , b’:2}
D[‘a’]=2 (取值,赋值)
命名空间:
parser = config_parser()
Args = parser.parser_args() # NameSpace()
Args. (一个点,取值,赋值) - N_rand 变量,含义:采样的射线个数,即采样的像素点个数,这个数字在 model_c 和 model_f 中是一样的,在 lego 数据集中默认 1024,则在model_c 和 model_f 中各自采样 1024 条射线。
load_blender.py
- 在注释处出现了一个词 RGBA,这代表图像是 4 通道图像——RGB Alpha,其中 Alpha 代表透明度。
- camera_angle_x 变量的含义是 FOV in x dimension,即 fov,从本地 json 文件中获取。第三行代码是通过 fov 求 focal length。
H, W = imgs[0].shape[:2]
camera_angle_x = float(meta['camera_angle_x'])
focal = .5 * W / np.tan(.5 * camera_angle_x)
如下图所示, f , W f,W f,W分别代表 焦距和图像宽度,fov 代表 field of view。
则 ( W 2 ) / f = tan ( f o v 2 ) (\frac{W}{2})/f=\tan(\frac{fov}{2}) (2W)/f=tan(2fov)
即 f = W 2 / tan ( f o v 2 ) f=\frac{W}{2}/\tan(\frac{fov}{2}) f=2W/tan(2fov)
这和第三行代码吻合。

- half_res ,是一个 flag变量,加入它为 true,则将原图像 resize ,注意 焦距要和图像边长大小成比例,如下列代码所示。
    if half_res:
        imgs = tf.image.resize_area(imgs, [400, 400]).numpy()
        H = H//2
        W = W//2
        focal = focal/2.
这部分代码更好的写法是指定训练图像的分辨率,比如用一个 target_wh变量指定训练图像的宽度和高度, 而不是只有让它的长宽分别缩小到原来一半的可能性。
run_nerf_helper.py
- multires 变量的含义是 positional encoding 中的最大频率,即论文中的 L \mathbf{L} L

- use_viewdirs 变量,是个 flag 变量,假如 use_viewdirs 为 true,则随着角度( d \mathbf{d} d)不同,空间点的颜色不同,论文中 use_viewdirs 是为 true的。这点模拟了 specular reflection(反光)。有时, view变化一点点,颜色就会变很大。
- init_nerf_model 函数的一个形式参数:input_ch,含义为 input channel( x \mathbf{x} x)默认值为 3 。误导人,其实是 63。因为 x \mathbf{x} x 是(x,y,z)有三个分量,当 L = 10 \mathbf{L}=10 L=10,而且同时有 sin , cos \sin,\cos sin,cos函数,所以 x \mathbf{x} x经过Positional Encoding后的向量的长度是
3 × 2 × 10 : = 60 3\times2\times10:=60 3×2×10:=60
但是 NeRF 初期其实 Positional Encoding 的函数还有 f ( x ) = x f(x)=x f(x)=x,所以长度还要加 3 3 3
所以,input_ch 在形式参数那里默认值应该赋为 63。 - 然后针对 d \mathbf{d} d,因为 L \mathbf{L} L 取 4 4 4,所以 d \mathbf{d} d经过Positional Encoding后的向量长度为
3 × 2 × 4 + 3 : = 27 3\times2\times4+3:=27 3×2×4+3:=27
input_ch_views 在形式参数那里默认值应该是 27。
def init_nerf_model(D=8, W=256, input_ch=3, input_ch_views=3, output_ch=4, skips=[4], use_viewdirs=False):
- alpha_out 变量,把它的名字改为 sigma_out 比较合适,因为它实际上是 volume density 的含义,在论文中,用的是 sigma- σ \sigma σ。而在论文中 alpha- α \alpha α 表达的含义是透明度。
- get_rays_np 函数:计算所有 rays 的原点坐标在世界坐标系下的表达和 direction 向量在世界坐标系中的方向
所有相机都有pose ,相机的原点坐标是可以直接从pose中取得的。
direction 向量具体是指相机原点和某个像素中心所连成的射线的向量。
def get_rays_np(H, W, focal, c2w):
    """Get ray origins, directions from a pinhole camera."""
    i, j = np.meshgrid(np.arange(W, dtype=np.float32),
                       np.arange(H, dtype=np.float32), indexing='xy')
    dirs = np.stack([(i-W*.5)/focal, -(j-H*.5)/focal, -np.ones_like(i)], -1)
    rays_d = np.sum(dirs[..., np.newaxis, :] * c2w[:3, :3], -1)
    rays_o = np.broadcast_to(c2w[:3, -1], np.shape(rays_d))
    return rays_o, rays_d

注意,上图
( H 2 , W 2 ) (\frac{H}{2},\frac{W}{2}) (2H,2W)
的索引方式是把图像看成矩阵,先索引行,再索引列。
但是上述代码中 的 i , j i,j i,j分别对应索引列和索引行。
——————注意求 dirc 的代码是在相机坐标系下的——————
所以,求 dirs的代码的含义是:
矩阵中第 i 行第 j 列的位置,先减掉图像中心位置对应的水平位置( W 2 \frac{W}{2} 2W)再除以焦距,
然后是减掉图像中心位置对应的竖直位置( H 2 \frac{H}{2} 2H)再除以焦距,
direction 向量的 z 分量始终是 -1。
——————注意求 dirc 的代码是在相机坐标系下的——————
而求 rays_d 的代码其实就是
将相机坐标系中的 视角向量 direction 转换到 世界坐标系下
如果代码用 C2W @ direction (其中@是python中矩阵相乘操作符),会更好理解,但是NeRF中的代码和这个diamante是等价的。
一
z_vals[: ,:-1],所有 rays 的 从near 开始的点,最后一个点的前一个点的 z 值
除了最后一个点没取,其他都取了

z_vals[: ,1:],所有 rays 的 从 near后面一个点开始,到最后一个点的 z 值
除了第一个点没取,其他都取了

z_vals_mid = 0.5 * (z_vals[: ,:-1] + z_vals[: ,1:]) # (N_rays, N_samples-1) interval mid points
相邻两个点的中点