python numpy版本SSIM复现与算法解释
目录
-
- 1. 简介
- 2. 算法
-
- 2.1 公式一
- 2.2 公式二
- 2.3 公式一的子项计算
- 2.4 常量
- 3. 复现代码
-
- 3.1 基于公式一的实现
- 3.2 基于公式二的实现(高斯滤波)
- 3.3 skimage的structural_similarity函数
- 4. SSIM-Loss
- 5. 测试
1. 简介
SSIM是一种图像评估指标算法,在算法实现里面输入是两张图片,输出是两张图片的相似评估数值,输入两张一模一样的图片则输出是1。
2. 算法
x与y分别代表两张图片(两个矩阵)
SSIM可通过两条公式计算:
2.1 公式一

2.2 公式二
paddle的高斯核滤波版本使用了这个公式

2.3 公式一的子项计算

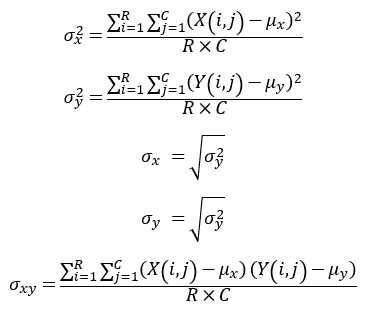
下面为图像均值的计算公式:
R(rows)代表图片的行,C(columns)代表图片的列,X为图像第i行第j列的像素值。

下面为单张图像的方差、标准差和两张图片的协方差计算公式:
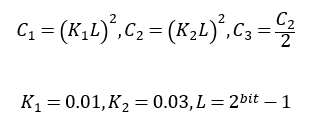
2.4 常量
bit为图像位数,假设图像为8位,L=255
3. 复现代码
3.1 基于公式一的实现
以下代码基于paddle的GAN代码里面的SSIM算法进行修改,这个版本是基于公式二。
import numpy as np
# 该函数作用于单通道
def ssim_1(img1, img2, L):
    """Calculate SSIM (structural similarity) for one channel images.
    Args:
        img1 (ndarray): Images with range [0, 255].
        img2 (ndarray): Images with range [0, 255].
    Returns:
        float: ssim result.
    """
    K1 = 0.01
    K2 = 0.03
    C1 = (K1 * L)**2
    C2 = (K2 * L)**2
    C3 = C2/2

    img1 = img1.astype(np.float64)
    img2 = img2.astype(np.float64)
    # ux
    ux = img1.mean()
    # uy
    uy = img2.mean()
    # ux^2
    ux_sq = ux**2
    # uy^2
    uy_sq = uy**2
    # ux*uy
    uxuy = ux * uy
    # ox、oy方差计算
    ox_sq = img1.var()
    oy_sq = img2.var()
    ox = np.sqrt(ox_sq)
    oy = np.sqrt(oy_sq)
    oxoy = ox * oy
    oxy = np.mean((img1 - ux) * (img2 - uy))
    # 公式一计算
    L = (2 * uxuy + C1) / (ux_sq + uy_sq + C1)
    C = (2 * ox * oy + C2) / (ox_sq + oy_sq + C2)
    S = (oxy + C3) / (oxoy + C3)
    ssim = L * C * S
    # 验证结果输出
    # print('ssim:', ssim, ",L:", L, ",C:", C, ",S:", S)
    return ssim
3.2 基于公式二的实现(高斯滤波)
代码来自paddle使用高斯核卷积
def ssim_2(img1, img2):
    """Calculate SSIM (structural similarity) for one channel images.
    It is called by func:`calculate_ssim`.
    Args:
        img1 (ndarray): Images with range [0, 255] with order 'HWC'.
        img2 (ndarray): Images with range [0, 255] with order 'HWC'.
    Returns:
        float: ssim result.
    """

    C1 = (0.01 * 255)**2
    C2 = (0.03 * 255)**2

    img1 = img1.astype(np.float64)
    img2 = img2.astype(np.float64)
    kernel = cv2.getGaussianKernel(11, 1.5)
    window = np.outer(kernel, kernel.transpose())

    mu1 = cv2.filter2D(img1, -1, window)[5:-5, 5:-5]
    mu2 = cv2.filter2D(img2, -1, window)[5:-5, 5:-5]
    mu1_sq = mu1**2
    mu2_sq = mu2**2
    mu1_mu2 = mu1 * mu2
    sigma1_sq = cv2.filter2D(img1**2, -1, window)[5:-5, 5:-5] - mu1_sq
    sigma2_sq = cv2.filter2D(img2**2, -1, window)[5:-5, 5:-5] - mu2_sq
    sigma12 = cv2.filter2D(img1 * img2, -1, window)[5:-5, 5:-5] - mu1_mu2
	# 公式二计算
    ssim_map = ((2 * mu1_mu2 + C1) *
                (2 * sigma12 + C2)) / ((mu1_sq + mu2_sq + C1) *
                                       (sigma1_sq + sigma2_sq + C2))
    return ssim_map.mean()
3.3 skimage的structural_similarity函数
skimage从1.17版本开始将compare_ssim更名为structural_similarity。
from skimage.metrics import structural_similarity
4. SSIM-Loss
该函数可作为部分神经网络的loss function,如图像生成网络等,计算output与label的相似度,SSIM-Loss如下:
S S I M L o s s = 1 − S S I M ( o u t p u t , l a b e l ) SSIM_{Loss}=1-SSIM(output, label) SSIMLoss=1−SSIM(output,label)
5. 测试
测试图使用肺部胸片与去肋骨后的胸片进行测试。
原图:
去肋骨后:
代码与输出:
if __name__=="__main__":
    origin_path = './origin.png'
    pred_path = './pred.png'
    img_ori = image.open(origin_path)
    img_pred = image.open(pred_path)
    X = np.array(img_pred)
    Y = np.array(img_ori)
    # 两者最后都需要做一个abs!!!!!!!!
    # 非高斯滤波
    print(abs(ssim_1(X, Y, 255))) # output:0.0002043533434396722
    # 高斯滤波
    print(abs(ssim_2(X, Y))) # output: 1.8464489378357714e-05