TensorFlow Lite(实战系列三):YOLOV3嵌入Android版APP实现对象检测案例
摘要
本次实战案例,少奶奶给大家带来了使用Tensorflow Lite方式把YOLOV3嵌入Android版APP中,该APP通过调用手机摄像头,实现实时检测并返回具体结果,从而实现自定义网络模型移植边缘设备的可能。通过阅读本篇博客,大家也可以获得以下提升:
1)自定义训练的网络模型都可以通过TensorFlow Lite移植到Android版的APP中,实现实时监测。
2)讲解Android项目中的核心源码,让大家理解TensorFlow Lite工作的整个流程,使得大家在开发不同APP时,从被动变成主动。
备注:不熟悉Android开发的朋友不必紧张,少奶奶也不懂Android开发,但我们使用的是Google官网提供的目标检测模型demo,大家只需要把它下载下来,然后跟着少奶奶一起修改源码就可以了(主要是Java代码)。
感谢前辈1的贡献
开发环境
window 10、Python 3.6、pycharm、anaconda、TensorFlow-GPU 1.13.0、Android studio
YOLO-V3模型转tflite
少奶奶使用的是原始的YOLO-V3模型权重,既官方通过训练coco数据集得到的权重,大家可以从 GitHub中下载到所需的YOLO-V3配置文件和模型转换文件convert.py,而YOLO-V3的weights文件网上可以搜到。
感谢前辈2的贡献
模型转换思路:weights转h5,h5转tflite
具体代码如下:
weights转h5:
python convert.py yolov3.cfg yolov3.weights yolov3.h5
h5转tflite
	import tensorflow as tf
	converter = tf.lite.TFLiteConverter.from_keras_model_file('yolov3.h5')
	tflite_model = converter.convert()
	open("yolov3.tflite", "wb").write(tflite_model)
自定义模型嵌入与源码修改
在本小节中,少奶奶会带领大家修改TensorFlow Lite给出的官方示例的源码,让大家能够根据自定义模型来修改官方示例。
步骤一:下载官方示例代码
Google为了让开发者能更好的接入TensorFlow Lite,其提供了很多示例demo,少奶奶使用的是Android版本的对象检测示例。大家直接下载到本地,再使用android studio打开即可运行代码,使用真机调试功能,就能快速体验一把TensorFlow Lite的魅力。
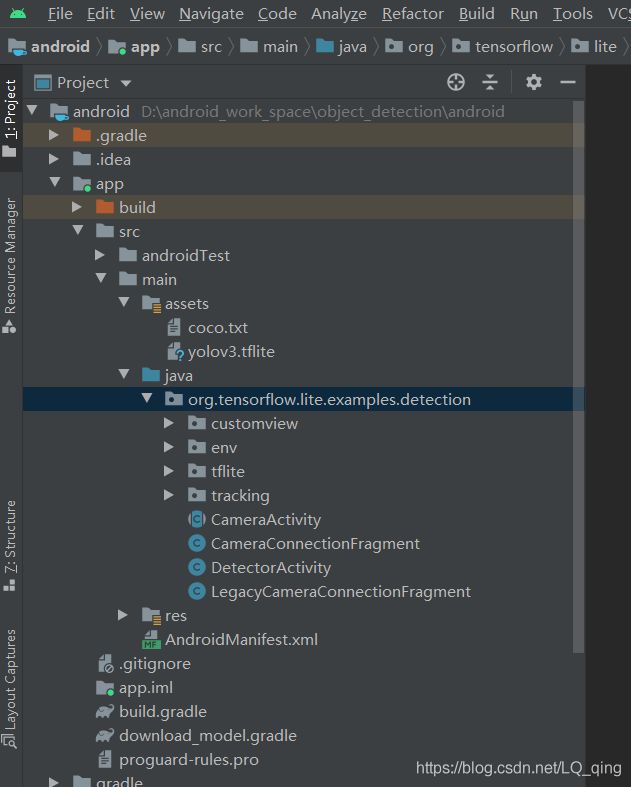
 成功导入Android Studio后,我们可以看到如下项目结构。

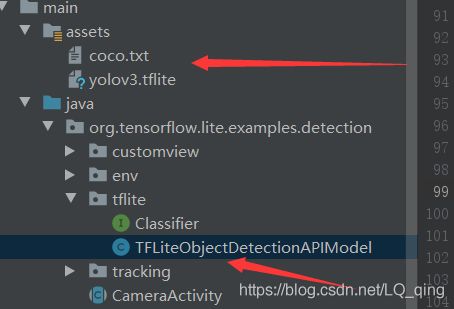
我们需要修改的地方如图所示:

assets:存放前一小节中,转换好的tflite模型和标签。
TFLiteObjectDetectionAPIModel.java:主要修改的源码文件。
步骤二:修改Google示例代码,使得示例兼容YOLOV3模型
Google示例代码使用的模型是SSD模型,在该模型的基础上进行重训练很繁琐,而且,该模型是直接输出检测目标的坐标值和置信度,所以在绘制检测框时可以直接使用模型的输出信息。而我们使用的YOLOV3模型直接输出的是三张不同尺寸的特征图,既:[1,13,13,255]、[1,26,26,255]、[1,52,52,255],修改后的YOLOV3模型会也可以直接输出[1,13,13,3,85]、[1,26,26,3,85]、[1,52,52,3,85],这些特征图都是一个意思,只是使用了不同的维度进行表示而已。在本次实战中,我们需要做的就是把这三张特征图转换成物体检测的坐标和置信度,进而绘制矩形框。这里少奶奶建议大家先看看其他博主对于YOLOV3的详细解释。
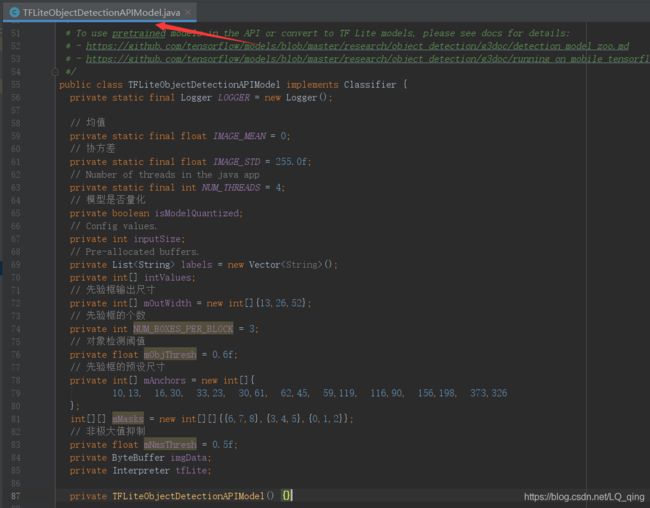
1)打开TFLiteObjectDetectionAPIModel.java,把前面部分的参数修改成如下形式,然后把该文件中的所有报错都删掉。
 2)添加YOLOV3位置信息转换的相关函数
private float expit(final float x) {
    return (float) (1. / (1. + Math.exp(-x)));
  }

  protected void softmax(final float[] vals) {
    float max = Float.NEGATIVE_INFINITY;
    for (final float val : vals) {
      max = Math.max(max, val);
    }
    float sum = 0.0f;
    for (int i = 0; i < vals.length; ++i) {
      vals[i] = (float) Math.exp(vals[i] - max);
      sum += vals[i];
    }
    for (int i = 0; i < vals.length; ++i) {
      vals[i] = vals[i] / sum;
    }
  }
  //non maximum suppression
  protected ArrayList<Recognition> nms(ArrayList<Recognition> list) {
    ArrayList<Recognition> nmsList = new ArrayList<Recognition>();

    for (int k = 0; k < labels.size(); k++) {
      //1.find max confidence per class
      PriorityQueue<Recognition> pq =
              new PriorityQueue<Recognition>(
                      10,
                      new Comparator<Recognition>() {
                        @Override
                        public int compare(final Recognition lhs, final Recognition rhs) {
                          // Intentionally reversed to put high confidence at the head of the queue.
                          return Float.compare(rhs.getConfidence(), lhs.getConfidence());
                        }
                      });

      for (int i = 0; i < list.size(); ++i) {
        if (list.get(i).detectedClass == k) {
          pq.add(list.get(i));
        }
      }
      Log.d("wangmin", "class[" + k + "] pq size: " + pq.size());

      //2.do non maximum suppression
      while(pq.size() > 0) {
        //insert detection with max confidence
        Recognition[] a = new Recognition[pq.size()];
        Recognition[] detections = pq.toArray(a);
        Recognition max = detections[0];
        nmsList.add(max);

        Log.d("wangmin", "before nms pq size: " + pq.size());

        //clear pq to do next nms
        pq.clear();

        for (int j = 1; j < detections.length; j++) {
          Recognition detection = detections[j];
          RectF b = detection.getLocation();
          if (box_iou(max.getLocation(), b) < mNmsThresh){
            pq.add(detection);
          }
        }
        Log.d("wangmin", "after nms pq size: " + pq.size());
      }
    }
    return nmsList;
  }
  protected float box_iou(RectF a, RectF b)
  {
    return box_intersection(a, b)/box_union(a, b);
  }
  protected float box_intersection(RectF a, RectF b)
  {
    float w = overlap((a.left + a.right) / 2, a.right - a.left,
            (b.left + b.right) / 2, b.right - b.left);
    float h = overlap((a.top + a.bottom) / 2, a.bottom - a.top,
            (b.top + b.bottom) / 2, b.bottom - b.top);
    if(w < 0 || h < 0) return 0;
    float area = w*h;
    return area;
  }
  protected float box_union(RectF a, RectF b)
  {
    float i = box_intersection(a, b);
    float u = (a.right - a.left)*(a.bottom - a.top) + (b.right - b.left)*(b.bottom - b.top) - i;
    return u;
  }

  protected float overlap(float x1, float w1, float x2, float w2)
  {
    float l1 = x1 - w1/2;
    float l2 = x2 - w2/2;
    float left = l1 > l2 ? l1 : l2;
    float r1 = x1 + w1/2;
    float r2 = x2 + w2/2;
    float right = r1 < r2 ? r1 : r2;
    return right - left;
  }
3)修改recognizeImage函数
public List<Recognition> recognizeImage(final Bitmap bitmap) {
    // Log this method so that it can be analyzed with systrace.
    Trace.beginSection("recognizeImage");

    Trace.beginSection("preprocessBitmap");
    // Preprocess the image data from 0-255 int to normalized float based
    // on the provided parameters.
    bitmap.getPixels(intValues, 0, bitmap.getWidth(), 0, 0, bitmap.getWidth(), bitmap.getHeight());

    imgData.rewind();
    for (int i = 0; i < inputSize; ++i) {
      for (int j = 0; j < inputSize; ++j) {
        int pixelValue = intValues[i * inputSize + j];
        if (isModelQuantized) {
          // Quantized model
          imgData.put((byte) ((pixelValue >> 16) & 0xFF));
          imgData.put((byte) ((pixelValue >> 8) & 0xFF));
          imgData.put((byte) (pixelValue & 0xFF));
        } else { // Float model
          imgData.putFloat((((pixelValue >> 16) & 0xFF) - IMAGE_MEAN) / IMAGE_STD);
          imgData.putFloat((((pixelValue >> 8) & 0xFF) - IMAGE_MEAN) / IMAGE_STD);
          imgData.putFloat(((pixelValue & 0xFF) - IMAGE_MEAN) / IMAGE_STD);
        }
      }
    }
    Trace.endSection(); // preprocessBitmap

    // Copy the input data into TensorFlow.
    Trace.beginSection("feed");
    Object[] inputArray = {imgData};
    Map<Integer, Object> outputMap = new HashMap<>();
    for (int i = 0; i < mOutWidth.length; i++) {
      float[][][][] out = new float[1][mOutWidth[i]][mOutWidth[i]][ mOutWidth.length * (5 +labels.size())];
      outputMap.put(i, out);
    }
    // Run the inference call.
    Trace.beginSection("run");
    tfLite.runForMultipleInputsOutputs(inputArray, outputMap);
    //    经过yolov3模型后的imgData 会返回3个特征图 [1,13,13,255],[1,26,26,255],[1,52,52,255]
	//    经过yolov3-tiny模型后的imgData 会返回2个特征图[1,13,13,255],[1,26,26,255]

    Trace.endSection();
    ArrayList<Recognition> detections = new ArrayList<Recognition>();

/**
 *    重新编写一个转换方法用于提取yolo-v3中检测到的对象信息
 * **/
    int labels_size = labels.size();
    for (int i = 0; i < mOutWidth.length; i++) {
      int gridWidth = mOutWidth[i];
      float[][][][] out = (float[][][][])outputMap.get(i);

      for (int y = 0; y < gridWidth; ++y) {
        for (int x = 0; x < gridWidth; ++x) {
          for (int b = 0; b < NUM_BOXES_PER_BLOCK; ++b) {
            final int offset =
                    (gridWidth * (NUM_BOXES_PER_BLOCK * (labels_size + 5))) * y
                            + (NUM_BOXES_PER_BLOCK * (labels_size + 5)) * x
                            + (labels_size + 5) * b;

            final float confidence = expit(out[0][y][x][(labels_size + 5) * b + 4]);
            int detectedClass = -1;
            float maxClass = 0;
            final float[] classes = new float[labels_size];
            for (int _c = 0; _c < labels_size; ++_c) {
              classes[_c] = out[0][y][x][(labels_size + 5) * b + 5 +_c];
            }
            softmax(classes);

            // 得到最大各个类别中概率最大的类
            for (int _c = 0; _c < labels_size; ++_c) {
              if (classes[_c] > maxClass) {
                detectedClass = _c;
                maxClass = classes[_c];
              }
            }

            final float confidenceInClass = maxClass * confidence;

            if (confidenceInClass > mObjThresh) {
              final float xPos = (x + expit(out[0][y][x][(labels_size + 5) * b])) * (inputSize / gridWidth);
              final float yPos = (y + expit(out[0][y][x][(labels_size + 5) * b + 1])) * (inputSize / gridWidth);

              final float w = (float) (Math.exp(out[0][y][x][(labels_size + 5) * b + 2]) * mAnchors[2 * mMasks[i][b] + 0]);
              final float h = (float) (Math.exp(out[0][y][x][(labels_size + 5) * b + 3]) * mAnchors[2 * mMasks[i][b] + 1]);

              Log.d("wangmin","box x:" + xPos + ", y:" + yPos + ", w:" + w + ", h:" + h);

              final RectF rect =
                      new RectF(
                              Math.max(0, xPos - w / 2),
                              Math.max(0, yPos - h / 2),
                              Math.min(bitmap.getWidth() - 1, xPos + w / 2),
                              Math.min(bitmap.getHeight() - 1, yPos + h / 2));
              Log.d("wangmin", "detect " + labels.get(detectedClass)
                      + ", confidence: " + confidenceInClass
                      + ", box: " + rect.toString());
              detections.add(new Recognition("" + offset, labels.get(detectedClass),
                      confidenceInClass, rect, detectedClass));
            }
          }
        }
      }
      Log.d("wangmin", "out[" + i + "] detect end");
    }
    final ArrayList<Recognition> recognitions = nms(detections);
    return recognitions;
  }
4)打开DetectorActivity.java 修改模型输入的尺寸,使用模型的名称和标签。
 5)真机调试(在检测过程中,有3秒左右的延迟,这是由于YOLOV3网络模型给出的是三张特征图,而手机的cpu并没有电脑的计算力,导致特征图在转换过程中消耗了时间)

总结
本次教程主要讲解了如何修改Google官网提供的对象检测示例源码,实现YOLOV3网络模型的嵌入。通过上述操作,我们能使用YOLOV3自训练其他数据集,然后嵌入到边缘设备中。若想使用Yolo-tiny的话,需要修改recognizeImage函数中特征图转换的三个循环,因为tiny只输出了两个特征图。此外,少奶奶还注解了TFLiteObjectDetectionAPIModel.java中所有函数的功能(为了减少篇幅,本文没有贴出来),大家可以在下载中找到。