Qt5.7 + OpenCV3.2开启多线程调用系统摄像头并实现视频录制与回放、图片截取与保存(二)摄像头画面显示与视频保存
在上一篇博客中,我们介绍了OpenCV中常用的类,并且实现了使用OpenCV加载本地的一张图片,本篇文章将讲解如何使用OpenCV调用系统摄像头,实现实时画面显示以及视频的存储与回放
事实上,视频的显示与图片显示原理一样,只不过视频是N多张图片叠放在一起的结果——显示摄像头画面时,使用VideoCapture捕捉摄像头画面,借助定时器每隔相同的时间在窗口中显示一帧;视频存储是将图片按照一定的频率压入*.avi视频文件中;回放则是按照写入的频率,将图片一帧一帧读出来并显示
接下来为大家详细介绍——
一、项目创建
首先还是创建一个主窗口项目,命名为multiThreadCamera,添加OpenCV头文件及变量声明:
#ifndef MAINWINDOW_H
#define MAINWINDOW_H
#include 变量的声明中,QTimer是为了设置视频的帧频fps,其定时时间(ms)为1000 ms / fps
VideoCapture与Videowriter介绍可以参照上一篇博客,VideoCapture读取的是视频的每一个原始帧;这些原始帧转换为Mat类型后,通过Videowriter写入视频文件。
二、代码编写
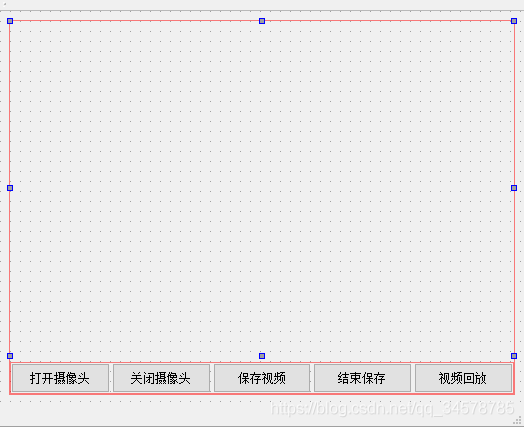
| 控件名 | 作用 |
|---|---|
label_videoviewer |
画面显示 |
pushbutton_opencamera |
打开摄像头 |
pushbutton_closecamera |
关闭摄像头 |
pushbutton_savevideo |
保存视频 |
pushbutton_savecomplete |
结束保存 |
pushbutton_videoreview |
视频回放 |
然后创建槽函数:(我是为了方便直接右击——转到槽函数)
private slots:
    void on_pushButton_opencamera_clicked();

    void on_pushButton_closecamera_clicked();

    void on_pushButton_savevideo_clicked();

    void on_pushButton_savecomplete_clicked();

    void on_pushButton_videoreview_clicked();

	void display_frame();
接下来是cpp文件编写:
在构造函数中添加定时器的初始化与槽函数:
MainWindow::MainWindow(QWidget *parent) :
    QMainWindow(parent),
    ui(new Ui::MainWindow)
{
    ui->setupUi(this);
    fps_timer.setInterval(40);//定时器设定时间40ms,即每秒钟显示25张画面
    connect(&fps_timer,SIGNAL(timeout()),this,SLOT(display_frame()));
}
接下来是几个按钮的槽函数:
-
on_pushButton_opencamera_clicked():
此按钮需要实现的功能是:打开系统摄像头、获取并显示画面。事实上,显示画面需要在定时器的槽函数display_frame()中实现,故在此我们只需打开定时器。void MainWindow::on_pushButton_opencamera_clicked() { myCapture.open(0); fps_timer.start(); }其中需要说明的是
virtual bool open(int index);是一个虚函数,一个参数int index表示摄像头的标号,从0开始,如果计算机有n个摄像头,那么那么参数可以选择0到n-1,如果超过n-1编译器不会报错,但是程序会直接崩溃);
我们看到该函数还有一个bool类型的返回值,用来返回摄像头是否成功打开,所以槽函数可以重新完善一下:void MainWindow::on_pushButton_opencamera_clicked() { myCapture.open(0); if(!myCapture.open(0)) { qDebug()<<"Camera Open Failed."; return; } fps_timer.start(); } -
display_frame():
摄像头与定时器成功开启之后,接下来就要在定时器的槽函数中实现画面的显示:void MainWindow::display_frame() { myCapture >> picture; QImage img1 = QImage((const unsigned char*)picture.data, picture.cols, picture.rows, QImage::Format_RGB888).rgbSwapped(); ui->label_videoViewer->setPixmap(QPixmap::fromImage(img1)); }几点说明:
- 我们要在定时器槽函数中实现的就是两个功能——画面的抓取与UI界面的显示,代码的第一和第三句则分别实现了这两个功能:
myCapture >> picture;采用了C++中数据流的方式将摄像头的当前帧读回来,实际上该语句可以替换为myCapture.read(picture);,可能更好理解,读者可以尝试;
- 第三句ui->label_videoViewer->setPixmap(QPixmap::fromImage(img1));就更好理解了,将QImage形式的图片转为QPixmap并显示在QLabel上。画面虽然是一帧一帧的,但是当一秒钟显示25帧时就变成了视频。
- 关键是第二句话,它提供了一种将Mat转为QImage的方法,我们这里默认的是彩色图片的转换,关于其他类型的转换方法可以参考这篇博客https://blog.csdn.net/liyuanbhu/article/details/86307283
另外再补充一句,这里我们选择的是在主窗口中采用QLabel控件显示画面,如果要像上一篇博客那样采用OpenCV中的窗口显示也应在定时器槽函数中实现:void MainWindow::display_frame() { myCapture >> picture; QImage img1 = QImage((const unsigned char*)picture.data, picture.cols, picture.rows, QImage::Format_RGB888).rgbSwapped(); ui->label_videoViewer->setPixmap(QPixmap::fromImage(img1)); namedWindow("VideoPlay", WINDOW_NORMAL); imshow("VideoPlay", picture); waitKey(40); }这里要加一句
waitkey(40),让程序停在这里等待外部键盘操作40ms,否则画面会卡死。 -
on_pushButton_closecamera_clicked():
停止的话则更好实现,目前来说只需关闭定时器和释放摄像头资源,如果需要的话,再清空显示区。void MainWindow::on_pushButton_closecamera_clicked() { fps_timer.stop(); myCapture.release(); ui->label_videoViewer->clear(); }如果使用了
imshow()函数,这里则要再加一句destroyWindow("VideoPlay");关闭该窗口。
写到这里程序其实已经可以运行,在Debug模式下点击打开/关闭摄像头,即可成功实现画面的显示与停止。
-
on_pushButton_savevideo_clicked():
保存按钮首先判断摄像头是否打开,如果没有则直接返回;然后打开(新建)一个视频文件,在while循环里面写入视频帧。void MainWindow::on_pushButton_savevideo_clicked() { if(!myCapture.isOpened()) { qDebug()<<"Camera Is Not Open."; return; } writer.open("D:\\test.avi",VideoWriter::fourcc('M', 'J', 'P', 'G'),25, Size(640, 480), true); while (!complete_flag) { myCapture >> picture; writer.write(picture); namedWindow("VideoPlay", WINDOW_NORMAL); imshow("VideoPlay", picture); waitKey(40); } }其中,
write.open()函数和第一篇文章加载图片的基本相同,不做赘述,制定了视频文件之后,通过write()函数不断向里面写入Mat类型的数据,即实现了保存。
在这里,我们在私有变量中设置了一个保存停止标志位,bool complete_flag = false;然后在
on_pushButton_savecomplete_clicked()中将该变量置位即可实现停止保存。 -
on_pushButton_savecomplete_clicked():void MainWindow::on_pushButton_savecomplete_clicked() { complete_flag = true; } -
on_pushButton_videoreview_clicked():
视频回放与从摄像头中获取方法是一致的,只不过回放视频时是从视频文件中获取画面帧。void MainWindow::on_pushButton_videoreview_clicked() { myCapture.open("D:\\test.avi"); while (myCapture.isOpened()) { myCapture >> picture; if(picture.empty()) break; imshow("VideoPlay", picture); if (waitKey(40) == 27) // ESC键的ASCII码为27,如果按下ESC键就推出 break; } destroyWindow("VideoPlay"); }这里面不过把我们打开摄像头的代码
myCapture.open(0)换为了myCapture.open("D:\\test.avi");接下来都一样,要注意的是当文件读完时,读回来的画面是空的,所以要加一句画面是否为空的判断,如果为空则表示文件读完,直接跳出。
三、总结
写到这里,我们的基本功能都已经实现,但是这离实际应用还差好多,一方面是前后功能逻辑不太完善,另一方面将全部功能发到主线程中过多的占用了UI资源致使其他功能难以实现,如何进一步完善和开辟新的线程,我们下一篇文章再讲。
PS
前面代码过于零散,重新沾一下便于查看:
mainwindow.h
#ifndef MAINWINDOW_H
#define MAINWINDOW_H
#include mainwindow.cpp
#include "mainwindow.h"
#include "ui_mainwindow.h"
MainWindow::MainWindow(QWidget *parent) :
QMainWindow(parent),
ui(new Ui::MainWindow)
{
ui->setupUi(this);
fps_timer.setInterval(40);
connect(&fps_timer,SIGNAL(timeout()),this,SLOT(display_frame()));
}
MainWindow::~MainWindow()
{
delete ui;
}
void MainWindow::on_pushButton_opencamera_clicked()
{
    myCapture.open(0);
    if(!myCapture.open(0))
    {
        qDebug()<<"Camera Open Failed.";
        return;
    }
    fps_timer.start();
}
void MainWindow::on_pushButton_closecamera_clicked()
{
fps_timer.stop();
myCapture.release();
ui->label_videoViewer->clear();
}
void MainWindow::on_pushButton_savevideo_clicked()
{
if(!myCapture.isOpened())
{
qDebug()<<"Camera Is Not Open.";
return;
}
writer.open("D:\\test.avi",VideoWriter::fourcc('M', 'J', 'P', 'G'),25, Size(640, 480), true);
while (!complete_flag)
{
myCapture >> picture;
writer.write(picture);
namedWindow("VideoPlay", WINDOW_NORMAL);
imshow("VideoPlay", picture);
waitKey(40);
}
}
void MainWindow::on_pushButton_savecomplete_clicked()
{
complete_flag = true;
}
void MainWindow::on_pushButton_videoreview_clicked()
{
myCapture.open("D:\\test.avi");
while (myCapture.isOpened())
{
myCapture >> picture;
if(picture.empty())
break;
imshow("VideoPlay", picture);
if (waitKey(40) == 27) // ESC键的ASCII码为27,如果按下ESC键就推出
break;
}
destroyWindow("VideoPlay");
}
   void MainWindow::display_frame()
   {
   	  myCapture >> picture;
   	  QImage img1 = QImage((const unsigned char*)picture.data, picture.cols, 				picture.rows, QImage::Format_RGB888).rgbSwapped();
   	  ui->label_videoViewer->setPixmap(QPixmap::fromImage(img1));
   namedWindow("VideoPlay", WINDOW_NORMAL);
   	  imshow("VideoPlay", picture);
   	  waitKey(40);
   	}
