Pytorch kaggle 房价预测实战
Pytorch kaggle 房价预测实战
0. 环境介绍
环境使用 Kaggle 里免费建立的 Notebook
教程使用李沐老师的 动手学深度学习 网站和 视频讲解
小技巧:当遇到函数看不懂的时候可以按 Shift+Tab 查看函数详解。
1. 准备工作
直接使用 Kaggle 自带的环境和数据集,比较方便,省去了下载数据集的代码。
1.1 加入比赛
https://www.kaggle.com/c/house-prices-advanced-regression-techniques
1.2 新建 Notebook
import numpy as np
import pandas as pd
import os

# 当前所在目录路径
print(os.getcwd())
# 查看数据集文件路径
for dirname, _, filenames in os.walk('/kaggle/input'):
    for filename in filenames:
        print(os.path.join(dirname, filename))
/kaggle/working
数据集文件路径:
/kaggle/input/house-prices-advanced-regression-techniques/train.csv
/kaggle/input/house-prices-advanced-regression-techniques/test.csv
2. 实战开始
2.0 导入模块
# 安装 d2l
!pip install -U d2l
# 安装1.3版本的pandas,不然会在生成 submission.csv 文件的时候报错
!pip install pandas==1.3.0
%matplotlib inline
import numpy as np
import pandas as pd
import torch
from torch import nn
from d2l import torch as d2l
install d2l 和 pandas==1.3.0,不 install pandas==1.3.0 的话,会在最后 submission.to_csv('submission.csv', index=False) 导出结果的时候报错:
ImportError: cannot import name 'Label' from 'pandas._typing' (/opt/conda/lib/python3.7/site-packages/pandas/_typing.py)
2.1 读取数据
train_data = pd.read_csv('../input/house-prices-advanced-regression-techniques/train.csv')
test_data = pd.read_csv('../input/house-prices-advanced-regression-techniques/test.csv')
train_data.shape, test_data.shape
![]()
训练数据集有 1460 个样本,每个样本 80 个属性和一个标签。
测试数据集有 1459 个样本,每个样本 80 个属性。
train_data.iloc[0:4, [0, 1, 2, 3, -3, -2, -1]]

查看前四个样本的前四个和最后两个特征,以及相应标签(房价)。
2.2 数据预处理
2.2.1 提取属性
在每个样本中,第一个特征是ID, 这有助于模型识别每个训练样本。 虽然这很方便,但它不携带任何用于预测的信息。 因此,在将数据提供给模型之前,我们将其从数据集中删除。
all_features = pd.concat((train_data.iloc[:, 1:-1], test_data.iloc[:, 1:]))
all_features 储存全部数据集中的的属性信息。
注:[1:-1] 表示不提取最后一个房价标签。

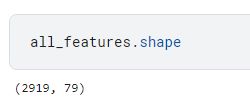
属性数据的形状。
2.2.2 标准化,填充空白数值
我们将所有缺失的值替换为相应特征的平均值。然后,为了将所有特征放在一个共同的尺度上, 我们通过将特征重新缩放到零均值和单位方差来标准化数据:
x ← x − μ σ , x \leftarrow \frac{x - \mu}{\sigma}, x←σx−μ,
我们标准化数据有两个原因: 首先,它方便优化。 其次,因为我们不知道哪些特征是相关的, 所以我们不想让惩罚分配给一个特征的系数比分配给其他任何特征的系数更大。
# 提取数值类型的属性
numeric_features = all_features.dtypes[all_features.dtypes != 'object'].index
# 标准化
all_features[numeric_features] = all_features[numeric_features].apply(
    lambda x: (x - x.mean()) / (x.std()))
# 在标准化数据之后,所有均值消失,因此我们可以将缺失值设置为0
all_features[numeric_features] = all_features[numeric_features].fillna(0)
2.2.3 离散值数据 one-hot 编码
诸如“MSZoning”之类的特征。 我们用独热编码替换它们,例如,“MSZoning”包含值“RL”和“Rm”。 我们将创建两个新的指示器特征“MSZoning_RL”和“MSZoning_RM”,其值为0或1。 根据独热编码,如果“MSZoning”的原始值为“RL”, 则:“MSZoning_RL”为1,“MSZoning_RM”为0。 pandas软件包会自动为我们实现这一点。
all_features = pd.get_dummies(all_features, dummy_na=True)
all_features.shape
![]()
Dummy_na=True 将 na(缺失值)视为有效的特征值,并为其创建指示符特征。
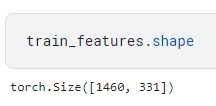
此转换会将特征的总数量从 79 79 79 个增加到 331 331 331 个。
2.2.4 转换为张量格式
通过 values 属性,我们可以 从 Pandas 格式中提取NumPy 格式,并将其转换为张量表示用于训练。
# 训练集数量
n_train = train_data.shape[0]

train_features = torch.tensor(all_features[:n_train].values, dtype=torch.float32)
test_features = torch.tensor(all_features[n_train:].values, dtype=torch.float32)
# 训练集标签(房价)
train_labels = torch.tensor(
    train_data.SalePrice.values.reshape(-1, 1), dtype=torch.float32)
2.3 定义训练模型
2.3.1 定义线性模型作为 Baseline
# 均方差损失函数
loss = nn.MSELoss()
in_features = train_features.shape[1]

def get_net():
	# 定义线性模型
    net = nn.Sequential(nn.Linear(in_features,1))
    return net
2.3.2 定义相对误差指标(不要和损失函数混淆)
房价就像股票价格一样,我们关心的是相对数量,而不是绝对数量。 因此,我们更关心相对误差 y − y ^ y \frac{y - \hat{y}}{y} yy−y^, 而不是绝对误差 y − y ^ y - \hat{y} y−y^。
例如,如果我们在俄亥俄州农村地区估计一栋房子的价格时, 假设我们的预测偏差了 10 万美元, 然而那里一栋典型的房子的价值是 12.5 万美元, 那么模型可能做得很糟糕。 另一方面,如果我们在加州豪宅区的预测出现同样的10万美元的偏差, (在那里,房价中位数超过400万美元) 这可能是一个不错的预测。
解决这个问题的一种方法是用价格预测的对数来衡量差异。这也是比赛中官方用来评价提交质量的误差指标。
即将 for ∣ log y − log y ^ ∣ ≤ δ |\log y - \log \hat{y}| \leq \delta ∣logy−logy^∣≤δ 转换为 e − δ ≤ y ^ y ≤ e δ e^{-\delta} \leq \frac{\hat{y}}{y} \leq e^\delta e−δ≤yy^≤eδ。 这使得预测价格的对数与真实标签价格的对数之间出现以下均方根误差:
1 n ∑ i = 1 n ( log y i − log y ^ i ) 2 . \sqrt{\frac{1}{n}\sum_{i=1}^n\left(\log y_i -\log \hat{y}_i\right)^2}. n1i=1∑n(logyi−logy^i)2.
def log_rmse(net, features, labels):
    # 为了在取对数时进一步稳定该值,将小于1的值设置为1
    clipped_preds = torch.clamp(net(features), 1, float('inf'))
    rmse = torch.sqrt(loss(torch.log(clipped_preds),
                           torch.log(labels)))
	# item() 可以将 tensor 标量转换为一个 python 标量
    return rmse.item()
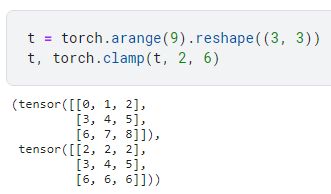
注:torch.clamp(input, min, max) 函数的作用就是把数据压缩到一个区间。当 input 中的值小于 min 时令其为 min,当 input 中的值大于 max 时令其为 max。例子如下:

2.3.3 定义训练函数
def train(net, train_features, train_labels, test_features, test_labels,
          num_epochs, learning_rate, weight_decay, batch_size):
    train_ls, test_ls = [], []
    train_iter = d2l.load_array((train_features, train_labels), batch_size)
    # 这里使用的是Adam优化算法
    optimizer = torch.optim.Adam(net.parameters(),
                                 lr = learning_rate,
                                 weight_decay = weight_decay)
    for epoch in range(num_epochs):
        for X, y in train_iter:
            optimizer.zero_grad()
            l = loss(net(X), y)
            l.backward()
            optimizer.step()
        train_ls.append(log_rmse(net, train_features, train_labels))
        if test_labels is not None:
            test_ls.append(log_rmse(net, test_features, test_labels))
    return train_ls, test_ls
2.4 K K K 折交叉验证
将训练数据分为若干个片,选择第 i i i 个切片作为验证数据,其余部分作为训练数据。
def get_k_fold_data(k, i, X, y):
    assert k > 1
    fold_size = X.shape[0] // k
    X_train, y_train = None, None
    for j in range(k):
        idx = slice(j * fold_size, (j + 1) * fold_size)
        X_part, y_part = X[idx, :], y[idx]
        if j == i:
            X_valid, y_valid = X_part, y_part
        elif X_train is None:
            X_train, y_train = X_part, y_part
        else:
            X_train = torch.cat([X_train, X_part], 0)
            y_train = torch.cat([y_train, y_part], 0)
    return X_train, y_train, X_valid, y_valid
注:slice() 函数可以结合 tensor 一起使用,用于取下标。例子如下:

K K K 折交叉验证函数:
def k_fold(k, X_train, y_train, num_epochs, learning_rate, weight_decay,
           batch_size):
    train_l_sum, valid_l_sum = 0, 0
    for i in range(k):
        data = get_k_fold_data(k, i, X_train, y_train)
        net = get_net()
        train_ls, valid_ls = train(net, *data, num_epochs, learning_rate,
                                   weight_decay, batch_size)
        train_l_sum += train_ls[-1]
        valid_l_sum += valid_ls[-1]
        if i == 0:
            d2l.plot(list(range(1, num_epochs + 1)), [train_ls, valid_ls],
                     xlabel='epoch', ylabel='rmse', xlim=[1, num_epochs],
                     legend=['train', 'valid'], yscale='log')
        print(f'折{i + 1},训练log rmse{float(train_ls[-1]):f}, '
              f'验证log rmse{float(valid_ls[-1]):f}')
    return train_l_sum / k, valid_l_sum / k
2.5 模型选择
调参?炼丹!
这些参数都是可以调整的。多进行几次实验。找一组效果相对好的参数参与测试即可。
k, num_epochs, lr, weight_decay, batch_size = 5, 100, 5, 0, 64
train_l, valid_l = k_fold(k, train_features, train_labels, num_epochs, lr,
                          weight_decay, batch_size)
print(f'{k}-折验证: 平均训练log rmse: {float(train_l):f}, '
      f'平均验证log rmse: {float(valid_l):f}')
2.6 训练和预测
def train_and_pred(train_features, test_feature, train_labels, test_data,
                   num_epochs, lr, weight_decay, batch_size):
    net = get_net()
    train_ls, _ = train(net, train_features, train_labels, None, None,
                        num_epochs, lr, weight_decay, batch_size)
    d2l.plot(np.arange(1, num_epochs + 1), [train_ls], xlabel='epoch',
             ylabel='log rmse', xlim=[1, num_epochs], yscale='log')
    print(f'训练log rmse:{float(train_ls[-1]):f}')
    # 将网络应用于测试集。
    preds = net(test_features).detach().numpy()
    # 将其重新格式化以导出到Kaggle
    test_data['SalePrice'] = pd.Series(preds.reshape(1, -1)[0])
	# 导出结果
    submission = pd.concat([test_data['Id'], test_data['SalePrice']], axis=1)
    submission.to_csv('submission.csv', index=False)
train_and_pred(train_features, test_features, train_labels, test_data,
               num_epochs, lr, weight_decay, batch_size)


