pytorch学习-使用torch.nn模块自定义模型
- 使用nn.Module构建神经网络
-
-
- 1 打印网络perception,可以看到上述定义的layer1和layer2
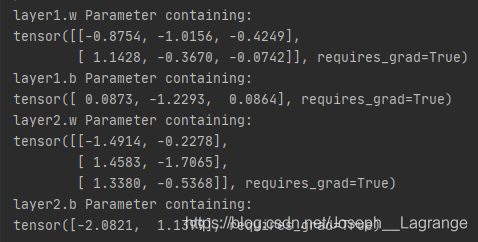
- 2 named_parameters()可以返回学习参数的参数名与参数值
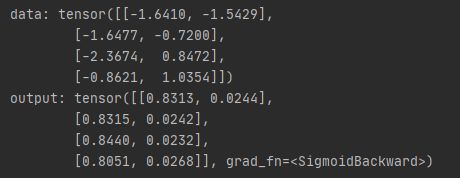
- 3 将输入数据传入perception,perception()相当于调用perception中的forward()函数
- 4 nn.Parameter函数
- 5 forward()函数与反向传播
- 6 多个module的嵌套
- 7 nn.Module与nn.functional库
- 8 nn.sequential()模块
-
使用nn.Module构建神经网络
完成模型的训练包括:参数求导、梯度计算、参数更新以及训练过程的控制
nn.Module是PyTorch提供的神经网络类,并在类中实现了网络各层的定义及前向计算与反向传播机制。
在实际使用时,如果想要实现某个神经网络,只需继承nn.Module,在初始化中定义模型结构与参数,在函数forward()中编写网络前向过程即可。
下面具体以一个由两个全连接层组成的感知机为例,介绍如何使用nn.Module构造模块化的神经网络
可以把代码的两个类分为四个步骤:
1.初始化层参数
2.定义层结构
3.定义所有网络层
4.定义完整的模型
import torch
from torch import nn

class Linear(nn.Module):
    def __init__(self, in_dim, out_dim):
        # 1.初始化层参数
        super(Linear, self).__init__()
        self.w = nn.Parameter(torch.randn(in_dim, out_dim))
        self.b = nn.Parameter(torch.randn(out_dim))

    def forward(self, x):
        # 2.定义层结构
        x = x.matmul(self.w)
        y = x + self.b.expand_as(x)
        return y

class Perception(nn.Module):
    def __init__(self, in_dim, hid_dim, out_dim):
        # 3.定义所有网络层
        super(Perception, self).__init__()
        self.layer1 = Linear(in_dim, hid_dim)
        self.layer2 = Linear(hid_dim, out_dim)

    def forward(self, x):
        # 4.定义模型
        x = self.layer1(x)
        y = torch.sigmoid(x)
        y = self.layer2(y)
        y = torch.sigmoid(y)
        return y
说明:
1 打印网络perception,可以看到上述定义的layer1和layer2
perception = Perception(2,3,2)  # 输入样本维度为2,输出维度也为2
print(perception)
2 named_parameters()可以返回学习参数的参数名与参数值
for name, parameter in perception.named_parameters():
    print(name, parameter)  # print(name, ':', parameter.size())
3 将输入数据传入perception,perception()相当于调用perception中的forward()函数
data = torch.randn(4,2)
print("data:", data)

output = perception(data)
print("output:", output)
4 nn.Parameter函数
在类的__init__()中需要定义网络学习的参数,在此使用nn.Parameter()函数定义了全连接中的ω和b,这是一种特殊的Tensor的构造方法,默认需要求导,即requires_grad为True。
5 forward()函数与反向传播
forward()函数用来进行网络的前向传播,并需要传入相应的Tensor,例如上例的perception(data)即是直接调用了forward()。在具体底层实现中,perception.call(data)将类的实例perception变成了可调用对象perception(data),而在perception.call(data)中主要调用了forward()函数。nn.Module可以自动利用Autograd机制实现反向传播,不需要自己手动实现。
6 多个module的嵌套
在Module的搭建时,可以嵌套包含子Module,上例的Perception中调用了Linear这个类,这样的代码分布可以使网络更加模块化,提升代码的复用性。在实际的应用中,PyTorch也提供了绝大多数的网络层,如全连接、卷积网络中的卷积、池化等,并自动实现前向与反向传播。
7 nn.Module与nn.functional库
在PyTorch中,还有一个库为nn.functional,同样也提供了很多网络层与函数功能,但与nn.Module不同的是,利用nn.functional定义的网络层不可自动学习参数,还需要使用nn.Parameter封装。nn.functional的设计初衷是对于一些不需要学习参数的层,如激活层、BN(Batch Normalization)层,可以使用nn.functional,这样这些层就不需要在nn.Module中定义了。
总体来看,对于需要学习参数的层,最好使用nn.Module,对于无参数学习的层,可以使用nn.functional,当然这两者间并没有严格的好坏之分。
8 nn.sequential()模块
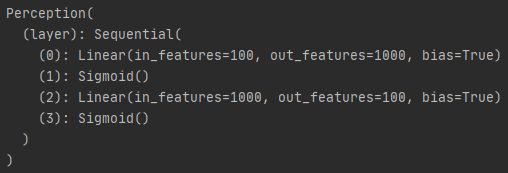
当模型中只是简单的前馈网络时,即上一层的输出直接作为下一层的输入,这时可以采用nn.Sequential()模块来快速搭建模型,而不必手动在forward()函数中一层一层地前向传播。因此,如果想快速搭建模型而不考虑中间过程的话,推荐使用nn.Sequential()模块。
在上面的例子中,Perception类中的layer1与layer2是直接传递的,因此该Perception类可以使用nn.Sequential()快速搭建。上面代码可改写为:
import torch
from torch import nn

class Linear(nn.Module):
    def __init__(self, in_dim, out_dim):
        # 1.初始化网络层参数
        super(Linear, self).__init__()
        self.w = nn.Parameter(torch.randn(in_dim, out_dim))
        self.b = nn.Parameter(torch.randn(out_dim))

    def forward(self, x):
        # 2.定义网络层结构
        x = x.matmul(self.w)
        y = x + self.b.expand_as(x)
        return y

class Perception(nn.Module):
    def __init__(self, in_dim, hid_dim, out_dim):
        # 3.定义所有网络层
        super(Perception, self).__init__()
        self.layer = nn.Sequential(
            nn.Linear(in_dim, hid_dim),
            nn.Sigmoid(),
            nn.Linear(hid_dim, out_dim),
            nn.Sigmoid()
        )

    def forward(self, x):
        # 4.定义模型
        y = self.layer(x)
        return y

perception = Perception(100,1000,100)
print(perception)


