wandb在pytorch中的使用记录
本文记录在学习wandb以及后续使用过程中的相关问题或注意事项,主要是在Pytorch中使用
安装及登录
使用前需要安装,直接在终端中使用pip安装,如下
pip install wandb
可先在官网https://wandb.ai上注册账号;安装完成后,在终端中输入
wandb login
输入后回车会提醒输入个人密钥,进入https://wandb.ai/settings复制个人账户密钥,复制后回车即完成账户连接。有一点需要注意的是,目前wandb的个人账户使用是免费的,但其是要与wandb官网绑定的,使用的时候需要网络连接,使用过程中产生的数据也是存储在wandb的官方服务器上;其提供团队版,可以在本地安装服务,保证数据、信息的安全性,但收费,目前可以免费使用一个月。使用个人账户,模型训练完后,会在工作路径下生成名为wandb的文件夹,该文件夹下每一个文件夹对应一次训练过程,命名格式一般为run_%y%y%y%y%m%m%d%d_%h%h%m%m%s%s_随机字符;同时在个人账户的Projects中会记录对应的训练信息
wandb主要使用步骤
- 将超参数和元数据存储在config中
- 使用wandb.watch()方法自动记录训练过程中模型梯度和参数等;也可以获取系统指标,如GPU、CPU利用率等
- 使用wandb.log()方法记录其他所有内容,例如损失
- 将模型保存为Netron-compatible格式(onxx),以便在W&B上查看
实例代码
以下为wandb官方提供的wandb在Pytorch框架下的使用代码,用详细注释表明使用方法和流程
import random
import wandb  # 导入wandb库
import numpy as np
import torch
import torch.nn as nn
import torchvision
import torchvision.transforms as transforms
from tqdm.notebook import tqdm

# Ensure deterministic behavior
torch.backends.cudnn.deterministic = True
random.seed(hash("setting random seeds") % 2 ** 32 - 1)
np.random.seed(hash("improves reproducibility") % 2 ** 32 - 1)
torch.manual_seed(hash("by removing stochasticity") % 2 ** 32 - 1)
torch.cuda.manual_seed_all(hash("so runs are repeatable") % 2 ** 32 - 1)

# Device configuration
device = torch.device("cuda:0" if torch.cuda.is_available() else "cpu")

# 1、将模型构建或训练中涉及到的元数据或超参数记录在config中
config = dict(epochs=3,
              classes=10,
              kernels=[16, 32],
              batch_size=1,
              learning_rate=0.005,
              dataset="MNIST",
              architecture="CNN")


# 整个记录路线,先定义模型,再训练,最后测试
def model_pipeline(hyperparameters):
    # tell wandb to get started
    with wandb.init(project="pytorch-demo", config=hyperparameters):  # 初始化wandb,此处的hyperparameters就是上面构建的config,wandb将本次训练的数据链接到指定的project下,后续在对应的项目下浏览记录;该函数会在代码和wandb官方服务器之间建立通信连接
        # access all HPs through wandb.config, so logging matches execution!
        config = wandb.config  # 使用wandb.config将config复制一份,这样能保证记录的数据就是本身需要记录的数据

        # make the model, data, and optimization problem
        model, train_loader, test_loader, criterion, optimizer = make(config)
        print(model)

        # and use them to train the model
        train(model, train_loader, criterion, optimizer, config)

        # and test its final performance
        test(model, test_loader)

    return model


def make(config):
    # Make the data
    train, test = get_data(train=True), get_data(train=False)
    train_loader = make_loader(train, batch_size=config.batch_size)
    test_loader = make_loader(test, batch_size=config.batch_size)

    # Make the model
    model = ConvNet(config.kernels, config.classes).to(device)

    # Make the loss and optimizer
    criterion = nn.CrossEntropyLoss()
    optimizer = torch.optim.Adam(
        model.parameters(), lr=config.learning_rate)

    return model, train_loader, test_loader, criterion, optimizer


def get_data(slice=5, train=True):
    full_dataset = torchvision.datasets.MNIST(root=".",
                                              train=train,
                                              transform=transforms.ToTensor(),
                                              download=True)
    #  equiv to slicing with [::slice]
    sub_dataset = torch.utils.data.Subset(
        full_dataset, indices=range(0, len(full_dataset), slice))

    return sub_dataset


def make_loader(dataset, batch_size):
    loader = torch.utils.data.DataLoader(dataset=dataset,
                                         batch_size=batch_size,
                                         shuffle=True,
                                         pin_memory=True, num_workers=8)
    return loader


# Conventional and convolutional neural network

class ConvNet(nn.Module):
    def __init__(self, kernels, classes=10):
        super(ConvNet, self).__init__()

        self.layer1 = nn.Sequential(
            nn.Conv2d(1, kernels[0], kernel_size=5, stride=1, padding=2),
            nn.ReLU(),
            nn.MaxPool2d(kernel_size=2, stride=2))
        self.layer2 = nn.Sequential(
            nn.Conv2d(16, kernels[1], kernel_size=5, stride=1, padding=2),
            nn.ReLU(),
            nn.MaxPool2d(kernel_size=2, stride=2))
        self.fc = nn.Linear(7 * 7 * kernels[-1], classes)

    def forward(self, x):
        out = self.layer1(x)
        out = self.layer2(out)
        out = out.reshape(out.size(0), -1)
        out = self.fc(out)
        return out


def train(model, loader, criterion, optimizer, config):
    # tell wandb to watch what the model gets up to: gradients, weights, and more!
    wandb.watch(model, criterion, log="all", log_freq=10)  # 2、使用wandb.watch()告诉wandb需要记录哪些数据,此处的log="all"表示将能记录的全部记录,如梯度、权重等,记录的频率是log_freg;该代码要放在训练和测试等开始之前

    # Run training and track with wandb
    total_batches = len(loader) * config.epochs
    example_ct = 0  # number of examples seen
    batch_ct = 0  # number of batches
    for epoch in tqdm(range(config.epochs)):
        for _, (images, labels) in enumerate(loader):

            loss = train_batch(images, labels, model, optimizer, criterion)
            example_ct += len(images)
            batch_ct += 1

            # Report metrics every 25th batch,每25个batch记录一次训练损失
            if ((batch_ct + 1) % 25) == 0:
                train_log(loss, example_ct, epoch)  # 此处的train_log中调用了wandb.log()记录训练过程中的损失、准确率等metrics


def train_batch(images, labels, model, optimizer, criterion):
    images, labels = images.to(device), labels.to(device)

    # Forward pass ➡
    outputs = model(images)
    loss = criterion(outputs, labels)

    # Backward pass ⬅
    optimizer.zero_grad()
    loss.backward()

    # Step with optimizer
    optimizer.step()

    return loss


def train_log(loss, example_ct, epoch):
    loss = float(loss)

    # where the magic happens
    wandb.log({"epoch": epoch, "loss": loss}, step=example_ct)  # 3、使用wandb.log()记录各种metrics,需要传入包括数据的字典,给step传入的examplt_ct是当前batch中图片在整个数据集中的绝对位置
    print(f"Loss after " + str(example_ct).zfill(5) + f" examples: {loss:.3f}")


def test(model, test_loader):
    model.eval()

    # Run the model on some test examples
    with torch.no_grad():
        correct, total = 0, 0
        for images, labels in test_loader:
            images, labels = images.to(device), labels.to(device)
            outputs = model(images)
            _, predicted = torch.max(outputs.data, 1)
            total += labels.size(0)
            correct += (predicted == labels).sum().item()

        print(f"Accuracy of the model on the {total} " +
              f"test images: {100 * correct / total}%")

        wandb.log({"test_accuracy": correct / total})  # 记录测试过程准确率

    # Save the model in the exchangeable ONNX format
    torch.onnx.export(model, images, "model.onnx")
    wandb.save("model.onnx")  # 4、将模型保存为onnx格式


# Build, train and analyze the model with the pipeline
model = model_pipeline(config)
注意
-
第四步将模型保存为onnx格式时,要保证两条代码中模型文件名一致;可能也需要管理员权限运行文件,如果报错,可使用管理员权限运行文件(pycharm中可先关闭pycharm,再“以管理员身份运行”pycharm)
-
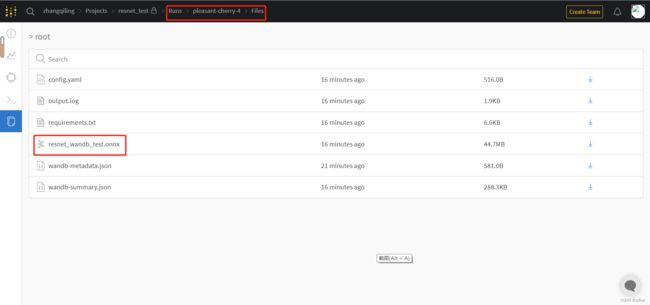
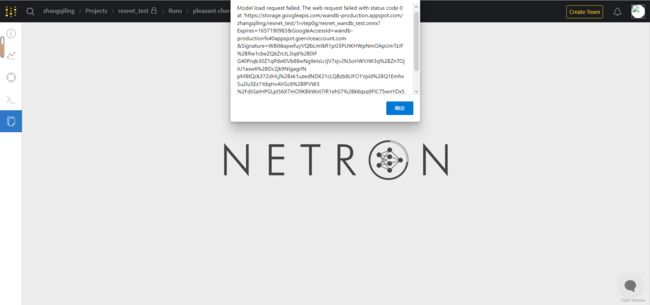
正常情况下,当模型保存完毕后,进入runs下面对应路径的files文件夹下会有保存的onnx文件,在wandb中点击onnx文件会跳转到NETRON页面对模型结构进行可视化加载,但可能NETRON不能加载模型,会报错,如下图所示


-
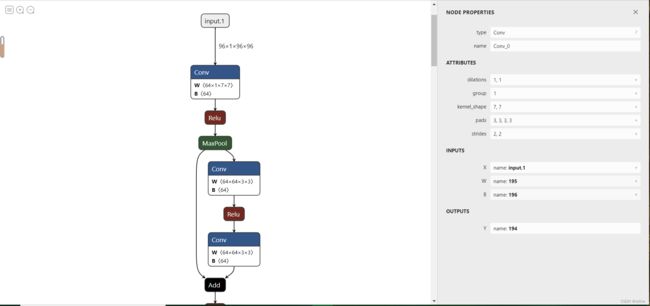
当报错时,可以进入NETRON的官网https://netron.app/点击Open Model按钮即可加载保存的onnx文件,从而完成可视化,如最后一张图所示
