Hive、Impala、Hue集成LDAP
1.LDAP简介
轻型目录访问协议,是一个开放的,中立的,工业标准的应用协议,通过IP协议提供访问控制和维护分布式信息的目录信息。在hadoop生态圈中,LDAP主要是用来做账号管理的。
2.LDAP安装配置
2.1 安装LDAP(以下操作都只需在主节点执行)
yum install -y openldap-*
2.2 配置
(1)更改配置
rm -rf /var/lib/ldap/*
cp /usr/share/openldap-servers/DB_CONFIG.example /var/lib/ldap/DB_CONFIG
chown -R ldap:ldap /var/lib/ldap
(2)备份slapd.d文件
cp -rf /etc/openldap/slapd.d /etc/openldap/slapd.d.bak
(3)编辑slapd.conf文件
vi /etc/openldap/slapd.conf
增加以下内容
include /etc/openldap/schema/core.schema
include /etc/openldap/schema/cosine.schema
include /etc/openldap/schema/duaconf.schema
include /etc/openldap/schema/dyngroup.schema
include /etc/openldap/schema/inetorgperson.schema
include /etc/openldap/schema/java.schema
include /etc/openldap/schema/misc.schema
include /etc/openldap/schema/nis.schema
include /etc/openldap/schema/openldap.schema
include /etc/openldap/schema/ppolicy.schema
include /etc/openldap/schema/collective.schema
pidfile /var/run/openldap/slapd.pid
argsfile /var/run/openldap/slapd.args
(4)更新slapd.d文件
slaptest -f /etc/openldap/slapd.conf -F /etc/openldap/slapd.d
chown -R ldap:ldap /etc/openldap/slapd.d && chmod -R 700 /etc/openldap/slapd.d
注意:在2.4以前的版本中,OpenLDAP 使用 slapd.conf 配置文件来进行服务器的配置,而2.4开始则使用 slapd.d 目录保存细分后的各种配置,这一点需要注意,其数据存储位置即目录 /etc/openldap/slapd.d 。尽管该系统的数据文件是透明格式的,还是建议使用 ldapadd, ldapdelete, ldapmodify 等命令来修改而不是直接编辑。
(5)启动ldap服务
systemctl start slapd
systemctl enable slapd
启动报错:5f30f8be config error processing cn={1}core,cn=schema,cn=config: olc…4.2"
解决方法:执行命令 rm -f /etc/openldap/slapd.d/cn=config/cn=schema/cn={1}core.ldif,可能会提示多个,均将提示的文件删除。
ps aux | grep slapd
netstat -tunlp | grep :389
2.3 创建LDAP数据库
(1)查看默认配置
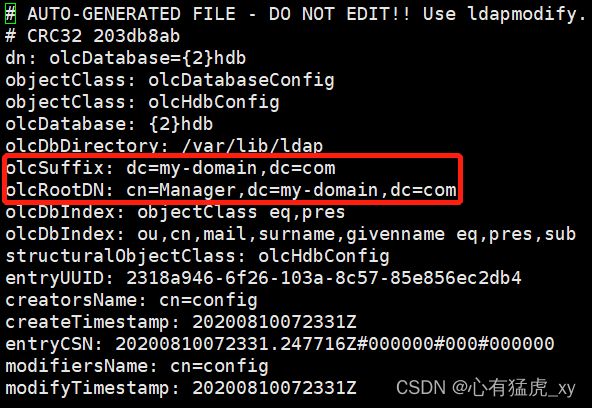
vi /etc/openldap/slapd.d/cn=config/olcDatabase={2}hdb.ldif

(2)创建modify.ldif 文件
cd /etc/openldap/slapd.d
vi modify.ldif
dn: olcDatabase={2}hdb,cn=config
changetype: modify
replace: olcSuffix
olcSuffix: dc=testdomain,dc=com

dn: olcDatabase={2}hdb,cn=config
changetype: modify
replace: olcRootDN
olcRootDN: uid=ldapadmin,ou=people,dc=testdomain,dc=com

dn: olcDatabase={2}hdb,cn=config
changetype: modify
replace: olcRootPW
olcRootPW: esen1234

dn: cn=config
changetype: modify
add: olcAuthzRegexp
olcAuthzRegexp: uid=([^,]*),cn=GSSAPI,cn=auth uid=$1,ou=people,dc=testdomain,dc=com

dn: olcDatabase={2}hdb,cn=config
changetype: modify
add: olcAccess
# Everyone can read everything
olcAccess: {0}to dn.base="" by * read
# The ldapadm dn has full write access
olcAccess: {1}to * by dn="uid=ldapadmin,ou=people,dc=testdomain,dc=com" write by * read
注意:如果是pb2.12版本 olcDatabase 需依据实际情况设置,上一步所述olcDatabase={2}hdb.ldif文件不存在,存在olcDatabase={2}bdb.ldif文件,将hbd替换为bdb。注:esen1234是ldapadmin的密码,根据实际情况设置
ldapmodify -Y EXTERNAL -H ldapi:/// -f modify.ldif(导入修改)
(3)添加数据
vi setup.ldif
dn: dc=testdomain,dc=com
objectClass: top
objectClass: dcObject
objectClass: organization
o: testdomain com
dc: testdomain

dn: ou=people,dc=testdomain,dc=com
objectClass: organizationalUnit
ou: people
description: Users

dn: ou=group,dc=testdomain,dc=com
objectClass: organizationalUnit
ou: group

dn: uid=ldapadmin,ou=people,dc=testdomain,dc=com
objectClass: inetOrgPerson
objectClass: posixAccount
objectClass: shadowAccount
cn: LDAP admin account
uid: ldapadmin
sn: ldapadmin
uidNumber: 1001
gidNumber: 100
homeDirectory: /home/ldap
loginShell: /bin/bash
ldapadd -x -D “uid=ldapadmin,ou=people,dc=testdomain,dc=com” -w esen1234 -f setup.ldif(导入数据)

2.4 安装 Migrationtools
yum install migrationtools -y
vi /usr/share/migrationtools/migrate_common.ph
修改以下内容
$DEFAULT_MAIL_DOMAIN = "testdomain.com";
$DEFAULT_BASE = "dc=testdomain,dc=com";
/usr/share/migrationtools/migrate_base.pl > /opt/base.ldif
2.5 添加ldap用户
vi /opt/adduser.sh(新增添加用户文件)
#!/bin/bash
username=$1
useradd $username
grep -E "${username}:" /etc/passwd > /opt/passwd.txt
/usr/share/migrationtools/migrate_passwd.pl /opt/passwd.txt /opt/passwd.ldif
ldapadd -x -D "uid=ldapadmin,ou=people,dc=testdomain,dc=com" -w esen1234 -f /opt/passwd.ldif
grep -E "${username}:" /etc/group > /opt/group.txt
/usr/share/migrationtools/migrate_group.pl /opt/group.txt /opt/group.ldif
ldapadd -x -D "uid=ldapadmin,ou=people,dc=testdomain,dc=com" -w esen1234 -f /opt/group.ldif
ldappasswd -x -D 'uid=ldapadmin,ou=people,dc=testdomain,dc=com' -w esen1234 "uid=${username},ou=people,dc=testdomain,dc=com" -S
sh /opt/adduser.sh ldapuser1(添加用户,下面输入密码)
New password:
Re-enter new password:
3.Hive集成LDAP
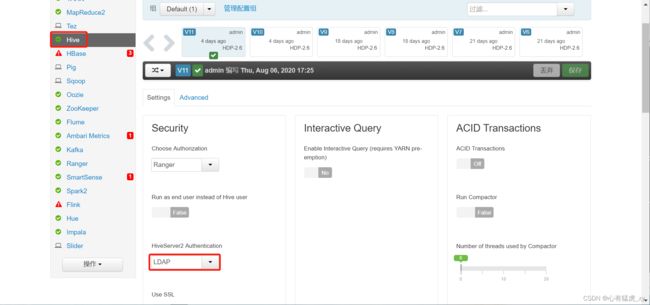
(1)HiveServer2 Authentication选用LDAP

(2)高级site.xml中添加以下配置
hive.server2.authentication.ldap.url=ldap://petabase.esen.com(主机名)
hive.server2.authentication.ldap.baseDN=ou=people,dc=testdomain,dc=com
保存后重启hive
(3)测试
beeline -u jdbc:hive2://petabase.esen.com:10000 -n ldapuser1 -p ldapuser1
必须输入ldap中已配置的用户名和密码才能正确连接

输入错误密码如下所示

4.Impala集成LDAP
1)配置(所有节点)
vi /etc/default/impala
IMPALA_SERVER_ARGS中增加以下内容
-enable_ldap_auth=true \
 -ldap_tls=false \
 -ldap_passwords_in_clear_ok=true \
 -ldap_uri=ldap://petabase.esen.com \
 -ldap_baseDN=ou=people,dc=testdomain,dc=com \
(2)重启impala服务
systemctl restart impala-catalog(所有节点)
systemctl restart impala-state-store(所有节点)
systemctl restart impala-server(主节点)
(3)impala-shell测试
impala-shell -u ldapuser1 -l --auth_creds_ok_in_clear(输入正确密码才可连接)
-i 集群中任意一台impalad服务器都可以
-u 登录用户
-l 使用ldap
–auth_creds_ok_in_clear 由于没有使用ssl,需要添加该参数。
beeline -u jdbc:hive2://petabase.esen.com:21050 -n ldapuser1 -p ldapuser1
Hue集成太麻烦了,放弃。


