CDH6 配置LDAP,Kerberos,Sentry
CDH6 配置LDAP,Kerberos,Sentry
1. 开启Sentry 控制Hive,Hue,Impala权限
仅用作个人笔记,还没有二次验证
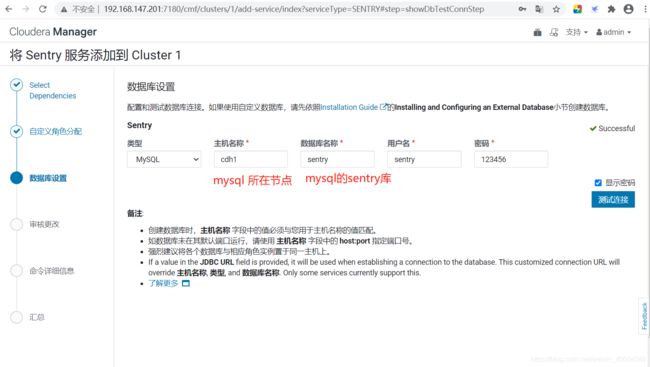
1.1 在mysql中配置数据库
[root@cdh1 ~]# mysql -uroot -p    //登陆mysql

mysql> CREATE DATABASE sentry DEFAULT CHARACTER SET utf8;  //创建sentry库

mysql> grant all on sentry.* to 'sentry'@'%' identified by '123456';  //密码为123456
CREATE USER 'cdh'@'%' IDENTIFIED BY '123456';

mysql> flush privileges; //刷新使生效
可能会报错:ERROR 1819 (HY000): Your password does not satisfy the current policy requirements
是mysql默认密码安全等级过高 ,修改下等级即可(我的调整为6位)
mysql> SHOW VARIABLES LIKE 'validate_password%';
+--------------------------------------+--------+
| Variable_name                        | Value  |
+--------------------------------------+--------+
| validate_password_check_user_name    | OFF    |
| validate_password_dictionary_file    |        |
| validate_password_length             | 8      |
| validate_password_mixed_case_count   | 1      |
| validate_password_number_count       | 1      |
| validate_password_policy             | MEDIUM |
| validate_password_special_char_count | 1      |
+--------------------------------------+--------+
7 rows in set (0.00 sec)

mysql> set global validate_password_policy=LOW;
Query OK, 0 rows affected (0.00 sec)

mysql> set global validate_password_length=6;
Query OK, 0 rows affected (0.00 sec)
1.2.添加sentry服务
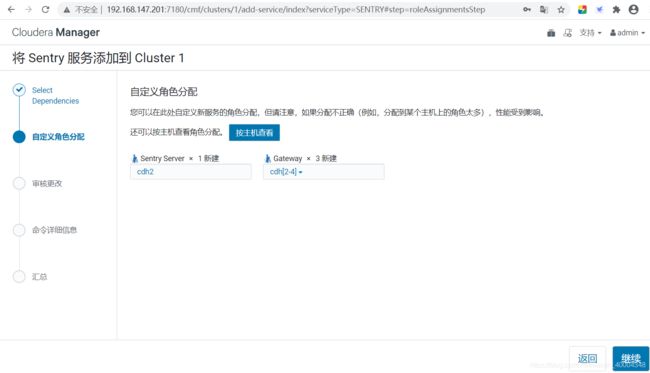
先在CDH中安装Sentry组件,gateway 选择全部节点。server选择主节
CM界面 -> 添加服务 -> sentry ->角色分配。。。。
1.3. HDFS配置 sentry
1.3.1. sentry加入hive组
在sengry的server节点执行。将sentry 管理员用户在linux系统上加入hive 组,非hive组用户权限同步会有问题。
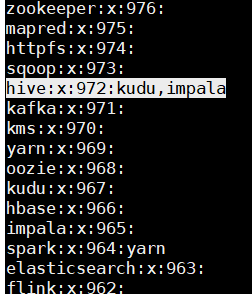
没加入前,使用cat /etc/group查看。kudu,impala用户属于hive组
[root@cdh2 ~]# usermod -a -G hive sentry
[root@cdh2 ~]# cat /etc/group
hive:x:972:kudu,impala,sentry
除了 /user/hive/warehouse,你还可以添加自己的外部表存储路径,外部目录路径用户组都改为hive:hive
(此处没动)
1.3.2. HDFS启用ACLS和Sentry权限同步
1.HDFS启用ACLS和Sentry权限同步
1.3.3. 启用 HDFS 权限检查。
1.4 hive配置:
1.4.1 hive 启用sentry
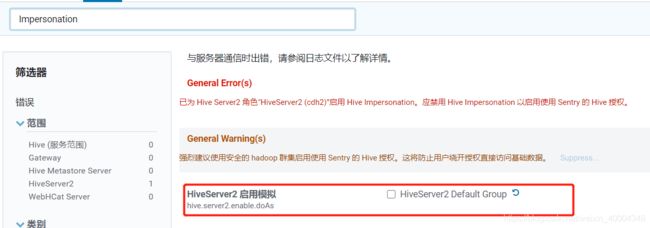
1.4.2 禁用 Hive Impersonation 以启用使用 Sentry 的 Hive 授权。
1.4.3.启用数据库中的存储通知
1.4.4 开启测试模式
集群未启用安全认证环境下,需要配置以下参数sentry.hive.testing.mode=true

1.4.4 Impala配置sentry
Impala服务范围none–>sentry
1.4.5 Hue配置sentry
Hue服务范围none–>sentry
重启各服务,使生效。
1.5 验证:
2.配置安全的hadoop集群
Kerberos是一个用于安全认证第三方协议,并不是Hadoop专用,你也可以将其用于其他系统,它采用了传统的共享密钥的方式,实现了在网络环境不一定保证安全的环境下,client和server之间的通信,适用于client/server模型,由MIT开发和实现。而使用Cloudera Manager可以较为轻松的实现界面化的Kerberos集成,本文Fayson主要介绍如何在Redhat7.3的CDH6.3环境中启用Kerberos。
2.1 安装配置kerberos
2.1.1 KDC服务安装及配置:
//在Cloudera Manager服务器上安装KDC服务
 yum -y install krb5-server krb5-libs krb5-auth-dialog krb5-workstation
2.1.2 修改/etc/krb5.conf配置
[root@cdh1 ~]# vim /etc/krb5.conf

# Configuration snippets may be placed in this directory as well
includedir /etc/krb5.conf.d/

[logging]
 default = FILE:/var/log/krb5libs.log
 kdc = FILE:/var/log/krb5kdc.log
 admin_server = FILE:/var/log/kadmind.log

[libdefaults]
 dns_lookup_realm = false
 ticket_lifetime = 24h
 renew_lifetime = 7d
 forwardable = true
 rdns = false
 pkinit_anchors = FILE:/etc/pki/tls/certs/ca-bundle.crt
 default_realm = HADOOP.COM
 #default_ccache_name = KEYRING:persistent:%{uid}

[realms]
 HADOOP.COM = {
  kdc = cdh1
  admin_server = cdh1
 }

[domain_realm]
 .hadoop.com = HADOOP.COM
 hadoop.com = HADOOP.COM
2.1.3 修改/var/kerberos/krb5kdc/kadm5.acl配置
   [root@cdh1 ~]# vim /var/kerberos/krb5kdc/kadm5.acl

    */[email protected]      *
2.1.4 修改/var/kerberos/krb5kdc/kdc.conf配置
( 注: max_renewable_life 表明最大过期时间)
 [kdcdefaults]
     kdc_ports = 88
     kdc_tcp_ports = 88

    [realms]
     HADOOP.COM = {
      #master_key_type = aes256-cts
      max_renewable_life=7d 0h 0m 0s
      acl_file = /var/kerberos/krb5kdc/kadm5.acl
      dict_file = /usr/share/dict/words
      admin_keytab = /var/kerberos/krb5kdc/kadm5.keytab
      supported_enctypes = aes256-cts:normal aes128-cts:normal des3-hmac-sha1:normal arcfour-hmac:normal camellia256-cts:normal camellia128-cts:normal des-hmac-sha1:normal des-cbc-md5:normal des-cbc-crc:normal
     }
2.1.5 创建Kerberos数据库
kdb5_util create –r HADOOP.COM -s
  密码:HADOOP.COM
---
Loading random data
Initializing database '/var/kerberos/krb5kdc/principal' for realm 'LANXIN.COM',
master key name 'K/[email protected]'
You will be prompted for the database Master Password.
It is important that you NOT FORGET this password.
Enter KDC database master key:
Re-enter KDC database master key to verify:
---
此处需要输入Kerberos数据库的密码。
2.1.6 创建Kerberos的管理账号
 admin/[email protected]

----
Authenticating as principal root/[email protected] with password.
kadmin.local:
kadmin.local:  addprinc admin/[email protected]
WARNING: no policy specified for admin/[email protected]; defaulting to no policy
Enter password for principal "admin/[email protected]":     【输入密码为admin】
Re-enter password for principal "admin/[email protected]":
Principal "admin/[email protected]" created.
kadmin.local:
kadmin.local:
kadmin.local:  list_principals
K/[email protected]
admin/[email protected]
kadmin/[email protected]
kadmin/[email protected]
kadmin/[email protected]
kiprop/[email protected]
krbtgt/[email protected]
----

输入exit退出
2.1.7 将Kerberos服务添加到自启动服务
并启动krb5kdc和kadmin服务
[root@cdh1 ~]# systemctl enable krb5kdc
  [root@cdh1 ~]# systemctl enable kadmin
  [root@cdh1 ~]# systemctl start krb5kdc
  [root@cdh1 ~]# systemctl start kadmin
2.1.8 验证kerberos的管理账号
   [root@cdh1 ~]# kinit admin/[email protected]
    Password for admin/[email protected]:
    [root@cdh1 ~]# klist
    Ticket cache: FILE:/tmp/krb5cc_0
    Default principal: admin/[email protected]

    Valid starting       Expires              Service principal
    10/15/2020 15:53:34  10/16/2020 15:53:34  krbtgt/[email protected]
            renew until 10/22/2020 15:53:34
2.1.9 为集群安装所有Kerberos客户端,包括Cloudera Manager
#如果没有yum源,下载阿里的yum源
[root@cdh4 ~]# wget -O /etc/yum.repos.d/CentOS-Base.repo http://mirrors.aliyun.com/repo/Centos-7.repo


[root@cdh1 ~]# yum -y install krb5-libs krb5-workstation
[root@cdh2 ~]# yum -y install krb5-libs krb5-workstation
[root@cdh3 ~]# yum -y install krb5-libs krb5-workstation
[root@cdh4 ~]# yum -y install krb5-libs krb5-workstation
2.1.10 在CM服务器上安装额外的包(openldap-clients)
[root@cdh1 ~]# yum -y install openldap-clients
2.1.11 将KDC Server上的krb5.conf文件拷贝到所有Kerberos客户端
[root@cdh1 ~]# scp /etc/krb5.conf root@cdh2:/etc
krb5.conf                                                              100%  602     0.6KB/s   00:00
[root@cdh1 ~]# scp /etc/krb5.conf root@cdh3:/etc
krb5.conf                                                              100%  602     0.6KB/s   00:00
[root@cdh1 ~]# scp /etc/krb5.conf root@cdh4:/etc
krb5.conf
2.2 CDH集群启用Kerberos
2.2.1 在KDC中给Cloudera Manager添加管理员账号
cloudera-scm/[email protected]
----
[root@dev01 ~]# kadmin.local
Authenticating as principal root/[email protected] with password.
kadmin.local:  addprinc cloudera-scm/[email protected]
WARNING: no policy specified for cloudera-scm/[email protected]; defaulting to no policy
Enter password for principal "cloudera-scm/[email protected]":       [密码:cloudera-scm]
Re-enter password for principal "cloudera-scm/[email protected]":
Principal "cloudera-scm/[email protected]" created.
kadmin.local:  list_principals
K/[email protected]
admin/[email protected]
cloudera-scm/[email protected]
kadmin/[email protected]
kadmin/[email protected]
kadmin/[email protected]
kiprop/[email protected]
krbtgt/[email protected]
验证cloudera-scm/[email protected]
进入Cloudera Manager的“管理”->“安全”界面 启动kerberos (图已经丢了 有机会再找回来)
点击“完成”,至此已成功启用Kerberos。
回到主页,一切正常,再次查看“管理”->“安全”,界面显示“已成功启用 Kerberos。”
2.2 安装配置LDAP
2.2.1 CM节点下载LDAP:
yum -y install openldap compat-openldap openldap-clients openldap-servers openldap-servers-sql openldap-devel migrationtools
各组件说明:
| 安装包名称 | 说明 |
|---|---|
| openldap | openldap服务端和客户端必须用的库文件。 |
| openldap-servers | 用于启动服务和设置. 包含单独的ldap后台守护程序。 |
| openldap-clients | 用于启动服务和设置. 包含单独的ldap后台守护程序。 |
| openldap-devel | devel包,可选择进行安装。 |
| openldap-servers-sql | 支持sql模块,可进行选择性安装。 |
| migrationtools | 通过migrationtools实现OpenLDAP用户及用户组的添加,导入系统账户,可进行选择性安装。 |
| compat-openldap | openldap兼容性库 |
openLDAP 常用名词解释
o– organization(组织-公司)
ou – organization unit(组织单元/部门)
c - countryName(国家)
dc - domainComponent(域名组件)
sn – suer name(真实名称)
cn - common name(常用名称)
dn - distinguished name(专有名称)
备注: OpenLDAP2.4.23版本开始所有配置数据都保存在/etc/openldap/slapd.d/
2.2.2 配置OpenLDAP管理员密码
设置OpenLDAP的管理员密码:
  [root@cdh1 ~]# slappasswd -s 123456
    {SSHA}VTd4T8iLnOZToUtlBd/iDdNlXigZs7cc
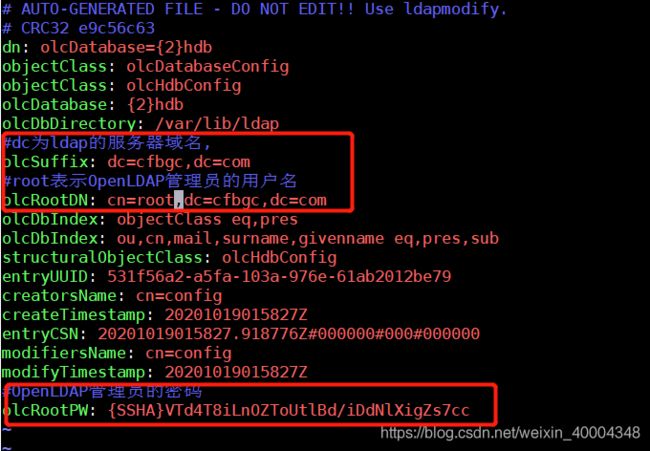
2.2.3 修改olcDatabase={2}hdb.ldif文件
 [root@cdh1 ~]# vim /etc/openldap/slapd.d/cn\=config/olcDatabase\=\{2\}hdb.ldif

    修改两条:
    #dc为ldap的服务器域名,
    olcSuffix: dc=涉密,dc=com
    #root表示OpenLDAP管理员的用户名
    olcRootDN: cn=root,dc=涉密,dc=com

    新增一条:
    #OpenLDAP管理员的密码
    olcRootPW: {SSHA}VTd4T8iLnOZToUtlBd/iDdNlXigZs7cc
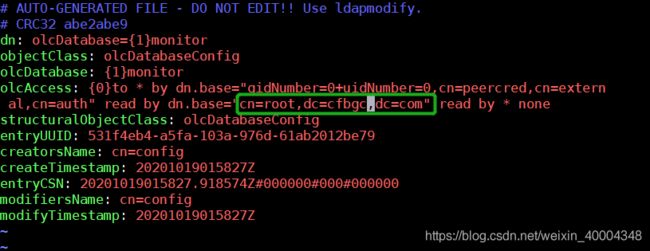
2.2.4 修改olcDatabase={1}monitor.ldif 验证文件
[root@cdh1 ~]# vim /etc/openldap/slapd.d/cn\=config/olcDatabase\=\{1\}monitor.ldif
验证OpenLDAP的基本配置是否正确,使用如下命令:
slaptest -u
2.2.5 启动OpenLDAP服务
[root@cdh1 ~]# systemctl enable slapd
[root@cdh1 ~]# systemctl start slapd
[root@cdh1 ~]# systemctl status slapd
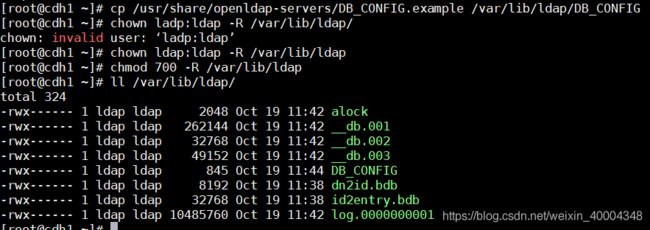
2.2.6 配置OpenLDAP数据库
OpenLDAP默认使用的数据库是BerkeleyDB,现在来开始配置OpenLDAP数据库,使用如下命令:
   [root@cdh1 ~]# cp /usr/share/openldap-servers/DB_CONFIG.example /var/lib/ldap/DB_CONFIG

    [root@cdh1 ~]# chown ldap:ldap -R /var/lib/ldap
    [root@cdh1 ~]# chmod 700 -R /var/lib/ldap
    [root@cdh1 ~]# ll /var/lib/ldap/
注意:/var/lib/ldap/就是BerkeleyDB数据库默认存储的路径。
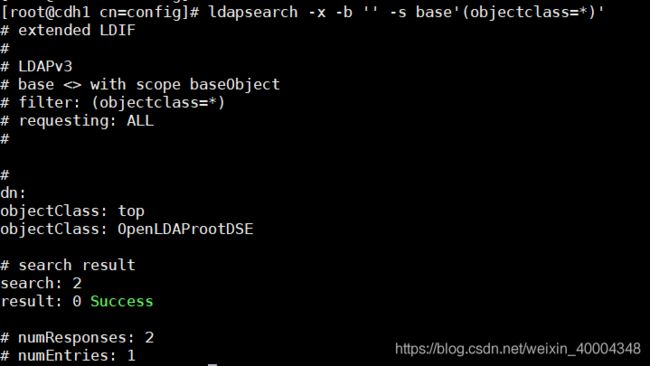
执行ldapsearch -x检查是否有如下输出,表示服务已经启动成功
[root@cdh1 cn=config]# ldapsearch -x -b '' -s base'(objectclass=*)'
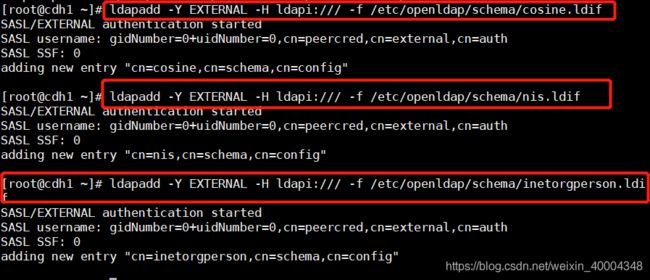
导入基本Schema
ldapadd -Y EXTERNAL -H ldapi:/// -f /etc/openldap/schema/cosine.ldif

ldapadd -Y EXTERNAL -H ldapi:/// -f /etc/openldap/schema/nis.ldif

ldapadd -Y EXTERNAL -H ldapi:/// -f /etc/openldap/schema/inetorgperson.ldif
2.2.7 创建基本的用户节点,数据库管理员
  [root@cdh1 cn=config]# vim base.ldif

    dn: dc=涉密,dc=com
    o: 涉密com
    dc: 涉密
    objectClass: top
    objectClass: dcObject
    objectclass: organization

    dn: cn=root,dc=涉密,dc=com
    cn: root
    objectClass: organizationalRole
    description: Directory Manager

    dn: ou=Users,dc=涉密,dc=com
    ou: Users
    objectClass: top
    objectClass: organizationalUnit

    dn: ou=Group,dc=涉密,dc=com
    ou: Group
    objectClass: top
    objectClass: organizationalUnit
2.2.8 导入数据库:
ldapadd -x -D "cn=root,dc=涉密,dc=com" -W -f base.ldif
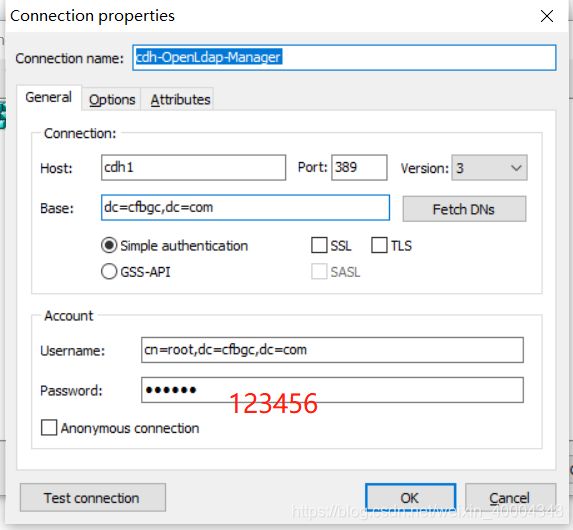
还可以用LDAP ADMIN工具直接import,也是可以的,LDAP admin(可视化工具)下载路径见文章末尾。
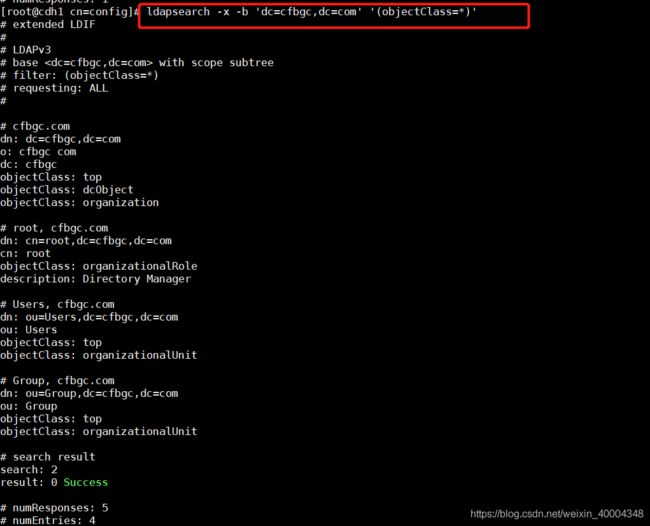
2.2.9 验证:
[root@cdh1 cn=config]# ldapsearch -x -b 'dc=涉密,dc=com' '(objectClass=*)'
