Open‐cv——图象的处理(膨胀,边缘检测,梯度,黑帽,算子)
形态学-腐蚀操作:
当我们日常搜集图片的时候,我们找出的图片某些会带一些毛边,这些毛边影响了整体图片的效果,我们需要通过一些操作来消除这些毛边
如图所示,“迪哥”的字体边缘有一些毛毛的细线,我们需要通过一些操作来将这些西边去除,这就是——腐蚀操作
import cv2 #opencv读取的格式是BGR
import numpy as np
import matplotlib.pyplot as plt#Matplotlib是RGB
%matplotlib inline
img = cv2.imread('dige.png')

cv2.imshow('img', img)
cv2.waitKey(0)
cv2.destroyAllWindows()

kernel = np.ones((3,3),np.uint8)
erosion = cv2.erode(img,kernel,iterations = 1)

cv2.imshow('erosion', erosion)
cv2.waitKey(0)
cv2.destroyAllWindows()
腐蚀操作的本质就是对一个区域内的值进行修改操作,通俗讲就是,如果一个黑白图片,要进行腐蚀,就是把检测到白色的区域换成黑色的值,从而做到对白色区域腐蚀的效果。
pie = cv2.imread('pie.png')

cv2.imshow('pie', pie)
cv2.waitKey(0)
cv2.destroyAllWindows()

kernel = np.ones((30,30),np.uint8)
erosion_1 = cv2.erode(pie,kernel,iterations = 1)
erosion_2 = cv2.erode(pie,kernel,iterations = 2)
erosion_3 = cv2.erode(pie,kernel,iterations = 3)
res = np.hstack((erosion_1,erosion_2,erosion_3))
cv2.imshow('res', res)
cv2.waitKey(0)
cv2.destroyAllWindows()
原图是一个圆形,对其进行三次腐蚀操作,效果如下:
形态学-膨胀操作:
有腐蚀就有膨胀,姑且可以看做腐蚀的反操作。
img = cv2.imread('dige.png')
cv2.imshow('img', img)
cv2.waitKey(0)
cv2.destroyAllWindows()
kernel = np.ones((3,3),np.uint8)
dige_erosion = cv2.erode(img,kernel,iterations = 1)

cv2.imshow('erosion', erosion)
cv2.waitKey(0)
cv2.destroyAllWindows()

kernel = np.ones((3,3),np.uint8)
dige_dilate = cv2.dilate(dige_erosion,kernel,iterations = 1)

cv2.imshow('dilate', dige_dilate)
cv2.waitKey(0)
cv2.destroyAllWindows()
由于我们之前的去除毛边的腐蚀操作,使得处理过的图片与原图存在差异,所以我们需要反过来,将腐蚀的区域补充回来,当然去除的毛边不会再出现,因为该部分以及全被腐蚀成黑像素,膨胀也还是黑像素,因为该区域不存在白色像素。
膨胀三次:
开运算与闭运算:——膨胀与腐蚀配套操作
# 开:先腐蚀,再膨胀
img = cv2.imread('dige.png')

kernel = np.ones((5,5),np.uint8)
opening = cv2.morphologyEx(img, cv2.MORPH_OPEN, kernel)

cv2.imshow('opening', opening)
cv2.waitKey(0)
cv2.destroyAllWindows()

# 闭:先膨胀,再腐蚀
img = cv2.imread('dige.png')

kernel = np.ones((5,5),np.uint8)
closing = cv2.morphologyEx(img, cv2.MORPH_CLOSE, kernel)

cv2.imshow('closing', closing)
cv2.waitKey(0)
cv2.destroyAllWindows()
梯度运算:
复式操作是缩小,膨胀则是扩张,那与原图比较必然存在区别,那么这个区别是多少呢,有没有办法使它可视化呢,没错——梯度就是为此存在的。
梯度=膨胀-腐蚀
pie = cv2.imread('pie.png')
kernel = np.ones((7,7),np.uint8)
dilate = cv2.dilate(pie,kernel,iterations = 5)
erosion = cv2.erode(pie,kernel,iterations = 5)

res = np.hstack((dilate,erosion))

cv2.imshow('res', res)
cv2.waitKey(0)
cv2.destroyAllWindows()

gradient = cv2.morphologyEx(pie, cv2.MORPH_GRADIENT, kernel)

cv2.imshow('gradient', gradient)
cv2.waitKey(0)
cv2.destroyAllWindows()
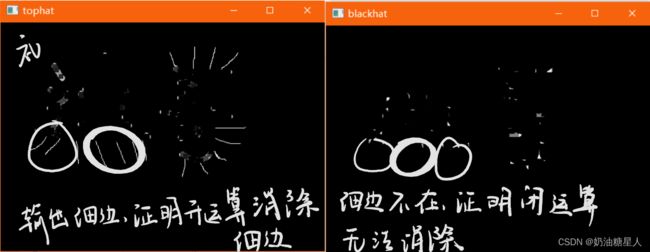
礼帽与黑帽
其实就是Tophat,blackhat,音译
- 礼帽 = 原始输入-开运算结果
- 黑帽 = 闭运算-原始输入
-
#礼帽
img = cv2.imread('dige.png')
tophat = cv2.morphologyEx(img, cv2.MORPH_TOPHAT, kernel)
cv2.imshow('tophat', tophat)
cv2.waitKey(0)
cv2.destroyAllWindows()
#黑帽 img = cv2.imread('dige.png') blackhat = cv2.morphologyEx(img,cv2.MORPH_BLACKHAT, kernel) cv2.imshow('blackhat ', blackhat ) cv2.waitKey(0) cv2.destroyAllWindows()
图像梯度-Sobel算子:
- 卷积的作用除了实现图像模糊或者去噪,还可以寻找一张图像上所有梯度信息,这些梯度信息是图像的最原始特征数据,进一步处理之后就可以生成一些比较高级的特征用来表示一张图像实现基于图像特征的匹配,图像分类等应用。
- Sobel算子是一种很经典的图像梯度提取算子,其本质是基于图像空间域卷积,背后的思想是图像一阶导数算子的理论支持。
- sobel算子主要用于获得数字图像的一阶梯度,常见的应用和物理意义是边缘检测。(Laplacian边缘检测并不局限于水平方向或垂直方向,这是Laplacian与soble的区别)
以我目前的理解,算子的作用就是边缘检测,用于表现出图片的大体轮廓,黑白表示,而sobel算子分为X与Y方向的算子,顾名思义就是,水平方向与垂直方向。通过点积输出,emm比较明显的我觉得像绘画的线稿的感觉。
比如这样的,当然这不是sobel算子,我们的没有这个高级。
这个是X和Y的,总的可以看做右边-左边
来看从左到右的:
def cv_show(img,name):
    cv2.imshow(name,img)
    cv2.waitKey()
    cv2.destroyAllWindows()

sobelx = cv2.Sobel(img,cv2.CV_64F,1,0,ksize=3)

cv_show(sobelx,'sobelx')

白到黑是正数,黑到白就是负数了,所有的负数会被截断成0,所以要取绝对值

sobelx = cv2.Sobel(img,cv2.CV_64F,1,0,ksize=3)
sobelx = cv2.convertScaleAbs(sobelx)
cv_show(sobelx,'sobelx')

sobelx = cv2.Sobel(img,cv2.CV_64F,1,0,ksize=3)    X轴的左右
sobelx = cv2.convertScaleAbs(sobelx)
cv_show(sobelx,'sobelx')

sobely = cv2.Sobel(img,cv2.CV_64F,0,1,ksize=3)   y轴上的上下
sobely = cv2.convertScaleAbs(sobely)
cv_show(sobely,'sobely')

把x和y加上
sobelxy = cv2.addWeighted(sobelx,1,sobely,1,0)
cv_show(sobelxy,'sobelxy')
sobelxy=cv2.Sobel(img,cv2.CV_64F,1,1,ksize=3)
sobelxy = cv2.convertScaleAbs(sobelxy)
cv_show(sobelxy,'sobelxy')
img = cv2.imread('89.jpg',cv2.IMREAD_GRAYSCALE)
cv_show(img,'img')
img = cv2.imread('89.jpg',cv2.IMREAD_GRAYSCALE)
sobelx = cv2.Sobel(img,cv2.CV_64F,1,0,ksize=3)
sobelx = cv2.convertScaleAbs(sobelx)
sobely = cv2.Sobel(img,cv2.CV_64F,0,1,ksize=3)
sobely = cv2.convertScaleAbs(sobely)
sobelxy = cv2.addWeighted(sobelx,0.5,sobely,0.5,0)
cv_show(sobelxy,'sobelxy')其他算子:
这个算子和sobel没有区别,就是检测更加敏感,因为权重更大,会存在更多细节
 不同于以上2个算子,这个是二维的,对变化感知铭感,但是对噪音点同样铭感,需要搭配其他的模块一起使用。
#不同算子的差异
img = cv2.imread('89.jpg',cv2.IMREAD_GRAYSCALE)
sobelx = cv2.Sobel(img,cv2.CV_64F,1,0,ksize=3)
sobely = cv2.Sobel(img,cv2.CV_64F,0,1,ksize=3)
sobelx = cv2.convertScaleAbs(sobelx)
sobely = cv2.convertScaleAbs(sobely)
sobelxy =  cv2.addWeighted(sobelx,0.5,sobely,0.5,0)

scharrx = cv2.Scharr(img,cv2.CV_64F,1,0)
scharry = cv2.Scharr(img,cv2.CV_64F,0,1)
scharrx = cv2.convertScaleAbs(scharrx)
scharry = cv2.convertScaleAbs(scharry)
scharrxy =  cv2.addWeighted(scharrx,0.5,scharry,0.5,0)

laplacian = cv2.Laplacian(img,cv2.CV_64F)
laplacian = cv2.convertScaleAbs(laplacian)

res = np.hstack((sobelxy,scharrxy,laplacian))
cv_show(res,'res')


