NanoDet-训练自己的数据集
公众号

NanoDet简介
nanodet网址:https://github.com/RangiLyu/nanodet
NanoDet 是一个速度超快和轻量级的移动端 Anchor-free 目标检测模型。该模型具备以下优势:
- 超轻量级:模型文件大小仅 1.8m;
- 速度超快:在移动 ARM CPU 上的速度达到 97fps(10.23ms);
- 训练友好:GPU 内存成本比其他模型低得多。GTX1060 6G 上的 Batch-size 为 80 即可运行;
- 方便部署:提供了基于 ncnn 推理框架的 C++ 实现和 Android demo。
模型性能
目前开源的 NanoDet-m 模型在 320x320 输入分辨率的情况下,整个模型的 Flops 只有 0.72B,而 yolov4-tiny 则有 6.96B,小了将近十倍。模型的参数量也只有 0.95M,权重文件在使用 ncnn optimize 进行 16 位存储之后,只有 1.8mb。
尽管模型非常的轻量,但是它的性能不容小觑。在与其他模型进行比较时,项目作者选择使用 COCO mAP (0.5:0.95) 作为评估指标,兼顾检测和定位的精度,在 COCO val 5000 张图片上测试,并且没有使用 Testing-Time-Augmentation。在这种设置下,320 分辨率输入能够达到 20.6 的 mAP,比 tiny-yolov3 高 4 分,只比 yolov4-tiny 低 1 个百分点。在将输入分辨率与 YOLO 保持一致,都使用 416 输入的情况下,NanoDet 与 yolov4-tiny 得分持平。具体结果如下表所示:
[外链图片转存失败,源站可能有防盗链机制,建议将图片保存下来直接上传(img-brtkSc4J-1616501467302)(C:\Users\zhong\AppData\Roaming\Typora\typora-user-images\image-20210323194120724.png)]
以上性能基于 ncnn 和麒麟 980 (4xA76+4xA55) ARM CPU 获得。
此外,项目作者将 ncnn 部署到手机(基于 ARM 架构的 CPU 麒麟 980,4 个 A76 核心和 4 个 A55 核心)上之后跑了一下 benchmark,模型前向计算时间只要 10 毫秒左右,而 yolov3 和 v4 tiny 均在 30 毫秒的量级。在安卓摄像头 demo app 上,算上图片预处理、检测框后处理以及绘制检测框的时间,NanoDet 也能轻松跑到 40+FPS。
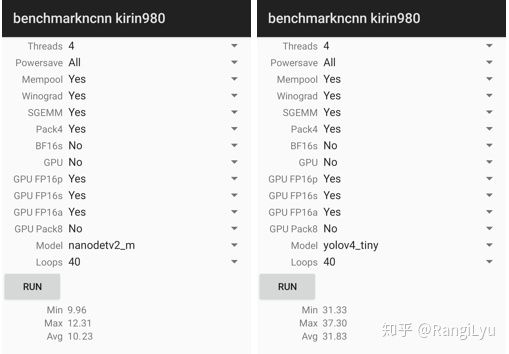
NanoDet 和 yolov4-tiny 的性能对比。
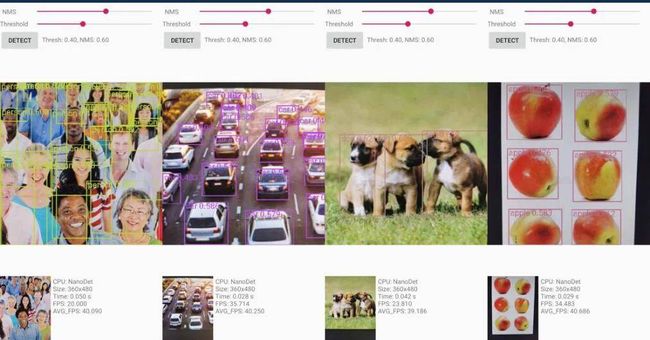
最后,该项目提供了 Android demo、C++ demo 和 Python demo。NanoDet 在安卓端的目标检测结果如下所示:
训练自己的数据集
我已经将我自己用到的代码都放在github上了,欢迎start。
https://github.com/zlszhonglongshen/nanodet_cigar
需要将自己的数据集存放在cigar/train和cigar/val,利用labelimg软件,可以很容易得到voc格式的标注文件
注意:图片文件后缀一定要保持一致,不然会报错
fire
├── train
│   ├── ann
│   │   ├── 1.xml
│   │   └── 2.xml
│   └── img
│       ├── 1.jpg
│       └── 2.jpg
└── val
    ├── ann
    │   └── 1.xml
    └── img
        └── 1.jpg
nanodet是支持voc和coco格式的,需要生成自己的config file文件
save_dir: ./fire
num_classes: 1
class_names: &class_names ['fire']
train:
  name: xml_dataset
  img_path: ./fire/train/img
  ann_path: ./fire/train/ann
  input_szie: [320,320]
val:
  name: xml_dataset
  img_path: ./fire/val/img
  ann_path: ./fire/val/ann
  input_szie: [320,320]
训练的命令如下
/home/zhongls/.conda/envs/pyzhongls/bin/python train.py cigar/nanodet_card.yml
结果文件
最终你会在文件夹中得到model_last.pth
测试脚本
import time
import os
import cv2
import torch

from nanodet.util import cfg, load_config, Logger
from nanodet.model.arch import build_model
from nanodet.util import load_model_weight
from nanodet.data.transform import Pipeline

config_path = 'nanodet_card.yml'
model_path = 'model_last.pth'
image_path = '000-0.jpg'


load_config(cfg, config_path)
logger = Logger(-1, use_tensorboard=False)

class Predictor(object):
    def __init__(self, cfg, model_path, logger, device='cuda:0'):
        self.cfg = cfg
        self.device = device
        model = build_model(cfg.model)
        ckpt = torch.load(model_path, map_location=lambda storage, loc: storage)
        load_model_weight(model, ckpt, logger)
        self.model = model.to(device).eval()
        self.pipeline = Pipeline(cfg.data.val.pipeline, cfg.data.val.keep_ratio)

    def inference(self, img):
        img_info = {}
        height, width = img.shape[:2]
        img_info['height'] = height
        img_info['width'] = width
        meta = dict(img_info=img_info,raw_img=img,img=img)
        meta = self.pipeline(meta, self.cfg.data.val.input_size)
        meta['img'] = torch.from_numpy(meta['img'].transpose(2, 0, 1)).unsqueeze(0).to(self.device)
        with torch.no_grad():
            results = self.model.inference(meta)
        return meta, results

    def visualize(self, dets, meta, class_names, score_thres, wait=0):
        time1 = time.time()
        self.model.head.show_result(meta['raw_img'], dets, class_names, score_thres=score_thres, show=True)
        print('viz time: {:.3f}s'.format(time.time()-time1))


predictor = Predictor(cfg, model_path, logger, device='cpu')


from nanodet.util import overlay_bbox_cv

from IPython.display import display
from PIL import Image

def cv2_imshow(a, convert_bgr_to_rgb=True):
    """A replacement for cv2.imshow() for use in Jupyter notebooks.
    Args:
        a: np.ndarray. shape (N, M) or (N, M, 1) is an NxM grayscale image. shape
            (N, M, 3) is an NxM BGR color image. shape (N, M, 4) is an NxM BGRA color
            image.
        convert_bgr_to_rgb: switch to convert BGR to RGB channel.
    """
    a = a.clip(0, 255).astype('uint8')
    # cv2 stores colors as BGR; convert to RGB
    if convert_bgr_to_rgb and a.ndim == 3:
        if a.shape[2] == 4:
            a = cv2.cvtColor(a, cv2.COLOR_BGRA2RGBA)
        else:
            a = cv2.cvtColor(a, cv2.COLOR_BGR2RGB)
    display(Image.fromarray(a))

frame = cv2.imread("000-0.jpg")
meta, res = predictor.inference(frame)
result = overlay_bbox_cv(meta['raw_img'], res, cfg.class_names, score_thresh=0.35)

imshow_scale = 1.0
cv2_imshow(cv2.resize(result, None, fx=imshow_scale, fy=imshow_scale))
[外链图片转存失败,源站可能有防盗链机制,建议将图片保存下来直接上传(img-CtrqYIoO-1616501467309)(C:\Users\zhong\AppData\Roaming\Typora\typora-user-images\image-20210323195132895.png)]
参考链接
-
https://blog.csdn.net/zicai_jiayou/article/details/110469717
-
https://www.jiqizhixin.com/articles/2020-11-24-5
-
https://blog.csdn.net/qq_34795071/article/details/110083258
-
https://github.com/RangiLyu/nanodet